AUDIO TOWER SYSTEM MODEL CD-CH1500 OPERATION MANUAL Thank you for purchasing this SHARP product. To obtain the best performance from this product, please read this manual carefully. It will guide you in operating your SHARP product. CD-CH1500 Audio Tower System consisting of CD-CH1500 (main unit) and CP-RW5500 (speaker system).
Special Notes CAUTION: TO REDUCE THE RISK OF ELECTRIC SHOCK, DO NOT REMOVE COVER (OR BACK). NO USER-SERVICEABLE PARTS INSIDE. REFER SERVICING TO QUALIFIED SERVICE PERSONNEL.
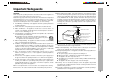
Important Safeguards 1 Heed Warnings - All warnings on the appliance and in the operating instructions 12 Outdoor Antenna Grounding - If an outside antenna is connected to the receiver, be sure the antenna system is grounded so as to provide some protection against voltage surges and built-up static charges. Section 810 of the National Electrical Code, ANSI/NFPA No.
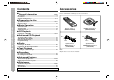
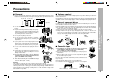
Contents Accessories ■ General Information Please confirm that the following accessories are included. Page Accessories ............................................................................................. 4 Precautions .............................................................................................. 5 Controls and Indicators .......................................................................6-9 ■ Preparation for Use System Connections ..........................................
Precautions ■ General ■ Volume control ● Please ensure that the equipment is positioned in a well-ventilated area and ensure The sound level at a given volume setting depends on speaker efficiency, location and various other factors. It is advisable to avoid exposure to high volume levels, which occur while turning the unit on with the volume control setting up high, or while continually listening at high volumes.
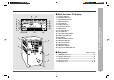
Controls and Indicators ■ Front panel 01. 02. 03. 04. 05. 06. 1 3 – Controls and Indicators – General Information 2 4 5 6 9 10 11 12 13 7 8 21 17 18 19 20 22 23 24 25 6 26 27 28 29 07. 08. 09. 10. 11. 12. 13. 14. 15. 16. 17. 18. 19. 20. 21. 22. 23. 24. 25. 26. 14 15 16 27. 28. 29. Reference page Cassette Compartment ................................................................... 22 Volume Up/Demo Button .......................................................... 13, 14 Volume Down Button ..
9 1 2 3 4 5 6 7 15 16 17 18 19 10 11 12 13 14 1 3 2 01. 02. 03. 04. 05. 06. 07. 08. 09. 10. 11. 12. 13. 14. 15. 16. 17. 18. 19.
Controls and Indicators (continued) – Controls and Indicators – General Information ■ Remote control 1 13 2 14 3 15 ✱ 4 16 ✱ 5 17 6 18 ✱ 7 8 9 10 11 12 19 20 21 22 23 24 25 26 01. 02. 03. 04. 05. 06. 07. 08. 09. 10. 11. 12. 13. 14. 15. 16. 17. 18. 19. 20. 21. 22. 23. 24. 25. 26. Reference page Remote Control Transmitter ..............................................................
■ Speaker system Speaker grilles are removable: 2 There is no distinction between the right and Left speaker the left speakers. Right speaker 4 5 3 6 Bi-amp system: Each speaker unit has a built-in subwoofer (low frequency range) which is driven separately from the woofer and tweeter (mid-to-high frequency range). Two independent amplifiers which have individual frequency characteristics are used. By amplifying separately the two frequency bands, clearer sound is achieved. 01. Woofer 02. Tweeter 03.
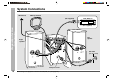
System Connections FM antenna AM loop antenna (Not supplied) VCR, DVD, etc. – System Connections – Preparation for Use (Not supplied) Right speaker ;;;;; ;;;;;;; ;;;;; ;;;;;;; ;;;;; ;;;;;;; ;;;;;;; Transport screw 10 ■ Listening to the playback sounds from VCR, DVD, etc. (See page 28.
■ Remove the transport screw ■ FM/AM loop antenna connection Before turning the power on, be sure to remove the transport screw on the back of the unit using a flat-blade screwdriver or a coin. Connect the FM/AM loop antenna to the FM/AM loop antenna jack. Note: This screw is required when transporting the unit again. Please keep it (see page 30). ■ Speaker connection Right speaker Position the FM antenna wire and rotate the AM loop antenna for optimum reception.
Remote Control ■ Battery installation 1. Remove the battery cover. 2. Insert the batteries according to the direction indicated in the battery compartment. When inserting or removing the batteries, push them toward the ë battery terminals. 3. Replace the cover. Face the remote control directly to the remote sensor on the unit. The remote control can be used within the range shown below: Press the POWER button. Does the power turn on? Now, you can enjoy the music.
General Control ■ Demonstration mode The first time the unit is plugged, the unit will enter the demonstration mode. You will see words scroll. To cancel the demonstration mode: When the unit is in the power stand-by mode, press the DEMO button again. ■ Opening and closing the control panel The control panel is motorized. The control panel automatically opens when the power is turned on, and closes when the unit is set to the power stand-by mode.
Sound Control ■ Volume control Press the VOLUME W button to increase the volume and the VOLUME X button for decreasing. When the X-BASS button is pressed, the unit will enter the extra bass mode which emphasizes the bass frequencies, and “X-BASS” will appear. To cancel the extra bass mode, press the X-BASS button. – Sound Control – Basic Operation ■ Bass control 14 Bass is emphasized. Canceled. ■ Equalizer When the EQUALIZER button is pressed, the current mode setting will be displayed.
Setting the Clock 5 Turn the jog dial to adjust the hour and within 2 minutes, press the ENTER button. When the 12-hour display is selected, “AM” will change automatically to “PM”. ● The hour will not advance even if minutes advance from “59” to “00”. ● The clock starts from “0” second. (Seconds are not displayed.) The time display will disappear after a few seconds. In this example, the clock is set for the 12-hour (AM12:00) display.
Listening to a CD (CDs) This system can play audio CD-R and CD-RW discs just as CD discs, but cannot perform recording. ■ To play discs in turn (from Disc 1 to Disc 6) 1 2 3 4 Press the POWER button to turn the power on. Press the CD button. Press the DISC 1 7 button to open the disc tray 1. Place a CD on the disc tray 1, label side up. CD Playback – Listening to a CD (CDs) – Be sure to place 3" (8 cm) CD in the middle of the disc trays.
7 Press the 06 button to start playback. ■ To locate the beginning of a track To move to the beginning of the next track: Turn the jog dial slowly clockwise by one position during playback. You can skip to any track by turning the jog dial until the desired track number appears. To interrupt playback: Press the 06 button. To resume playback from the same point, press the 06 button again. To stop playback: Press the ■ button.
Advanced CD Playback – To specify a disc to Play / Switching the time display / Repeat or Random Play – 18 To specify a disc to Play Repeat or Random Play You can play a disc by specifying the disc number. You can select one of the CD playback mode; “Repeat play”, “Random play” and “Normal play”. Press one of the DISC 1 - DISC 6 buttons to play the desired disc. 1 Selected disc number Press the PLAY MODE button repeatedly to select the playback mode.
Programmed Play 2 5 While in the stop mode, press the MEMORY button to enter the programming save mode. Press one of the DISC 1 - DISC 6 buttons to select the desired disc. Repeat steps 2 - 4 for other tracks. Up to 32 tracks can be programmed. 6 Press the ■ button. 7 Press the 06 button to start playback. At this time, playback will not begin even if one of the DISC 1 - DISC 6 buttons is pressed.
Listening to the Radio 1 2 3 Press the POWER button to turn the power on. Press the TUNER (BAND) button repeatedly to select the desired frequency band (FM or AM). X or W) button to tune in to the desired staPress the TUNING (X tion. Manual tuning: Auto tuning: – Listening to the Radio – Radio Press the TUNING (X or W) button as many times as required to tune in to the desired station. When the TUNING (X or W) button is pressed for more than 0.
Listening to the memorized station ■ Memorizing a station You can store 40 AM and FM stations in memory and recall them at the push of a button. (Preset tuning) 2 Turn the jog dial to select the desired station. Perform steps 1 - 3 in the “Listening to the Radio” section on page 20. This can be operated by pressing the PRESET (X or W) button on the remote control. Press the ENTER button to enter the preset tuning saving mode.
Listening to a Cassette Tape 1 2 3 Press the POWER button to turn the power on. Press the TAPE button. Open the cassette door by pushing the area marked “PUSH EJECT 7”. Tape Playback – Listening to a Cassette Tape – PUSH EJECT 7 4 5 Load a cassette into the compartment with side A facing you. Press the REVERSE MODE button to choose one side or both sides. ... To listen to both sides. ... For repeat play of both sides. ... To listen to one side.
Recording from a CD ● When recording important selections, make a preliminary test to ensure that the desired material is properly recorded. 4 Press the REVERSE MODE button to choose one side or both sides. ● SHARP is not liable for damage or loss of your recording arising from malfunction of this unit. .... To record on both sides. .... To record on only one side. 5 Press the REC PAUSE I6 button repeatedly to switch to the side you record on. ● Recording will be paused.
Recording from the Radio 1 2 3 Tune in to the desired station. (See page 20.) Load a cassette into the compartment with side A facing you. Press the REVERSE MODE button to choose one side or both sides. .... To record on both sides. .... To record on only one side. Recording – Recording from the Radio – 4 Press the REC PAUSE I6 button repeatedly to switch to the side you record on. ● Recording will be paused. ● To record on both sides, begin on side A.
Timer and Sleep Operation Timer playback: The unit turns on and plays the desired source (CD, tuner, tape) at the preset time. Timer recording: The unit turns on and starts recording from the tuner at the preset time. ■ Timer playback or Timer recording Before setting the timer: While the power is in the stand-by mode, press the DISPLAY button on the remote control to check that the clock is on time. Press the POWER button to turn the power on. Press the MENU button.
Timer and Sleep Operation (continued) 6 – Timer and Sleep Operation – Advanced Features 7 Turn the jog dial to specify the minute and within 10 seconds, press the ENTER button. Turn the jog dial to specify the hour to stop and within 10 seconds, press the ENTER button. To cancel the timer playback or timer recording: 1. Press the POWER button to turn the power on. 2. Press the MENU button. 3. Turn the jog dial to select “TIMER OFF” and then press the ENTER button.
Timer and Sleep Operation (Continued) Play back the desired sound source. Press the MENU button. 1 Turn the jog dial to select “SLEEP”. Then press the ENTER button. 2 To change the sleep time: While the sleep time is displayed, turn the jog dial. (Maximum: 2 hours - Minimum: 30 minutes) 4 5 Example: To fall asleep and wake to the same radio station You can play back the same source only (the function cannot be switched). Press the ENTER button.
Enhancing Your Stereo System The connection cord is not included. Purchase a commercially available cord as shown below. ■ Listening to the playback sounds from VCR, DVD, etc. – Enhancing Your Stereo System – Advanced Features 1. Red White 2. 3. 4. 5. Use a connection cable to connect the unit to the AUX IN jacks. When using video equipment, connect the audio output to this unit and the video output to a television. Press the POWER button to turn the power on. Press the AUX button to select “AUX”.
Troubleshooting Chart puter? ● Is the FM/AM loop antenna placed prop- ● Did a power failure occur? ● Reset the clock. (Refer to page 15.) ● When a button is pressed, the unit ● Set this unit to the power stand-by mode and then turn it back on. ● If the unit still malfunctions, reset it. (Refer to page 30.) ● Is the volume level set to “0”? ● Are the headphones connected? ● Are the speaker wires disconnected? erly? Move the AC power cord away from the antenna if located near.
Troubleshooting Chart (continued) Maintenance ■ If trouble occurs ■ Cleaning the tape-handling parts When this product is subjected to strong external interference (mechanical shock, excessive static electricity, abnormal supply voltage due to lightning, etc.) or if it is operated incorrectly, it may malfunction. ● Dirty heads, capstans or pinch rollers can cause poor sound and tape jams. Clean References – Troubleshooting Chart / Maintenance – If such a problem occurs, do the following: 1.
Specifications As part of our policy of continuous improvement, SHARP reserves the right to make design and specification changes for product improvement without prior notice. The performance specification figures indicated are nominal values of production units. There may be some deviations from these values in individual units. ■ Cassette deck Frequency response 50-14,000 Hz (Normal tape) Signal/noise ratio 50 dB (recording/playback) Wow and flutter 0.
CONSUMER LIMITED WARRANTY SHARP ELECTRONICS CORPORATION warrants to the first consumer purchaser that this Sharp brand product (the “Product”), when shipped in its original container, will be free from defective workmanship and materials, and agrees that it will, at its option, either repair the defect or replace the defective Product or part thereof with a new or remanufactured equivalent at no charge to the purchaser for parts or labor for the period(s) set forth below.