STARLAB Portable Planetarium System — Part A — Set-up, Operation and Maintenance ©2008 by Science First/SATRLAB, Buffalo NY 14216. www.starlab.com. All rights reserved.
Table of Contents Part A — Set-up, Operation and Maintenance Adjusting the Latitude..........................................A-21 Getting Started Introduction..........................................................A-4 Earth Rotation Control.........................................A-21 Safety Rules.........................................................A-5 Using the Cardinal Points and Meridian Projectors...........................................................A-21 Emergency Procedures.............
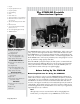
Welcome aboard and keep the stars in your eyes! Getting Started Introduction Thank you for your purchase of the STARLAB Planetarium System. We welcome you to a growing family of educators who have come to appreciate the versatility and excitement inherent in the STARLAB system. In this section, you will be provided with all of the information needed to successfully set up and operate the STARLAB Portable Planetarium System.
Safety Rules In order to maximize the overall quality of your STARLAB experience, and make certain that the system components are not damaged in any way, it’s important that you always follow these simple safety rules when using the STARLAB System. 1. Never set up the STARLAB dome near an open flame or point heat source such as an incandescent light bulb or a radiant heater. These can easily damage the dome. Never allow anyone who is smoking in or near the dome. 2.
1 Projector 2 Projector/Cylinder Travel Case 3 Projection Cylinders 4 Dome Duffel Bag 5 Blower 6 Blower Travel Case 7 Astronomy and More Curriculum Manual 8 Planetarium Activities for Student Success (13 volume set) 9 Slide Set of the Planets, Stars and Galaxies The STARLAB Portable Planetarium System 3 1 10 LED Arrow Pointer 11 Accessory Box with replacement bulbs, planet set, moon set.
air-supported structure. This will result in the top of the dome being flattened somewhat as it rests against the ceiling. As long as the STARLAB isn’t flattened by more than about a foot, the images projected inside will appear correctly with little discernible distortion. If the dome must rest on a ceiling, just be careful that it does not come into contact with any sharp objects like sprinkler heads or light gratings that could damage it.
Preparing the Floor Surface Because the STARLAB dome has no floor of its own, and participants sit on the floor, it is important to consider the floor surface. Ideally, the STARLAB should be set up on a carpeted floor. This provides maximum comfort for the participants, and reduces wear on the dome fabric. A wood or tile floor can also be used but these are hard and often are cold. When setting up on this type of floor, individuals can sit on carpet squares or pillows to make it more comfortable.
Setting Up the STARLAB Dome Before Unrolling the Dome 1. Check the electrical outlets that you are planning to use to make sure that they are “live” by plugging in and turning on the fan. Make sure you have adequate space to set up the dome and that you are not near the edge of a stage or blocking a fire exit. 2. Before setting up the dome, unpack the STARLAB projector and plug it in to make sure that it works properly. (See page 11 for proper procedures).
5. Begin connecting the fan by first attaching the bottom two snaps on the fabric. The bottom snaps are located about 2 feet apart, while all of the other snaps are about 9 inches from each other. After you’ve attached the bottom snaps, begin connecting the side snaps going up one snap at a time on each side. Finally, attach the single snap on the top of the fan. 6. After the fan has been secured to the dome, turn it on high.
STARLAB Standard Projector Unpacking and Setting Up the Standard STARLAB Projector Once the STARLAB dome has been inflated, you can unpack and begin setting up the projector. Since it is dark inside the STARLAB, use a flashlight or an extra lamp attached to an extension cord to light the inside of the dome while you’re working. Remove the projector from its case. Note Always carry the projector by the two heavy metal bars on either side.
jector case and store it in a safe location outside of the dome.* Then lay the case flat on its back, lift the side of the inflated dome and slide the box under the fabric. Unravel the power cord that is attached to the projector and plug it in. * A new style of travel cases began shipping with systems in January 2005. If you have new cases, please refer to the note on the top of page 13. Note Do not plug in the projector until after the protective coverings have been removed.
The projector should then be placed on top of the case oriented with the side lamps hanging over the edge. This will maximize floor brightness. Note If you have the new-style travel cases (shipped with systems beginning in January 2005), the Projector Travel Case is too large to be used as the stand for the projector inside the dome. Instead, use either the Blower Travel Case or the Cylinder Travel Case as the projector stand (for either the FiberArc and Standard projectors).
Note When cylinders are not in use, they should always be stored in either the projector case or a cylinder case. Never leave a cylinder loose on the floor where it can get damaged! Adjusting the Projector Brightness The two dimmer knobs on the STARLAB projector allow you to set light conditions that mimic a true sky for anywhere in the world.
location with this edge.” The cylinder stays tilted due to friction and will stay in this position until you change it. Note When tilting the cylinder, always use the two metal brackets on the two sides of the projector and never push directly on the cylinder because it may damage it. When changing cylinders, always reset the projector to the polar position.
The projector lamp plug shown up close on right. Before replacing the projection lamp, it is a good idea to make sure that the bulb is indeed burned out. There are several places where the power to the bulb can become disrupted, making it appear that the bulb has blown. First check to see that the projector itself is plugged in and that there is power. The side lamps and daily motion drive should be able to work even if the projector bulb is burned out.
Front STARLAB FiberArc Projector Introduction The STARLAB FiberArc Projector uses a revolutionary means of projecting images. By replacing the standard halogen projection bulb with a combination of a high intensity arc-lamp light source and a state-of-the-art fiber optic light guide, the FiberArc provides an image clarity that is unsurpassed by any other portable planetarium projector available today.
In writing this manual we have tried to be as thorough as possible but inevitably, questions will arise. If you have any questions concerning the use, operation or maintenance of the STARLAB FiberArc Projector, please call our toll free number at 1-800-537-8703 and we will be happy to assist you. Unpacking and Setting Up the STARLAB FiberArc Projector The STARLAB FiberArc Projector is packed in a STARLAB projector case with one or two projection cylinders.
Changing the Projection Cylinders All of the projection cylinders used on the STARLAB planetarium are designed to work in the same way. They are made out of film and should be handled gently because they are easily crushed. Cylinders should be handled from the top and bottom rather than the sides. Before touching the cylinder, hands should be cleaned and free of hand lotion and perspiration. Cylinders are held on the projector by four magnets attached to the clear plastic cylinder platform.
position. You should see the light come on in the top center of the projection head. After about one minute the lamp will be fully warmed up and you will be able to control the brightness by turning the knob labeled “Projection Brightness” in a clockwise direction. Side Lamp Control The four gooseneck side lamps are controlled by means of four dimmer knobs located at the extreme righthand side of the projector control panel (see photo on right).
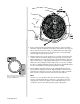
Adjusting the Latitude You can set the STARLAB projector to view the sky from any location in the northern or southern hemisphere (from the pole to the equator) by tilting the projector support plate and using the Latitude Adjustment Bar found on the right-hand side of the projector. Look at the accompanying graphic. Below the latitude bar is a distorted map with latitude lines drawn every 15 degrees. When the projector is straight up and down, you are at the pole.
useful for measuring star angles in celestial navigation and for calculating the position of the sun along the ecliptic during different months of the year. Setting the Position on the Meridian Projector The position of the Meridan Projector will be set at the factory, however, it may shift when changing the bulbs (see page 23) or when in transit. To check alignment, put the Starfield Cylinder (SL-321) on the projector in the STARLAB dome.
Changing the Bulb on the Meridian Projector Note The same bulbs (SL-550) are used in both the Meridian and Cardinal Points projectors. These are halogen cycle bulbs that have no socket assembly, only two small wire leads. Because they are halogen bulbs, it is important that they be handled as little as possible. Skin oil and moisture can reduce their life expectancy. You should always clean and dry your fingers before handling the bulbs.
Changing the Arc Lamp Projector Bulb The main projector bulb is located in the rear of the projector in a pull out drawer that is secured with locking screws. The light from this bulb is transferred to the projector head via a fiber optic cable that runs from the back of the projector to the projector head and looks like a corrugated metal cable. The replacement projector bulb looks similar to the type of bulb found in an overhead or slide projector.
at the base of the housing near the outside edge. There is a small picture of a fuse on the outlet just below the slot on the outside (see photo at right). Insert the blade of a flat head screwdriver into this slot and gently pry open the cover. The fuse cover should slide out of the back of the housing. Inside the cover there should be two fuses. The exposed fuse is the “active” fuse while inside the cover there should be a spare fuse. Remove the active fuse by pulling on the black plastic tab.
Projecting the Sun and Moon Note These instructions apply to both the Standard and FiberArc Projectors. The Sun The Starfield Cylinder is unique because, unlike most of the cylinders, it has twelve magnetic light blocks around its circumference. These light blocks mark the position of the Sun along the ecliptic and when one is removed, it shows where the Sun would appear in the sky for each month of the year.
that are true lunar calendars, like the Jewish, Chinese, or Muslim calendars, the phases repeat exactly each month, so the 1st of each month will be a new moon. Procedure 1. Determine how old the moon is. The age of the moon can be determined by looking at a calendar showing moon phases, by checking the newspaper for this information, consulting a source like the Abrams Sky Calendar, or referring to an internet site such as www.skypub.com for information about the current sky.
Projecting Planets with the Starfield Cylinder In addition to the magnetic moon phase inserts, the STARLAB accessory box also contains 5 clearly marked planet projectors that allow you to place any or all of the naked eye planets into the night sky. The planet projectors have the same type of magnetic attachment system as the moon phases and they use the same light ports on the STARLAB cylinder.
Taking Down and Packing Up The STARLAB After you have completed your STARLAB presentations for the day, it’s time to break down and repack the STARLAB back into its cases. Note If you are going to use the STARLAB for several days and it’s in a secure room, it is not necessary to completely pack it up each night. Simply place the projector on the floor next to the stand, leave the side lights on and exit the dome. Pull out the power cords and turn off the fan.
Note Make certain that you are using the correct lid! The lid for the cylinder cases is the same size as the projector case lid. The cylinder case lids DO NOT have cut outs for the projector and if they are forced on the projector case, they can cause serious damage to the projector! Once the lid has been placed on the case, snap it closed and move it off to the side next to the fan case.
Routine Maintenance of the STARLAB While the STARLAB planetarium system is designed to stand up to repeated use, it does occasionally need some routine maintenance to keep it operating in top form. Here are basic maintenance procedures that should be done periodically. Dome The dome is made from a nylon/vinyl (no latex) composite fabric and is bonded together with specially-formulated adhesive.
Fan/Blower After several months of use, dust and dirt will build up on the fan blades and motor. This can easily be removed by vacuuming the motor with a soft brush attachment. The nuts on the support bracket of the fan should be tightened periodically with a wrench to keep them from rattling.
Troubleshooting What happens if the projector does not go on even when I know the power outlet works? There is a fuse on the back of the projector that may break if the projector is dropped or handled improperly. If the projector fails to turn on, replace the fuse with one from the accessory box. What happens if I turn on the daily motion switch and the cylinder doesn’t rotate? First check to see if the large rectangular plug is securely attached to the back of the projector.
STARLAB User Tips Entering and Exiting the STARLAB Because the STARLAB dome is an air-supported structure, leaving the door open for an extended period of time will cause the dome to begin to deflate. As a result, it’s necessary to have visitors enter the dome in a controlled fashion. Visitors should be instructed to enter and exit the dome in a single file line, one at a time. While they do not have to crawl, they should be instructed to “stay low and go slow”.
see everything without blocking the view of other visitors. When the program is over, move the wheel chair out of the tunnel and position it next to the projector. Allow the rest of the group to leave via the entrance tunnel and then remove the person in the wheelchair the same way that you brought them in. Seating Inside the STARLAB Dome Placing carpet squares on the floor to establish a seating pattern helps to make things more orderly for classes entering the STARLAB.
Marking Positions On the Dome For many activities, it is useful to mark positions as reference points inside the planetarium. You may wish to mark the path of the Sun across the sky so that you can compare the angle of insolation on a winter and summer day. You may also want to have students predict and mark the position of the sunrise and sunset points for different days of the year or mark the position of different constellations as they appear to move across the sky.