SL-6000L/SL-6000N
In the U.S.A. Declaration of Conformity Personal Mobile Tool: SL-6000L/SL-6000N This device complies with Part 15 of the FCC Rules. Operation is subject to the following two conditions: (1) This device may not cause harmful interference, and (2) this device must accept any interference received, including interference that may cause undesired operation.
1 SAR The available scientific evidence does not show that any health problems are associated with using low power wireless devices. There is no proof, however, that these low power wireless devices are absolutely safe. Low power Wireless devices emit low levels of radio frequency energy (RF) in the microwave range while being used. Whereas high levels of RF can produce health effects (by heating tissue), exposure to low level RF that does not produce heating effects causes no known adverse health effects.
2 Introduction Introduction Congratulations and thank you for purchasing the Personal Mobile Tool. Read this Start-up Guide first. Then, refer to the Operation Manual on the CD-ROM for more details. NOTICE: • SHARP strongly recommends that you keep separate permanent written records of all important data. Data may be lost or altered in virtually any electronic memory product under certain circumstances.
Introduction 3 Conditions for using SHARP original software SHARP CORPORATION (hereafter referred to as “SHARP”), under the following conditions, grants to the customer a non-exclusive license to use the SHARP original software for PCs, that accompanies this product. Use of the software by the customer indicates agreement to the following conditions: 1. SHARP will make no compensation for damages to the customer caused by the use of this software, except for compensation required by law. 2.
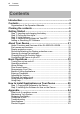
4 Contents Contents Introduction .......................................................................... 2 Contents ............................................................................... 4 Organization of the Operation Manuals ............................................... 5 Cheking the contents .......................................................... 6 Getting Started ..................................................................... 8 Step 1: Inserting and charging the battery .......
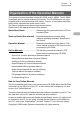
Contents 5 Organization of the Operation Manuals This operation manual describes both the SL-6000L and SL-6000N. The SL-6000L is equipped with an internal wireless LAN module. The SL-6000N does not come equipped with an internal wireless LAN module. “Zaurus” is used when describing both models, otherwise the model name is used. The Zaurus operation manuals are organized as follows: Please refer to the appropriate manual as required. Quick Start Guide.........................
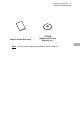
6 Cheking the contents Cheking the contents Personal Mobile Tool with Display protection cover Rechargeable Lithium-Ion Battery (EA-BL09) Stylus (inserted in the unit) AC Adapter (EA-70) and AC Power Cord (Specified Charger) CF Slot Protection Card (inserted in the unit) Docking Station (CE-ST10)
Cheking the contents Start-up Guide (this book) CD-ROM (Software and Online Manuals, etc.) Note: The AC power cord plug may differ in some countries.
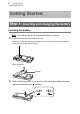
8 Getting Started Getting Started Step 1: Inserting and charging the battery Inserting the battery Note: Only use the “EA-BL09” rechargeable battery (supplied). 1. Attach the battery on the back of the unit. Make sure to slide the switch on the back of the unit to the “ON” position by using the stylus pen before inserting the battery. Insert the battery. Terminal 2. Push and hold the battery in the direction of the arrow while sliding the battery replacement switch to the “ ” position.
Getting Started 9 Charging the battery using the AC adapter Note: Only use the “EA-70” AC adapter (supplied). 1. Connect the AC power AC adapter cord to the AC adapter. AC power cord 2. Plug the AC adapter connector into the unit with the battery inserted. AC adapter jack To AC outlet AC power cord AC adapter connector AC adapter 3. Plug the AC power cord into an AC outlet. 4. Make sure the Zaurus is off. Press the reset switch with the supplied stylus pen while holding the Rec and POWER keys.
10 Getting Started Note: • Charge the battery to its full capacity until the charge light turns off. • Be sure to slide the battery replacement switch to the “ ” position before charging. • If a charging error occurs, the charge light will blink. Make sure that the AC power cord and the AC adapter are connected correctly, remove and reinsert the battery, then perform steps 1 to 3 above again. If the error persists, there is something wrong with the battery, Zaurus, etc.
Getting Started 11 Step 3: Initial settings Open the Display protection cover (see page 29) and carry out the initial setup of the Zaurus after completing the battery charge. Turning the unit on 1. Press to turn the power on. The Welcome screen will appear after a few minutes. Then, follow the next steps to complete the initial settings. Note: • If the power will not turn on after charging the battery, disconnect the AC adapter and remove the battery.
12 Getting Started Setting the date and time For the time-critical functions to work properly, the built-in clock must be set to the current date and time. Note: For detailed information on how to enter characters, see page 62, “Entering Characters”. Time Zone drop-down list button City Time button Hour and Minute spinboxes Date button Time format drop-down list button Weeks start on drop-down list button Date format drop-down list button 1. Tap the Time Zone drop-down list button.
Getting Started 13 7. Tap the Weeks start on drop-down list button and then select Sunday or Monday to begin the week. 8. Tap the Date format drop-down list button and then tap the desired format. The selected format applies to the Date column displayed on the Index screen of the application, etc. M/D/Y (example, 12/26/04) D.M.Y (example, 26.12.
14 Getting Started Note: You will not be able to select or enter the category name on this screen. Follow the next procedure. Setting your passcode By setting your own passcode in the Zaurus, you can protect your Zaurus from unauthorized use. Once you set the passcode enables the Require passcode at power-on setting. You will be required to enter it every time you turn the Zaurus on. To skip setting the passcode now, tap “Finish” or .
Getting Started 15 Step 4: Installing the Software on Your PC Checking the Operating Environment Minimum System Requirements • 100% IBM Compatible PC • Microsoft Windows 98/98SE/2000 Professional/Me/XP • Pentium 200MHz or higher for Microsoft Windows 98/98SE/2000 Professional/ Me, Pentium/Celeron 300MHz or higher for Microsoft Windows XP • 80MB Available Hard Disk Space for installation • 64MB RAM (Recommend 128MB RAM) for Microsoft Windows 98/98SE/2000 Professional/Me, 128MB RAM (Recommend 192MB RAM
16 Getting Started About USB Ports • Activating the power saving mode (such as suspend, resume, or sleep function) of some PCs may result in the USB port not functioning properly. In this case, disable the power saving mode. • The software may not operate properly when using a commercially available USB card installed in a PCI slot. • If the USB port on your PC or the USB hub connected to the Zaurus does not operate properly, perform the following steps.
Getting Started 17 Installing the PC Software and the USB Driver onto your PC Using the accompanying CD-ROM, “Intellisync for Zaurus,” “Backup/Restore application” etc. can all be installed at one time. Preparation for Installation 1. When installing this software in Windows XP/2000, check the limitations on the previous page. 2. Close all applications on your PC. 3. Insert the accompanied CD-ROM into your CD-ROM drive. A menu screen will be displayed automatically.
18 Getting Started • If the software for the former SL-models has been installed, a confirmation dialog box for uninstallation of the software will be displayed. Confirm the message to uninstall the software. After uninstallation, repeat the procedure from step 3. 5. Follow the on-screen instructions and complete the installation. Note: • To install the add-on software or data onto the Zaurus at a later time (See page 80), be sure to install the “Zaurus File Transfer” beforehand.
Getting Started 19 11. The connection will be established. If a new hardware wizard dialog box appears, follow the wizard until the USB driver is installed. Note: In the “Hardware Installation Wizard” dialog box, confirm “SL Series Ver 3 (WDM)” as its target hardware, and click “Continue Anyway”. Next, set the PC Link options on the Zaurus. 12. Tap the “PC Link” icon on the Settings Home screen. 13. Select “USB-I/O (default)” or “Serial” as the connection. 14. Tap .
20 Getting Started Adding or Removing PC Software Displaying the screen for Add or Remove PC software Select “Sharp Zaurus Software” from “Add or Remove Programs” on the Control Panel (Or click the Start menu, then (All) programs → Sharp Zaurus 2 → Uninstall). The following screen will be displayed. Note: • Executing “SHARP SL Series USB Driver” from “Add or Remove Programs” on the Control Panel will uninstall the USB drivers. Adding the software Insert the included CD-ROM into your CD-ROM drive.
About Your Zaurus 21 About Your Zaurus Useful Functions and Services of the SL-6000L/SL-6000N Your Zaurus has the following features: • A large colorful VGA LCD screen • A full QWERTY keyboard and software keyboards (capable of handwriting recognition) • The ability to create and read Internet e-mail message (POP3/POP3(APOP)/ IMAP4/SMTP) The e-mail message can include attachments.
22 About Your Zaurus Applications Calendar Allows you to store events and set alarms. Address Book Allows you to add and view the list of existing names and contact details. Todo List Allows you to view a list of Todo items and reminds you of what needs to be completed and when to be done. Text Editor Allows you to open a list of text files, create a new text file and edit it. EMail Allows you to create and transmit e-mail messages.
About Your Zaurus 23 Settings Light & Power Allows you to select the amount of time that elapses before the Zaurus turns off automatically and control the brightness of the backlight. Sound Settings Allows you to change the Startup and other sounds. Tab Setting Allows you to create an original Home screen by changing the Navigation tab order or moving the applications. Appearance Allows you to customize the desktop and window properties.
24 About Your Zaurus Note: • The EMail and Web Browser applications require the use of a modem or LAN card and a service plan. • The EMail application can be used for synchronization of Outlook email with attachments. Function that are available when the PC software is installed: Zaurus File Transfer When connected to the PC, files can be transferred easily between the PC and the Zaurus. Backup/Restore The Zaurus memory can be backed up to and restored from the PC.
About Your Zaurus 25 Part names and functions Front 13.LED indicators 1.Display 3.HOME key 2.Address Book key 11.Calendar key 12.OK key 10.Cancel key 4.Menu key 6.EMail key 5.Back light key/Screen rotate key 7.OK key 9.SELECT key 8.Cursor key (Up, Down, Left, Right) 18.Keyboard 14.Display protection cover 15.AC adapter jack 16.SHARP I/O PORT (with the cover) 19.Expansion pack connector 20.USB port 17.
26 About Your Zaurus Back/Rear 31.Microphone 22.Battery pack 23.Battery replacement switch 24.RESET button 21.Eyelet for the handstrap 28.Stereo headphone jack 26.Stylus 32.Rec key 30.SD card slot 29.IR port 27.CF card slot 33.POWER key 25.Speaker 1. Display: 2. 3. 4. 5. Address Book key: HOME key: Menu key: Back light key: Screen rotate key: 6. 7. EMail key: OK key: 8. Cursor key: ( ) 9. SELECT key: 10. Cancel key: 11. 12.
About Your Zaurus 27 13. LED indicators Charge light (amber): 14. 15. 16. 17. 18. 19. 20. 21. 22. 23. 24. 25. 26. 27. 28. 29. Turns on when charging begins. Turns off when it is completed. When the light blinks: indicating trouble while charging. Mail light (green): Turns on for incoming e-mail messages. Blinks when the alarm is going off as per the setting in the Calendar application. Wireless LAN light (SL-6000L): Turns on: Communicating with the network through the internal wireless LAN module.
28 About Your Zaurus 30. SD card slot (for the SD memory card and Multi Media Card): Insert an optional SD memory card or Multi Media Card here. Use the microphone for recording with the Voice Recorder application. Opens the Voice Recorder application and start to record voice memos when it is held for 1 second. You can open the Voice Recorder application from the power-off status or cancel this function in the “Preference” setting of this application. Turns the Zaurus on when it is off.
About Your Zaurus 29 Display protection cover To open the Display protection cover When carrying the Zaurus, be sure to close the cover to protect the LCD display. If not closed, the display may become damaged or broken. 180° Open or close the Display protection cover by using the edges of the display cover. The Display protection cover will open by approximately 180°. Removing/Attaching the Display protection cover To remove Push upwards to remove the cover.
30 About Your Zaurus Opening or closing the keyboard To open the keyboard, hold the sliding cover firmly and pull it down until it is locked. To close the keyboard, push it upwards until it is locked. Note: • Please close the sliding cover when you carry your Zaurus. Carrying the Zaurus with the sliding cover open may cause damage. • Be sure to completely open or close the slide cover into the locked position prior to press the keys in the sliding cover.
About Your Zaurus 31 3. Plug the AC power cord into an AC outlet. To AC outlet USB cable AC power cord Docking Station 4. Remove the SHARP I/O PORT cover of the Zaurus and then place the Zaurus in the Docking Station by sliding it in. The LED indicator on the unit (charge light) will turn amber when charging begins. Note: Make sure that the unit is fully inserted into the Docking Station. 5. When the charging has been completed, the LED indicator will turn off.
32 About Your Zaurus Connecting the Zaurus to your PC Using the Docking Station, you can connect to a PC and exchange files and data. Refer to the PC operation manual for more information regarding connections. 1. Connect the USB connector of the Docking Station to the USB port of the PC. PC USB port USB connector Docking Station 2. Follow the instructions in Steps 1 through 4 of “Charging using the Docking Station” above to connect the AC adapter and Zaurus to the Docking Station.
Basic Operations 33 Basic Operations Turning the unit on and off Turning the unit on Press to turn the power on. Note: When the battery level is low, the power will not turn on even when you attach the AC adapter. Turning the unit off Press to turn the power off. Turning the back light on and off When it is dark and difficult to see the LCD display, turn the back light on for easier viewing. Every time you press the Back light key , the back light will turn on and off.
34 Basic Operations Operating methods The Zaurus can be operated by either pressing keys on the keyboard or tapping an item (buttons, etc.) on the screen using the stylus. The operation manual primarily describes operation using the stylus. Button or key operations are included, if they make it easier to carry out the relative function. Using the stylus To tap Touch an item (application icon, button, etc.) on the screen once to execute it.
Basic Operations 35 Home Screen Press the Home key to display the Home screen. There are following Home screens. Press the Home key or tap one of the Navigation tabs to switch between the Home screens, and then tap the desired icon to start it. Applications: consisting of built-in applications. Java: consisting of built-in sample Java applications. Settings: consisting of programs to control the basic operations of the Zaurus.
36 Basic Operations Using the taskbar Qt Menu icon: Tap to display the menu. This is an another way of accessing applications in the list view. You can also perform a Rotation, Reboot (see page 84) or Suspend (power off), etc. Input methods icon: Tap to display the input modes (see page 64). Input methods menu icon: Tap to pop up a list of input methods.
Basic Operations 37 Files Home Screen This section gives a simple explanation of the Files Home screen. For more detailed explanations, see “Reorganizing Your Files” (page 39). New Folder button Creates a new folder. Menu bar Folder menu Tap here to move to a higher folder. Displays the folder selected before or after the currently selected folder. Displays the contents of the folder one level above. History button Tap this to display the file most recently used.
38 Basic Operations My Zaurus Internal Flash Image_Files .............. Contains Image files created with the Imaging application. Install_Files .............. This folder is used when installing software. Text_Files ................. Contains Text files created with the Text Editor. SD Card ............................... Displayed when an SD memory card is installed. Documents ............... Created when the SD memory card is installed in the Zaurus. Install_Files ...
39 Basic Operations Reorganizing Your Files You can reorganize your files using folders in the File Home screen. Opening folders and viewing files This section explains how to view files created using the Imaging application. 1. Tap the Folder menu on the Files Home screen. Folder menu 2. Tap “Internal Flash”. 3. Tap “Image_Files”. 4. Tap the file you wish to view. The Imaging application will start and the file will open. 5. Return to the Files Home screen by pressing the Cancel key or tapping .
40 Basic Operations Creating a new folder This section describes how to create a new folder within the “Internal Flash” folder. If a different folder is selected in Step 1, the new folder will be created within that folder. 1. Open the “Internal Flash” folder on the Files Home screen. If a different folder is currently open, tap on the Folder menu, tap the “Internal Flash” folder. 2. Tap the New Folder button. The new folder creation screen will be displayed. New Folder button 3.
Basic Operations 41 Changing folder and file names 1. Select the folder or file you wish to rename on the Files Home screen. 2. Tap the “File” menu (or tap and hold the folder or file) and then tap “Rename”. The Rename screen will be displayed. 3. Change the name, then tap . Changing date information for a file 1. Select the file for which you want to change the date. 2. Tap the “File” menu (or tap and hold the file) and then tap “Change date”. 3.
42 Basic Operations Setting and clearing wallpaper from the Files Home screen You can set an image file (JPEG, BMP, GIF and PNG format) as the wallpaper for the Zaurus. Setting the wallpaper 1. On the Files Home screen, tap and hold the Image file that you want to set as wallpaper. A pop-up menu will appear. 2. Select “Set as wallpaper”. The selected image file will be set as the wallpaper. Clearing the wallpaper 1. On the Files Home screen, tap and hold any Image file. 2.
Basic Operations 43 Defining the Cancel key function for the Files Home screen You can define how the Cancel key will operate on the Files Home screen. There are three options. 1. On the Files Home screen, tap the “View” menu and then tap “Preferences”. The Preference screen will be displayed. 2. Tap the desired radio button and then tap . Use cancel as close When a file is open, the application and file will be closed.
44 Basic Operations Menu list File Edit View New folder Creates a new folder (see page 40). Delete Deletes the selected file or folder. When a folder is deleted, all of the files within the folder will also be deleted. Duplicate Duplicates the selected folder or file. When a folder is duplicated, all of the files within the folder will also be duplicated. Send by beam Transmits the selected file to another Zaurus or similar device using infrared transmission.
Basic Operations 45 Basics of Using Applications This section describes basic operations for using applications. Operations may differ in some applications. Starting and exiting an application 1. Display the Applications Home screen. 2. Tap the “Todo List” application icon to start the application. Menu bar (see page 47) Exit Displays the online Help.
46 Basic Operations Application Fast Load Some applications may take a while to launch when there is a large amount of data associated with the application. There are some applications which you can reduce the start up time by using the settings on the “Details” screen. (To open the “Details” screen, tap and hold an application icon for a few moments in the Applications Home screen.) If you check the “Fast load” option in the “Details” screen, the start up time for that application will be shortened.
Basic Operations 47 Tapping an entry in the Index screen will also display the Detail screen. Closes the screen. Note: For data intensive applications, the screen might display slowly. 4. Press the Cancel key or tap in the upper right to close the Detail screen. The display will return to the Index screen. Using the Menu bar The Menu bar is displayed at the top of the Index, New/Edit and other screens. The items on the Menu bar will vary depending on the application.
48 Basic Operations Menu operations 1. Press the Menu key or tap the desired menu command. The menu will open. Note: Pressing the Menu key again will close the menu. 2. Press the Left/Right or Up/Down cursor keys to select the desired menu command, then press the SELECT key to execute it. You can also tap the desired menu to select it. When is displayed on the right edge of the menu, a sub-menu exists. When the menu item has a ellipsis mark suffix (...
Basic Operations 49 Moving the focus The focus is moved using the cursor key. Focused items (entry, tab, shortcut icon, etc.) are enclosed by a dotted line. The focus will move within the allotted area (entries list, menu bar, tab, etc.). For example, when the focus is on the shortcut icon, pressing the Left and Right cursor keys will move the focus within the Menu bar, and not to the entries list. Press the Tab key to move the focus to another area (the focus will differ within applications).
50 Basic Operations Creating a new entry 1. Tap the New icon ( ). The new entry screen for the selected application will be displayed. Select items. Enter text. Note: Instead of step 1, pressing screen. + will allow you to open a new entry 2. Select and enter the required items. See the following pages for details about making entries.
Basic Operations 51 Modifying an entry Open the Edit screen 1. On the Index screen, select an entry you want to modify. 2. Tap the Edit icon ( ). The Edit screen will be displayed. 3. Make your modifications. 4. When you have finished making your modifications, tap or press the OK key to save the modifications. If you tap or press the Cancel key, the Edit screen will close without saving any changes. Moving and duplicating text 1. 2. 3. 4. Drag the text to select it.
52 Basic Operations Drop-down list 1. Tap the drop-down list button and select from the displayed list. Drop-down list button When you tap here, a list will be displayed. Combobox 1. Tap the Combobox button at the right edge of the field and select from the displayed list. When you tap here, a list will be displayed.
Basic Operations 53 2. When the desired entry does not appear on the displayed list, tap the field and enter the information there. Tap here and enter the information. Spinbox 1. Tap or at the right edge of the field to change the number. You can also tap the entry field and enter a number directly. Tap here.
54 Basic Operations Using checkboxes You can select items by placing a checkmark or deselect them by removing the checkmark. 1. Tap a checkbox to place a checkmark there. Tap here 2. Tap again to remove the checkmark. Using the radio buttons Radio buttons are used to select a single item from multiple options. 1. Tap the radio button to select.
Basic Operations 55 Categorizing entries Once you categorize an entry, you will be able to display the entry in the appointed category (Address Book and Todo List). You can also assign an entry to several different categories. Selecting the desired category from a list 1. Display the New Entry screen or the Edit screen. 2. Tap the Category drop-down list button. The Drop-down list will be displayed. Category drop-down list button Edit Categories button Adds new categories. 3.
56 Basic Operations 3. Tap the “Add” button. The Add screen will appear for entering a new category name. 4. Enter the new category name and then tap . The newly created category name will be displayed in the Edit Categories screen. To add additional categories, repeat steps 3 and 4. • If you want to change the category name you created, tap the desired category name and then tap the “Rename” button.
Basic Operations 5. Tap 57 or press the OK key to save the setting. Note: • If you tap the Category drop-down list button on the New Entry or Edit screen, the added category will be displayed in the list. • To view the entries of a specified category, see page 58. Assigning one entry to multiple categories 1. Display the New Entry screen or the Edit screen. 2. Tap the Edit Categories button ( ). The Edit Categories screen will be displayed. Category checkbox 3.
58 Basic Operations Viewing the entries of a specified category only In the Index screen of the Address Book or Todo List applications, you can display only the entries that are assigned to a specified category. 1. On the Index screen, tap the “Category” menu. The category name will appear in alphabetical order and the current category will be checked.
Basic Operations 59 Note: The “New Event” screen for inputting an event entry for the Calendar application includes a Category setting. This setting is for synchronization with a PC. There is no function for viewing the event entries of a specified category in the Calendar application itself. Deleting entries Deleting an entry 1. On the Index screen, select an entry you want to delete. 2. Tap the Delete icon on the Menu bar. The confirmation message will be displayed.
60 Basic Operations Changing the display font size (For the Address Book, Todo List, and the Detail screen of the Calendar, Text Editor and EMail applications) You can change the display font size in the application for easier viewing. 1. Tap the “Option” menu and then tap “Font”. The current display font size will be checked. 2. Tap the desired font size. Note: The selected font size will only apply to the current application.
Basic Operations 61 3. Tap “Find Next” to continue the search in the remainder of the entries, or “Find Prev” to search the previous part of the entries. The search result will appear. If multiple entries are found, tap the “Find Next” or “Find Prev” to switch between the entries to be displayed. 4. Tap to close the Find screen.
62 Basic Operations Entering Characters The Zaurus provides two ways of entering characters: using the hardware keyboard and software keyboard. Using these tools, you can type in letters, numbers and special characters. The hardware keyboard g d e c h f c Tab key ( ) Acts as a tab key. On the Edit screen, the cursor will move to the next field. d Shift key ( ) Shifts the mode to enter uppercase letters or lowercase letters when the Caps lock key is active.
Basic Operations 63 key as combination key when held down Caps ( + Symbol ( Num ( ) + + Changes the entering mode to enter uppercase (capital) letters (Caps lock). To cancel the function, press + again. ) ) Opens the symbol window for entry of special characters. Changes the entering mode to enter numbers (Num lock) and symbols. To cancel the function, press + again. Del ( + ) Deletes the character to the right of the cursor. Cut ( + ) Cuts the selected text.
64 Basic Operations Software keyboard By default, “ ” will appear at the bottom left of the screen. Input methods icons Input methods menu Tap the Input methods menu icon ( ) to pop up a list of input methods: Handwriting, Keyboard, Pickboard and Unicode. Tap the input method you prefer. The icon will change to reflect your choice. • Handwriting ( ): Enters characters using your handwriting. • Keyboard ( ): Enters characters by tapping a QWERTY keyboard on the screen.
Basic Operations 65 Handwriting Pop up the input area in the handwriting mode. Write a letter with the stylus. There are three input areas: Uppercase letter input area, Lowercase letter input area and Symbol input area. As you write letters, a list of words will appear on the Candidates area (top of the input area). Tap it to enter it.
66 Basic Operations Handwriting recognition Tap the Help button of the Handwriting input method to view the tips or to use the trainer. The Tips screen will show you hints of how to use handwriting effectively. Character type drop-down list button Character list Left and right arrow buttons Sample area Input area Practicing your handwriting On the Trainer screen, tap the character type drop-down list button to switch character types. Then, tap any character in the Character list.
Basic Operations 67 You can confirm your performance in the area above the input area showing the matched rate (%) of the character you wrote and the matched rate of similar characters to the character you wrote. Tap to close the Handwriting Help Setting up your preferences Tap the Setup button ( ) on the input area to set your preferences and to customize the handwriting input. You can customize the handwriting input area.
68 Basic Operations If you want to have only a lowercase input area, select “Lower case (toggle Upper case)” by tapping the radio button. In this case, when you write in uppercase, first perform an “Uppercase” gesture (see page 65, “Handwriting Gestures”) for writing the uppercase character and then write the desired character (in lowercase). Upper and lowercase Lowercase Customizing your handwriting This setting will allow you to customize the handwriting to your own style of writing.
Basic Operations 69 Recognizing your handwriting The input area shows the corresponding character selected in the character list. This demonstrates the way the Zaurus recognizes the character. You can clear it and write it your own way in the input area. This will be the way the Zaurus recognizes your character. 1. 2. 3. 4. 5. Tap your choice from the character list. Tap the “Clear” button when the character is displayed. Write the character in your own style. Tap the “Add” button to add your writing.
70 Basic Operations “Character” combobox The choices are as follows: [Esc], [Tab], [BackSpace], [Return], [Uppercase], [Caps Lock], [Shortcut], [Punctuation], [Symbol], and [Extended]. Keyboard Pull up the keyboard mode in the input area. The keyboard will work just like a full-size keyboard, except that you tap the keys instead of typing on them.
Basic Operations 71 Pickboard The Pickboard will provide fast text input using a minimum amount of screen space. Pull up the pickboard mode in the input area. The pickboard comprises groups of letters, plus a few symbols and command words. Pickboard top row This row has the 123 letter group for entering digits, the symbols letter group and some command words. Tap “Space” to enter a space, tap “Back” to backspace delete, and tap “Return” to move to a new line. CAPS LOCK is controlled by tapping “Shift”.
72 Basic Operations Pickboard bottom row Tapping letter groups will enter words. The Pickboard will present a list of letters and words at the top of the input area. If the word you intend to type appears, tap it to insert it. For example, to enter the word “hotel”, tap the GHI group (for “h”), then the MNO group (for “o”), then the STU group (for “t”), then the DEF group (for “e”), then the JKL group (for “l”). At this point the word “hotel” will appear; tap the word to enter it.
Basic Operations 73 Unicode Use Unicode mode to insert special characters and symbols. Unicode group drop-down list button Character chart Entering characters Unicode characters are collected in groups. To change the group, tap the Unicode group drop-down list button, then select the group you want. To insert a character, tap it in the grid.
74 Basic Operations Adjusting the Volume Volume setting allows you to adjust the volume setting of the built-in speaker and the stereo headphone to listen to the Voice Recorder files or the alarm, keyclicks, screentaps, and sound effects. Using the task bar The Sound volume icon will always appear on the taskbar. 1. Tap the Sound volume icon on the taskbar to display the volume adjustment slider. Volume adjustment slider Sound volume icon 2.
Basic Operations 75 Checking the battery level 1. Tap the Battery icon on the taskbar to check the battery level. The Battery Status screen will appear. Battery indicator Battery icon The battery indicator will display the remaining battery power in green when the Zaurus is connected to the AC adapter, or in blue when not connected to the AC adapter.
76 Basic Operations Using memory expansion You can use a CompactFlash card, an SD memory card or a Multi Media Card. The Zaurus automatically recognizes the CompactFlash card and the SD memory card (Multi Media Card) when the card is inserted in the Zaurus. The memory card folders will appear in the Files Home screen. The data in the Internal Flash can be backed up and restored using a memory card. Caution: Do not drop or shock the Zaurus with a card partially ejected from the main body.
Basic Operations 77 Caution: • Only insert the card after the start-up routine has been completed (the keyboard and other function keys will be fully operational) after the power is turned on. If the card is inserted before the start-up routine is completed, the Zaurus will not properly recognize the card, and may result in improper operation. • Do not subject the card to strong electrical shocks. • Insert the SD memory card and the Multi Media Card into the slot until they are completely inserted.
78 Basic Operations 4. After the CF (or SD) icon disappears, remove the CF card straight out. Or push the SD memory card or Multi Media Card inwards slowly and then remove it. Caution: • The Eject Operation is not available if any files on the memory cards are open, or if a modem card, etc. is in use. • When you select the destination to store files of the EMail application to the CF card or the SD card, the CF card or the SD card may be unable to eject.
Basic Operations 79 Registering bookmarks By registering frequently-used pages, you can easily jump to the page. 1. Display the Help Browser page you want to register to the bookmarks. 2. Tap the “Bookmarks” menu and then tap “Add Bookmark”. The title of the page will be registered. Once you have registered it, the title of the bookmarked page will be displayed in the Bookmarks menu. Tap the bookmarked page in the Bookmarks menu to jump to that page. Removing bookmarks 1.
80 How to Install Applications on Your Zaurus How to Install Applications on Your Zaurus This section provides the procedures for installing software from the accompanying CD-ROM onto the Zaurus. Step1: Transfer the application installation file from the CD-ROM to the Zaurus. Insert the CD-ROM into your CD-ROM drive. The procedure for transferring the application installation file to the internal Flash memory of the Zaurus will be explained. (The software can also be transferred to a memory card.
How to Install Applications on Your Zaurus 81 4. Double-click on the CD-ROM drive name (example: D) in the My Computer application on your PC. The menu screen will be displayed automatically. You can also display the menu by ejecting the CD-ROM, then reinserting it. 5. Click “Additional Software for the Zaurus”. A window will open, displaying the Applications folder on the CD-ROM. 6. Next, display the Zaurus memory window.
82 How to Install Applications on Your Zaurus 8. Drag the file from the Applications folder of the CD-ROM and drop it into the “Install_Files” folder of the Zaurus. The file will be transferred into the Zaurus memory. Note: If there is a PC card slot on the PC you are using, instead of using the Zaurus File Transfer procedure above, you can copy the software onto a memory card, then insert the memory card into the Zaurus. You can then continue with the following steps.
How to Install Applications on Your Zaurus 83 4. Tap “Internal Flash” to select it. 5. Tap . The installation will begin. 6. Tap “OK” on the confirmation screen. The display will return to the screen in step 3. The icon for the software will change from to . To install additional software, repeat steps 3 through 6. To complete the software installation, be sure to perform steps 7 and 8. The installation is not yet completed at this point. 7. Tap .
84 Appendix Appendix What to do if a problem occurs When a problem occurs, first refer to the Troubleshooting section (see page 95) and the “Troubleshooting Guide” included on the CD-ROM. If an entry is displayed incorrectly on the screen, if tapping the screen or operating a key does not work properly, or if other problems occur, try the following sequence of operations: 1. Reboot 2. Reset 3.
Appendix 85 2. Performing a Reset When a Reboot cannot be performed, or the Zaurus does not work correctly even when rebooted, try the following reset operation (reset and full-reset). Editing data will be lost by performing a reset (the stored data won’t be lost). Resetting 1. After saving any entry being edited, close all applications. Turn the Zaurus off and make sure that the screen has gone blank.
86 Appendix 2. Press the reset switch with the supplied stylus pen while holding the Rec and POWER keys. Reset switch Rec key key 3. Release the Rec and POWER keys. 4. Turn the Zaurus on. The Set System Time screen will be displayed after a few minutes. Adjust the time and date, then press the OK key. The Home screen will be displayed. Caution: Be careful not to drop the Zaurus when resetting. Note: Repeat from step 1 if resetting can not be performed. 3.
Appendix 87 Maintaining Your System Zaurus system maintenance can be performed from the Maintenance menu. You need to display the Maintenance menu first, to perform the Error check, Format, and Update operation. Note: After performing one of the steps below, the time and date setting may not be accurate. Be sure to check the setting and adjust the time and date of the Zaurus. Displaying the Maintenance menu 1. After saving an edited entry, close all applications.
88 Appendix 1. Cancel Closes the Maintenance menu screen. After performing a reset, the display will return to the Home screen. 2. Error check (see page 88) Checks whether there are any abnormalities in the data in the Zaurus Internal Flash memory and memory card. Should be performed when abnormal operation continues even after a Reset operation (see page 85). The files or data with problems will be deleted, and your files, entries, data or settings may be lost. 3.
Appendix 89 Format the Zaurus Formatting the Zaurus will erase all data on the Zaurus and then re-format the memory. Caution: Any settings or add-on software entered will be deleted when you format the Zaurus. Application updates and the contents which the Zaurus come with standard will not be erased (they will remain in the updated version). 1. Display the Maintenance menu (see page 87). 2. Press to select “3. Format”. The Format screen will be displayed. 3.
90 Appendix Replacing the Battery Caution: • Before sliding the battery replacement switch to the “ ” position, make sure that the Zaurus is turned off and the screen is blank. If this step is not observed, the memory contents may be changed or lost. • Only use the “EA-BL09” rechargeable battery. 1. Turn the Zaurus off. 2. Slide both battery replacement switches on the back of the Zaurus to the “ ” position. 3. Remove the discharged battery. 4. Insert the new battery.
Appendix 91 Conditions of Use Your Zaurus conforms to international regulations insofar as it is used under normal conditions and in accordance with the following instructions. Caring for your Zaurus • Do not open or attempt to repair your Zaurus yourself. The product may only be repaired by authorized service personnel. • Do not drop your Zaurus or subject it to severe impacts. Be especially careful when a partially ejected communications or other card is in the Zaurus.
92 Appendix Battery • The Zaurus consumes battery power even when turned off. • Before removing the battery from the Zaurus, make sure the Zaurus is turned off. • The power supply may be blocked if there is dust on the battery terminals or the terminals of the main unit. Use a soft dry cloth to wipe the terminals. Batteries can cause damage, injury or burns if a conductive material touches the exposed terminals. In the U.S.A., Canada only “BATTERY DISPOSAL” CONTAINS LITHIUM-POLYMER BATTERY.
Appendix 93 Precautions AC adapter and AC power cord If the following precautions are not observed, fire or electric shock may occur. • Only use the “EA-70” AC adapter and the recommended AC power cord. • Do not use the AC adapter for other equipment. The equipment may be destroyed. • Do not use voltages beyond the indicated power supply voltage range. • When not in use, disconnect the AC power cord and the AC adapter from the wall outlet and from the unit for safety.
94 Appendix • After storing the battery for a long period of time, be sure to charge the battery completely prior to use. • Charge the battery properly, according to the details described in this guide. • Fluid from a leaking battery accidentally entering an eye could result in serious injury. Should this occur, wash with clean water and immediately consult a doctor. • Should fluid from a leaking battery come into contact with your skin or clothes, immediately wash with clean water.
Appendix 95 Troubleshooting If you have a problem with your Zaurus, check the following points. If the problem remains, contact our Support center. The screen is dark. I want to know how to turn the back light on. • Adjust the brightness of the light setting in the Light & Power application (See the Operation Manual: “Managing power (Light & Power)”).
96 Appendix • The battery may be exhausted. Use the AC adapter to turn on the power if necessary, and after disconnecting the adapter tap the battery icon to check the battery status. Charge the battery, if it is low. • Strong extraneous electrical noises or shocks might turn the Zaurus off. Try to turn the power on again. The Zaurus does not turn on by pressing the POWER key. The screen is lit but characters, etc. are not displayed. Entries are displayed incorrectly.
Appendix 97 Entries in the Calendar application, etc. cannot be deleted. • When the user area of the memory is full, entries in the Calendar, Address Book, Todo List, EMail, and Text Editor (in the Notes tab) applications may not be deleted. In such cases, delete unnecessary files in the Imaging or Text Editor (in the Text tab) applications or unnecessary files displayed on the Files Home screen. A memory shortage is occurring when starting up applications.
98 Appendix I have set a scheduled alarm but the alarm does not make a sound. • When an optional headphone is inserted into the stereo headphone jack, alarm sounds will be heard through the headphone. • You might have set the sound volume to off. Tap the Sound volume icon on the taskbar. Turn the “Mute” checkbox off, adjust the slider, and turn the “Alarms” checkbox on (see page 74). • You might have selected “Silent” when you set the schedule alarm.
Appendix Specifications Hardware Intel® XScale™ (PXA255, 400 MHz) Platform OS: Linux 2.4 (OpenPDA™) • Linux based embedded operating system (OpenPDA™) Memory Flash Memory: 64 MB (User area: Approx. 25 MB) ROM: 8 MB RAM: 64 MB SDRAM Display CG Silicon LCD with Back light 4" with 480 × 640 pixels, 65536 colors Input device Touch panel and QWERTY keyboard I/O device Serial/USB (via Docking Station) port, IR (IrDA, 115.
100 Appendix Note: • When the power of the Zaurus is turned on at a temperature of under 25°C (77°F), without any peripheral devices (including the expansion memory card) connected, after the rechargeable battery (EA-BL09) is fully charged. • Battery power is consumed even when the power of the Zaurus is turned off. A fully charged battery will become exhausted in about 14 days even if the Zaurus is not being used. Please recharge during this time.
Appendix 101 Product Support Please register on our website so we can keep you up-to-date as new products and services become available. If you have read the operation manual and require further product support, you can contact us using the information below. Prior to contacting us, please have the following information available. • The serial number of your Zaurus (indicated on the back of the unit). Product Registration and Support USA http://www.sharpusa.com/zregister zaurussupport@sharpsec.
In Europe: This equipment complies with the requirements of Directives 89/336/EEC and 73/23/EEC as amended by 93/68/EEC. Dieses Gerät entspricht den Anforderungen der EG-Richtlinien 89/336/EWG und 73/23/ EWG mit Änderung 93/68/EWG. Ce matériel répond aux exigences contenues dans les directives 89/336/CEE et 73/23/CEE modifiées par la directive 93/68/CEE. Dit apparaat voldoet aan de eisen van de richtlijnen 89/336/EEG en 73/23/EEG, gewijzigd door 93/68/EEG. Dette udstyr overholder kravene i direktiv nr.
In the U.S.A. CONSUMER LIMITED WARRANTY SHARP ELECTRONICS CORPORATION warrants to the first consumer purchaser that this Sharp brand product (the “Product”), when shipped in its original container, will be free from defective workmanship and materials, and agrees that it will, at its option, either repair the defect or replace the defective Product or part thereof with a new or remanufactured equivalent at no charge to the purchaser for parts or labor for the period(s) set forth below.
SHARP CORPORATION PRINTED IN JAPAN IMPRIMÉ AU JAPON 03B2.