Introduction Thank you for purchasing the SoftBank 812SH/813SH. ^ For proper handset use, read this manual beforehand. ^ This manual was created exclusively for SoftBank 812SH and 813SH handsets sold in Japan. ^ Keep this manual in a convenient place for reference. ^ Accessible SoftBank services may vary by service area, subscription, etc. SoftBank 812SH and 813SH are compatible with both 3G and GSM network technologies. Note ^ Copying this manual in whole or part without authorisation is prohibited.
Symbols & Illustrations In this manual, most operations are described with SoftBank 812SH open (see P.1-11) in Standby. Sample screen shots, etc. are provided for reference only. Actual handset windows, menus, etc. may differ in appearance. SoftBank 813SH users, please note that SoftBank 813SH is not equipped with mobile camera. See SoftBank 813SH Supplementary Guide for operational and functional differences with SoftBank 812SH.
Keypad Keys Side Keys Indicated in this manual as shown below. Activate/cancel Manner mode, adjust volume, etc. Indicated in this manual as shown below. N f k M g i j Circle Talk Key 1 2 3 4 5 6 7 8 9 0 u L Volume/Zoom Key M Multi Selector Select menu items, move cursor and scroll, etc. In this manual, Multi Selector operations are indicated as shown to the right.
Abbreviated Steps Handset operations starting from Main Menu are abbreviated as follows: Perform the operation such as opening a window Press b Use F to open the menu Main Menu H Menu Item A Selection A Operation A Options (N) A Menu (F) Select the menu item and press b Select the folder or file and press b Press the corresponding key in parentheses Manual descriptions are based on default Font Settings (see P.9-4). Actual handset windows, menus, etc.
Accessories CLithium-ion Battery (Type 1) (SHBAY1) CAC Charger (SHCAA1) CUtility Software (CD-ROM)*★ *Utility Software updates/upgrades may become available on SoftBank Mobile Website (http://www.softbank.jp) without prior notification. Please check for the newest versions of Utility Software and download as required. ★ Complimentary sample not available for purchase Note H Supplied Utility Software is designed exclusively for 812SH and 813SH.
Symbols & Illustrations ...................................................................i Accessories....................................................................................iv Contents ..........................................................................................v Safety Precautions........................................................................xii General Notes..............................................................................
Contents Manner Mode ............................................................................. 2-18 C Minding Mobile Manners .................................................... 2-18 C Activating & Cancelling....................................................... 2-19 C Activating/Cancelling Offline Mode..................................... 2-20 Simple Menu .............................................................................. 2-21 C Activating/Cancelling Simple Menu ...........................
Video Call Getting Started ............................................................................ 5-2 Initiating a Video Call.................................................................. 5-3 Answering a Video Call .............................................................. 5-3 Engaged Video Call Operations................................................. 5-4 Video Call Settings ..................................................................... 5-6 6 Camera Getting Started ..............
Contents C Ringvideo & Ringtone......................................................... 8-10 C S! Mail Attachments ........................................................... 8-11 C Printing Images .................................................................. 8-11 Editing Still Images ................................................................... 8-12 C Changing Image Size ......................................................... 8-12 C Visual Effects (Retouch)...................................
Tools Calendar..................................................................................... 12-2 C Opening Calendar .............................................................. 12-2 C Saving Entries .................................................................... 12-4 C Opening Entries ................................................................. 12-6 C Searching Entries by Subject ............................................. 12-6 C Editing Entries .......................................
Contents C Opening New Messages .................................................. 14-18 C Retrieving Complete S! Mail Messages ........................... 14-21 C Retrieving Mail List ........................................................... 14-22 Using Messages ...................................................................... 14-23 C Checking Messages ......................................................... 14-23 C Replying to Messages ......................................................
18 Entertainment S! Cast (Japanese Only) ........................................................... 18-2 C Basics................................................................................. 18-2 C Service Registration & Content Subscription ..................... 18-2 C Opening Received Information........................................... 18-2 C Using Information ............................................................... 18-3 C Using Weather Indicator...........................................
Safety Precautions ^ Read safety precautions before using handset. ^ Observe precautions to avoid injury to self or others, or damage to property. ^ SoftBank is not liable for any damages resulting from use of this product. Before Using Handset CSymbols Make sure you thoroughly understand these symbols before reading on.
!DANGER Handset, Battery & Charger Use specified battery, Charger and Desktop Holder only (see P.iv). Battery # Using non-specified equipment may cause malfunctions, electric shock or fire due to battery leakage, overheating or bursting. Do not short-circuit Charger terminals. Keep metal objects away from Charger terminals. Keep handset away from necklaces, hairpins, etc. Battery may leak, overheat, burst or ignite causing injury. Use a case to carry battery.
!WARNING Handset, Battery & Charger Do not insert foreign objects into the handset, Charger or Desktop Holder. $ Do not disassemble or modify handset or related hardware. % $ If water or foreign matter is inside handset: Do not insert metal or flammable objects into handset, Charger or Desktop Holder; may cause fire or electric shock. Keep out of children's reach. Keep handset out of rain or extreme humidity. Fire or electric shock may result. Keep handset away from liquid-filled containers.
!WARNING Handset, Battery & Charger Keep handset off and Charger disconnected near filling stations or places with fire/explosion risk. Handset # Handset use near petrochemicals or other flammables may cause fire/explosion; turn handset off before using S! FeliCa at filling stations (cancel IC Card Lock beforehand). Do not subject handset to strong shocks or impacts. $ Strong shocks or impacts to handset, Charger or Desktop Holder may cause malfunction or injury.
!WARNING Charger Use only the specified voltage. Non-specified voltages may cause fire or electric shock. ^ AC Charger: AC 100V-240V Input B SoftBank is not liable for problems caused by charging battery abroad. ^ In-Car Charger: DC 12V-24V Input Do not use power adapters. Using AC Charger with step-up/step-down transformer may cause fire, electric shock or damage. Do not use In-Car Charger in positive earth vehicles. $ Do not short-circuit Charger terminals.
!WARNING Battery ^ If battery does not charge properly, stop charging. Battery may overheat, burst or ignite. ^ If there is leakage or abnormal odour, avoid fire sources. Battery may catch fire or burst. # If there is abnormal odour, excessive heat, discolouration or distortion, remove battery from handset. It may leak, overheat or explode.
!CAUTION Handset, Battery & Charger Handset care ^ Place handset on stable surfaces to avoid malfunction or injury. ^ Keep handset away from oily smoke or steam. Fire or accidents may result. ^ Cold air from air conditioners may condense, resulting in leakage or burnout. ^ Keep handset away from direct sunlight (inside vehicles, etc.) or heat sources. Distortion, discolouration or fire may occur. Battery shape may be affected. ^ Keep handset out of extremely cold places to avoid malfunction or accidents.
!CAUTION Handset If you experience any skin irritation associated with handset use, discontinue handset use and consult a doctor. See handset materials below. Some materials may cause skin irritation, rashes, or itchiness depending on your physical condition.
!CAUTION Charger Charger & In-Car Charger ^ Grasp plug (not cord) to disconnect Charger. May cause fire/electric shock. ^ Keep cord away from heaters. Exposed wire may cause fire or electric shock. ^ Stop use if plug is hot or improperly connected. May cause fire/electric shock. ^ Keep In-Car Charger socket clean. May overheat and cause injury. $ Always charge battery in a well-ventilated area. Avoid covering/wrapping Charger and Desktop Holder; may cause damage/fire.
!CAUTION Battery Do not throw or abuse battery. Battery may overheat, burst or ignite. Do not leave battery in direct sunlight or inside a closed vehicle; may reduce battery performance or overheat. An overheated battery may cause fire. Do not expose battery to liquids. Performance may deteriorate. If battery fluid contacts skin or clothes, rinse with clean water immediately. Do not dispose of an exhausted battery with ordinary refuse; always tape over battery terminals before disposal.
General Notes General Use ^ SoftBank is not liable for any damages resulting from accidental loss/alteration of handset or Memory Card data. Keep a copy of Phone Book entries, etc. in a separate place. ^ Handset transmissions may be disrupted inside buildings, tunnels or underground, or when moving into/out of such places. ^ Use handset without disturbing others. ^ Handsets are radios as stipulated by the Radio Law. Under the Radio Law, handsets must be submitted for inspection upon request.
FCC Notice ^ This device complies with part 15 of the FCC Rules. Operation is subject to the following two conditions: (1) This device may not cause harmful interference, and (2) this device must accept any interference received, including interference that may cause undesired operation. ^ Changes or modifications not expressly approved by the manufacturer responsible for compliance could void the user's authority to operate the equipment.
European RF Exposure Information Your mobile device is a radio transmitter and receiver. It is designed not to exceed the limits for exposure to radio waves recommended by international guidelines. These guidelines were developed by the independent scientific organization ICNIRP and include safety margins designed to assure the protection of all persons, regardless of age and health. The guidelines use a unit of measurement known as the Specific Absorption Rate, or SAR.
Handset Care ^ If handset is left with no battery or an exhausted one, data may be altered/lost. SoftBank is not liable for any resulting damages. ^ Use handset within 5]C to 35]C and 35% to 85% humidity. Avoid extreme temperatures/direct sunlight. ^ Exposing lens to direct sunlight may damage colour filter and affect image colour. ^ Do not drop or subject handset to shocks. ^ Clean handset with dry, soft cloth. Using alcohol, thinner, etc. may damage it.
Copyrights Copyright laws protect sounds, images, computer programs, databases, other materials and copyright holders. Duplicated material is limited to private use only. Use of materials beyond this limit or without permission of copyright holders may constitute copyright infringement, and be subject to criminal punishment. Comply with copyright laws when using images captured with 812SH camera. Video recording and playback are based on MPEG-4.
Bluetooth is a registered trademark of the Bluetooth SIG, Inc. microSD! and miniSD! are trademarks of the SD Card Association.
The frequency band used for the Bluetooth# function of handset is shared with other industrial, scientific or medical equipment (microwave ovens, etc.), and used at premises radio stations, amateur radio stations, etc. (hereinafter "other radio stations"). 1 Before using the Bluetooth# function, visually check that there are no other radio stations sharing the same frequency band nearby.
Chaku-Uta and Chaku-Uta Full are registered trademarks of Sony Music Entertainment (Japan) Inc. BookSurfing is a trademark of CELSYS Inc., Voyager Japan, Inc. and INFOCITY Inc. ^ SOFTBANK, SoftBank and the SoftBank logo are trademarks or registered trademarks of SOFTBANK CORP. in Japan and other countries. ^ Yahoo! and the Yahoo! and Y! logos are trademarks or registered trademarks of Yahoo! Inc.
Specific Absorption Rate (SAR) 812SH and 813SH meet the government's requirements for exposure to radio waves. These requirements are based on scientific basis to assure that radio waves emitted from mobile phones and other handheld wireless devices do not affect human health. They require that the Specific Absorption Rate (SAR), which is the unit of measurement for the amount of radiofrequency absorbed by the body, shall not exceed 2 W/kg*.
Getting Started 1-1
1 Function & Feature Preview Getting Started ^ Memory Card is required for items with grey background. ^ ★These items are not available on 813SH. Circle Talk Press one key to speak to up to ten parties simultaneously via this Walkie-Talkie type service. P.19-13 E-Book/Document Viewer Read E-Book, E-Book dictionaries or documents (PDF files, etc.) on handset. P.18-5, P.12-18 1-2 PC Site Browser View websites designed for PCs on handset. P.
Display Language Custom Screen Face Recognition★ 1 Getting Started Display Change Wallpaper, System Graphics, Fonts, et cetera to customise handset interface. Change Phone Settings to make handset user interface appear in either English or Japanese. Load uni-themed Wallpaper, Indicators, ringtones, and more, all at the same time. Save up to five facial images to use along with passwords, etc. to restrict handset access. P.9-3 P.9-9 P.9-9 P.
1 USIM Card Getting Started General Information & Precautions Universal Subscriber Identity Module (USIM) Card is an IC card containing customer and authentication information, including the handset number, and limited storage for Phone Book entries and SMS messages. USIM Card must be inserted to use this handset. ^ Save contacts on USIM Card Phone Book (see P.4-3). ^ Insert into compatible SoftBank handsets to access files. ^ Do not apply excessive force to insert/remove USIM Card.
1 Inserting & Removing USIM Card Inserting Removing 1 Slide in USIM Card with IC chip facing down Take care not to lose removed USIM Card. 1 Gently slide out USIM Card as shown 2 Insert battery (Steps 3 - 4 in "Inserting" on P.1-16) 2 Insert battery (Steps 3 - 4 in "Inserting" on P.1-16) Getting Started ^ Follow the steps below after removing battery (see P.1-16). ^ Do not force USIM Card into or out of handset; damage may result.
1 USIM PINs Getting Started There are two Security Codes for USIM Card: PIN1 and PIN2. PIN1 A 4-digit to 8-digit Security Code to prevent unauthorised use of handset. ^ PIN 1 is 9999 by default; change as needed (see P.9-25 "Change PIN"). ^ Activate PIN Entry (see P.9-24) to require PIN1 entry each time handset (USIM Card inserted) is turned on. PIN2 Required to clear Call Costs or set Max Cost (see P.2-15). PIN 2 is 9999 by default; change as needed (see P.9-25 "Change PIN").
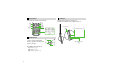
Handset Parts & Functions 1 Getting Started ★ 813SH is not equipped with these parts (9, T and U). Handset 8 G P 1 Q R 9★ A 2 3 5 6 7 4 B C D H I L S J M N T★ U★ K V E F 1 Display 2 Mail Key Open Messaging menu or execute Soft Key functions (see P.1-23). 3 Start Key Initiate/answer calls. Open records of All Calls. O W 4 Shortcuts & A/a Key Open Shortcuts menu. In text entry windows, toggle upper/ lower case roman letters or standard/small hiragana/katakana.
1 Getting Started 1-8 7 4 Key In text entry windows, open Symbol/Pictogram Lists. 8 Earpiece 9 Internal Camera★ Use during Video Call. A Multi Selector & Keypad Lock Key Select menu items, move cursor, scroll, etc. In Standby, press b for 1+ seconds to activate/cancel Keypad Lock. B Yahoo! Keitai Key Open Yahoo! Keitai Main Menu or execute Soft Key functions (see P.1-23). C Power On/Off Key Press and hold to turn handset power on/off.
Note H Internal Antenna ^ Handset has no external antenna. Handset transmits and receives signals via Internal Antenna. ^ Do not cover or place stickers, etc. over the area containing Internal Antenna. ^ Voice quality varies with handset usage/location. ^ For better reception in Standby, close handset (see P.1-11).
1 Getting Started 1-10 7 Memory Card Status, Loudspeaker Microphone Mute (see P.2-11) c: Inserted, b: In Use, a: Formatting s: Unusable/Poor Connection x: Loudspeaker Active, h: Microphone Muted L: Loudspeaker Active & Microphone Muted 8 Multi Job (see P.1-26), IC Card Lock S: Multiple Functions (Multi Job) Active o: IC Card Lock Active 9 External Transmission, PC Site Browser (see P.
External Display CIndicators See major External Display indicators below. 1 3 2 4 1 Signal Strength 2 Battery Strength 3 Date 4 Time Clock View C While External Display Backlight is on (with handset closed), press h to toggle Clock view (Large Clock, Clock (S), World Clock or Clock & Date). ^ Display Date & Time setting (see P.9-13) is not affected. ^ View is fixed while music plays, during infrared transfers, etc.
1 Battery & Charger Getting Started Getting Started Charge battery before first use/after period of disuse. Battery Life ^ Do not use/store battery at extreme temperatures; this may shorten battery life. Ideally, use/store between 5]C - 35]C. ^ Use specified Charger only; others may damage handset/ battery or overheat or ignite battery. ^ Replace battery if operating time shortens noticeably. Charging ^ Do not use Charger for other purposes. ^ Contact with metal may short, overheat or burst battery.
Estimated Hours of Use (fully charged battery) 150 minutes in 3G 240 minutes in GSM Continuous Standby Time 330 minutes in 3G 320 minutes in GSM Continuous Operating Time 7 hours Continuous Playback Time 16.5 hours Continuous Video Call Talk Time 80 minutes (with Internal Camera in use) Values calculated with Backlight Brightness set to Level:2. ^ Continuous Talk Time is an average measured with a new, fully charged battery, with stable signals.
1 Extend Battery Time Getting Started Adjust Light Settings (see P.9-13) to extend Battery Time. Select shorter Display Saving/Backlight time and lower Brightness. When Battery Runs Out A message appears and short beeps sound. Press g to stop short beeps. (Short beeps do not sound in Manner mode.) CDuring Voice Call A double beep sounds every five seconds. After 20 seconds, the call ends and handset shuts down. Tip H This product requires a lithium-ion battery.
Small Light & Battery Strength Indicator CHandset Power On Battery Voltage Battery low. Please connect to charger! appears. Charge or replace battery immediately. Minimum Operating Voltage J/W Level 3 Approx. 70% K/X Level 2 L/Y Level 1 M/Z Level 0 Approx. 20% Approx. 10% Hours of Use Remaining Strength (at 25˚C) CBattery Strength & Environment At low temperatures, battery is consumed faster. At high temperatures, battery lasts longer. Note H ^ Battery Strength indicator is for reference only.
1 Installing & Removing Battery Getting Started Inserting 1 Battery Cover e f 2 1-16 Press down and slide cover as shown Removing ^ Turn handset power off before removing battery. ^ Do not remove battery immediately after saving files, sending messages, etc. 1 Press down and slide cover as shown Lift and remove cover as shown 3 Insert battery 4 Close cover e f 2 Lift and remove cover as shown 3 Remove battery ^ With printed side up, fit tabs into battery cavity slots.
1 AC Charger 2 Getting Started External Device Port AC 100V Outlet AC Charger Release Tabs Blades Small Light Arrows Up Charger Connector 3 Port Cover 1 Use specified Charger only. 1 Open Port Cover to connect Charger ^ Insert connector until it clicks. ^ Use slot to gently pull Port Cover down and out as shown. Slot 2 Plug Charger into AC outlet 3 After Charging Unplug Charger, then disconnect handset ^ Squeeze release tabs to remove connector.
1 Desktop Holder Getting Started Desktop Holder may be purchased separately. Small Light 3 2 AC 100V Outlet 2 1 Release Tabs 1 Blades AC Charger Charger Connector 4 Insert cord into the groove. Connection Port Use specified Charger only. 1 Arrows 3 Gently insert handset into Desktop Holder 4 After Charging Unplug Charger, then disconnect handset Insert Charger connector into Desktop Holder until it clicks ^ Connection Port is on the back of Desktop Holder.
1 In-Car Charger Getting Started In-Car Charger may be purchased separately. Cigarette Lighter Socket 2 External Device Port Release Tabs Charger Connector 3 In-Car Charger 4 1 2 3 Small Light 1 Plug Open Port Cover to connect In-Car Charger ^ Insert connector until it clicks. Plug Charger into cigarette lighter socket Start car engine ^ Charging starts and Small Light illuminates red (see P.1-15). Charging takes approximately 150 minutes. ^ Charging is complete when Small Light goes out.
1 Handset Power On/Off Getting Started 1 2 3 Open handset Press and hold g After Power On Graphic, handset enters Standby. Turning Off Press g for 2+ seconds After Power Off Graphic, handset shuts down. My Details Setup & Network Information 1 C When handset is turned on for the first time, setup confirmation appears after Power On Graphic.
Opening Standby Window 1 Getting Started g Standby Standby Window B Press g to toggle Standby Window on/off. My Details 1 1 Press b0 Handset phone number appears. ^ To add, edit or delete My Details, see P.4-19.
1 Keypad Lock Getting Started Use Keypad Lock to lock handset keys and prevent accidental operation/function activation. 1 1 Activating Cancelling Press b for 1+ seconds Press b for 1+ seconds b appears and Keypad Lock is set. 1 b disappears. Note H Emergency calls (110, etc.) are possible even when Keypad Lock is active. See P.2-3 "Emergency Calls". Tip H When Keypad Lock is Active ^ Incoming calls temporarily cancel Keypad Lock. To answer a call, press f. [Activate Any Key Answer (see P.
Handset Menus 1 Access functions/operations from Main Menu. 1 2 1 2 Press b CMain Menu Items Main Menu opens. Use G to select an item and press b Soft Keys Press N to select or execute the assigned function or operation. Press b to select or execute the assigned function or operation. Press M to select or execute the assigned function or operation. Shortcut to Custom Screens (see P.
1 User Shortcuts Getting Started Using Shortcuts Press a key (1 - 9) to access assigned function, folder or menu. Default Shortcuts: 1 1 1 Received Msg. 4 Calendar 7 Calculator 2 Create Message 5 Phone Book List 8 Alarms 3 Bookmarks 6 Data Folder 9 Bluetooth# In Standby, press a key (1 - 9) for 1+ seconds Assigned function, folder or menu opens. Editing Shortcuts Edit items except Main Menu and Enter Number.
Quick Operations 1 Digits 1 2 3 4 5-6 Speed Dial (see P.4-14) ! # # # # # # # # Speed Video Call (see P.4-14) ! # # # # # # # # Calculator (see P.12-15) ! ! ! ! ! ! ! # # Expenses Memo (see P.12-25) ! ! ! ! ! # # # # Speed Mail (see P.14-33) !1 # # # # # # # # Calendar (see P.12-2) # # # !2 # # # # # Set Alarm (see P.12-11) # # # !3 # # # # # Call Circle Talk (see P.
1 Multi Job Getting Started Open a function window while another is active. 1 1 2 3 In a function window, press k Shortcuts menu opens. ^ Some shortcuts are disabled. ^ Multi Job cannot be activated from some windows/under some conditions (e.g. when an S! Application is active, etc.). ^ In text/phone number entry windows, press k for 1+ seconds. 2 Select a function and press b 3 Press g to exit Menu/window opens (S appears). ^ Press h to toggle active windows.
Security Codes 1 Handset Code 4-digit number (9999 by default) required to use or change some handset functions. ^ 4 appears as digits are entered. ^ If Handset code is incorrect! appears, enter again. ^ Change Handset Code as needed (see P.9-28). Centre Access Code 4-digit number selected at initial subscription; required to access Voicemail via landlines or subscribe to fee-based information. Network Password 4-digit number selected at initial subscription; required to restrict handset services.
Basic Handset Operations 2-1
Initiating a Call 2 See P.2-5 to initiate international calls from Japan, P.2-17 for Voice Calls from outside Japan and P.5-3 for Video Calls. Basic Handset Operations 1 Confirm handset is on 2 Enter a phone number 1 ^ Check signal strength (see P.1-9 1). ^ Handset will not transmit when P, U, b or l appears (see P.20-4 - 20-6). 3 Confirm the number and press f 4 Press g to end call 3 4 2 ^ Include dialling code for all numbers.
Tip H ^ Check Call Timers (see P.2-14) and Call Costs (see P.2-15). ^ For operations during a call (Loudspeaker, Mute, Hold, etc.), see P.2-11- 2-12. Emergency Calls Emergency calls (110, 119, 118, etc.) are possible even while some handset restrictions are active. Active Restriction Keypad Lock (see P.1-22) Max Cost (see P.2-15) Emergency Calls Possible Possible Offline Mode (see P.2-20) Not Possible PIN Entry (see P.9-24) Not Possible Password Lock (see P.9-25) Possible Outgoing Calls (see P.
Redial 2 Place calls from Dialled Numbers. Up to 30 recently dialled numbers are saved. Basic Handset Operations 1 1 3 Press B (F) 2 3 Select a record and press b Press f Handset dials the number. CIndicators 2 q Dialled Voice Call J Requested Circle Talk O Dialled Video Call Dialled numbers appear with date and time, most recent first. ^ Name appears if saved in Phone Book. ^ Use F to open Received Calls/All Calls.
Placing an International Call from Japan 1 2 3 4 Enter a phone number 5 Press f ^ Include dialling code for landline numbers. Press N x Select Int'l Call and press b Country names appear. Select a country and press b + (international prefix symbol) and corresponding country code appear.
Incoming Call 2 Basic Handset Operations 1 When a call arrives, open handset 1 2 3 ^ Number appears when Caller ID is sent. ^ Name appears if saved in Phone Book. C To reject an incoming call, press N x while handset is ringing/vibrating A Select Reject A Press b B Standby returns; record appears in Received Calls. C To place a caller on hold, press g while handset is ringing/vibrating. B Press f to answer the call on hold. C Answering a Video Call: see P.
Redirecting a Call CVoicemail: see P.13-4 Unanswered calls are forwarded to Voicemail Centre. Activate Missed Call Notification (see P.13-5) for records of calls missed while handset is off/out-of-range. CAnswer Phone: see P.2-9 Record caller messages on handset. Use Quick Recorder (see P.2-10) to record caller messages on handset when Answer Phone is inactive. Information C Information window opens for Missed Calls or Answer Phone messages. ^ Select Call and press b to see details (see P.2-13).
Calling from Received Calls 2 Basic Handset Operations Up to 30 received calls are saved. When Caller ID is sent, number appears. Place calls directly to those numbers. 1 1 3 Press A (l) 3 Press f Handset dials the number. CIndicators r Answered Voice Call N Rejected Voice Call Q Answered Video Call S Rejected Video Call I Requested Circle Talk L Missed Call Notification Received numbers appear with date and time, most recent first. ^ Name appears if saved in Phone Book.
Answer Phone 2 Record caller messages on handset. Activating & Cancelling Main Menu H Settings A Call/Video Call (F) A Answer Phone 1 Select Switch On/Off and press b 2 Activating 1 Choose On and press b C To sample outgoing message, select Outgoing Message A Press b B Press i to stop. ^ Press g to return to Standby (j appears). (r appears when messages are recorded.
Playing Messages 2 Main Menu H Phone Basic Handset Operations 1 Select Play Messages and press b Number of recordings appears and playback starts from the most recent message. After all messages have played, playback ends automatically. C Press B to replay. C Press i to stop playback. C To skip a message, press b J or A. C To play the previous message, press B twice during playback. C To delete a message, press N .
Engaged Call Operations 2 Adjust Earpiece Volume (5 levels). ^ Volume level remains as set even after handset power is turned off. ^ To adjust Earpiece Volume in Standby, see P.9-17. ^ Earpiece Volume is Level 3 by default. 1 1 2 During a call, press L or M 2 Press L (up) or M (down) to adjust volume Basic Handset Operations Earpiece Volume Voice Output Loudspeaker Use Loudspeaker for handsfree conversations During a call, press b. C To cancel, press b.
Voice Memo 2 Record up to 90 seconds or 20 messages between Voice Memo and Answer Phone (see P.2-9). Basic Handset Operations 1 2 1 2 3 During a call, press N x Select Record and press b 3 Recording starts. Play Press b to stop ^ Alternatively, end call to stop. (Recordings remain even after handset power is turned off.) Play Voice Memos Main Menu H Phone Select Play Messages A Press b C For details, see P.2-10 "Playing Messages".
Call Log 2 All Calls Dialled Numbers Received Calls 1 1 2 All dialled/received calls All dialled calls All received calls Press f All Calls opens. C Press F to open others. 2 Select a record and press b Record details appear. Tip H Press f to open All Calls during a call.
Call Timers & Data Counter 2 Basic Handset Operations Call Timers Data Counter Check estimated time of the most recent call (Last Call Time) and all calls made since Clear Timers was last applied (All Calls Time). ^ Times for Dialled Calls and Received Calls appear separately. ^ To show elapsed Call Time during a call, see P.9-30 "Call Time Counter".
Call Costs Main Menu 1 2 H Settings A Call/Video Call (F) A Call Time & Cost A Call Costs Select Last Call or All Calls and press b Press b to return to Call Costs menu ^ Press g to return to Standby. Tip H ^ Call Costs remain even after handset power is turned off. ^ Sum of charges appears for Conference Call (Optional Service).
Outside Japan (International Roaming) 2 Basic Handset Operations Switching Network Services ^ Auto is set by default. ^ Use Auto whenever possible. Sets Network by location (Network status) when selected and each time handset is turned on thereafter. Auto 3G/GSM 1 Use in 3G or GSM service areas 3G Use in 3G service areas GSM Use in GSM service areas Main Menu H Settings A Network Settings (F) A Select Service 1 Select Auto, 3G/GSM, 3G or GSM and press b Selected service is activated.
Calling from Outside Japan 2 Use the same SoftBank handset number overseas. 2 5 1 3 4 1 2 3 4 Enter a phone number Calling SoftBank Handsets ^ Always select 日本 (JPN) (or press 81 for direct entry). ^ Include dialling code for landline numbers. Press N x Select Int'l Call and press b Country names appear. C To call Japan, select Call to Japan A Press b A Skip ahead to Step 5 Select a country and press b ^ + and country code are inserted before the phone number.
Manner Mode 2 Basic Handset Operations 2-18 Minding Mobile Manners Please use your handset responsibly. Use these basic tips as a guide. Inappropriate handset use can be both dangerous and bothersome. Please take care not to disturb others when using your handset. Adjust handset use according to your surroundings. ^ Turn it off in theatres, museums and other places where silence is the norm. ^ Refrain from using it in restaurants, hotel lobbies, lifts, etc.
Activating & Cancelling Activate/cancel Manner mode in Standby, while browsing the Internet or during calls, etc. 1 Cancelling Press h for 1+ seconds E appears and Manner mode is set. ^ j (Answer Phone), g (Silent) and v (Silent & Vibration) appear as set in Manner settings (see P.9-2 "Mode Settings"). 1 E disappears and Manner mode is cancelled. When Manner Mode is Active Basic Handset Operations 1 Activating Press h for 1+ seconds 2 C Keypad Tones, Power On/Off and error tones are muted.
Activating/Cancelling Offline Mode 2 Use Offline Mode to temporarily suspend all handset transmissions. Basic Handset Operations ^ Offline Mode blocks all calls/Internet transmissions. Bluetooth#/infrared transmissions are available. ^ Offline Mode is Off by default. Activating Main Menu H Settings A Network Settings (F) A Offline Mode 1 Choose On and press b U appears and Offline Mode is set.
Simple Menu ^ Handset is limited to basic operations (see P.2-22). ^ Fonts are enlarged while Simple Menu is active. Press N to toggle description on/off. 1 Standard Main Menu 2 Basic Handset Operations Activate Simple Menu to reduce available handset functions and simplify menus. Simple Main Menu Activating/Cancelling Simple Menu Activating 1 Press j for 1+ seconds ^ Simple Menu remains active even after handset power is turned off.
Simple Menu Operations 2 Menus Basic Handset Operations In Standby, press b to open Simple Main Menu. Messaging Phone Received Msg. Create Msg. Drafts Templates Sent Messages Unsent Msg. Create SMS Ph. Book List Add New Entry Play Messages Call VM My Details Speed Dial Camera Calendar Alarms Calculator Convenient Tool Assignment Hot Status Circle Talk Answer Phone Simple Menu Pictures DCIM My Pictograms Data Folder Ring Tones S! Appli Music Videos 2-22 Wallpaper Assign Tone Volume See P.
Text Entry 3-1
^ Available Modes: Character Selection 3 Text Entry Use Kana and Pager (see P.3-9) to enter alphanumerics, Symbols, hiragana, kanji, katakana and Pictograms. Unless otherwise noted, text entry operations are described for use in text entry windows using Kana Mode.
Key Assignments Key Kanji (Hiragana) [Double-byte] Katakana [Double & Single-byte] Alphanumerics [Double & Single-byte] Numbers [Single-byte] Character Codes 1 あいうえお ぁぃぅぇぉ アイウエオ ァィゥェォ @.
CKey Assignments (Continued) Key Kanji (Hiragana) [Double-byte] 3 C Conversion (Up)5 Text Entry D Conversion (Down)6 Katakana [Double & Single-byte] B Cursor Down X (Line Break) Cursor Right Change Entry Mode Toggle Case (for some characters) Delete One Character, Cancel Conversion i Long Press f Character Codes Cursor Left A i Press Numbers [Single-byte] Cursor Up j k Toggle Case + Toggle Mode (upper/lower and lower case) ───── Delete One Character ───── Delete Code/ One Character
Entering Characters 4 Kanji, Hiragana & Katakana Press 2 twice ^ To enter unconverted hiragana, skip ahead to Step 6. 3 1 2 3 Text Entry Following the example below, enter 鈴木 to learn how to enter characters in kanji (hiragana) entry mode. Press 3 twice Word suggestions change as hiragana are entered. 5 ^ The most recent selection appears first in the list. C To see other suggestions, press N z or M J. C To exit the list, press i. C To change segment, see P.3-6 "Segmenting Phrases".
Katakana Entry 3 Text Entry C Switch to double or single-byte katakana mode to enter katakana. (Press b ) after entry.) Alternatively, enter hiragana then select katakana from the word suggestion list. C To convert hiragana to katakana/alphanumerics only, see P.3-11 "Hiragana to Katakana/Alphanumerics Conversion". Predictive & Previous Usage C Use these functions to convert hiragana to kanji more quickly.
Adding ゛or ゜ 1 Enter a character and press q は q q q Space Alternatively, in kanji (hiragana), katakana or alphanumeric entry, press p six times for space. ^ To insert line breaks in text, press p until X appears, then press b. Contact me at D Contact me atX 3 Undo & Recover Cancel the previous conversion or recover deleted characters. Tip H In Single-byte Katakana Entry ^ Press q once to add single-byte ゛or twice for ゜. ^ Press i to remove ゛or ゜.
Symbols, Pictograms & Emoticons Symbols & Pictograms 3 Text Entry Pictograms do not appear in e-mail or on incompatible SoftBank handsets. 1 Press q to open Log/History (Log/History is available in some entry modes; see P.3-3) Recently used Symbols/Pictograms appear. ^ ― appears by default or when Log/History is deleted. C To see Symbols, press M; toggle as follows: Symbol List(s) % Log/History. C To see Pictograms, press N; toggles as follows: Pictogram Lists % Log/History.
Emoticons 1 2 Select Emoticons and press b ^ Enter two digits (01 - 50) to jump to the emoticon assigned to the number. Select an emoticon and press b Tip H ^ For other emoticons, enter かお and press D (convert). Alternatively, enter a descriptive word such as わーい or うーん and press D (convert). Corresponding emoticons can be selected. ^ Immediately after inserting a descriptive word such as 嬉しい or 悲しい, corresponding emoticons may appear in the word suggestion list. To disable this function, see P.
CPager Code List ^ Blanks indicate no entry. ^ Grey background indicates upper and lower case available. Press k to switch immediately after character entry.
Conversion Methods (Japanese Only) Enter katakana and alphanumerics in kanji (hiragana) entry mode. Phonetic Conversion Enter reading in hiragana Press N _ Select a kanji and press b One-Hiragana Conversion Enter the first hiragana to access previously selected words. Example: To enter 鈴木 DE b す 鈴木 鈴木 ^ Up to 20 word selections are saved per hiragana. When memory is full, the oldest entry is deleted to make room for a new entry. 1 2 Enter hiragana and press M S ^ To enter AM, press 26 then M S.
66q (び)77 (み) 888888 (ょ ) 111 (う) D (convert) Quick Conversion 6q (ば)7 (ま)8 (や)1 (あ) C (convert) 1 2 Enter hiragana and press C Cursor turns green. ^ While cursor is green, use F to segment entered hiragana and then convert one segment at a time. C To cancel Quick Conversion, press i A Press D for normal conversion Use E to select a word and press b Note H Use Quick Conversion in kanji (hiragana) mode only.
Editing Characters Conversion Settings Optional Predictive Functions Activate or cancel Predictive, Previous Usage or EmoticonWordLink Press N x A Select Input/Conversion A Press b A Select Predictive, Previous Usage or EmoticonWordLink A Press b A Choose On or Off A Press b Set Low Priority ^ The highlighted character is deleted. ^ Place cursor at the end of text and press i for 1+ seconds to delete all text. When cursor is located amidst a block of text, characters on and after cursor are deleted.
3 Use G to select the first character of text and press b Start point is set. C To change the start point, press M s. 3 Text Entry 4 5 6 7 Select the end point and press b Open text paste target window Press N x Select Paste and press b 1 2 3 4 Additional Functions Cut Copying from Phone Book Insert Phone Book entry items into text entry windows. Select from name, phone numbers, mail addresses, Category, postal address, homepage, Note, and Birthday.
Using Text Templates Insert text saved in Text Templates (see P.12-26) into text entry windows. Select Text Templates and press b Select Call Templates and press b Select text and press b 1 2 3 4 Press N x Select Advanced and press b Select Font Size and press b Select a size and press b Tip H Setting applies to Editor Font Size in Display Font Settings (see P.9-4). 3 Text Entry 1 2 3 4 Press N x Changing Font Size Text is inserted.
Phone Book 4-1
Overview Save frequently used phone numbers and mail addresses to Phone Book. 4 ^ Entry names appear for calls from numbers saved in Phone Book. ^ Set ringtone/ringvideo by caller/sender, sort entries into Categories, etc. See P.4-3 for more about Phone Book entry items. Phone Book CDialling from Phone Book f CSending SMS/S! Mail messages from Phone Book CWhen a Call Arrives A call arrives Service Dial C Dial service dial numbers saved on compatible USIM Cards to use services.
Saving to Phone Book Phone Book Entry Items Save up to 750 entries in handset Phone Book; USIM Card Phone Book entry limit varies according to card specifications. 2 Item Description Enter up to 32 characters. (Select Name: when saving to USIM Card.) Homepage:1 Save URLs. Enter up to 1,024 bytes. First Name: Note:1 Add personal details. Enter up to 256 characters. Reading: Enter up to 64 characters.
Creating Phone Book Entries 4 Phone Book 4-4 Enter a name, reading, phone number and mail address. For other items, see P.4-5 - 4-7. Storage media is set to handset (Phone) by default. Main Menu H Phone 1 Select Add New Entry and press b 2 3 4 5 Select Last Name: and press b 6 7 8 Select Add Phone Number: and press b Note H To save an entry, enter at least one of the following: a) last name; b) first name; c) phone number; or d) mail address. Phone Book Details appears.
Confirmation for Unsaved Numbers Ringtone 1 Select Preset Sounds, Ring Songs·Tones, Music or Flash#Ringtones and press b Ringvideo 1 Select Videos and press b 4 Select a file and press b C Follow these steps to show/hide confirmation for saving to Phone Book after calls with unsaved numbers. Press b A Select Phone A Press b A Select Ph.Book Settings A Press b A Select New Number Prompt A Press b A Select Incoming Call or Outgoing Call A Press b A Choose On or Off A Press b ^ Both are On by default.
Personal Vibration 4 Phone Book Set handset vibration for calls/mail from numbers/addresses saved in Phone Book. Follow these steps after opening Phone Book Details (see P.4-4). When finished, Phone Book Details returns. Complete other fields.
Saving Secret Entries 1 2 Select Secret: and press b Choose On and press b Other Phone Book Entry Items ^ For descriptions of each item, see P.4-3. ^ Follow these steps after opening Phone Book Details (see P.4-4). When finished, Phone Book Details returns. Complete other fields.
Saving from Call Log 4 Phone Book 1 2 3 4 Use F to open Dialled Numbers/Received Calls Use E to select a record and press N x Select Save Number and press b New Entry 1 Select As New Entry and press b Phone number is entered automatically and Phone Book Details (see P.4-4) appears. Complete other fields. Add to Existing Entry 1 Select a Phone Book entry and press b Using Phone Book Dialling from Phone Book Search Phone Book by katakana row (default search method) to call numbers within entries.
Window Description Switching Between Handset & USIM Card 1 2 3 4 Phone Book Search Methods By Reading Shows entries that start with specified Reading By Category Opens entries in the specified Category By a-ka-sa-ta-na Shows entries with Readings that start with katakana in the specified row By a-ka-sa-ta-na is set by default. Main Menu H Phone A Ph.
Editing Phone Book Entries To edit Secret entries, first activate Show Secret Data (see P.9-27). 4 Correction/Change Phone Book 1 2 3 4 Copying Phone Book Entries Exchange entries between handset and USIM Card. USIM Card does not support some Phone Book entry items (see P.4-3). Those items are deleted when Phone Book entries are copied from handset. Press D, then select an entry Press N x Select Edit and press b Select an item and press b Edit contents.
Deleting Phone Book Entries One Entry Press D, then select an entry Press N x Select Delete and press b Choose Yes and press b Tip H The source files remain in Data Folder, even when deleting entries containing melodies, video or images set for incoming calls/mail or Picture. Customise Category options; create new Category names.
Customising Handset Responses 4 Phone Book Set ringtone/ringvideo or Vibration for incoming calls/mail by Category. Category settings for incoming calls/mail are not available for Categories on USIM Card. Main Menu H Phone A Category Control 1 2 3 4 Use F to select handset Select a Category and press N x Select Assign Ringtone or Assign Vibration and press b Select an item and press b ^ See the corresponding procedure for each setting.
2 3 4 Select Edit Name and press b Enter name and press b ^ Enter up to 16 characters. Choose Yes and press b Main Menu H Phone A Contact Groups 1 2 3 4 Select a Group and press N x Main Menu H Phone A Contact Groups A Open a Group 1 2 3 Select a member and press N x Select Remove Entry and press b Choose Yes and press b Tip H Source Phone Book entries remain even after deleting members.
Saving from Phone Book 4 C Open a Phone Book entry and select a phone number A Press N x A Select Add Speed Dial A Press b A Select from 0 to 9 A Press b B To overwrite existing number, choose Yes A Press b Phone Book Note H Saved numbers are deleted from Speed Dial List when edited in Phone Book or when source entry is deleted. Tip H Use Headphones with Call Button to call the number saved in Speed Dial 0.
S! Address Book (SAB) SAB Sync Commands & Features Backup/ Restore Synchronise Backup/Restore Synchronise Birthday Notification Phone Book Edit on PC Server Edit on PC Send Notice Import from/Export to PC Backup Export Phone Book content to SAB1 Restore Import SAB content to Phone Book2 Normal Synchronise Phone Book and SAB3 Sync from Client Add Phone Book changes to SAB Sync from Server Add SAB changes to Phone Book5 Import from PC Upload PC address book info to SAB Export to PC Expor
Service Usage Outline Complete Contract 4 Phone Book Visit a SoftBank shop, dial 157 from a SoftBank handset for SoftBank Customer Centre, General Information or access My SoftBank via Yahoo! Keitai. Receive User ID & Password After subscription, User ID and Password arrive via SMS. ^ Handset phone number serves as User ID. Save User ID & Password See P.4-17 for procedures. Use SAB Export Phone Book content to SAB. ^ Using sync commands incurs transmission fees.
CContract Termination SAB content is deleted upon contract termination. CAvailability SAB is only accessible within Japan. After completion of contract, User ID and Password arrive via SMS. Save them on handset to activate SAB.
Auto Synchronisation Synchronising Phone Book Manual Synchronisation 4 Phone Book ^ For details, see the table on P.4-15. ^ If this is your first use of SAB (new handset), Synchronisation is performed via Normal regardless of selection. Main Menu H Phone A S! Address Book 1 Select Normal, Sync from Client or Sync from Server and press b 2 3 Choose Yes and press b 4 Enter Handset Code and press b Handset connects to the Server and Synchronisation starts. ^ After Synchronisation, details appear.
Opening Log View result of Backup, Restore or Synchronisation. Main Menu H Phone A S! Address Book C Press b to return. Edit/add My Details Main Menu H Phone A My Details Press N x A Select Edit/Add Details A Press b A Select an item A Press b ^ For more, see P.4-4. Note H Phone number in Tel 1: cannot be changed. My Details Opening My Details Confirm handset number (phone number on USIM Card). Save name, reading, phone number, mail address, personal data, etc.
Video Call Not Available for 813SH Users 5-1
Getting Started Important Video Call Usage Notes Communicate with another party using live video images. 5 ^ Use Video Call with compatible handsets only. ^ Use Internal Camera to send your own image. ^ Use External Camera to send higher quality images. Video Call Internal Camera Window Description Incoming Image1 Outgoing Image1 Other Party's Number2 1 Change incoming/outgoing image size/position (see P.5-5 "Switch Images"). 2 Name appears if saved in Phone Book.
Initiating a Video Call Answering a Video Call 1 2 3 1 Press N x Incoming Video Call appears. Select Video Call and press b When the call is answered, incoming image appears. ^ Incoming image may not appear depending on handset settings. (Video Call charges apply.) C For operations during a Video Call, see P.5-4.
Rejecting Video Calls C When a Video Call arrives, press N x A Select Reject A Press b Engaged Video Call Operations Camera Picture Change outgoing image Redirecting Video Calls C When a Video Call arrives, press M h. 5 Placing Callers on Hold Video Call C When a Video Call arrives, press g or follow these steps. Press N x A Select Hold A Press b B To answer the call on hold, press b A Choose Yes or No A Press b ^ Callers placed on hold receive Hold Guidance Picture; Microphone is muted.
Switch Images Change incoming/outgoing image size/position During a call, press b. ^ Incoming Priority (incoming image appears larger) is set when initiating Video Calls. ^ Images toggle as shown below. Loudspeaker Cancel or activate Loudspeaker During a call, press N x A Select Loudspeaker Off or Loudspeaker On A Press b ^ Loudspeaker is temporarily cancelled when Manner mode is activated during calls.
Activate or cancel reversed Internal Camera image Mirror Image During a call, press N x A Select Settings A Press b A Select Mirror Image A Press b A Choose On or Off A Press b 5 ^ External Camera image, Alternative Image and incoming images cannot be reversed. ^ Mirror Image is On when initiating Video Calls.
Outgoing Picture Select quality of outgoing images Loudspeaker Activate or cancel Loudspeaker for Video Calls KNormal H Settings A Call/Video Call (F) A Video Call A Main Menu Outgoing Picture KOn H Settings A Call/Video Call (F) A Video Call A Main Menu Loudspeaker Choose On or Off A Press b ^ Select Quality Prior for higher quality and Frame Rate Prior for faster frame rate. ^ Outgoing Picture setting may automatically change during calls depending on the other party's Incoming Picture setting.
Remote Monitor Automatically answer Video Calls from numbers saved in Auto Answer List KSwitch On/Off: Off, Answer Time: 00 seconds H Settings A Call/Video Call (F) A Video Call A Main Menu Remote Monitor A Enter Handset Code 5 Activating/Cancelling Video Call Select Switch On/Off A Press b A Choose On (answer automatically) or Off A Press b Adding to Auto Answer List Select Auto Answer List A Press b A Select A Press b A Enter a number A Press b C To select from Phone Book or Call Log, selec
Camera Not Available for 813SH Users 6-1
Getting Started 812SH features a 2 megapixel CCD camera. Capture still images (see P.6-5) or record video (see P.6-8). Tip H Use Internal Camera or External Camera; unless otherwise noted, mobile camera operations are described for External Camera. 6 Camera Mobile Camera Basics ^ Clean dust/smudges from lens cover with a soft cloth before use. ^ Handset movement may blur images; hold handset firmly or place it on a stable surface and use Self-timer. (see P.6-11).
Camera Display Indicators Photo Camera Mode 1 2 3 4 5 6 7 8 7 Continuous Shoot (see P.6-12) Q - c: Captured/Total Q: 4 Pictures, R: 9 Pictures, S: Overlapped ^ S: Index Image (composite image for Overlapped) is on Display. 8 Self-timer Active (see P.6-11) M: 10 seconds, N: 5 seconds, O: 2 seconds Video Camera Mode 1 Capacity (see P.6-5) ^ F: 101 or more ^ Red background: 3 or less 2 Picture Quality* (see P.6-16) M: High Quality, L: Fine, K: Normal *Hidden if IP Service Setting (see P.
6 Shutter 7 Exposure B (darker), A (brighter) 8 End 9 Function Shortcuts Activate mobile camera and press the following keys to use the corresponding functions. 6 Self-timer Active (see P.6-11) M: 10 seconds, N: 5 seconds, O: 2 seconds Key Assignments 1 6 Camera Show Exposure slider 2 Hide indicators to frame image on full Display (see P.6-15 "Display Indicators") Toggle Viewfinder size (see P.
Still Images Photo Camera Mode Capture images to send via S! Mail, save as Wallpaper, etc. Various settings and functions are available for camera use. Format Save Location Picture Quality Digital Zoom S! Mail Attachment Memory Capacity 6 Camera Picture Size 2M (W 1200 x H 1600 dots: UXGA) 1.2M (W 960 x H 1280 dots: Quad-VGA) VGA (W 480 x H 640 dots: VGA) Mail L (W 240 x H 320 dots: QVGA) Mail S (W 120 x H 160 dots: QQVGA) Tip H ^ Select storage media beforehand or each time you save an image (see P.
Note H Internal Camera Images Your image appears on Display as a mirror image before/ after shutter is released; saved image appears reversed. Capturing Still Images Main Menu H Camera 1 6 Camera Tip H When Captured Image is Unsaved Finished? appears when closing mobile camera before returning to Viewfinder. ^ Choose Yes and press b to end. Handset returns to Standby. ^ Choose No and press b to return to captured image.
Still Image Functions Before Image Capture Press N x to use the following functions: Adjust amount of light (see P.6-16) Add Frame2 Add frames (see P.6-13) Continuous Shoot3 Capture images sequentially (see P.6-12) Camera Effects2 Capture images with special effects (see P.6-14) Scan Barcode Scan barcodes (see P.12-19) Data Folder Access Data Folder files (see P.6-10) Picture Size Select image size (see P.6-16) Scene Select a mode to suit lighting conditions or subject (see P.
Video Video Camera Mode Record short video clips to send via S! Mail. Use Memory Cards to save long recordings (recording time varies by card capacity). 6 Image Size Camera Format W 176 x H 144 dots (QCIF) W 128 x H 96 dots (SubQCIF) MPEG-4 or H.263 (.3gp)2 W 320 x H 240 dots (QVGA) W 240 x H 176 dots (HQVGA)1 MPEG-4 (.3gp)2 MPEG-4 (.
4 6 Video Recording Operations Recording begins after a tone. C To start over, press i. To stop, press b Before Recording Press N x to use the following functions: Recording stops with a tone. ^ Recording stops automatically when maximum recording time is reached or memory becomes full. ^ When Auto Save is active, recorded video is saved automatically and Viewfinder returns. C To play back, select Preview A Press b B Press 2 during playback to toggle Display Size. C To start over, press i.
Tip H Open Options and use Multi Selector or Keypad to open/ set items. Before Saving The following menu items appear after recording: 6 Camera * Save Save video to handset or Memory Card (see P.6-9) Preview Play video (see P.6-9) Save and Send* Attach video to S! Mail (see P.6-15) Available when Record Time/Size is set to For Message. If Attach Only is set for Send File Settings (see P.14-38), Multimedia appears. Opening Images & Playing Video To open files directly from Data Folder, see P.8-5.
3 Select a file and press b Video plays. Press b to pause/resume playback. C To open other files, press i A Select one A Press b SD Video 4 Frame image on Display and press b 5 Saving Still Images 1 Press b Play QVGA size (.
^ Follow these steps before capturing an image (after Step 1 on P.6-6). Self-timer Details C To release shutter manually during countdown, press b. Image is captured or video recording starts and Self-timer is cancelled. C Incoming calls and Alarm interrupt countdown. (Self-timer remains active.) C Available functions during countdown are Digital Zoom and Exposure. 6 Camera Continuous Shoot (Photo Camera) Capture a series of 4 or 9 separate images automatically with a single press of the Shutter Key.
7 Index Image or a composite image appears 8 To save, press b 9 Saving All Images 1 Select All Pictures and press b C When confirmation for save location appears, select a location A Press b Images are saved and Viewfinder returns with Continuous Shoot active. Saving the Selected Image 1 Select Selected Picture and press b Image is saved and captured image returns with Continuous Shoot active.
Original Frames 1 Select Data Folder and press b ^ Some images may not be used as frames. 2 Select a frame and press b C To check frames, select one A Press M ) B Press i to return. 3 Press b Cancelling 1 Choose Off and press b 6 Camera Tip H In Continuous Shoot, frame is added to each image. Camera Effects (Photo Camera) Sending Images Still Images Capture and send images as S! Mail attachments. To attach images in Data Folder, see P.8-11.
Video Clips Send recorded video clips via S! Mail. ^ For details of attachable files, see the table on P.6-8. ^ To attach video files saved in Data Folder, see P.8-11. 1 2 Select Save and Send and press b Video is saved to Data Folder and Mail Composition window opens with the video file attached. ^ To attach video without saving to Data Folder, see P.14-38 "Send File Settings". B If Attach Only is set for Send File Settings (see P.14-38), Multimedia appears instead of Save and Send.
Display Size # Photo Camera * Picture/Video Quality Change Viewfinder size for video Video Camera !* * Available when Record Time/Size is SubQCIF or QCIF.
Record Time/ Size Select For Message to record short video (up to 295 KB) to send via S! Mail For longer recording, select Extended Video Photo Camera # Video Camera ! KFor Message, QCIF (176 x 144) Press N x A Select Record Time/Size A Press b A Select For Message, Extended Video or SD VIDEO A Press b A Select a size A Press b Photo Camera * Select a video encoding format # !* Video Camera Available when Record Time/Size is SubQCIF or QCIF.
Save to Photo Camera * Select a save location for images or video ! Video Camera !* Available when Record Time/Size is set to For Message. KPhone Memory (handset) 6 Press N x A Select Settings A Press b A Select Save Pictures to or Save Videos to A Press b A Select a location or Ask Each Time A Press b Camera ^ For Ask Each Time, confirmation appears each time you save an image or video (with Record Time/Size set to For Message).
Media Player 7-1
Media Player Basics Use Media Player to listen to music (Music Player) or play video (Video Player). Save video/music files to handset or Memory Card (including SD VIDEO and SD AUDIO). To open files, specify the location first. Video (Video Player) 7 Music (Music Player) Downloading Music/Video Media Player My Videos My Music Handset Handset/Memory Card Open music/video-related links directly from Media Player to download music (Chaku-Uta#) and video via the Internet.
Music Search C Follow these steps to access Yahoo! Keitai Music Search site. In Step 1 on P.7-2, select Music A Press b A Select Music Search A Press b ^ Fill in fields or follow links to search for/download music. Downloading Content Keys Content Keys are required to use some downloaded files. 1 2 Select a file and press b ^ Select a file with b. Choose Yes and press b Handset connects to the Internet and download page appears. ^ Follow onscreen instructions.
Precautions for Handling AAC Files CUse software supporting AAC conversion. ^ Use software such as iTunes to convert music to AAC format. ^ iTunes is an example only. SoftBank does not guarantee compatibility with any software. ^ For software usage and specifications, see the provider's website, etc. iTunes is a registered trademark of Apple Computer, Inc. registered in the United States and other countries. 7 Media Player CSupported bit rate and sampling frequency are as follows.
Tip H ^ To activate/cancel Manner mode during playback, press h for 1+ seconds. ^ In Manner mode, sound is audible from Headphones. ^ To answer calls during playback with Headphones, etc., press Call Button for 1+ seconds. ^ Turn down the volume if distortion is noticeable in Speaker sound. ^ As saved files increase, files, My Music and Playlists may take longer to open.
Playback Operations (Music/Video) Playback Main Menu H Media Player A Music 1 Select My Music or SD AUDIO and press b C For My Music, use F to select Music Folder or Ring Songs·Tones. C To play the last played file from where it stopped, select Last Played Music A Press b 7 Media Player 2 Select All Music or a Playlist and press b My Music Three Playlists (プレイリスト1 to プレイリスト3) are saved by default.
Opening File Properties C While playing or paused, press N x A Select Details A Press b ^ Press D to scroll down. B Press b to return. Accessing Linked Information Note H Playback pauses for Alarm, then resumes automatically. Tip H ^ Press k to create mail messages and use Phone Book, etc. during playback; however, some functions are not available. ^ Stop music? appears when g is pressed in Standby. Choose Yes or No and press b.
Playing Video Play video files recorded with mobile camera or obtained via the Internet, S! Mail, etc. ^ Use Headphones, etc. to listen to sound without bothering others. ^ Read the precautions on P.7-4 beforehand. Playback Window Indicators Tip H Press 2 during playback to toggle Display Size (see P.7-10). Playback 7 Media Player Play video on Video Player. ^ To change playback settings, see P.7-10. ^ To add subtitles, see P.7-12.
3 For basic operations, see P.7-6 "Playback Operations (Music/Video)". All Videos Select a file and press b Playback window opens and playback starts. ^ Playback stops after the last file when Playback Pattern is set to Normal (see P.7-10). C To access linked information, see P.7-7. Change Settings Press N x A Select Settings A Press b A P.7-10 Edit See P.7-11 Frame Advance While paused, press A (Long Press) Toggle Display Size Press 2 or h (see P.
Playback Settings Display Size Change playback size Available for My Videos files only.
Editing Video HQVGA (W 240 x H 176 dots) or larger video cannot be edited. Select Two Points Crop Delete Before Delete After Save portion after selected point as a new file Save portion before selected point as a new file Add subtitle text to video Note H ^ Some files may not be edited. ^ Edited video may not play properly if Memory Card is not formatted for 812SH or 813SH. ^ To save to Memory Card, a maximum of 1.2 MB of free memory is required in addition to the file size.
Cropping Video Clips Delete the portion before or after the selected point to save the rest as a new file. Follow these steps after Step 4 on P.7-9. 7 Media Player 1 2 3 4 5 6 While playing or paused, press N x Select Edit and press b Choose Yes and press b ^ Incoming transmissions are blocked during editing. Select Crop and press b Select Delete Before or Delete After and press b Video plays. ^ To adjust start point, press b to start/pause video.
8 9 Press N E at the end point Display Settings Edit Subtitle menu opens. ^ If video has ended before pressing N E, start over from Step 7. C To edit text, select Edit Text A Press b A Edit text A Press b Change display settings (see right) and add effects (see P.7-14) Follow these steps in Step 9 on the left. Duration Set timing and time period for subtitles Select Duration A Press b A Press N U at the start point A Press N E at the end point C When finished, perform from Step 10 on the left.
Scrolling Select a direction and visual effect for subtitle scroll KDirection: Stop, Effect: Frame In Scroll Direction Select Advanced A Press b A Select Scrolling A Press b A Select Direction A Press b A Select Stop, Left to Right or Right to Left A Press b C When finished, press i A Press i A Perform from Step 10 on P.
Managing Video & Music Files C When finished, press i A Perform from Step 10 on P.7-13 Blink Set subtitles to flash C When finished, press i A Perform from Step 10 on P.7-13 Reset Reset Advanced subtitle settings Select Advanced A Press b A Press N l A Choose Yes A Press b ^ Reset does not affect Duration setting.
Adding New Playlist Adding Files to Playlists Create up to 99 Playlists in My Videos, My Music and SD AUDIO each. ^ Playlists cannot be added into SD VIDEO. ^ Playlist 1 to Playlist 3 (or プレイリスト1 to プレイリスト3) are saved in My Videos and My Music by default.
6 Select a Playlist and press b File is added to the end of the Playlist.
Managing Files (Data Folder) 8-1
Data Folder Window Description Handset files are organised in folders by file format. Still Images Data Folder Pictures Downloaded Pictograms DCIM My Pictograms 8 Shortcut to S! Applications (see P.16-2) Ring Songs • Tones Managing Files (Data Folder) Downloaded E-Books, etc.
CVideo Files File List In Data Folder, select a folder and press b. File list appears. Download Icon Icon S MPEG-4 (.3gp) 3GPP video image U MPEG-4 or H.263 (.3gp or .mp4) 3GPP video image Icon Thumbnails Pictures CStill Image & Animation Files Format & Extension Description JPEG (.jpg) JPEG image PNG (.png) PNG image R E-Animation (NEVA files) (.nva) Animation (may include sound) W SVG (.svgz) SVG-T file Format & Extension Description H SMAF (.
Sorting Files Display Settings Sort files by name, date, size, type or Content Key status. Select Unsorted to list files randomly. Switching File List View Main Menu H Data Folder 8 Managing Files (Data Folder) Inline Grid Preview Main Menu H Data Folder 1 2 Select a folder and press b 3 4 5 Select Manage Items and press b Press N x ^ Select a folder other than My Pictograms, Ring Songs·Tones, S! Appli, Music, Lifestyle-appli, Flash# or Flash# Ringtones.
Opening Files Note H Remote control on LCD Remote/Mic (optional accessory) is disabled for Music Player activated via Data Folder. Main Menu H Data Folder 1 3 C Open file list in Pictures, DCIM or Videos folder and follow these steps. File list appears.
Slide Show Properties Main Menu H Data Folder 1 Select Pictures or DCIM and press b 2 3 Select a file and press N x 8 Managing Files (Data Folder) 4 C To open a created sub folder or a sub folder in DCIM, select it A Press b Select Slide Show and press b Slide Show starts. ^ All images in the folder appear sequentially. ^ When Speed is set to Manual, press b or q to advance or reverse frames. Press b to stop Setting Interval C Follow these steps after Step 3.
SVG Files C Handset supports Scalable Vector Graphics-Tiny (SVG-T). Follow these steps to view graphics such as tables or maps. Press b A Select Data Folder A Press b A Select Other Documents A Press b A Select an SVG file A Press b ^ Press N x to use the following functions.
Managing Files & Folders Adding Folders ^ Assign different names to folders within a layer. ^ Folders cannot be added to DCIM, S! Appli or Lifestyle-appli folder. Main Menu H Data Folder 8 Managing Files (Data Folder) 1 2 3 4 5 Select a folder and press b Press N x Select Manage Items and press b Select Create Folder and press b Enter name and press b Changing File/Folder Name ^ File extensions do not change. ^ Assign different names to files/folders within a layer. B Single-byte Symbols 5, /, :, ;, .
3 4 Select Delete or Delete All and press b C For deleting folders or Delete All, enter Handset Code A Press b Choose Yes and press b 3 4 Select Copy or Move and press b 5 Select Copy here.. or Move here.. and press b Copying/Moving Files Copy or move files to the corresponding folder on Memory Card or to created sub folders within the folder (handset or Memory Card).
Using Files Use Data Folder files as Wallpaper, Phone Book Picture, ringtone and ringvideo. ^ Set as Wallpaper, Add to Ph.Book, Set as Ring Video and Set as Ringtone appear only for compatible files. ^ Some files may not be used depending on the size. 8 Managing Files (Data Folder) 8-10 Note H Some copy protected files (a or b) cannot be used even if Set as Wallpaper, Add to Ph.Book, Set as Ring Video or Set as Ringtone appears.
Ringtone Main Menu H Data Folder 1 Select Ring Songs·Tones, Music or Flash#Ringtones and press b 2 3 Select a file and press N x Select Set as Ringtone and press b S! Mail Attachments Printing Images Connect handset to a printer via Bluetooth# and print JPEG/ PNG images. ^ Use a Bluetooth#-compatible printer. ^ Activate Bluetooth# on the printer.
Editing Still Images Changing Image Size Resize Pictures folder images for Wallpaper, Alarm, etc. ^ Alternatively, crop image for size or zoom in/out on portions. (File size changes when images are resized.) ^ Picture Editor appears only for compatible files. 3 4 5 6 7 Resize to Preset Size 8 Managing Files (Data Folder) Select from To Wallpaper to Alarm and press b A rectangle appears on the image (except for To Wallpaper and Power On/Off).
7 8 9 Select Save as New and press b C To overwrite, select Overwrite A Press b Enter name and press b Select a location and press b Image is saved to Data Folder as a new entry. Visual Effects (Retouch) Dress up images with pre-loaded visual effects.
Adding Text & Stamps Picture Editor appears only for compatible files. H Data Folder A Pictures A Select a file A Options Main Menu (N) A Edit A Picture Editor 1 C To enter the date, select Date A Press b A Skip ahead to Step 2 8 3 Enter text and press b Managing Files (Data Folder) ^ Enter up to 16 characters. ^ Apply to JPEG and PNG images. ^ Face Arrange may not fit all images. Adjust position and size as required (see P.8-15). ^ Picture Editor appears only for compatible files.
2 3 4 5 6 Press b Press M q 3 Set the face line Select Save as New and press b C To overwrite, select Overwrite A Press b b b Enter name and press b Select a location and press b Image is saved to Data Folder as a new entry. Use G to move + to the lower right corner Adjusting Face Arrange Position Change the default positions and sizes of targets to fit the image. Changes apply to the current image only. 1 In Step 1 under "Face Arrange" on P.
Additional Picture Effects Rotate Picture Editor appears only for compatible files. Main Menu Frame Add Frame to JPEG and PNG images H Data Folder A Pictures A Select a file A Main Menu Options (N) A Edit A Picture Editor A Frame 8 Select a frame A Press b A Press b A Press M q A Select Save as New A Press b A Enter name A Press b A Select a location A Press b Managing Files (Data Folder) C To change the frame, press i before assigning it.
Main Menu Cancelling Effects C Before saving/adding an effect, select Undo A Press b B To restore effect immediately after cancelling, select Redo A Press b Panorama Images Combine two still images into one.
4 Split Screen Combine up to four reduced images into one. ^ Apply to JPEG and PNG images. ^ Make sure there is enough free memory. ^ Images are placed in the upper left, upper right, lower left and lower right in numerical order. Split Image 8 Managing Files (Data Folder) 8-18 Main Menu 1 H Data Folder A Pictures A Select a file A Options (N) A Edit A Composite Select SplitPicture 240x320 or SplitPicture 120x160 and press b Upper left image is set.
Additional Settings 9-1
Mode Settings Any Key Answer Activate Normal, Manner, Drive or Original mode to change multiple handset settings at one time; each mode offers a basket of defaults tailored to a particular usage pattern.
Display Restoring Custom Screen Wallpaper Display Settings Wallpaper Use Wallpaper to show an image in Standby KFlash PANTONE H Settings A Phone Settings (F) A Display A Main Menu Wallpaper Preset Pictures Select Preset Pictures A Press b A Select an image A Press b Select Pictures, DCIM, Flash# or Other Documents A Press b A Select an image A Press b C To use files in DCIM folder, select DCIM A Press b A Select a folder A Press b A Select an image A Press b A Select Centred, Full Screen or Fit Image A
Incoming Calls/Alarm Select from Voice Call to Alarm A Press b A Select from Pattern 1 to Pattern 3, Pictures, DCIM, Flash#, Other Documents or Custom Screen A Press b C For Pictures, Flash# or Other Documents, select an image A Press b A Press b C For DCIM, select a folder A Press b A Select an image A Press b A Press b ^ If a rectangle appears for images in Pictures, DCIM or Other Documents, use G to specify display area and press b. ^ Custom Screen is selectable when compatible Custom Screen is active.
Clock/ Calendar Show Operator Name Select Clock/Calendar type/view Show or hide the name of your service provider (SoftBank, etc.
Standby Window (Japanese Only) CWindow Description (Communication Mode) My Status Access shortcut icons, view Live Monitor news (see P.15-14) or monitor Hot Status members (see P.19-4) in Standby; open Standby Window in Shortcut, Headline, Communication or Calendar mode. Circle Talk Availability Mail Availability Call Availability Icon CWindow Description (Shortcut Mode) Icon Panel Shortcut Area ^ Save up to six shortcuts/Bookmarks.
Tip H For more about icons and information in Headline/ Communication mode, see P.15-14 or P.19-4. Toggle Modes C Press M. Customising Shortcut Mode Follow these steps after opening Standby Window in Shortcut mode (see P.9-6).
Change Icon Change member icons Select an icon A Press N x A Select Icon Panel Display A Press b A Select Change Icon A Press b A Select an icon A Press b Add News Content Add Live Monitor items; corresponding titles appear in News area Press N x A Select Icon Panel Display A Press b A Select Add News Content A Press b A Perform from Step 1 in "Live Monitor List" on P.15-15 or in "S! Loop List" on P.
Move Custom Screens Change member order Select a member A Press N x A Select Member Panel Settings A Press b A Select Move A Press b A Select a member to move A Press N (Up) or M (Down) A Press b Delete Hide members Select a member A Press N x A Select Member Panel Settings A Press b A Select Delete A Press b A Choose Yes A Press b Change Icon Change member icons Language Setting Language Switch handset interface between Japanese and English KAutomatic Main Menu H Settings A Phone Settings (F) A 言語
Main Menu H Data Folder A Custom Screens 1 2 Select Download Custom Screens and press b Handset connects to the Internet and カスタモ appears. C To read introduction to カスタモ first, select カスタモご紹介 A Press b A Press b A Choose Yes A Press b 2 ^ Select one with b. 3 Select Activate and press b 4 Press N i Download a Custom Screen ^ Read through information on the site. ^ On PCs, download Custom Screens to the following Memory Card directory. Do not change file name, extension, etc.
Delete Delete Custom Screen and Custom Screen Key Main Menu H Data Folder A Custom Screens Select a Custom Screen A Press N x A Select Delete A Press b A Choose Yes A Press b C To delete the corresponding Custom Screen Key at the same time, choose Yes A Press b B To cancel, choose No A Press b ^ Custom Screen Keys cannot be deleted independently. ^ Delete カスタモご紹介 as needed.
Familiar Usability Download and install applications that load user interface themes based on previous SoftBank or other handsets. Note H Familiar Usability does not completely remake handset. Downloading Familiar Usability Download Familiar Usability applications via the Internet. Main Menu H Data Folder A Custom Screens 9 Additional Settings 9-12 1 Select Download Familiar Usability and press b Handset connects to the Internet and Familiar Usability download site appears.
Light Settings Backlight External Display Settings Select Display and Keypad Backlight illumination time or Display Brightness Duration Select active time for External Display KTime Out: 15 seconds, Brightness: Level 2 H Settings A Phone Settings (F) A Display A Main Menu Backlight K5 seconds H Settings A Phone Settings (F) A Display A Main Menu External Display A Duration Select time A Press b Backlight Illumination Time Select Time Out A Press b A Select time A Press b C To disable External Dis
Caller Display Show or hide caller's number or name on External Display Ringtone/ videos KOn H Settings A Phone Settings (F) A Display A Main Menu External Display A Caller Display Choose On (show) or Off A Press b Sounds & Alerts Customising Handset Responses 9 Additional Settings Volume Main Menu Set volume level for handset functions H Settings A Phone Settings (F) A Sounds & Alerts A Volume Select an item A Press b A Use G to adjust level A Press b ^ Select from five levels.
Duration (Not Available for Calls or Circle Talk) Select an item other than For Voice Call, For Video Call or Circle Talk A Press b A Select Duration A Press b A Enter time (01 - 99 seconds) A Press b Restoring Custom Screen Ringtone/Ringvideo C When ringtone/ringvideo is set while Custom Screen is active, ringtone/ringvideo takes priority over Custom Screen ringtone/ringvideo. (Custom Screen remains active.) To restore Custom Screen ringtone/ringvideo, select Custom Screen instead of Preset Sounds, etc.
Event Light Set Small Light illumination for incoming communications KOn (Live Monitor: Off) H Settings A Phone Settings (F) A Sounds & Main Menu Alerts A Event Light Activating/Deactivating Select an item A Press b A Select On, Link to Sound or Off A Press b ^ Select Link to Sound to allow compatible SMAF files to control Small Light. For other SMAF files, Small Light flashes to the main melody.
Other System Sounds Select tones for errors, power on/off, handset open/close, or charging completion; set duration KWarning Tone: Sound Effect 11 (0.
Date & Time Set Time Zone/ Daylight Saving Change Time Zone or activate Daylight Saving KTime Zone: Tokyo, Daylight Saving: Off See indicated pages for these items. World Clock See P.12-14 Alarm See P.
Calendar Format Select whether to start the week on Sunday or Monday Edit/Delete KSunday-Saturday H Settings A Phone Settings (F) A Date & Time Main Menu A Calendar Format Select Sunday-Saturday or Monday-Sunday A Press b User Dictionary Entries (Japanese Only) ^ Save up to 100 entries. ^ Save up to five words/phrases per reading.
Cancel Main Menu Cancel dictionary H Settings A Phone Settings (F) A User Dictionary A Acquire Dictionary Select a dictionary A Press N x A Select Cancel A Press b Info Main Menu 9 Additional Settings 9-20 View dictionary information H Settings A Phone Settings (F) A User Dictionary A Acquire Dictionary Select a dictionary A Press N x A Select Info A Press b C Press b to return.
Note H ^ Identification accuracy is not guaranteed. SoftBank cannot be held liable for misuse or any damages associated with the use of Face Recognition. ^ Handset Code is required to activate/cancel Face Recognition. Changing the code (see P.9-28) helps enhance security. ^ S! FeliCa is available even when Face Recognition is active. Saving User Information Save a name and portrait as well as a question and an answer to the question. In case recognition fails, enter the answer to unlock handset.
2 3 9 4 5 Select from Image 1 to Image 5 and press N l C To overwrite saved portrait, choose Yes A Press b C To delete portraits, select one A Press M . A Choose Yes A Press b B Deleting all portraits cancels Face Recognition. Frame your face on Display and press b ^ Stay still until shooting is completed. ^ If Cannot Register. Please change the shooting condition. appears, start over from Step 2. Press N i Portrait is saved. Choose Yes and press b Additional Settings Face Recognition is activated.
When Face Recognition Fails C Under Pwd Key Lock. appears. Follow these steps to unlock handset. Face Recognition Settings Conductor Setting Show or hide operational tips during recognition Press b A Enter Handset Code A Press b ^ To retry Face Recognition, press N k. C When saved question appears, press b, enter the answer and press b. ^ If the answer is incorrect, Collate failure. appears. Press b to re-enter the answer, or follow these steps to unlock handset.
Security Level PIN Select accuracy level KNormal H Settings A Phone Settings (F) A Locks A Face Main Menu Recognition A Security Level For more information on PIN, see P.1-6.
Change PIN Activating Lock when Handset is Turned On Change PIN1 or PIN2 CActivate PIN Entry first. Main Menu H Settings A Phone Settings (F) A Locks PIN1 Select PIN Entry A Press b A Select Change PIN A Press b A Enter current PIN1 A Press b A Enter new PIN1 A Press b A Re-enter new PIN1 A Press b Cancelling Choose Off A Press b A Enter Handset Code A Press b Tip H Password Lock remains active even if handset power is deactivated, then reactivated.
IP Service Setting Enable or disable Hot Status and Circle Talk Fixed Dialling No.
Packet Lock Opening Secret Entries Disable packet transmissions KOff H Settings A Phone Settings (F) A Locks A Main Menu Restrict Modes A Packet Lock Choose On A Press b A Choose Yes A Press b A Enter PIN2 A Press b C To cancel, choose Off A Press b A Enter PIN2 A Press b Note H This function is available only for compatible USIM Cards. Activate Show Secret Data to open Secret entries.
Changing Handset Code Chng Handset Code Reset All Whenever necessary, change Handset Code K9999 H Settings A Phone Settings (F) A Locks A Chng Main Menu Handset Code Enter current Handset Code A Press b A Enter new Handset Code A Press b A Re-enter new Handset Code A Press b 9 Additional Settings Reset Reset Settings Main Menu Cancel custom settings and return handset functions to their default settings H Settings A Phone Settings (F) A Master Reset A Reset Settings Enter Handset Code A Press b A C
Call Settings Auto Add Code Add a preset country code automatically when placing calls KOff/Country Code: 81 (Japan) See indicated pages for these items. Voicemail/Divert See P.13-4, P.13-2 Show My Number See P.13-10 Call Waiting See P.13-5 Call Barring See P.
Auto Answer Answer Time Set handset to answer Voice Calls automatically when using Headphones or handsfree devices. When Auto Answer is active, Auto Answer tone sounds after ringtone (even in Manner mode). ^ To avoid unintentional activation, cancel Auto Answer after use. ^ Handsfree device Auto Answer tone varies by device.
Connectivity 10-1
Bluetooth# Precautions Getting Started Bluetooth# is a wireless technology that allows 812SH and 813SH to communicate with other 812SH and 813SH within ten metres or with other compatible devices (PCs, mobile phones, handsfree devices, etc.). In this chapter, "files" refers collectively to the following: Bookmarks, Tasks, Text Templates, Phone Book and Calendar entries; Messaging and Data Folder files. ^ Bluetooth# connections are available with compatible devices supporting the same profile.
Bluetooth# Connection Device Search & Pairing Activate Bluetooth# (see P.10-2) on recipient device. Connection starts when a request is received from the other device. (Authorisation Code may be required.) CExample Sender Recipient Search for devices Search for Bluetooth# devices for pairing. ^ Authorisation Codes are not necessary for paired devices. ^ Search for up to 16 devices at a time. ^ Device search is disabled if 32 devices are already registered.
Pairing with Handsfree Devices C Start device search with handsfree devices for pairing. Handset receives a connection request A Choose Yes A Press b A Enter Authorisation Code A Press b ^ Activate Bluetooth# (see P.10-2) on handset and set Visibility (see below) to Show My Phone. Opening Paired Device List Transferring Files via Bluetooth# Transfer Options One File Transfer Transfer files one at a time. Received files are saved to corresponding functions.
Function Calendar Tasks Notes Available Available1 One File Transfer resets Reminder Tone/Video to Alert 1 and omits Secret setting. Received entries with unsetable start date/time (0:00 AM on 1 January 2016 or later) cannot be saved. Available Available1 One File Transfer resets Reminder Tone/Video to Alert 1 and omits Secret setting. Received entries with unsetable due date/time (0:00 AM on 1 January 2016 or later) are saved as No limit.
One File Transfer CSending Send one file from Phone Book, Calendar, Tasks, Bookmarks, Templates or Data Folder (see P.10-4 "Transferable Files"). 10 Connectivity 10-6 1 2 Select a file and press N x 3 Select Via Bluetooth and press b 4 5 6 Select Send, Send Entry or Send My Card and press b ^ When there is no entry in Paired Devices, device search starts.
All File Transfer 2 CSending C To accept connection request from unpaired devices, choose Yes A Press b A Enter Authorisation Code A Press b Main Menu H Settings A Connectivity (F) A Bluetooth 1 ^ When there is no entry in Paired Devices, device search starts. C To send files to unpaired devices, select More Devices A Press b A Press N , A Device search starts Select a device and press b C When transmission is in progress, choose Yes A Press b Choose Yes and press b Offline Mode is set.
Receiving Folders Receive folders from compatible devices and save to handset Data Folder. ^ Handset does not support sending folders. ^ Handset receives folders when it can newly create a folder, or the same folder name exists in the same layer as that of sender's. ^ For sender's procedures, see the device manual. Main Menu 10 Connectivity 10-8 1 2 H Settings A Connectivity (F) A Bluetooth A Switch On/Off Choose On and press b Bluetooth# is activated.
Note H ^ While talking on handsfree devices, adjust volume on the device. ^ Place calls from handsfree devices while handset is in Standby. Tip H ^ Devices marked with P reconnect to handset when placing or receiving calls. ^ O indicates that the device is not selected. When O is set to the connected device, a confirmation appears.
Infrared Getting Started Infrared is a wireless technology that allows 812SH and 813SH to communicate with other 812SH and 813SH or with other compatible devices (PCs, mobile phones, etc.). In this chapter, "files" refers collectively to the following: Bookmarks, Tasks, Text Templates, Phone Book and Calendar entries; Messaging and Data Folder files. 10 Connectivity ^ 812SH and 813SH comply with IrMC 1.1, but some files may not be exchanged.
Note H ^ Transfers are disabled while using the Internet or Media Player, while editing mail or files, etc. ^ Some files may not be saved in whole or part. ^ Only compatible devices receive files transferred via high-speed infrared. Function Text Templates Phone Book Tasks 1 Notes One File Transfer omits Category, Tone/Video, Available Available Vibration and Secret. Picture may be omitted; transfer image alone then reset as Picture.
10 Connectivity 10-12 Note H ^ Handset stores up to 300 entries between Calendar and Tasks. If the limit is reached during a transfer, the remaining entries will not be received. ^ Transfer most Memory Card Data Folder files one at a time. Send DCIM folder files one by one; received DCIM files are automatically saved in Pictures folder. ^ Unsent Messages are not transferable. ^ Messages may not be received depending on the size. ^ Large Bookmarks may not be received correctly.
4 Transfer starts and confirmation appears 5 Choose Yes and press b to save C Press M 3 to cancel. C Press g to end. C To cancel transfer, choose No A Press b A Choose Yes A Press b C For Data Folder files, select Phone or Memory Card A Press b B Files are automatically saved to handset or Memory Card depending on available memory. All File Transfer CSending Main Menu H Settings A Connectivity (F) A Infrared 1 2 3 4 5 Select Send All and press b Choose Yes and press b Offline Mode is set.
Overwriting Existing Files 1 Select Delete All & Save and press b 2 Choose Yes and press b 3 Enter Handset Code and press b When transfer completes, handset returns to Standby. ^ When Phone Book is overwritten, My Details except handset phone number is overwritten as well. C Press M 3 to cancel. C Press g to end. Receiving Folders Receive folders from compatible devices and save to handset Data Folder. 10 Connectivity ^ Handset does not support sending folders.
Adding Network to the End Press b A Select Add to End A Press b A Select a Network A Press b Deleting Network Select a Network A Press b A Select Delete A Press b Add, Edit & Delete Add, edit or delete Networks H Settings A Network Settings (F) A Select Main Menu Network A Add New Network Network Info Check Network Information Main Menu H Settings A Network Settings (F) Select Network Info A Press b Retrieve NW Info Retrieve Network Information manually Main Menu H Settings A Network Settings (F)
Datum On/Off Select whether to send Location Information automatically upon request KOn H Settings A Network Settings (F) A Location Info Main Menu A Datum On/Off Choose On (send) or Off A Enter Handset Code A Press b Location Property Set Location Information confirmation parameters KAlways Confirm H Settings A Network Settings (F) A Location Info Main Menu A Location Property 10 Connectivity 10-16 Select Always Confirm, Send or Do not Send A Press b A Enter Handset Code A Press b
Memory Card 11-1
Memory Card 812SH and 813SH are compatible with microSD! Memory Card. ^ Format a new microSD! Memory Card for use with handset (see P.11-4). ^ To learn how to save a particular file to Memory Card, refer to that section of the manual. Keep Memory Card out of children's reach; may cause suffocation if swallowed. 11 Memory Card 11-2 Note H ^ SoftBank is not liable for any damages resulting from accidental loss/alteration of information. Keep a copy of Phone Book entries, etc. in a separate place.
Removing Inserting & Removing Memory Card Turn handset power off. Inserting 1 Turn handset power off. 1 2 Open cover ^ With a light push, card pops out. 2 Remove card 3 Close cover With logo side down, insert card until it clicks. Close cover ^ Using the notch on its edge, pull card straight out.
Note H ^ Do not force Memory Card into or out of handset; damage may result. ^ When s appears, Memory Card may not be connected properly; reinsert the card. ^ Do not insert other objects into Memory Card slot; may damage handset/card. ^ Never remove Memory Card or battery while files are being accessed. Damage to handset/card may result and files/data may be damaged/lost. Tip H Insert a Memory Card and turn handset power on. Standby appears.
Tip H Copy handset entries as backups, share information between microSD! Memory Card-compatible handsets, or transfer entries to a newly purchased handset. Precautions 11 Memory Card ^ Backup/Restore is not available when battery is low or while handset is in use. ^ Transmissions are blocked during Backup or Restore. ^ When restoring data from Memory Card, select an item; when prompted, delete corresponding data on handset to proceed. ^ Some items may not be transferable.
^ Observe the following when transferring data backed up on other SoftBank handsets to handset. B Messages may not transfer depending on the size. B Handset stores up to 500 messages between Drafts, Unsent Messages and Sent Messages. If the limit is reached during a transfer, the remaining messages will not be received. B Sky Mail may transfer as S! Mail depending on the SoftBank handset used for backup. ^ Observe the following when transferring data backed up on handset to other SoftBank handsets.
Additional Functions Memory Status Check Memory Card memory status Main Menu H Data Folder A Memory Status Select Memory Card A Press b ^ A portion of Memory Card is reserved for storing copyright information, etc. SD Local Open HTML files on Memory Card to access Contents Internet sites B Available only when HTML files are saved on Memory Card.
4 5 11 Repeat Steps 2 - 3 for other images Index Print KOff H Settings A Connectivity (F) A Memory Card A Main Menu DPOF A Settings A Index Print Note H ^ DPOF settings made on other devices are unusable; delete existing settings to create new ones on handset. ^ Some settings may not be supported depending on the printer or printing services. ^ Process may take a while if print settings are made for many images. ^ If image files are deleted or renamed on PCs or other devices, print settings change.
Mass Storage Activate Mass Storage and connect handset to a PC via USB Cable to access Memory Card from the PC without removing the card from handset. ^ Activating Mass Storage activates Offline Mode. ^ Mass Storage is not available when battery is low, when an S! Application is paused or while Music Player is active. Main Menu H Settings A Connectivity (F) Select Mass Storage and press b Calling not available during operation, OK? appears.
Tools 12-1
Calendar Key 6 8 E F Opening Calendar ^ Open Calendar in Month View, 2Month View or Week View. ^ Calendar appears in Month View by default. Main Menu H Tools A Tools 1 (F) 1 12 Set to open Calendar in Month View, 2Month View or Week View KMonth View Calendar of the current month opens. C If Clock is unset, use F to select a Time Zone A Press b A Enter date/time A Press b C To open Help (Key Assignments), press N x A Select Help A Press b B Press b to return.
Set Holiday Remove/restore preset holidays or save additional holidays Stamp Create new entry quickly by entering a stamp CAvailable in Month View.
Saving Entries Organise daily, weekly, monthly and yearly schedule. Save up to 300 entries between Calendar and Tasks (see P.12-8). Main Menu H Tools A Tools 1 (F) A Calendar 12 Tools 1 2 3 4 Select a day and press b 5 6 7 8 Select End: and press b Select and press b Enter subject and press b ^ Enter up to 32 characters. Subject is mandatory. Enter start date/time and press b ^ For all-day entries, enter date and press N (press again to cancel), then press b and skip ahead to Step 7.
At Reminder Time Reminder is activated, sounding/vibrating, etc. according to related settings. Image appears if System Graphics is set (see P.9-3). However, video and SMAF file images take priority over System Graphics. Calendar Options Follow these steps after Step 12 on P.12-4. After each setting, New Entry window returns. Complete other settings. Assign Tone/Video Set a tone/video to sound/play at Reminder Time KAlert 1 Stopping Reminder C Press M C, g, i or h.
Repeat Assign schedule type (once only, daily, weekly, monthly or yearly) for each event 2 Select an entry and press b 3 Press i to return KOnce Only Once Only Schedule Select Repeat: A Press b A Select Once Only A Press b C To send the entry via S! Mail, press N x A Select Send A Press b A Select As Message A Press b A Complete and send message (Perform from Step 3 on P.14-7.
Editing Entries Main Menu H Tools A Tools 1 (F) A Calendar 1 2 3 4 5 Select a date and press b Select an entry and press N x Select Edit and press b Select an item and press b ^ For details, see procedure for saving entries.
Deleting Repetitive Entries C A confirmation appears except for All Appointments. To delete, follow these steps. 5 6 Choose Yes A Press b Save event with deadlines. ^ Check completed tasks (see P.12-10). ^ Save up to 300 entries between Tasks and Calendar (see P.12-4). Saving Entries 12 Tools 12-8 Select from At Due Time to 1 hour before and press b C For custom Reminder Time, select Other A Press b A Enter date/time A Press b C To set tone/video and duration, see P.12-9.
Data Folder Files Stopping Reminder Select Reminder: A Press b A Select Assign Tone/ Video: A Press b A Select Ring Songs·Tones, Music, Videos or Flash#Ringtones A Press b A Select a file A Press b A Press M K C Press M C, g, i or h. Opening Entries C While Reminder is activated, press b. Tip H ^ If Reminder Time arrives during a call or while recording video, Reminder will not be announced. End the call or exit mobile camera to reactivate Reminder. ^ Active Reminder stops for incoming calls.
Alarm Settings 3 C Select Alarm Volume setting. In Task list, select an entry A Press N x A Select Alarm Settings A Press b A Select Alarm Volume: A Press b A Use G to adjust level A Press b Completed Tasks C To mark completed, follow these steps after Step 1 on the left. Select an unchecked entry (O) A Press b A Press b B To cancel checks, select a checked entry (P) A Press b A Press b C Select Vibration setting.
Editing Entries Main Menu H Tools A Tools 1 (F) A Tasks 1 2 3 4 Select an entry and press N x Select Edit and press b Select an item and press b ^ For details, see procedure for saving entries. When finished editing, press M q Deleting Entries Delete Delete one entry Main Menu H Tools A Tools 1 (F) A Tasks All Tasks/ All Comp.
5 6 Press M q Alarm is set. ^ For more settings, start over from Step 1 in "Setting Alarm" on P.12-11. Press g to exit Handset returns to Standby and e appears. For Manner Mode C Select Manner mode ringer setting. After Step 1 in "Setting Alarm" on P.12-11, select Settings A Press b A Select For Manner Mode A Press b A Select Ring or Do not Ring A Press b B For Ring, choose Yes A Press b For World Clock C Set Alarm for World Clock (see P.
Alarm Options Snooze Follow these steps after Step 2 in "Setting Alarm" on P.12-11. After each setting, Alarm settings window returns. Complete other settings.
Cancelling & Reactivating Alarm Switch Off Cancel Alarm and retain the settings Main Menu H Tools A Tools 1 (F) A Alarms Select an entry A Press N x A Select Switch Off A Press b ^ e disappears. ^ Reactivate Alarm to use the same settings.
Opening World Clock Main Menu H Tools A Tools 1 (F) 1 Select World Clock and press b Local date/time and the date/time of another area in the world appear. Tip H ^ To change local Time Zone, see P.9-18. ^ To set World Clock to appear in Standby, select World Clock (L), World Clock (S), World Clk+1mo. or World Clk+2mos. for Clock/Calendar (see P.9-5). 1 2 2 Calculator Use Calculator for basic arithmetic (up to 12 digits) and percentage calculation, or currency conversion (Money Converter).
Voice Recorder Recording Use Microphone to record short voice memos and save files on handset or Memory Card; record and save longer recordings on Memory Card.
Note H ^ Avoid shocks to handset; may cause noise or skipping. ^ Recording window may take longer to open as more Voice files are saved on Memory Card. Tip H ^ Alarm is disabled while recording, and starts after Voice Recorder stops/closes. ^ Attach saved Voice file or record voice directly from Mail Composition windows (see P.14-10). Playback Play sounds from Speaker, or use Headphones.
Document Viewer Open documents via Data Folder, Internet, S! Mail, Bluetooth# or infrared. ^ Supported File Formats: B PDF (.pdf) B Microsoft Excel (.xls) B Microsoft Word (.doc) B Microsoft PowerPoint (.ppt) ^ Some files may take time to open or may not appear correctly. (Complicated designs, special characters in file names, password-protected, language other than Japanese or English used, etc.
Barcode Scan printed barcodes with mobile camera or download/ exchange QR Codes via the Internet, S! Mail, etc. Main Menu H Tools A Tools 3 (F) A Barcode A Scan Barcode 1 ^ Slide Portrait/Macro Selector to Macro (o). ^ Hold handset approximately 10 cm away from barcode. C Use F to adjust brightness. C To activate or cancel Continuous mode, press N x A Select Continuous Scan A Press b A Choose On or Off A Press b C To open Help (Key Assignments), press 0. B Press b to return.
Continuous Mode C After scanning, Scan completed. Scan new? appears. ^ To scan next code, choose Yes A Press b A Frame the code on Display A Press b ^ To cancel, choose No A Press b A Scan results appear Split Data C After scanning, Split data. Scan next symbol? appears. ^ To scan next code, choose Yes A Press b A Frame the code on Display A Press b ^ To cancel, choose No A Press b A Choose Yes A Press b C Scan results do not appear until all split data is scanned.
Copy Text Text Press N x A Select Copy A Press b A Select the first character of text A Press b A Select the end point A Press b URL5 Select a URL starting with http:// or rtsp:// A Press N x A Select Copy URL A Press b Mail Address3 Select a mail address including @ A Press N x A Select Copy Address A Press b Phone Number1 Select a number starting with TEL:2 A Press N x A Select Copy Telephone A Press b Wallpaper Select an image A Press N x A Select As Wallpaper A Press b A Press b B For images s
Note H ^ Resized QR Codes may be invalid. ^ When invalid, This data may be incorrect. appears. Scanned Results Main Menu Open files saved in Scanned Results H Tools A Tools 3 (F) A Barcode A Scanned Results Select a file A Press b C To open properties, select a file A Press N x A Select Details A Press b B Press b to return. C To delete files, select one A Press N x A Select Delete A Press b A Choose Yes A Press b ^ Opened results cannot be re-saved. ^ Some files such as large images may not open.
Incoming Calls while Creating QR Code C Contents are temporarily saved. End the call to return. Main Menu H Tools A Tools 3 (F) A Barcode A Scan Text 1 Text Scanner Scan text (URLs, mail addresses, phone numbers or roman letters) with mobile camera. ^ Scan up to 256 characters continuously. ^ Scan up to 60 single-byte characters within 3 lines. Scanning over 35 characters at one time may yield poor results. ^ Some symbols may not be read. ^ Text mode is set to Auto each time Text Scanner is activated.
4 5 Scan results appear Handset automatically registers scan results as a URL, Email Address, Phone Number or Text; if incorrect, change mode. ^ If text exceeds limit, results appear with overage truncated. C To change mode, press N x A Select Change Mode A Press b A Select a type A Press b (Scan results and alternatives list change accordingly.
3 To exit, press i then choose Yes and press b Tip H ^ Records are deleted when Stopwatch is cancelled. Save records to Text Templates. ^ Stopwatch setting is not affected by incoming calls. End the call to return. ^ Alarm is disabled while Stopwatch window is open, but is reactivated automatically when handset returns to Standby. Countdown Timer Set Countdown Timer up to 60 minutes in 1-second increments. Alarm Tone sounds and Small Light flashes when set time elapses.
Add New Expense Main Menu Enter monetary figure and categorise it H Tools A Tools 3 (F) A Expenses Memo A Add New Expense Enter amount A Press b A Select a category A Press b C Shortcut: In Standby, enter amount A Press D A Press b A Select a category A Press b ^ The entry date, category and figure are saved. ^ If Clock is unset, entry date and time will be saved as --/--/-- --:--.
Editing Templates Main Menu H Tools A Tools 3 (F) A Text Templates 1 2 3 Select a file and press N x Select Edit and press b Edit text and press b Phone Help Learn when/how to use Keypad functions/shortcuts. Most Phone Help functions are inaccessible from menu items. Main Menu H Tools A Tools 3 (F) 1 File is overwritten. Select Phone Help and press b Phone Help window opens. Deleting Templates Handset Status and Key Press Method Delete single Text Templates.
Optional Services 13-1
Optional Services Overview ^ When P appears, access services from a touch-tone landline. ^ For details, contact SoftBank Customer Centre, General Information (see P.20-29). Optional Services 13 * 13-2 Call Forwarding When you know you won't be able to receive calls made to handset, automatically divert incoming calls to another phone number (see right) Voicemail Set handset to forward all or all unanswered calls to Voicemail Centre.
Incoming Calls while Call Forwarding is Active C To answer calls, press f while handset is ringing/vibrating. ^ When Always is set, handset does not ring/vibrate for calls. Cancel All Cancel Call Forwarding Main Menu H Settings A Call/Video Call (F) A Voicemail/Divert Select Cancel All A Press b A Choose Yes A Press b ^ Cancel All also cancels Voicemail.
Voicemail Optional Services 13 ^ Calls are diverted to Voicemail Centre via Call Forwarding function; Voicemail and Call Forwarding can only be set simultaneously when Call Forwarding is set to Video Calls. ^ Call Forwarding and Voicemail are not available when All Outgoing Calls or All Incoming Calls in Call Barring is active. ^ For details, contact SoftBank Customer Centre, General Information (see P.20-29). ^ Activate Missed Call Notification (see P.
Status Main Menu Check Voicemail status H Settings A Call/Video Call (F) A Voicemail/ Divert Select Status A Press b ^ Voicemail status appears. C Press b to return. Missed Call Notification Activate/Cancel Activate or cancel Missed Call Notification Main Menu H Settings A Call/Video Call (F) Select P Missed Calls A Press b A Press b ^ Follow the voice guidance for further operations after handset connects to the Network.
Tip H ^ Handset does not ring or vibrate for incoming calls while a line is engaged. A tone sounds from Earpiece. ^ When Voicemail or Call Forwarding is active, unanswered calls are transferred to Voicemail Centre or the forwarding number. When active service is set to Always Call Waiting is disabled. Closing Handset while Someone is on Hold C All lines are disconnected. Pressing g while Someone is on Hold C Active line ends and handset re-engages the party on hold.
Call Barring Restrict incoming/outgoing calls or SMS messages. Following restrictions are available: All Outgoing Calls Restrict all non-emergency calls Outgoing Bar Int'l Call1 Allow only domestic calls Calls Restrict all international calls Only Local & Home2 except to Japan 1 2 Reject all calls Reject calls when outside Japan Example: While in the UK, place domestic calls only. Example: While in the UK, place calls domestically or to Japan.
Restricting Outgoing Calls Set/Cancel Restriction Main Menu Set or cancel restriction of outgoing calls H Settings A Call/Video Call (F) A Call Barring A Outgoing Calls Each Restriction Select restriction A Press b A Choose On (set) or Off A Press b A Enter Network Password A Press b Cancelling All Restrictions Optional Services 13 Select Cancel All A Press b A Enter Network Password A Press b Tip H Emergency calls (110, etc.) are possible even when outgoing calls are restricted. See P.
Rejecting a Call Set Reject Number Main Menu Unknown Reject calls from numbers not saved in Phone Book KOff Designate phone numbers to reject H Settings A Call/Video Call (F) A Call Barring A Rejected Numbers A Black List A Set Reject Number H Settings A Call/Video Call (F) A Call Barring A Main Menu Rejected Numbers A Unknown Choose On (reject) or Off A Press b Adding Numbers Select A Press b A Enter a number A Press b Editing Numbers Select an entry A Press b A Edit the number A Press b D
Changing Network Password Change NW Password Main Menu Change Network Password H Settings A Call/Video Call (F) A Call Barring A Change NW Password Enter current Network Password A Press b A Enter new Network Password A Press b A Enter new Network Password again A Press b Optional Services 13 Caller ID Show or hide your own phone number when placing calls. Regardless of this setting, sending or blocking Caller ID can be selected for each call.
Messaging 14-1
Basics Use SMS and S! Mail for messaging. Create Arrange Mail or Feeling Mail from S! Mail. Messaging Folders Messages are organised in folders by type. Received Msg.1 Received messages SMS Exchange short text messages of up to 160 alphanumerics with SoftBank handsets. ^ Send SMS to up to 20 recipients at one time. Drafts Templates Sent Messages2 S! Mail Messaging 14 Exchange text messages of up to 30,000 characters with e-mail compatible SoftBank handsets, other mobiles and PCs, etc.
Memory Status C Press b A Select Messaging A Press b A Select Memory Status A Press b A Select Received Msg., Sent Total, Sent Msg., Drafts or Unsent Msg. A Press b B Press b to return. ^ Save up to 5 MB or 1,000 messages in Received Msg. folder. Handset stores up to 3 MB or 500 messages between Sent Messages, Drafts and Unsent Messages. ^ A notice appears when Messaging Folder memory is low. ^ Templates memory usage is reflected in memory status of Other Documents in Data Folder (see P.8-2).
Tip H ^ Follow these steps to sort messages. Press N x A Select View Settings A Press b A Select Sort A Press b A Select an option A Press b ^ To change message list view, see right. 2 ^ Message List View is Sender+Preview by default. Tip H ^ Alternatively, open a Messaging folder and follow these steps. Press N x A Select View Settings A Press b A Perform from Step 1 on the left Message Contents Select a message and press b to open it. ^ Shortcut: Open a Messaging folder and press h to toggle view.
Sending Text Messages Customising Handset Address Change alphanumerics before @ of the default handset mail address. Default OOOOOOOOOOO@softbank.ne.jp Custom Account Name ^ Create Contact Groups beforehand to send the same message to multiple recipients at one time (see P.4-12). ^ Save frequently used numbers/addresses to Speed Mail List (see P.14-33). ^ Use Multi Job (see P.1-26) to view other messages while creating a message. Basics Domain Name Entered Account Name @softbank.ne.
Character Entry Limits Character entry limit varies by Message Type. SMS 160 single-byte alphanumerics S! Mail Approximately 30,000 single-byte alphanumerics ^ For SMS, only single-byte alphanumeric entry is available when Char-code (see P.14-37) is GSM 7bit. ^ Send up to 300 KB including message text via S! Mail. Message text character limit differs by attachment size or number of recipients. ^ Approximate mail size appears in Mail Composition window (see right, P.14-7).
Converting SMS Mail to S! Mail C In SMS Mail Composition window, press N x A Select Change to S! Mail A Press b A Choose Yes A Press b ^ When entered message text exceeds SMS character limit, a confirmation appears. Choose Yes and press b to convert SMS to S! Mail and continue entering text. Creating & Sending S! Mail 1 2 Press b, select Messaging and press b ^ Alternatively, press N in Standby.
Direct Entry 1 Select Enter Number or Enter Address and press b 2 Enter recipient's SoftBank handset number or mail address and press b Messaging 14 14-8 5 Select subject field and press b 6 7 Enter subject and press b Subject entry window opens. Alternatively, enter the first character to open subject entry window. ^ Enter up to 512 single-byte alphanumerics. Select lText and press b then enter a message C Entering Characters: see P.
Sending from Phone Book Entries C Open a Phone Book entry and follow these steps. ^ Phone Numbers Select a number A Press b A Select Create Message A Press b A Select S! Mail or SMS A Press b A Perform from Step 5 on P.14-8 or on P.14-6 ^ Mail Addresses Select a mail address A Press b A Perform from Step 5 on P.14-8 When Recipient Handset is Off or Out-of-Range Delivery Failure C Information window opens (W appears) for delivery failure.
Attaching Files Attach images, sound files, vFiles (Phone Book/schedule entries), etc. to S! Mail messages. ^ Attach up to 20 files or 300 KB including message text. ^ Confirm compatibility with recipient handsets (file format, services, etc.) before sending files. ^ Follow these steps after Step 8 on P.14-8; after S! Mail Composition window returns, complete and send message.
Templates 1 Select Templates and press b 2 Select a file and press b Books 1 Select Books and press b 2 Select a file and press b Custom Screens 1 Select Custom Screens and press b 2 Select a file and press b Other Files 1 Select Other Documents and press b 2 Select a file and press b Creating Arrange Mail Select font colour, font size, background colour; insert images, background sound, and more. ^ Insert one sound or Flash# file per Arrange Mail. ^ Enter up to 40 types of My Pictograms per Arrange Mail.
3 Changing Font Colour 1 Select Font Colour: and press b 2 Select a colour and press b 3 Enter text ^ To open Arrange menu, press M.
Inserting Background Sound 1 Select Insert and press b 2 Select Insert BGM Sound and press b 3 Select Ring Songs·Tones or Music and press b 4 Select a file and press b Inserting Flash# (see P.8-7) File 1 Select Insert and press b 2 Select Insert Flash and press b Data Folder (Flash#) opens.
Aligning Text 1 Select Effect and press b 2 Select Alignment and press b 3 Select Alignment Left, Alignment Centre or Alignment Right and press b 4 Enter text C To align entered text, press N % A Select the start point A Press b A Select the end point A Press b A Select Effect A Press b A Select Alignment A Press b A Select Alignment Left, Alignment Centre or Alignment Right A Press b Messaging 14 Changing Background Colour 1 Select Background Colour: and press b 2 Select a colour and press b Cancelling
Creating Feeling Mail Apply Feeling Mail setting to S! Mail; corresponding Pictogram appears to the left of subject, and recipient handset responds according to Link to Feeling settings (see P.14-20). ^ Send Feeling Mail to compatible SoftBank handsets only. ^ Feeling Mail Pictograms appear as standard Pictograms in subjects on incompatible recipient handsets. ^ Follow these steps in Step 8 on P.14-8; after Mail Composition window returns, complete and send message.
S! Mail Delivery Options Reply To Settings Reply Request Designate a different mail address for receiving replies CAvailable when reply-to address is saved. KOff Press N x A Select Messaging Settings A Press b A Select Reply To Settings A Press b A Choose On or Off A Press b CAvailable when messaging to SoftBank handset numbers. KOff Press N x A Select Messaging Settings A Press b A Select Reply Request A Press b A Choose On or Off A Press b Forward NG C To set reply-to address, see P.
Editing Question/Answer Press N x A Select Messaging Settings A Press b A Select Quiz A Press b A Select Edit Question A Press b A Select Question A Press b A Enter a question A Press b A Select Answer A Press b A Enter the answer A Press b A Press N $ Set Auto Play File Show a comment and open/play an attached file automatically before message text is opened on recipient handsets CAvailable when messaging to SoftBank handset numbers. CFollow these steps after Step 9 on P.14-8.
Using Drafts 3 Saving to Drafts ^ When memory is full, delete messages (see P.14-29) before creating new ones. ^ Follow these steps after Step 6 on P.14-6 (for SMS) or Step 8 on P.14-8 (for S! Mail). 1 2 Press N x Select Save to Drafts and press b Message is saved to Drafts folder. Note H Recipient status (To/Cc/Bcc) or the order in which attachments appear may change when saving S! Mail messages.
3 Select a message and press b Message window opens. ^ To set 3D animation (see P.14-24 "3D Pictogram") to play for compatible messages, see P.14-24 "Display Effect". C To retrieve complete S! Mail messages, see P.14-21. C Using Messages: see P.14-23 Tip H ^ When no Delivery Notice or Information window appears, open from Received Msg. folder (see P.14-23 "Checking Messages"). ^ Handset does not respond to messages with Low Priority.
New Mail Out of Standby C A double beep sounds and a notice such as New Message from XX (name/number). appears. ^ To change/hide notice or mute double beep, see P.14-36 "Message Notice". C Information window opens when handset returns to Standby. When Handset Address is Changed C New handset address confirmation from SoftBank arrives. To update My Details automatically, follow these steps.
Ringtone Main Menu Select sound/video for incoming Feeling Mail; set duration H Messaging A Settings A General Settings A Link to Feeling A Ringtone Activating/Deactivating Select Switch On/Off A Press b A Choose On or Off A Press b Assign Tone/Video Select Assign Tone A Press b A Select Happy/ Glad, OK/Good, Sad/Sorry, NG/Bad or Important/ Notice A Press b A Select Preset Sounds, Ring Songs·Tones, Music, Videos or Flash#Ringtones A Press b A Select a tone or file A Press b Duration Retrieving Complet
Retrieving Mail List Retrieve a list of messages stored in Server Mail Box (Server Mail). Main Menu H Messaging 1 Messaging 14 2 3 4 Select Server Mail Box and press b C To open retrieved Mail List, select Mail List A Press b C To retrieve all Server Mail, select Retrieve All Mails A Press b (Omit the next steps.) C To delete all Server Mail, select Delete All Mails A Press b A Enter Handset Code A Press b A Select Except New Msg. or Delete All A Press b (Omit the next steps.
Using Messages Checking Messages To open Received Msg. folder while using another function, press N for 1+ seconds. Main Menu H Messaging 1 Select Received Msg., Drafts, Sent Messages or Unsent Messages and press b Select a message and press b ^ When an image is attached, press b to open it. Images may not appear if file size is too large. ^ When a question appears, press b and enter the correct answer to open the message. B Message cannot be opened until the correct answer is entered.
Copying Message Contents C After Step 2 on P.14-23, press N x A Select Copy A Press b A Select Address, Subject or Message Text A Press b B For Message Text or Subject, use G to select the first character of text A Press b A Use G to select the end point A Press b B Paste text in other windows (see P.3-13 "Copy/Cut & Paste"). Copied Arrange Mail messages pastes as text; My Pictograms, images, etc. paste as single-byte spaces. B Select a folder other than Drafts, Unsent Messages or Templates.
2 Select a message and press M @ 3 Repeat Step 2 as required P appears. C To uncheck, select a message with P A Press M r C To uncheck all, press N x A Select Unselect All A Press b Switch to Read/Unread Replying to Messages Main Menu H Messaging 1 2 Select Received Msg. and press b 3 4 Press N x Change received message status to read or unread. Main Menu H Messaging Select Received Msg.
Tip H ^ Select Reply All to send the same message to the sender and up to 19 recipients (To/Cc) of the original message at one time. Reply All may not appear for some messages. ^ For Reply All, your handset may be included in recipients. ^ Select SMS (History) or S! Mail (History) to quote the original message text when replying. Forwarding Messages Main Menu H Messaging Messaging 14 14-26 1 2 3 4 Select Received Msg.
Cancelling Sent Messages Send cancellation request to delete sent messages saved in recipient's received message folder. Subjects of cancellation requests are prefaced with Del:. ^ Available for S! Mail messages sent to compatible SoftBank handsets. ^ Sent messages may not be deleted if message text is short. ^ Protected sent messages cannot be deleted.
Accessing Internet Sites 1 Select a URL and press b 2 Choose Yes and press b Using Linked Info Use linked numbers, addresses or URLs (http://, https:// or rtsp://) within message text to place calls, send messages or access Internet sites. Available numbers/addresses/ URLs are selectable with E. Main Menu H Messaging 1 Select Received Msg.
Deleting Messages Protected messages cannot be deleted. Selecting Messages to Delete Deleting Server Mail C Select Received Msg. in Step 1 on the left and follow these steps. Select an S! Mail Notice (Q) A Press N x A Select Delete A Press b A Select Notification, Remote Delete or Notifi. and Remote A Press b A Choose Yes A Press b Main Menu H Messaging 1 Select Received Msg., Drafts, Sent Messages or Unsent Messages and press b ^ Some messages cannot be deleted.
Saving Attachments to Data Folder Save attached images, sounds, vFiles (Phone Book/ schedule entries, etc.) and other files to Data Folder. Main Menu H Messaging 1 Select Received Msg. or Sent Messages and press b Using Attachments Assign attached files as Wallpaper, ringtone or ringvideo directly from messages and save to Data Folder.
My Folders Organise received/sent messages into My Folders. Activate Folder View beforehand (see P.14-4). 3 Select Rename and press b 4 Enter name and press b Adding My Folders Select Received Msg. or Sent Messages and press b 2 3 4 Press N x Select Create New Folder and press b Enter name and press b ^ Enter up to 20 characters. ^ Protected or incoming linked messages cannot be moved. ^ To move files to a Secret folder, unlock temporarily or cancel Secret beforehand.
Setting Auto Sort Keys 5 Set keys (sender/recipient, S! Mail subject or SMS message text string) by folder to sort received/sent messages automatically. C To change entries, select one A Press N x A Select Replace A Press b A Perform Step 4 on P.14-7 ^ Specify up to 20 keys for each folder including Spam Folder (see P.14-35 "Anti Spam Measures"). ^ Keys in folders with smaller numbers have higher priority. ^ Settings apply to newly received or sent messages.
Unlock Temporarily C For temporary access to Secret folders, set folders to appear and follow these steps. After Step 1 in "Secret Folders" on P.14-32, press N x A Select Unlock Temporarily A Press b A Enter Handset Code A Press b ^ Secret folders are hidden next time Received Msg. or Sent Messages folder is opened. Cancel Secret C Unlock Secret folders temporarily and follow these steps. Additional Functions Speed Mail List Save up to ten frequently used numbers/addresses here to use Speed Mail (see P.
Adding to Speed Mail List while Creating Message C Follow these steps after Step 3 on P.14-6 or on P.14-7. Select Speed Mail List A Press b A Select empty A Press b A Choose Yes A Press b A Perform Step 2 on P.14-33 Speed Mail Create mail from Standby using numbers/addresses saved to Speed Mail List (see P.14-33). Messaging 14 1 In Standby, press Speed Mail List entry number with Keypad (0 - 9) 2 Press N A 3 Complete and send message (perform from Step 5 on P.14-6 or on P.
Delivery Report Confirm SMS/S! Mail delivery (see P.14-19) CAvailable when messaging to SoftBank handset numbers. KOff Main Menu H Messaging A Settings A General Settings A Delivery Report Choose On (request) or Off A Press b ^ If On, reports arrive for all messages to SoftBank handsets.
Auto Delete Activate or cancel automatic deletion of oldest received/sent messages to save new ones Secret Folder Select whether to notify (with ringtones, etc.) of incoming messages sorted to Secret folders KReceived Msg.: Off, Sent Messages: On H Messaging A Settings A General Settings A Main Menu Auto Delete KNotify H Messaging A Settings A General Settings A Main Menu Message Notice A Secret Folder Select Notify or No Response A Press b Received Messages Select Received Msg.
Message Centre S! Mail Settings Set SMS Centre Number KSetting1 (+819066519300) H Messaging A Settings A SMS Settings A Main Menu Message Centre Message DL (Japan) CAdjust this setting when using handset in Japan.
Picture Appearance Set display size for images in received messages KNormal H Messaging A Settings A S! Mail Settings A Main Menu Picture Appearance Select Normal or Fir for Screen A Press b ^ Slides (see P.14-23) always play at Normal size.
Yahoo! Keitai 15-1
Getting Started Access Yahoo! Keitai Mobile Internet and PC sites. In this manual, "Yahoo! Keitai" refers to the SoftBank Mobile Internet portal, "PC sites" to websites viewed via PC Site Browser, and "Internet" to both Yahoo! Keitai and PC sites. Retrieve Network Information (see P.1-20) before using the Internet. Tip H ^ An additional contract is required to use the Internet. ^ Address questions about Yahoo! Keitai to SoftBank Customer Centre, General Information (see P.20-29).
CSSL Secure Sockets Layer (SSL) is an encryption protocol for secure Internet transmissions of important/sensitive information such as credit card numbers. Electronic certificates are saved on handset (see P.15-22 "Root Certificates"). Disclaimer C When a security notice appears, subscribers must decide for themselves whether or not to open the page. Opening secure pages constitutes agreement to the terms of usage.
5 To exit, press g then choose Yes and press b Using History Deleting History C Open History and follow these steps. Select an item A Press N x A Select Delete A Press b A Choose Yes A Press b Open previously viewed Yahoo! Keitai pages. History stores up to 300 pages; when full, oldest are deleted to make room for new ones.
Basic Operations Back Return to the previous page Press M W. C To return to the initial page, press N x A Select Forward A Press b Jump to Top/Bottom Access pages requiring user authentication If requested, enter user ID or password A Press b A Press M N View a summary of key assignments Press N x A Select Help A Press b C Press b to return. Activating/Cancelling Pointer Navigation C Open a page and follow these steps.
Using Cursor Scrolling Pages When pointer navigation is off, use cursor. Use E to scroll items. D D C C Cursor Yahoo! Keitai 15 15-6 Use F to move left and right when multiple items are listed in one row. Cursor does not appear for unselectable items. Tip H Press and hold these keys to scroll by page. 2 (Up), 4 (Left), 6 (Right), 8 (Down) CNon-Framed Pages Scroll bar appears on the right or bottom when page content continues beyond view. Slider indicates current page position.
Viewing Single Frame C Open a framed page and follow these steps. Press j for 1+ seconds to select a frame A Press N x A Select Frame In A Press b B To return, press N x A Select Frame Out A Press b B Alternatively, press i to return. Tabbed Browsing Open up to three pages at one time using tabs. Yahoo! Keitai and PC site pages cannot be open simultaneously. 2 Select Open in New Tab and press b Highlighted link opens in a new tab.
Text Entry & Item Selection Enter text or select items to send information. Text Entry Field ^ Highlight , and press b. Text entry window opens. Enter text and press b. Check-box ^ Highlight ) (check-box) and press b. The box changes to P, indicating that the item is selected. ^ In addition to ), ! may also appear as selection indicators. Menu List Yahoo! Keitai 15 15-8 ^ Highlight the field and press b to select an item.
Advanced Features Bookmarks & Saved Pages Bookmark sites or save page content to Saved Pages. Item Bookmarks Save links to sites. Handset connects to the Internet to access the site. ^ Create folders to organise Bookmarks. ^ Save up to 100 Bookmarks between Yahoo! Keitai and Streaming Bookmarks, and up to 100 for PC sites. Save page content; handset opens saved pages without connecting to the Internet. ^ Save frequently used items to Saved Pages.
Opening Bookmarks & Saved Pages 2 Select a title and press b Main Menu H Yahoo! Keitai 1 Yahoo! Keitai 15 Opening Bookmarks Online C Press N x A Select Bookmark A Press b A Select Open List A Press b A Select a title A Press b Bookmarks 1 Select Bookmarks and press b C To send URLs via S! Mail/SMS, select a title A Press N x A Select Send A Press b A Select As Message A Press b A Select S! Mail or SMS A Press b A Complete and send message (Perform from Step 3 Bookmarks on P.14-6 or on P.14-7.
Changing Folder Names Select a folder A Press N x A Select Rename A Press b A Enter name A Press b 2 Select Save Items and press b 3 Select a file and press b CSaved Pages Rename Change titles Select a title A Press N x A Select Rename A Press b A Enter title A Press b CBookmarks & Saved Pages Move 5 Press b Select a title or folder A Press N x A Select Delete A Press b A Choose Yes A Press b C To delete all titles/folders, press N x A Select Delete All A Press b A Enter Handset Code A Press b A C
Using Linked Info Use linked numbers (TEL:), addresses or URLs (http://, https:// or rtsp://) to place calls, send messages or access the Internet. ^ Available only when number, address or URL is underlined. ^ Underlined words may serve as a linked number, address or URL.
Incoming Calls/Mail while Streaming Changing Display Size C Streaming stops for incoming calls. Press b to answer calls. C Press 2 to toggle Display Size for current stream. B Display Size toggles as follows: Full Screen (no indicators) % Full Screen (with indicators) % Normal % Enlarge B Display Size cannot be changed while stream is paused; press 2 to show or hide indicators. ^ Display Size may not change depending on file/stream. C Change Display Size setting for streaming while streaming.
Time Search C Specify start point while streaming. Press N x A Select Time Search A Press b A Enter time A Press b Streaming from Media Player Access the Internet from Media Player Main Menu H Media Player A Streaming Live Monitor (Japanese Only) Live Monitor Basics Register with compatible Yahoo! Keitai content to receive update notices on handset. ^ Live Monitor consists of Live Monitor List and S! Loop List. ^ In Standby, view breaking news in Live Monitor List (see P.9-6).
CS! Loop List S! Loop List Main Menu H Yahoo! Keitai A Live Monitor b Indicators Items 1 2 3 b Title List F Unread S! Loop D Read S! Loop H S! Loop auto update disabled Information 1 2 3 Select Live Monitor List and press b Select an item and press b Title list appears (see P.15-14). Select a title and press b Information appears (see P.15-14). C To access the Internet, select the title in information A Press b A Choose Yes A Press b B Handset connects to the Internet.
S! Loop List Register with up to five S! Loop items. Main Menu H Yahoo! Keitai A Live Monitor 1 2 3 Select S! Loop List and press b Select S! Loop and press b Choose Yes and press b Handset connects to the Internet. ^ Refer to the S! Loop help menu for operational instructions.
Live Monitor List Main Menu 1 H Yahoo! Keitai A Live Monitor A Settings A Automatic Update A Live Monitor News Flash 1 Select News Flash and press b 2 Press b 3 Select an interval and press b C To cancel, choose Off A Press b General News 1 Select General and press b 2 Press b 3 Choose On and press b S! Loop List Main Menu 1 2 H Yahoo! Keitai A Live Monitor A Settings A Automatic Update A S! Loop Press b Main Menu H Yahoo! Keitai A Live Monitor 1 2 Select Live Monitor List or S! Loop List and pre
Using PC Site Browser 4 Activate PC Site Browser to view websites designed for PCs; only document files are downloadable and browsing PC sites may incur higher charges. Opening Yahoo! JAPAN Main Menu H Yahoo! Keitai A PC Site Browser 1 Yahoo! Keitai 15 15-18 2 3 Select Homepage and press b A message appears. To proceed, press b twice. Yahoo! JAPAN Home opens (J appears). C To open Yahoo! Keitai, press N x A Select Switch Browser A Press b B A message appears. To proceed, press b twice.
Using History Open previously viewed pages. History stores up to 300 pages; when full, oldest are deleted to make room for new ones. Main Menu H Yahoo! Keitai A PC Site Browser A History 1 2 Select an item and press b C To open properties, send URL, sort items or delete, see P.15-4. To exit, press g then choose Yes and press b Entering URLs Directly Enter URLs directly to access sites. ^ To use History, see above. ^ http:// may be omitted.
Send URL Uploading Files Send URLs via S! Mail/SMS Press N x A Select Convenient Functions A Press b A Select Send URL A Press b A Select S! Mail or SMS A Press b A Complete and send message (Perform from Step 3 on P.14-7 or on P.14-6.) ^ S! Mail Composition window opens automatically if a URL exceeds the SMS character limit. Details C Press b to return. Yahoo! Keitai 15 COpen compatible site first. Select Browse...
Memory Operation Main Menu Clear cache, cookies or authentication information H Yahoo! Keitai A Common Settings A Memory Operation Select Delete Cache, Delete Cookies or Delete Auth Info A Press b A Choose Yes A Press b ^ Deleted Items: Cache Temporarily saved information in Cache Memory Cookies Information sent by a server for user identification Auth Info User ID or password previously entered for authentication Download to Select whether to save downloaded files on handset or Memory Card Selec
Send Referer Select whether or not to send referer information to the Server Root Certificates KSend H Yahoo! Keitai A Common Settings A Security Main Menu Settings A Send Referer Select Send or Not Send A Press b Cookies Main Menu H Yahoo! Keitai A Common Settings A Security Settings Select Root Certificates (preloaded certificates) A Press b C To open certificates, select one A Press b C Press b to return. Enable or disable cookies (see P.
S! Applications 16-1
Getting Started Download S! Applications, including games. Download and use 812SH/813SH compatible S! Applications. Tip H ^ Separate subscriptions are required for S! Applications downloaded via Yahoo! Keitai. ^ Address questions about S! Applications to SoftBank Customer Centre, General Information (see P.20-29). ^ Some preloaded S! Applications can be deleted (see P.16-5). To restore them, perform Memory All Clear (see P.16-8).
S! Applications on Memory Card Synchronise Memory Cards used on other SoftBank handsets, PCs and other devices to update S! Appli Library. Retrieve Network Information beforehand (see P.1-20). 3 Press N i 4 Downloaded S! Application is automatically saved and a confirmation appears Main Menu H S! Appli A Settings A Synchronisation 1 Downloading S! Applications ^ Retrieve Network Information beforehand (see P.1-20). ^ Some S! Applications can be downloaded to Memory Cards.
Using S! Applications Exit, Pause & Resume Exiting or Pausing S! Applications Starting S! Applications Main Menu H S! Appli 1 2 Select S! Appli and press b S! Appli Library opens (see P.16-2). S! Applications 16-4 Starting Network S! Applications Choose Yes or No A Press b A S! Application starts ^ To skip confirmation, select Never Ask for Network Access (see P.16-7 "Setting Permissions"). C Some S! Applications require permission settings (see P.16-7).
Managing S! Applications Opening S! Application Properties Main Menu H S! Appli A S! Appli 1 2 Select an S! Application and press N x Select Details and press b Title of the S! Application Vendor Name of the distributor (or supplier/ manufacturer) Version Version of the S! Application Description Description of the S! Application Save Size Downloaded file size Recorded Record game scores, etc.
Screensaver Set an S! Application to activate when handset enters Standby. Activating/Cancelling Screensaver Screensaver is Off by default. Main Menu H S! Appli A Settings A Screensaver A Switch On/Off 1 Choose On and press b C To cancel, choose Off A Press b Setting Screensaver ^ Only one compatible S! Application can be set for Screensaver. ^ Screensaver cannot be set when another S! Application is paused. ^ Lifestyle-Appli and S! Applications on Memory Card cannot be set.
Setting Permissions Customise the method of confirmation, etc. for each S! Application operation below. ^ Settings: Phone Call Place Voice Calls Network Access Connect to the Internet Messaging Send/receive messages Autorun Execute Autorun files Bluetooth Conn. Connect via Bluetooth# Resetting Permission Settings C Follow these steps after Step 2 on the left.
When activated, Backlight flashes while compatible S! Applications play Blink Reset KOn Set to Default Main Menu H S! Appli A Settings A Backlight A Blink Choose On (activate) or Off A Press b Main Menu H S! Appli A Settings A Set to Default Enter Handset Code A Press b A Choose Yes A Press b When activated, handset vibrates while compatible S! Applications play Vibration KOn Main Menu H S! Appli A Settings A Vibration Choose On (activate) or Off A Press b ^ In Manner mode, vibration set in Mann
S! FeliCa (Japanese Only) Not Available for 813SH for Biz Users 17-1
Basics Service Usage Outline S! FeliCa encompasses a range of IC Card-based services available via FeliCa-compatible SoftBank handsets. 812SH and 813SH support S! FeliCa. To use services such as e-money, e-ticketing and reward point systems, simply hold handset over a compatible reader/writer at a shop or restaurant, etc.
Starting Lifestyle-Appli To use S! FeliCa, activate a service Lifestyle-Appli and complete service registration, setup, charge, balance check, etc. Main Menu H Lifestyle-appli 1 2 Select Lifestyle-appli and press b C To download a Lifestyle-Appli, select Download A Press b Select an application and press b Using S! FeliCa Follow these steps to conduct a transaction. Example: making an electronic payment: ^ Complete registration, setup and charge in advance.
Tip H ^ When placed over sensor, handset may display a message, vibrate or activate mail, Internet or an S! Application for some services. To disable response, see P.17-7 "Interface Settings". ^ Reader/writer will scan FeliCa IC Card even during calls or Internet transmissions. (It may take some time.) When Handset Power is Off C Transactions possible; Lifestyle-Appli does not start automatically. ^ After installing/reinstalling battery, always turn on handset power to use S! FeliCa.
Remote Lock 7 Send mail with specified subject (Mail Remote Lock) or call from a specified phone (Call Remote Lock). C Press i to return.
CCall Remote Lock Number/Count for Lock Save up to two phone numbers from which to call handset, and set Missed Call count required to activate IC Card Lock (default count is 3 times). Enable Remote Lock activation via public phones. 7 ^ To enable Call Remote Lock, perform from Step 3 in "Remote Lock Setup" below and choose On in Step 4.
Activating Remote Lock CVia Mail 1 After Specified Number of Missed Calls C IC Card Lock is set; a message announces Remote Lock activation. Use S! Mail/e-mail to send password to handset ^ Enter password as subject; leave other fields blank. ^ To confirm IC Card Lock status, send a message via phone or PC with specified mail address (see P.17-5 "Mail Remote Lock Password/Address"). Note H ^ Missed Call count is reset by calls from numbers not saved for this function.
Resetting Defaults Cancel custom settings and return S! FeliCa settings to their defaults. Main Menu H Lifestyle-appli A IC Card Settings A Set to Default 1 2 Enter Handset Code and press b Choose Yes and press b Note H ^ Set to Default does not delete downloaded Lifestyle-Appli. ^ Reset All (see P.9-28)/Memory All Clear (see P.16-8) returns Lifestyle-Appli settings to defaults; all downloaded Lifestyle-Applications are deleted. If IC Card data remains, Reset All and Memory All Clear are disabled.
Entertainment 18-1
S! Cast (Japanese Only) Basics Subscribe to Japanese mobile periodicals that download to handset automatically overnight. ^ A separate subscription and registration are required. ^ After registration, Weather Indicator (see P.18-4) appears in Standby. ^ Only available within Japan on compatible 3G handsets. ^ Retrieve Network Information (see P.1-20) before using S! Cast. Service Registration & Content Subscription Complete service registration to use S! Cast, then subscribe to content.
3 Press g to exit Using Information Requesting Re-Delivery C If information delivery fails, follow these steps to request re-delivery of latest information. (Make sure signal is strong and stable.) Press b A Select Entertainment A Press b A Select CAST A Press b A Select Get Latest Contents A Press b A Choose Yes A Press b CAST Notif.
Activating/Cancelling Weather Indicator Using Weather Indicator After S! Cast (see P.18-2) registration, local area weather forecast (based on Location Information) appears. Main Menu H Entertainment A CAST A Weather Icon A Settings CIndicators & Updates A : Clear Skies (Day) F : Clear Skies (Night) B : Cloudy C : Rain D : Snow E : Thunder Showers N : Partly/Chance of M : Then Example: BNC A Partly cloudy with a chance of rain ^ J (chance of rain), K (fall foliage season), etc.
Display Info Toggle Notification (Information window) on/off KOn H Entertainment A CAST A Weather Icon A Main Menu Settings A Display Info Choose On (show) or Off A Press b Manual Update Update Weather Indicator manually Main Menu H Entertainment A CAST A Weather Icon Select Manual Update A Press b ^ Handset connects to the Internet and Weather Indicator is updated. Note H Activate Icon Update (see P.18-4) beforehand.
Reading Content Main Menu H Entertainment 1 2 Entertainment 18 3 Select E-Book and press b Book contents list appears. (When you press g to close Reading window, the same page will open next time.) C To read E-Books saved in other folders, press N x A Select Switch Folders A Press b A Select a folder A Press b B Selected item appears next time E-Book is selected. B Access E-Books saved in Book and Book (SD) from Entertainment or Data Folder (Books).
C Copy text (up to 20 characters). In Reading window, press N x A Select Copy A Press b A Perform from Step 3 in "Copy/Cut & Paste" on P.3-14 B Dictionary index text and search results cannot be copied. B Images and ruby annotations cannot be copied.
Bookmark Using E-Book Images Add bookmarks to return to the pages easily. Use two bookmarks per E-Book (for up to five E-Books).
BookSurfing# (Japanese Only) Activate BookSurfing# S! Application to read comics, photo books and other CCF files saved in Data Folder (Books). To read fee-based CCF files, download Content Keys. Main Menu H Entertainment 1 Select BookSurfing and press b BookSurfing# S! Application starts. ^ Refer to the BookSurfing# help menu for operational instructions. ^ When an S! Application is paused, Application suspended. End application? appears. Choose Yes and press b to start BookSurfing#.
Communication 19-1
S! Town (Japanese Only) Communication 19 19-2 Using S! Town S! Town is an online communication application. Select an avatar to enter this 3D virtual town, where you can participate in events and meet other users. When using S! Town for the first time, agree to the terms of service then complete free user registration. ^ Usage requires the pre-installed S! Town S! Application. ^ S! Town S! Application cannot be deleted. ^ Internet connection is required; may incur high charges.
S! Town Library Save S! Town-compatible S! Applications to S! Town Library. ^ Start S! Applications from S! Town Library. (S! Town may start for some applications.) ^ S! Town-compatible S! Applications are not saved in S! Town Library by default. Main Menu H Communication 1 S! Loop (Japanese Only) S! Loop is a communication service. Main Menu H Communication 1 Select S! Loop and press b Handset connects to the Internet and S! Loop Main Menu opens.
Hot Status Window Description 3 Exchange current usage status, mood, etc. with compatible handsets. Member Status My Status ごきげん ひまー Answer OK Member Status Hot Status Info Trip Communication 19 19-4 5 6 2 7 8 Hot Status Info Answer OK 4 1 ^ A separate subscription is required. Answer NG ^ Save compatible handset numbers to member list. Hot Status information is updated automatically. Note H ^ Before use, set IP Service Setting (see P.9-26) to On.
Hot Status Notification Information window opens for the following notifications. Adding Members Save up to 30 members to Hot Status member list.
Adding from Phone Book or Direct Entry Main Menu H Communication A Hot Status 1 Use F to select a Group and press N x 2 3 Select Add Member and press b C When Register a member? appears, choose Yes A Press b A Skip ahead to Step 3 Phone Book 1 Select Phone Book and press b 2 Select an entry and press b C For entries with multiple numbers, select one A Press b Direct Entry 1 Select Add New Entry and press b 2 Enter a phone number and press b 4 Communication 19 19-6 Choose Yes and press b Request M
Adding from Request Memo Save members via Request Memo. When a request arrives, Accept the registration request from XX (name/number) ? appears. Accept or reject it. 1 Accepting 1 Choose Yes and press b Opening Member Status Details Main Menu H Communication A Hot Status 1 2 Use F to select a Group, then E to select a member Press b Member status details appear. C Window Description: see P.19-4 Acceptance Memo is sent and the number is saved to Hot Status member list.
CDefault Settings My Status Item Opening My Status Details 1 In Standby, press q for 1+ seconds 1 2 3 4 5 6 D 7 Communication 19 19-8 C 1 Image/Name ^ Image and name appear if saved in My Details. 2 Connection Status (see P.19-9) 3 Status ^ To edit Status Icon/Label, see P.19-12 "Status Setting". 4 Answer Status ^ Change availability for Calls, Mail and Circle Talk at once. 5 Availability ^ Set availability for Calls, Mail and Circle Talk separately. 6 Comment ^ Enter up to 15 characters.
^ Available Settings: Item Status Setting 16 Status Icon/Label combinations All OK Calls: Answer OK Mail: Reply OK Circle Talk: Join OK Only Mail is OK Calls: Answer NG Mail: Reply OK Circle Talk: Join NG All NG Calls: Answer NG Mail: Check Later Circle Talk: Join NG Answer Status User Setting 2 Calls Answer OK, Urgency Only or Answer NG Mail Reply OK or Check Later Circle Talk Join OK, Auto Join1 or Join NG2 Comment Up to 15 characters Automatically accepts Circle Talk requests.
Editing Hot Status Member List Edit Group name or move members to other Groups.
Using Hot Status Info Use Hot Status to place calls, send messages, start Circle Talk or save numbers to Phone Book. Calls, Messages & Circle Talk Main Menu H Communication A Hot Status 1 2 Select a member and press N x Select a contact method and press b For Call and Video Call, handset dials the number. C Creating & Sending SMS/S! Mail: see P.14-6 C Initiating Circle Talk: see P.
Status Setting Change Status Icon Pictogram or edit Status Label description for My Status Additional Functions Main Menu H Communication A Hot Status Press N x A Select Settings A Press b A Select Status Setting A Press b A Select a Status A Press b A Select Status Icon A Press b A Select a Pictogram A Press b A Select Status Label A Press b A Enter text A Press b Opening Hot Status Notification List Main Menu H Communication A Hot Status 1 2 C Press M q to save. ^ Pictogram List: see P.
Circle Talk Circle Talk is a Walkie-Talkie type communication service. Press one key to speak to up to ten parties simultaneously. ^ Press u to take the floor and speak; other participants may only listen until the floor is released. ^ A subscription to Hot Status is required. ^ Transmission/connection fees apply during Circle Talk. Receiver Note H ^ Before use, set IP Service Setting (see P.9-26) to On and Connection Setting (see P.19-9) to Online.
Initiating Circle Talk 6 Follow the steps below to start Circle Talk from Standby. When Register the circle talk member right now? appears, see P.19-17 to create Circle Talk member list. Communication 19 19-14 1 2 3 4 Enter a phone number 5 Press u when finished Press u (Circle Talk Key) To speak again, press u while Press M to speak appears Press M when finish appears when you have the floor. ^ Busy appears if the floor is taken by another participant; try again later.
Note H Incoming Calls/Alarm during Circle Talk ^ Handset responds to incoming calls according to Incoming Calls settings (see P.19-18). ^ Alarm Times are announced after exiting Circle Talk. From Circle Talk Member List Save members or Groups beforehand (see P.19-17).
Accepting a Circle Talk Request 1 3 While handset is ringing/ vibrating, press u, f or N Circle Talk starts. C To take the floor, see P.19-14. 2 Press g to exit Note H To always accept Circle Talk requests automatically, set Circle Talk availability (see P.19-8) to Auto Join. If Join NG is set, Circle Talk requests are always rejected.
Cancelling Participants Follow these steps before starting Circle Talk. Participants cannot be cancelled during Circle Talk. 1 2 3 Select a member and press N x Select Delete Member and press b Choose Yes and press b Creating Circle Talk Member List Save members from Hot Status member list or Phone Book to create Circle Talk member list. ^ Save members as individuals or Groups. ^ Save up to 30 entries in total (up to ten members per Group).
Editing Circle Talk Member List Edit or delete members and Groups. Circle Talk Settings Loudspeaker Editing Members or Groups 1 2 Communication 19 19-18 Press u Individual Members 1 Select a member and press N x 2 Select Edit and press b 3 Press b 4 Perform Steps 2 - 3 in "Saving as Individuals" on P.19-17 Groups 1 Select a Group and press N x 2 Select Edit and press b 3 Perform Steps 2 - 8 in "Saving as Groups" on P.
Near Chat (Japanese Only) ^ In the event that this handset may be used by a minor, access to this application may be password restricted by a supervising adult. In this case, Handset Code access must also be managed to prevent the execution of Memory All Clear (see P.16-8) that may be used to reset the application password. ^ For more about password restriction, see Near Chat S! Application instructions.
CS! Appli Request S! Appli Request is On by default. Main Menu 1 H Settings A Connectivity (F) A Bluetooth A My Device Settings A S! Appli Request A Switch On/Off Receiving Near Chat Request 1 Choose On or Off and press b ^ After 30 seconds of inactivity, the tone sounds again, notification appears and Information window opens. ^ Check request log in Latest Information (see below).
Appendix 20-1
Function List For SoftBank 813SH Function List, see SoftBank 813SH Supplementary Guide. Communication Yahoo! Keitai Media Player Appendix 20 20-2 Messaging Sub Menu S! Town S! Loop Hot Status Circle Talk Near chat Yahoo! Keitai Bookmarks Saved Pages Enter URL History Live Monitor PC Site Browser Common Settings Music Videos Streaming Received Msg. Create Message Retrieve New Msg. Drafts Templates Sent Messages Unsent Messages Server Mail Box Create New SMS Settings Memory Status Refer to P.19-2 P.
Main Menu Connectivity Settings Refer to P.18-9 P.18-5 P.18-2 P.16-2 P.16-7 P.16-2 P.17-2 P.17-4 P.4-2 P.4-4 P.2-7 P.2-13 P.2-10 P.13-4 P.4-11 P.4-19 P.4-13 P.4-12 P.4-15 P.4-9 P.4-8 P.9-2 P.9-3 P.9-9 P.9-14 P.9-18 P.9-9 P.9-19 P.9-17 P.9-17 P.2-21 P.9-20 P.20-8 P.9-28 Call/Video Call Sub Menu Bluetooth Infrared Mass Storage Memory Card Call Time & Cost Answer Phone Voicemail/Divert Video Call Show My Number P Missed Calls Int'l Calling Disp.
Troubleshooting Problem ^ Is Switch On/Off in PIN Entry On? ^ If On, PIN1 is required. Enter PIN1 according to onscreen instructions. For more, see P.9-24. ^ USIM Card may not be properly inserted. ^ There may be debris on IC chip/terminals. ^ Make sure USIM Card is properly inserted. If the message still appears, USIM may be damaged. ^ Make sure the correct USIM Card is inserted. The inserted USIM Card may not be valid. ^ Clean relevant parts with a dry cloth and re-insert.
Problem Possible Cause Solution Call won't connect and there's a beeping tone ^ Did you include the dialling code or the first 0? ^ Handset may be out-of-range. (P appears) ^ Handset Offline Mode (see P.2-20) may be active. ^ Dial the number including the dialling code or 0. ^ Move to a place where signal is strong and retry. ^ Cancel Offline Mode (see P.2-20). Call is choppy or cut off ^ Network signal may be weak. ^ Battery may need to be charged or replaced.
Problem Possible Cause Solution Battery Time seems shorter than usual ^ Environmental factors (temperature, charging/signal conditions), usage or settings can affect Battery Time. Display flickers ^ Display may flicker under fluorescent lights. Display went dark ^ Leaving handset open with no key presses for a preset period cancels Backlight (Time Out) then panel (Display Saving); this is not a malfunction. ^ For more on Battery Time, usage factors and ways to extend Battery Time, see P.
Message Exceeds limit. Cannot save. Cause & Solution ^ 100 S! Applications are already saved. (The message disappears automatically.) D ^ Delete applications (see P.16-5) and try again. Same version found Continue download? ^ The same version of selected S! Application is already saved. D ^ Choose Yes (download) or No (cancel) and press b. New version found Continue download? ^ An older version of the same S! Application is saved. D ^ Choose Yes (download) or No (cancel) and press b.
Software Update Check for firmware updates and download as required. Precautions Before updating software, turn power off to end all active functions/applications, then restart handset. ^ Choose to begin update or schedule update. ^ Handset is disabled until update is complete. Update may take up to approximately 30 minutes. ^ Connection fees do not apply to updates (including checking for updates, downloading and rewriting). ^ Keep handset in a place where signal is strong and stable.
Note H Update failure may disable handset. Contact SoftBank Customer Centre, Customer Assistance (see P.20-29). Scheduled Update Update Failure Update Result C While Information window appears, select Update Result A Press b B Press b again to exit. C In Standby, press b A Select Settings A Press b A Use F to select Phone Settings A Select Software Update A Press b A Select Update Result A Press b B Press b again to return. C Confirmation appears at scheduled update time.
Character Code List First Three Digits Last Digit 0 1 2 3 4 5 6 7 8 9 * 010 (Space) 、 。 , .・ : ; ? 011 ! ゛ ゜ ´ ` ¨ ^  ̄ _ ヽ 012 ヾ ゝ ゞ 〃 仝 々 〆 〇 ー ― 013 ‐ / \ ∼ ‖ | … ‥‘ ’ 014 “ ”( )〔 〕[ ]{ } 015 〈 〉《 》「 」『 』【 】 016 + − ± × ÷ = ≠ < > ≦ 017 ≧ ∞ ∴ ♂ ♀ ° ′ ″ ℃ ¥ 018 $ ¢ £ % # & @ § ☆ 019 ★ ○ ● ◎ ◇ 020 ◆□■△▲▽▼※〒 021 → ← ↑ ↓ 〓 022 ∈∋⊆⊇ 023 ⊂ ⊃ ∪ ∩ 024 ∧∨¬⇒⇔∀∃ 026 027 028 029 Appendix 20 20-10 031 032 033 034 035 036 037 038 039 040 041 042 043 044 045 046 ∠⊥͡∂∇≡≒≪≫√ ∽∝∵∫∬ ʼn♯♭♪†‡¶ ⃝ 0 1 2 3 4 5 6
First Three Digits 223 224 225 226 226 227 228 229 230 231 232 232 233 234 235 236 237 238 239 240 241 242 243 1 2 3 4 5 6 7 8 9 蕎郷鏡響饗驚仰凝尭暁 業局曲極玉桐粁僅勤均 巾錦斤欣欽琴禁禽筋緊 芹菌衿襟謹近金吟銀 く 九 倶句区狗玖矩苦躯駆駈 駒具愚虞喰空偶寓遇隅 串櫛釧屑屈 掘窟沓靴轡窪熊隈粂 栗繰桑鍬勲君薫訓群軍 郡 け 卦袈祁係傾刑兄啓圭 珪型契形径恵慶慧憩掲 携敬景桂渓畦稽系経継 繋罫茎荊蛍計詣警軽頚 鶏芸迎鯨劇戟撃激隙桁 傑欠決潔穴結血訣月件 倹倦健兼券剣喧圏堅嫌 建憲懸拳捲 検権牽犬献研硯絹県 肩見謙賢軒遣鍵険顕験 鹸元原厳幻弦減源玄現 絃舷言諺限 こ 乎個古呼固 姑孤己庫弧戸故枯湖狐 糊袴股胡菰虎誇跨鈷雇 顧鼓五互伍午呉吾娯後 御悟梧檎瑚碁語誤護醐 乞鯉交佼侯候倖光公功 効勾厚口向 后喉坑垢好孔孝宏工 巧巷幸広庚康弘恒慌抗 拘控攻昂晃更杭校梗構 江洪浩港溝甲皇硬稿糠 紅紘絞綱耕考肯肱腔膏 航荒行衡講貢購郊酵鉱 砿鋼閤降項香高鴻剛劫 First
First Three Digits Last Digit 0 1 2 3 4 5 6 7 8 9 つ 363 364 365 366 366 367 368 369 370 371 372 373 373 374 375 376 377 378 379 380 381 382 383 384 385 386 Appendix 386 387 388 20 388 389 390 390 391 20-12 津墜椎 槌追鎚痛通塚栂掴槻佃 漬柘辻蔦綴鍔椿潰坪壷 嬬紬爪吊釣鶴 て 亭低停偵 剃貞呈堤定帝底庭廷弟 悌抵挺提梯汀碇禎程締 艇訂諦蹄逓 邸鄭釘鼎泥摘擢敵滴 的笛適鏑溺哲徹撤轍迭 鉄典填天展店添纏甜貼 転顛点伝殿澱田電 と 兎吐 堵塗妬屠徒斗杜渡登菟 賭途都鍍砥砺努度土奴 怒倒党冬凍刀唐塔塘套 宕島嶋悼投搭東桃梼棟 盗淘湯涛灯燈当痘祷等 答筒糖統到 董蕩藤討謄豆踏逃透 鐙陶頭騰闘働動同堂導 憧撞洞瞳童胴萄道銅峠 鴇匿得徳涜特督禿篤毒 独読栃橡凸突椴届鳶苫 寅酉瀞噸屯惇敦沌豚遁 頓呑曇鈍 な 奈那内乍凪薙 謎灘捺鍋楢馴縄畷南楠 軟難汝 に 二尼弐迩匂賑肉 虹廿日乳入 如尿韮任
First Three Digits 1 2 3 4 5 6 7 8 9 弌丐丕个丱丶丼丿乂 乖乘亂亅豫亊舒弍于亞 亟亠亢亰亳亶从仍仄仆 仂仗仞仭仟价伉佚估佛 佝佗佇佶侈侏侘佻佩佰 侑佯來侖儘俔俟俎俘俛 俑俚俐俤俥倚倨倔倪倥 倅伜俶倡倩倬俾俯們倆 偃假會偕偐偈做偖偬偸 傀傚傅傴傲 僉僊傳僂僖僞僥僭僣 僮價僵儉儁儂儖儕儔儚 儡儺儷儼儻儿兀兒兌兔 兢竸兩兪兮冀冂囘册冉 冏冑冓冕冖冤冦冢冩冪 冫决冱冲冰况冽凅凉凛 几處凩凭凰凵凾刄刋刔 刎刧刪刮刳刹剏剄剋剌 剞剔剪剴剩剳剿剽劍劔 劒剱劈劑辨 辧劬劭劼劵勁勍勗勞 勣勦飭勠勳勵勸勹匆匈 甸匍匐匏匕匚匣匯匱匳 匸區卆卅丗卉卍凖卞卩 卮夘卻卷厂厖厠厦厥厮 厰厶參簒雙叟曼燮叮叨 叭叺吁吽呀听吭吼吮吶 吩吝呎咏呵咎呟呱呷呰 咒呻咀呶咄咐咆哇咢咸 咥咬哄哈咨 咫哂咤咾咼哘哥哦唏 唔哽哮哭哺哢唹啀啣啌 售啜啅啖啗唸唳啝喙喀 咯喊喟啻啾喘喞單啼喃 喩喇喨嗚嗅嗟嗄嗜嗤嗔 嘔嗷嘖嗾嗽嘛嗹噎噐營 嘴嘶嘲嘸噫噤嘯噬噪嚆 First Three Digits 517 518 519 520 521 522 523 524 525 526 527 528 529 530
First Three Digits Appendix 20 20-14 637 638 639 640 641 642 643 644 645 646 647 648 649 650 651 652 653 654 655 656 657 658 659 660 661 662 663 664 665 666 667 668 669 670 671 672 673 674 675 676 Last Digit 0 1 2 3 4 5 6 7 8 9 煕熈煦煢煌煖煬熏燻熄 熕熨熬燗熹熾燒燉燔燎 燠燬燧燵燼 燹燿爍爐爛爨爭爬爰 爲爻爼爿牀牆牋牘牴牾 犂犁犇犒犖犢犧犹犲狃 狆狄狎狒狢狠狡狹狷倏 猗猊猜猖猝猴猯猩猥猾 獎獏默獗獪獨獰獸獵獻 獺珈玳珎玻珀珥珮珞璢 琅瑯琥珸琲琺瑕琿瑟瑙 瑁瑜瑩瑰瑣瑪瑶瑾璋璞 璧瓊瓏瓔珱 瓠瓣瓧瓩瓮瓲瓰瓱瓸 瓷甄甃甅甌甎甍甕甓甞 甦甬甼畄畍畊畉畛畆畚 畩畤畧畫畭畸當疆疇畴 疊疉疂疔疚疝疥疣痂疳 痃疵疽疸疼疱痍痊痒痙 痣痞痾痿痼瘁痰痺痲痳 瘋瘍瘉瘟瘧瘠瘡瘢瘤瘴 瘰瘻癇癈癆癜癘癡癢癨 癩癪癧癬癰 癲癶癸發皀皃皈皋皎 皖皓皙皚皰皴皸皹皺盂 盍盖盒盞盡盥盧盪蘯盻 眈
First Three Digits 1 2 3 4 5 6 7 8 9 閹閾闊濶闃闍闌闕闔闖 關闡闥闢阡阨阮阯陂陌 陏陋陷陜陞 陝陟陦陲陬隍隘隕隗 險隧隱隲隰隴隶隸隹雎 雋雉雍襍雜霍雕雹霄霆 霈霓霎霑霏霖霙霤霪霰 霹霽霾靄靆靈靂靉靜靠 靤靦靨勒靫靱靹鞅靼鞁 靺鞆鞋鞏鞐鞜鞨鞦鞣鞳 鞴韃韆韈韋韜韭齏韲竟 韶韵頏頌頸頤頡頷頽顆 顏顋顫顯顰 顱顴顳颪颯颱颶飄飃 飆飩飫餃餉餒餔餘餡餝 餞餤餠餬餮餽餾饂饉饅 饐饋饑饒饌饕馗馘馥馭 馮馼駟駛駝駘駑駭駮駱 駲駻駸騁騏騅駢騙騫騷 驅驂驀驃騾驕驍驛驗驟 驢驥驤驩驫驪骭骰骼髀 髏髑髓體髞髟髢髣髦髯 髫髮髴髱髷 髻鬆鬘鬚鬟鬢鬣鬥鬧 鬨鬩鬪鬮鬯鬲魄魃魏魍 魎魑魘魴鮓鮃鮑鮖鮗鮟 鮠鮨鮴鯀鯊鮹鯆鯏鯑鯒 鯣鯢鯤鯔鯡鰺鯲鯱鯰鰕 鰔鰉鰓鰌鰆鰈鰒鰊鰄鰮 鰛鰥鰤鰡鰰鱇鰲鱆鰾鱚 鱠鱧鱶鱸鳧鳬鳰鴉鴈鳫 鴃鴆鴪鴦鶯鴣鴟鵄鴕鴒 鵁鴿鴾鵆鵈 鵝鵞鵤鵑鵐鵙鵲鶉鶇 鶫鵯鵺鶚鶤鶩鶲鷄鷁鶻 鶸鶺鷆鷏鷂鷙鷓鷸鷦鷭 鷯鷽鸚鸛鸞鹵鹹鹽麁麈 麋麌麒麕麑麝麥麩麸麪 麭靡黌黎黏黐黔黜點黝 黠黥黨黯黴黶黷黹黻黼 First Three Digits 837 838 839 840 Last Digit
Pictogram List Appendix 20 Note H Pictograms do not appear in e-mail or on incompatible SoftBank handsets. Tip H Pictograms in 2 are animated.
Specifications CSoftBank 812SH CSoftBank 813SH Weight Approximately 105 g Weight Approximately 104 g Continuous Talk Time Approximately 150 minutes (3G) Approximately 240 minutes (GSM) Continuous Talk Time Approximately 150 minutes (3G) Approximately 240 minutes (GSM) Continuous Standby Time (handset closed) Approximately 330 hours (3G) Approximately 320 hours (GSM) Continuous Standby Time (handset closed) Approximately 330 hours (3G) Approximately 320 hours (GSM) Continuous Video Call Talk Ti
^ Talk Time/Standby Time decrease with frequent use of Display/Keypad backlights. ^ Talk Time/Standby Time may decrease when an S! Application is active. ^ Talk Time/Standby Time decrease with handset use in poor signal conditions (see P.1-13 "Battery Time"). ^ Display employs precision technology, however, some pixels may appear brighter/darker. CAC Charger Power Source AC 100V-240V, 50/60 Hz Power Consumption 12VA Output Voltage/Current DC 5.
Memory List Messaging 1 2 Received Msg. Approximately 5 MB or 1,000 messages Drafts Approximately 3 MB1 Sent Messages Approximately 3 MB or 500 messages1 Unsent Messages Approximately 3 MB1 Templates Approximately 64 MB2 Drafts, Sent Messages and Unsent Messages share memory. Shared with S! Appli Library and Data Folder. S! Applications S! Appli * Approximately 64 MB* (100 items) on handset Shared with Templates folder and other folders in Data Folder.
Index Number 3D Pictogram ................................14-24 3D Pictogram Settings .................14-24 3G.....................................................2-16 A Appendix 20 20-20 AC Charger......................................1-17 Accept Calls (S! Applications) ......16-8 Access WEB Link .............................7-7 Acquire Dictionary .........................9-19 Activation Time (S! Applications) ....16-6 Add Date..........................................11-8 Add Email Address..........
Cookies ..............................15-21, 15-22 Copy (text).......................................3-13 Copy Text (Internet)......................15-19 Cost Units .......................................2-15 Countdown Timer.........................12-25 Country Codes ...............................9-29 Create QR Code............................12-22 Crop .................................................7-11 Cursor..............................................15-6 Custom Screens ............................
Enable DTMF...................................2-12 English ..............................................9-9 Enter URL ................. 15-4, 15-14, 15-19 Entertainment .................................18-1 Event Light......................................9-16 Expenses Memo ...........................12-25 Expiry Time (Messaging) ..... 14-15, 14-36 Exposure (mobile camera) ............6-16 Exposure (Video Call) ......................5-6 External Display..............................
K Keep Auth Info ..............................15-22 Key Assignments (text entry)..........3-3 Keypad Lock ...................................1-22 Keypad Tones .................................9-16 L Language ..........................................9-9 Last Played..................... 7-6, 7-8, 15-14 Latest Information (Near Chat)....19-20 Lifestyle-Appli.................................17-2 Light...............................................14-20 Live Monitor ..................................
Optional Predictive Functions (text entry).......................................3-13 Outgoing Calls (Call Barring) ........13-8 Outgoing Picture (Video Call) .........5-7 Out-of-range............................ 1-9, 20-6 P Appendix 20 20-24 Packet Lock (Locks) .......................9-27 Packet transmission volume .........2-14 Pager Code........................................3-9 Pager Code List ..............................3-10 Paired Devices ................................10-4 Password Lock .....
S Send URL .............................15-4, 15-20 Sending Progress ........................ 14-34 Sent Messages ............................... 14-2 Sent MsView ................................... 14-4 Server Mail Box ............................ 14-22 Set as Ring Video........................... 8-10 Set as Ringtone .............................. 8-11 Set as Wallpaper............................. 8-10 Set Auto Delete............................. 14-16 Set Auto Play File .........................
Appendix 20 20-26 Side Keys .............................................ii Signature Settings (Messaging) ...14-35 Simple Menu ...................................2-21 Slide Show ........................................8-6 Slides.............................................14-23 Small Light ......................................1-15 SMS..................................................14-2 SMS Settings ................................14-36 Snooze (Alarm) .............................12-13 Soft Keys .....
Withheld (Call Barring) ..................13-9 World Clock...................................12-14 Y Yahoo! Keitai...................................15-2 Yahoo! Keitai (accessing) ..............
Warranty & After-Sales Services CWarranty Warranty is provided when you purchase handset. ^ Check the name of distributor and date of purchase. ^ Read through contents and keep in a safe place. ^ The warranty term is described in the warranty. CAfter-Sales Services See P.20-4 "Troubleshooting" before contacting SoftBank for service or repairs. If you cannot find solutions or solve problems, contact SoftBank Customer Centre, Customer Assistance (see P.
Customer Service If you have questions about SoftBank handsets or services, please call General Information. For repairs, please call Customer Assistance. SoftBank Customer Centres SoftBank International Call Centre From a SoftBank handset, dial toll free at 157 for General Information or 113 for Customer Assistance From outside Japan, dial +81-3-5351-3491 (International charges will apply.) CCall these numbers toll free from landlines.
SoftBank 812SH/813SH Instruction Manual March 2007, First Edition SOFTBANK MOBILE Corp. For additional information, please visit a SoftBank shop. Model: SoftBank 812SH 813SH Manufacturer: SHARP CORPORATION Please help the mobile industry maintain high environmental standards. Recycle your old handsets, batteries and charger units (all manufacturers and brands). Before you recycle, please remember these important points: ^ Handsets, batteries and chargers submitted for recycling cannot be returned.