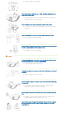
To avoid injuries or damage to property, please read the following precautions carefully and use the product accordingly. Failure to follow the instructions marked with this symbol may cause personal injury or even fatality. Failure to follow the instructions marked with this symbol may cause personal injury or damage to the product or property. | Power Related | Installation Related | Cleaning and Use Related | [The images here are for reference only, and are not applicable in all cases (or countries).
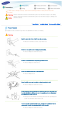
Always unplug the unit by holding the power plug. Pulling the power cable may damage the inside of it. z There is a danger of fire. Unplug the power plug before cleaning the product. z There is a danger of electric shock or fire. | Power Related | Installation Related | Cleaning and Use Related | TO PREVENT THE SPREAD OF FIRE, KEEP CANDLES OR OTHER OPEN FLAMES AWAY FROM THIS PRODUCT AT ALL TIMES. z There is a danger of fire.
z If the product falls it may harm children. Install on a flat and stable location as the front part is heavy. In case of thunder/lightning, disconnect the power cord from the wall outlet. z There is a danger of electric shock or fire. Make sure the product's vents are not blocked by a table cloth or curtain. z An increase in the internal temperature may cause a fire. Place the product on the ground carefully. z Doing so may cause damage or injury. Do not drop the product while carrying it.
z There is a danger of fire or explosion. Do not place containers with water, vases, drinks, chemicals, small metal parts or heavy objects on the product. z If water enters the product, it may cause electric shock, or fire and when heavy objects fall, they may cause injury. Do not let children place objects such as toys or cookies on the product. z If a child tries to reach for any of these objects, the product may fall and cause harm.
If the product is dropped or the casing is damaged, turn the product off and unplug the power cord. z This may cause electric shock or fire. Contact a Service Center. Use only specified standard batteries. Do not use new and used batteries together. z Incorrect polarity may cause a battery to break or leak and could lead to fire, injury, or contamination (damage). Make sure to place your remote control on a table or desk.
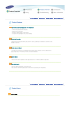
| Product Features | Product Views | Remote Control | Product Specifications | An optical engine adopting new LCD technology - 1024 x 768 panel has been adapted. - Utilizing a 3P-LCD panel. - Provides a bright screen of 3000 lumen. - Compact size, lightweight, and good portability Minimized fan noise - Minimizes the noise generated by the product’s fan by optimizing the internal air flow and the fan installation structure.
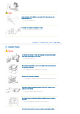
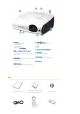
1. Indicators 5. POWER( - STAND BY (Blue LED) ) Button Used to turn the projector on or off. - LAMP (Blue LED) 6. Lens - TEMP (Red LED) ※ Refer to the LED Indications. 7. Remote Control Signal Receiver 2. VOL - / + & Select and Move Button Adjusts the volume. 8. Focus Ring Use this button to move to or select an item Used for Focus Adjustment. within a menu. 9. Zoom Knob 3. MENU Button Used to enlarge or reduce image size. Use this button to enter or exit a menu or to move forward in a menu.
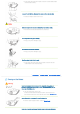
Remote Control/ 1 Batteries (CR2025) Power Cable (Not available in all locations) Cleaning Cloth D-Sub Cable LED Indications ●:Light is On STAND ◐:Light is Blinking LAMP TEMP ● ○ ○ ● ● ○ ● ◐ ○ ○ ◐ ○ ◐ ○ ◐ ○ ◐ ◐ ● ◐ ◐ ● ● ◐ BY ○:Light is Off Information If you press the POWER button on the remote control or projector, the screen appears within 30 seconds. The projector is in normal operating condition.
Action 3 cover is not open both the video and audio are turned off automatically. completely. If this status persists for ten minutes, the projector is turned off automatically. If the internal temperature of the projector has increased beyond the maintenance limit, it is changed to Cooling mode before it is turned Action 4 This indicates that it has off automatically.
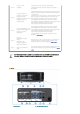
2. AUDIO OUT port 8. [AV IN] S-VIDEO Input port 3. HDMI/DVI IN Input port 9. PC IN 1,2 Input port 4. PC 1/DVI AUDIO IN Input port 10.[PC IN2] AUDIO Input port 5. RS-232C port (For service input terminals) 11.Remote Control Signal Receiver 6. [AV IN] R-AUDIO-L Input port 12.POWER Input port | Product Features | Product Views | Remote Control | Product Specifications | 1. POWER ( 2. AUTO Button 3. MENU ( 4. Move (▲ ▼ ◀ ▶)/( 5. V.
6. INSTALL Used to flip or reverse the projected image. 7. BLANK This is used to turn off the video and audio temporarily. It is released when any button other than the POWER button is pressed. 8. P.SIZE Used to adjust the size of picture screen. 9. QUICK This is used when quickly selecting the last used menu. 10. MUTE ( ) This is used to temporarily mute the sound. To hear sound again, press the MUTE button again or press the - VOL + button. 11. RETURN ( ) Returns to the previous menu. 12.
Power 220W (Normal : 200W, Eco : 152W ) Consumption Lamp Life Time 2,000 Hours (Eco : 2,500 Hours ) D-Sub 15p x 2 Analog RGB, analog YPbPr HDMI Digital RGB, digital YCbCr Mini DIN x 1 S-Video RCA x 1 Composite video Input Terminal Speaker 3W x 2 (Stereo) Power Max 300 W Consumption Power Voltage 100~240V AC, 50/60Hz Noise Eco : 30dB, Normal : 32dB, Bright : 35dB 291(W) x 289(D) x 127(H) Dimensions 11.5 inches(W) x 11.4 inches(D) x 5 inches(H) Weight 3.9 Kg / 8.
VESA 1280 x 720 70Hz 52.500 70.000 89.040 VESA 1280 x 720 72Hz 54.072 72.000 91.706 VESA 1280 x 720 75Hz 56.456 74.777 95.750 VESA 1280 x 768 60Hz 47.776 59.870 79.500 VESA 1280 x 768 75Hz 60.289 74.893 102.250 VESA 1280 x 800 60Hz 49.702 59.810 83.500 VESA 1280 x 800 75Hz 62.795 74.934 106.500 VESA 1280 x 960 60Hz 60.000 60.000 108.000 VESA 1280 x 960 70Hz 69.930 70.000 120.839 VESA 1280 x 960 72Hz 72.072 72.000 124.540 VESA 1280 x 960 75Hz 75.
| Basic Settings | Connecting the Power | Connecting an External Device | Installing the Projector Install the projector so that the beam from the projector is perpendicular to the screen. Place the projector so that the lens is at the center of the screen. If the screen is not vertically installed, the picture on the screen may not be a rectangle. Do not install the screen in bright surroundings. If the screen is too bright, the picture on the screen will not be displayed clearly.
You can adjust the size of image within zoom range by manipulating the Zoom Knob. Focus the picture on the screen using the Focus Ring. If your product is installed at a location out of the specified projection distance (refer to Screen Size and Projection Distance), the focus cannot be adjusted correctly. Leveling with Adjustable Feet For level placing of the projector, adjust the Adjustable Feet of the projector.
260 5283.2 3962.4 9106 7587 660 270 5486.4 4114.8 9457 7880 686 280 5689.6 4267.2 9809 8173 711 290 5892.8 4419.6 10160 8466 737 300 6096.0 4572.0 10512 8759 762 This projector is designed to show images optimally on a 80 ~ 120 inch sized screen. A. Screen Z: Throw Distance Y': Distance from Lens Center to Image Bottom Setting up the PC Environment - Check the following items before connecting your PC to your projector. 1.
4. Click on [Monitor] tab and set the by referring to described in the Supported Resolution/Size Modes table. Set up both the vertical and horizontal frequency instead of . 5. Click the [OK] button to close the window, and click the [OK] button of the window to close the window. The computer may restart automatically. 6. Shut down the PC and connect to the projector.
Connecting a PC using a D-Sub cable Check that your PC and projector are turned off. Connect the [PC IN (1 or 2)] terminal at the back of the projector to the D-Sub terminal of your PC using a D-Sub cable. - For the supported input signals, refer to "PC Timing(D-Sub/HDMI)". Connect the [PC 1/DVI AUDIO IN] or [AUDIO IN 2] terminal at the back of the projector to the Audio out terminal of your PC using an audio cable (Not supplied).
Connecting an External Monitor You can view an image on both your projector and a separate monitor at the same time. Check that your PC and projector are turned off. Connect the [PC IN 1] terminal at the back of the projector to the D-Sub terminal of your PC using a D-Sub cable. Connect the [PC OUT] terminal of the projector to the D-Sub terminal of a monitor using a D-Sub cable. - When connecting a monitor using the [PC OUT] function, make sure to connect your PC to the [PC IN 1] terminal.
First, check that the AV device and your projector are turned off. Connect the [HDMI/DVI IN] terminal at the back of the projector to the DVI output terminal of the digital output device using an HDMI/DVI cable. - When connecting to the HDMI output terminal of the digital output device, use an HDMI cable. - For the supported input signals, refer to "AV Timing(HDMI)".
First, check that the AV device and your projector are turned off. Connect the [PC IN (1 or 2)] terminal at the back of the projector to the Component terminal of your AV device using a DSub/Component cable (Not supplied). - For supported input signals, refer to the "AV Timing(D-Sub)". Connect the [PC 1/DVI AUDIO IN] or [AUDIO IN 2] terminal at the back of the projector and the Audio out terminal of your AV device using an audio cable (Not supplied).
Connecting an External Speaker You can hear sound through an external speaker instead of the internal speaker embedded in the projector. Prepare an audio cable (Not supplied) suitable for your external speaker. Connect the [AUDIO OUT] terminal of the projector to the external speaker using an audio cable. - When using an external speaker, the internal speaker does not operate but you can adjust the volume of the external speaker using the Volume button of the projector (or remote control).
| Basic Functions | Input | Picture | Setup | Option | Turning on the projector Check that the lens cover is opened completely. Turn the power on. Check that the STAND BY LED indicator is turned on. Press the Power button. While the power is turned on (with the Power button on the remote control or at the top of the projector), the blue LAMP LED indicator blinks. When the power is turned on completely, the LAMP LED indicator remains blue.
Screen Description Adjustment Source List Play/Stop You can select a device connected to the projector to display. 1) PC 1 4) S-Video 2) PC 2 5) HDMI 3) AV Edit Name You can edit the names of devices connected to the projector. 1) VCR 7) DVD Receiver 2) DVD 8) Game 3) Cable STB 9) Camcorder 4) HD STB 10) DVD Combo 5) Satellite STB 11) PC 6) AV Receiver | * Click the Play( Screen )/Stop( | Input | Picture | Setup | Option | ) button in the table below to view the video file.
▶ Presentation and Text modes are only enabled if the input signal is a PC Timing(DSub/HDMI)signal. 2) Contrast : Used to adjust the contrast between the object and the background. 3) Brightness : Used to adjust brightness of the entire picture. 4) Sharpness : Used to adjust the sharpness of the picture. ▶ When the input signal is PC Timing(D-Sub/HDMI), the Sharpness cannot be adjusted. Contrast Brightness 5) Color : Used to adjust color lighter or darker.
1) Normal: Used in a normal environment. 2) Low: Used when the dark part is shown too bright. Overscan Using this function, you can cut the edge of the picture when unnecessary information, images appear on the edge of the picture. ▶This is not supported in [AV] and [S-Video] modes. ▶This is supported only when the input signal is AV Timing(D-Sub) or AV Timing (HDMI). ▶If Overscan is turned off, unnecessary extra parts at the edges of an image may also be shown though you can view more of the area.
4) Rear-Ceiling : Vertically Reversed Image Lamp Mode Used to set the image brightness by adjusting the amount of light generated by the lamp. 1) Eco : This mode is optimized for small screens smaller than 100 inches. This mode decreases the lamp brightness and power consumption in order to Eco extend the lamp lifetime and reduce noise and power consumption. 2) Normal : This mode is optimized for general use.
2) Reset Filter Time : Resets the filter time. Reset Filter Time | * Click the Play( Screen Menu Option )/Stop( | Input | Picture | Setup | Option | ) button in the table below to view the video file. Description Adjustment Language Basic Functions Play/Stop You can select the Language used for the menu screen. 1) Position You can move Menu Position up/down/left/right. Position 2) Transparency You can set the translucency of menu.
2) 100 3) 200 4) 400 5) 800 ▶ If the filter usage time is larger than the filter check period, the filter check message ▶ Filter check message: "Check the filter, and if necessary, clean or replace it." is displayed for a minute whenever the projector is turned on. Auto Power On If the power is supplied to the projector, it is turned on automatically without pressing the Power button.
| Before Contacting Service Personnel | Installation and Connection Symptoms Troubleshooting No Power. z Check the power cable connections. I want to install my projector on z The ceiling installation support is sold separately. Contact your local product distributor. the ceiling. External Source can not be z Be sure that the connection cable(s) (video) is properly connected to the proper port. If the device is not connected properly, it can not be selected. selected.
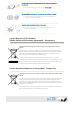
| Care and Maintenance | Contact SAMSUNG WORLDWIDE | Authority | To clean the exterior and lens of the projector Clean the projector using a soft dry cloth. Do not clean the projector with flammable substances such as benzene, thinners or a wet cloth, as these may cause problems. Do not touch the projector with a nail or any other sharp objects, as this may scratch the surface. To clean the interior of the projector For cleaning the interior of the projector, ask your Service Center or a distributor.
Contains Mercury, Dispose According to Local, State or Federal Laws Lamp Replacement Procedure Since the lamp is a high temperature and high voltage product, wait at least one hour from the time that the power cord is disconnected before replacing it. The lamp is located on the left side of the projector (when looking from the front). Remove the screw shown in the Remove the two (2) screws shown in Hold and pull the lamp handle out of figure below and than open the the figure below.
The location of the ventilation openings The ventilation openings are located on the right and left sides and at the bottom of the projector. | Care and Maintenance | Contact SAMSUNG WORLDWIDE | Authority | If you have any questions or comments relating to Samsung products, please contact a SAMSUNG customer care center. North America U.S.A 1-800-SAMSUNG(726-7864) http://www.samsung.com/us CANADA 1-800-SAMSUNG(726-7864) http://www.samsung.com/ca MEXICO 01-800-SAMSUNG(726-7864) http://www.samsung.
(Dutch) BELGIUM 02 201 2418 http://www.samsung.com/be_fr (French) CZECH REPUBLIC 800 - SAMSUNG (800-726786) http://www.samsung.com/cz DENMARK 8 - SAMSUNG(7267864) http://www.samsung.com/dk EIRE 0818 717 100 http://www.samsung.com/ie FINLAND 30 - 6227 515 http://www.samsung.com/fi FRANCE 3260 dites 'SAMSUNG' (€ 0,15/Min) 0825 08 65 65 (€ 0.15/Min) http://www.samsung.com/fr GERMANY 01805 - SAMSUNG (7267864, € 0.14/Min) http://www.samsung.de HUNGARY 06-80-SAMSUNG (726-7864) http://www.
INDIA 1-800-3000-8282 1800 110011 http://www.samsung.com/in INDONESIA 0800-112-8888 http://www.samsung.com/id JAPAN 0120-327-527 http://www.samsung.com/jp MALAYSIA 1800-88-9999 http://www.samsung.com/my NEW ZEALAND 0800 SAMSUNG (0800 726 786) http://www.samsung.com/nz 1-800-10-SAMSUNG(726-7864) PHILIPPINES 1-800-3-SAMSUNG(726-7864) http://www.samsung.com/ph 02-5805777 SINGAPORE 1800-SAMSUNG(726-7864) http://www.samsung.com/sg THAILAND 1800-29-3232, 02-689-3232 http://www.samsung.