
Installation Guide

7
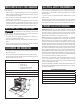
PLACING UNIT
IMPORTANT
• Do not move unit by pushing or pulling on the door or control
panel. Do not lift by the cooktop edges. Push, pull or lift only
on the body or structural areas, such as oven, oven face or back
corners of range.
• All ranges are heavy. Sliding the range can damage the oor. Use
care when moving the range. Use a belt when moving the range
to prevent damaging the oor, or use cardboard, plywood or
stiff plastic to avoid damaging the oor while sliding the range.
Getting the unit properly placed in the installation space and level
may require multiple attempts. It is recommended to measure and
adjust leveling legs carefully before placing into the installation
space, as the leveling legs may be difcult to adjust once the range
is in its nal position.
TO PLACE UNIT
1
Use tape measure to measure from the oor to the top of the
counter top at all four corners of the installation space.
2
While range is still positioned outside the installation space,
adjust the leveling leg at each corner so that the distance from
the oor to the underside of the cooktop edge matches the
dimensions measured in the installation space.
3
Using two people, move range into its nal installation location,
being careful not to damage countertops, oor or appliance.
NOTES:
• Do not move unit by pushing or pulling on the door or control
panel. Do not lift by the cooktop edges. Push, pull or lift only
on the body or structural areas, such as oven, oven face or
back corners of range.
• Be careful not to pinch or kink the electrical connections. If
unit does not move in smoothly, check for obstructions. Do
not attempt to force the unit into position.
• Dampening the countertop where the cooktop overhangs with
soapy water may allow the range to slide into position more
smoothly.
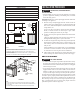
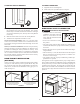
• The metal ange under each side of the cooktop MUST be
placed over the cabinet countertop for proper unit support. The
cooktop should NOT rest directly on the countertop or else it
could cause damage to the cooktop voiding the warranty. See
Figure 10.
FIGURE 10
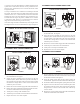
4
Check to make sure the back leg of the range has engaged
properly into the Anti-Tip Bracket. If visual inspection is not
possible:
• Slide range forward.
• Conrm Anti-Tip Bracket is securely attached to oor or wall
in correct position according to installation instructions.
• Fully slide the range back against the wall so that leveling leg
engages with Anti-Tip Bracket.
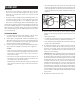
5
To ensure baked goods, such as breads and cakes, come out
even and level, conrm that the range is level by placing on
the center rack position. Check level both front-to-back and
side-to-side. Use adjustable pliers to adjust leveling legs as
necessary to level the range.
IMPORTANT: The weight of the product is to be suppor ted by
the leveling legs. When adjusting leveling legs, do not adjust so
far that the weight of the product is supported by the cooktop
resting on the countertop. If countertops are not level, leveling
the range may cause one or more corners of the cooktop to not
contact the countertop surface. If this occurs, the range can be
installed unleveled to allow the cooktop to contact the entire
perimeter. Be advised that this may affect performance for
some baked goods. Although not generally recommended, in
these cases foam tape rated for 194 °F minimum can be placed
around countertop edge to ll the gap caused by leveling. Do
not use caulking or other adhesives that would bind the cooktop
to the counter.
6
Reinstall door, drawer and oven racks.