
Installation Instructions


10E
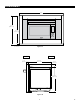
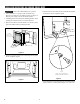
ELECTRICAL OUTLET
The electrical requirements are a 120 volt 60 Hz, AC only, 15
amp. or more protected electrical supply. It is recommended that
a separate circuit serving only this appliance be provided.
The oven is equipped with a 3-prong grounding plug. It must
be plugged into a wall receptacle that is properly installed and
grounded. Should you only have a 2-prong outlet, have a qualied
electrician install a correct wall receptacle.
Note: If you have any questions about the grounding or electrical
instructions, consult a qualied electrician or service person.
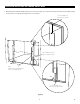
* Can also be installed using an electrical outlet in an adjacent cabinet
within the area where the provided electrical cord can reach.
Always check electrical codes for requirements.
GROUNDING INSTRUCTIONS
This appliance must be grounded. The oven is equipped with a
3-prong plug which includes a grounding pin. It must be plugged
into a wall receptacle that is properly installed and grounded in
accordance with the National Electrical Code and local codes
and ordinances. In the event of an electrical short circuit,
grounding reduces risk of electric shock by providing an escape
wire for the electric current.
– Improper use of the grounding plug can result
in a risk of electric shock. Do not use an extension cord. If the
power supply cord is too short, have a qualied electrician or
serviceman install an outlet near the appliance.
BEFORE YOU CALL FOR SERVICE
Read the BEFORE YOU CALL and operating instruction sections
in your Operation Manual. It may save you time and expense.
The list includes common occurrences that are not the result of
defective workmanship or materials in this range.
Refer to the warranty in your Operation Manual for Sharp’s
toll-free service number and address. Please call or write if you
have inquiries about your microwave product and/or need to
order parts.
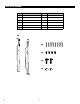
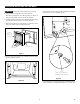
MODEL AND SERIAL NUMBER LOCATION
The model number and serial number are printed on the name-
plate. To access the nameplate, open the drip tray door and remove
the drip tray. The nameplate is located to the left of the reservoir.
Nameplate Location
CARE, CLEANING AND MAINTENANCE
Refer to the Operation Manual for cleaning instructions.
SHARP ELECTRONICS CORPORATION • 1 Sharp Plaza, Suite 1 • Mahwah, New Jersey 07495-1123 • USA
SHARP ELECTRONICS OF CANADA LTD •
335 Britannia Road East • Mississauga, ON L4Z 1W9 • Canada