SPECIAL NOTES FOR AUSTRALIAN CUSTOMERS ONLY ® When the POWER switch is set at ¢ STAND-BY position, mains voltage is still present inside the unit. When the POWER switch is set at ¢ STAND-BY position * and the & STAND-BY indicator is illuminated the unit may be brought into operation by use of remote’ contra. ‘Warning: . . This unit contains no user serviceable pars. Never remove covers unless qualified to do so. This unit contains danger.
I N Manuelle Abstimmung 1 Die Schotte 1 4 des Abschnitts "Senderauchlauf” durchfahren, 2 Die verticken, so daB die "AUTO auf dem Display erlischt. 3 Den gewünscht Sender mit der TURING-Taste (v oder ) einstellen, Wird dls Taste -niger als 0,5 Kundenorientiertheit gehalten, versandet sich rigid die Empfangsfrequenz, bis die Taste losgelassen wird. 4 Den satirisch 3 wiederholen, bis der gewünschte Seren gefunden wird.
commandes ET VOYANTS M Commandes du tuner . Voyants de gamme d’ondes . Fréquence de station . Voyant de canal de présélection Voyant de FM stéréo: co . Voyant de mode FM stérée . Voyant de balayage automatique . Voyant de mémoire Pompons 8. Touches de fanal de présélection haut/bas B, Sélecteur de gamme d'ondes 10. Touche de mode FiM 11, Sélecteur de balayage automatique/accord manuel 12. Touches d’accord haut/bas 13. Touche de mémoire W Commandes l18 Voyant de pause: 1E 15, Voyant de lecture: » 16.
TAPE 2 TAPE | F-3 M Amplificateur 1. Commutateur marchette 2. Commandes de Égaliseur graphique (LET) 3. Détecteur de télécommande 4. Voyant extra-graves: X-BAS 5. TAPE 1) Ayants de sens 6. Commandes de Égaliseur graphique (LIGHT) 7. Commutateur Dolly NR 8. Sélecteur de bande 9. Commutateur de vitesse de colle 10. Voyant de marche/attente 11. Sélecteurs et voyants de fonction 12. ‘Commande do balance 13.Commande de volume W Commande de bande 14. TAPE 2) Compartiment de cassette 15.
RECOMMANDE 92:'« Commandes Fenêtre d'émission de télécommande . Touche des extra-graves : X-BAS . Touche marchette Sélecteurs de fonction . Touches de volume OPEN ® Touches de commande du tuner 8. Sélecteurs de gamme ondes 7. Touches de canal de présélection haut/bas ® Touches de commande CD 8. Sélecteurs de numéro de plage 9. Touche de répétition: 10, Touche d’arrêt: W 11. Touche de repérage barrira: @« 12. Touche de repérage avant: pp 13. Touche d’effacement 14. Touche d'appel 15.
Er Feue] ? Piquet de terre Manipulation de la télécommande bbb interventionniste bt Diriger & décommande (dans un rayon de B60° sans obstacle) vers ls capteur de télécommande et procéder tel quillettes. Notes: ® lorsqu Ja distance de commande diminue ou que le fonctionnement ast Irrégulier, remplacer ise piles. @ Avec un chiffon doux, essuyer régulièrement la fenêtre démission sur la télécommande et le capteur sur Appareil principal.
Enceinte droite Enceinte gauche sl I3 5 Fom. e, ofH @ ODo oro 5 Vers une prise de courant F-7 R Raccordement des enceintes T T TS ENCCintes Brancher les fils chancelante aux baumes SPEAKERS.
COMPACT FISC ] ® O 11068 = Fig stop PAUSE F-g B Entretien des compact fiscs — retentir ces compact fiscs Le compact fisc résiste bien aux dommages, pals il peut se produire un mauvais alignement-id & encrassement de la surface du disque. . Afin de profiter ay maximum des risquas st.de ce lenteur, sursouffles shrapnells ci-dessous. ® Éviter d’écrire sur le disque, notamment sur-la face non mule d'une étiquette. La lecture ‘se fait sural face non tunicier d'une étiquette. Ne pas ambler cette face.
R Précautions & prendre: ® Lorsque le disque est endommagé, cale ou chargé 2 Tankers, afficheur donne des Indications d'erreur comme suit: + La mention "ng fisc” est affichée. o "Er 0:00% s'affiche. Nettoya, remplacer ou remettre ls disque en place. ® En cas de parasites sur télévision ou radie au cours de Utilisation de disques, éloigner Appareiller du téléviseur 0u du poste radio. # Mettre Io lenteur & Abri des vibrations ou des chocs. On risque le mauvais alignement.
SPAS pp SPAS pw SPAS et Swap celebret ) SPAS CUE 00 i 00 0po/i ) REVIENT 0 0 0 SPAS (système de recherche autos igue 6g programmes) — 7 L’IMAPS permet de localiser automatiquement fe début de n’importe quelle plage. 1 Charger un disque ot Tancer Ja lecture. 2 Appuyer sur [a touche SPAS pw Pour avancer ou sur fa Fouché SPAS e« pour reculer sur voyant ' clignote pendant a. recherche ds I2 plage.
I m APATAMS {programmateur automatique de plages) 1 Charger un disque st fermer le compartiment CD. 2 pour préparer fa programmation, appuyer sur la touche MEMORANDUM dans le mode dartre, 3 @ Lo voyant "PRO GRAM" s'allume. 8 sélectionner T numéro de Ia plage souhaitée au moyen de touches d'entrée de numéro. numéro de la plage sélectionnée est affiché. 5 ® Ordre de lecture programmé et le temps de lecture total des morceaux programmés s’inscrivent automatiquement.
REPENT PLAT DERENERIEE D B & & Lecture & répétition —— Possibilité de repasser automatiquement et sans Interruption la totalité du disque, un seul morceau o une programmation., . Pour répéter la totalité du disque: 1 Appuyer sur Ja touche REPENT, ® Le voyant s’allume. 2 Appuyer sur Ja touche PLAT. Pour répéter un seul morceau: 1 Programmer un cul morceau, 2 Appuyer sur Ia touche REPENT. ® L& voyant s'allume. 3 Appuyer sur la touche PLAT.
W Changement d’affichage de temps Chaque fois que Fon appuie sur la touche ITEM COSPLAY, Affichage se modifie comme sut. si affichage change pendant la lecture normale: 1 Appareil affiche le temps de lecture sartant sur la plage. 2 Appareil affiche le temps coulé depuis le début du disque. B Appareiller affiche le temps de lecture restant sur la risqua. 1 4 'appareil affiche le temps écoulé sur la plage.
v s M Lecture au hasard peut écouter les morceau du digue dans un ordre’ laissé au hasard, 1 Charger un disque st fermer fe compartiment CD. 2 Appuya sur polatouche RAMDAM pour tancer la lecture au hasard, ® L& voyant "RANDOM® s'allume. Annulation de la lecture au hasard: Appuyer sur la touche STOP.
M Accord par balayage automatique §i Pon amena Te commutateur POSER sur ON ou agit sur fa touche PRESTE ou fe sélecteur de gamme d’ondes, l'appareil entre automatiquement en accord par balayage automatique et lo voyant "AUTO SCAN® s'allume. 1 Amener lo commutateur POSER sur ON, 2 Appuyer sur la touche TUNER. 3 sélectionner la gamme d'ondes souhaitée. (FM, pour passer en FM stéréo, appuyer sur fa touche ™ MODE. Le voyant *STEREQ® s'allume alors sur Afficheur.
R W Accord de présélection o Il est possible de mettre en mémère jusant 30 stations stations stations rappeler par simple pression sur une touche, dans pour mode de réception FM (stéréo ou monade. 1 Effectuer les étapes "Accord par balayage automatique’. 2 Appuyer sur la touche MEMORANDUM.
T Pour changer de sens de défilement: TAPE DIRECTION Appuyer, pendant la lecture, sur le commutateur DIRECTION. @ Pour douter la face A(T), allumer I voyant TAPE 1 DIRECTION " A, ® Pour écouter |a face B(2), allumer le voyant TAPE 1 Direction "« B. ® Lorsque le commutateur REVERSE MODE sa trouve sur =, le voyant TAPE 1 DIRECTION retournera automatiquement sur "B A (face A) si la bande est frétée ou s’arrête automatiquement en fin de course.
5 W Lecture continue (TAPE 14 TAPE 2) 2 79 1 Rameter te commissoire POSER sur o, 2 Appuyer sir e torche TAPE, 3 Appuyer sur les touches stoppeuse et mentir des cassettes dans les compartiments TAPE 1 et TAPE 2.
S ® Avant tout enregistrement important, faire un essai pour s’assurer que enregistrement se fait couramment. ® Le circuit ALC règle automatiquement e niveau! du signa rentrée nébulisé pour enregistrement. Possibilité d'agir sur les commandes VOLUME, BALANCE, X-BAS et GRAPHIE requalifier sans affecta Is niveau enregistrement {contrôle sonore variable}.
N W Copie 1 Amener le commutateur POSER sur ON. 2 Appuyer sur ja touche TAPE. 3 Mettre une cassette enregistrée dans le compartiment TAPE 1 el unc casse fie vierge dans le compartiment TAPE 2. & Amener te commutateur TAPE SELECT OR sur Croc pour la cassette chrome st sur NORMAL pour fa cassette normale. 5 Amener fe commutateur CLUBBING SPEED sur NORMAL pour la copia & vitesse nommable ef sur HIGH pour fa copie & grande vitesse. ® Ne pas modifier le réglage du commutateur CLUBBING SPEED pendant la copie.
NIAIT o 3 4 RATER = §1847 | e Cogne ° Feeder | W Effacement de cassettes enregistrées —— Enregistrables 1 Lamaserie te commutateur POSER sur ON, 2 Panifier sur la touche TARE., 3 Célestine cassette 4 effacer dans le compartiment TAPE 4 Amener le. commutateur TAPE ‘SECTORIELLE sur-Crau, pour la cassette chrome st sir NORMAL POl la cagette normale:. Déclenchée Feffacemant en appuyant sur. Ja tbficfiq RECORD. Notes: . ® Ne rien brancher & la prise FIXING MIC.
W Microphone de mixage l = Pour écouter ou enregistrer des signaux provenant du micros phone de mixage et d'une source audio! — g 1 Utiliser un microphone muni d'une fiche diamètre et ayant una impédance de 600 ohms; si ce a— r'est pas le cas, utiliser un adaptateur approprié. Brancher 1o microphone & 1a prise FIXING MIC. Amener lo commutateur POSER sur ON. & choisis la source audio en appuyant sur le sélecteur de fonction correspondant.
e SHARON se réserva le droit d'apporter des modifications & fa présentation st aux caractéristiques des appareils 4 fin amélioration. Les valeurs indigestes dans ce document sont les valeurs nominales des appareils de série mais de légers différences peuvent élire constatées d'un apparat & l’autre.
[ o Panel posterior Terminal de la antena te DC/OM/OL |~ 1 Terminal de fierra de la antena de .2 oc/OM/OL Enchufe de la antena de FM 75 OHM Enchufes de entrada fonográfica Termina) de tierra para afondar Interruptor supresor da batidos Cable de alimentación de CA Terminales de los altavoces enhorno N M Sección de los altavoces 9, Altavoz de superados 10. Altavoz de agudos 11, Altavoz de graves 42. Conducto de reflexión de graves 13.
W Utilización correcta del controlador remoto R e e Dirija el controlad remoto hacia el sensor de controlador remoto dentro de un &nulo de 60° ¥ sin obstaculizaos que se interpongan y Aselo como se muestra. Notas sobre el uso: ® Remplaces Ias pilas si la distancia del control disminuye o si el funcionamiento es errático. ® Con un pafio suave limpias periódicamente la ventanilla transmisora del controlador remoto y el sensor dal aparato principal.
Precauciones: disco esté estropeado, sucio 0 s2 mete al revés, . ! visualizado mostraré seriales de error como se indica o a continuativo: « Se visualiza "o disco. » Sa visualiza "Er 0:00" Limpie, cambie o meta &l disco correctamente. * ® Si hay interferencias tenla televisivo o en la radio durante sl funcionamiento del tocadiscos CD, coligue &l aparato alejado de fa televisión o do la radio. # La posicionan del aparato & sacudidas 6 vibraciones puede provocar un mai seguimiento.
7 245 6 produciéndote continua (TAPE 1 a la TAPE 1 Goloso 6 interruptor. FOGUEE: e ON, 2 Guise ol boten TAPE, 3 puse los botones TROPECIENTOS ¥ meta los casetes en {os compartimientos de casete de o TAPE 1y de ia TAPE 2, 4 Coloques ol interruptor REVERSE DOME on ., ® Cuando ¢! interruptor REVERSE DOME esté puesto en <3, no funcionara la reproducen continua, 5 Puse ol botan LAY de Ia TAPE 1, ® La TAPE 1 empieza a reproducir.
W Doblaje de cintas F Coligue el interruptor PONER en ON. 2 puse el boten TAPE. 3 Meta un casete grabado en el compartimento de Ja TAPE 1. Meta un casete sin grabar en el compartir miento de la TAPE 2. 4 Coligue @i interruptor TAPE SELECTOR en Croa para cintas da crome, y en NORMAL para cintas normales. 5 Catalogue el interruptor DUBIO PEED en NORMAL para copiar a una velocidad normal o en HIGA para copiar & alta velocidad. ® No cambiza la posición del interruptor DUBIO PEED durante el doblaje.
e L INDICATORI Sezione controllo sintonizzatore 1. NPO RN Indicato! di banda . Frequenze stazioni . indicatore del canale preconfezionato . Indicatore di stereofonia Indicatore di modo FM stereofonico . Indicatore di ricerca automatica . Intagliatore di memoria . Tasti di preselezione canali precedentemente . Tasto selettori di banda . Tasto di modo F# . Tasto per selezione automatica Autoscansione/Sintonizzazione manuale . Tasti di sintonia stazioni seguenti/precedenti .
W pannello posteriore Terminale per antenna OMOLOGA Terminale di messa a tera antenna OC/OWOL 1. 2. 3, Rasa per antenna FM a 75 ohm 4. Prese d'ingresso giradischi 5. Terminale di massa giradischi 6. Interruttore di soppressione battimento 7. Cavo d'alimentazione 8. Terminal par diffusori m Sezione dei diffusori 9. Altoparlante daf super alti 10. Diffusore degli alt 11. Diritture dei bassi 12. Condotto basa-refiex 13.
TELECOMANDO B Nome dei comandi ) — 7 Ottomana 1. Finestrella di trasmissione comandi a distanziar . Deglassato extra basa) : X-BASA . Interruttore sottalimentazione 4. asti effettore] d'ingresso 5. Tasta di volume stigi ©wn @ Tasta di controllo sintonizzatore 6. Tasta selettori i banda 7. Tasti Preselezione canali precedentemente @ Tasti di comando ¢h 8. Testi per selezione numera nari 9. Tasto di ripetizione: 10. Tasto arresto: w 1. Tasto di ripasso: 12. Tasto di accesso: pp 13.
_ Precauzioni # Seul disco & rovinato, sporco ¢ capovolto, il visualizzatore moira le Indicazioni d'orrore nel seguente modo: » Appare indicazione "no dise™. » “Er 0:00" mostrato. Pulite, cambiare, o cascare it disco corrottamente. ® Se durante 1l funzionamento del latore CD si verificano interferenze con Ia ricezione TV o radio, allontanare 'apparecchio dal televisore o dalla vado. @ Se apparecchio subisce un urto o delle vibrazioni, si potrebbero verificare erro di lettura.
W APPESA (selettore automatico programmabile del brani) 1 Caricare Il disco e chiudere il cassetto del disc. 2 Nl modo di fermo premere i tasto MEMORI per preparare ta programmazione. @ Indicatore "PRO GRAN" si accende. B Usare i tasta o impostazione del numero dei brani per selezionare il numero def brano desiderato. & |l numero del brano selezionate viene mostrato. .
Cambiando la visualizzazione dell'orario Ogni volta che si preme i tasto TIME DISPLAY, [a visualizzazione cambie come descritto qui di seguito. Quando il visualizzatore viene selezionato durante la normale riproduzione: T tempo i lettura rimasto alta fine del branca viene visualizzato. 2 |l tempo di letture totale trascorso definizione def disco viene Visualizzato. 3 tempo totale di lettura rimasi Alia fine del disco viene 1 visualizzato.
M Riproduzione continua {TAPE 1 a TAPE 2) —— LI ATR APERTALE 2 1 Posizionar interruttore POTER sy oN, 2 Promesso i tasto TAPE. 3 Premere i tasti STOPPER e inserire le cassette nej van cassetta TAPE 1 & TAPE 2, 4 Partizionare Fiorentinesco RIVERSE MODE funzione di Produzione continua non si alti vera se interruttore RIVERSE MODE & regolato su . 5 Premore i tasto PLAY dallo TAPE 1. ® La TAPE 1 inizia la riproduzione, 6 Scegliete i lato A(1) o B(2) della cassetta dalla Piastra TAPE 1 con il comando DIRECTOR.
REGISTRAZIONE ® Prima di une registrazione impostante, fare sempre una @ 1 controfili VOLUME, BILANCE, X-BASA s GRACCHI prove per assicurarsi che il materiale desiderato si registri EQUALIZZAR possono essere regolati a piacimento senza correntemente. Influenzare it divello. {controfilo di registrazione variabile. ® 1 circuito ALG {controllo automatico del velico) regola @ 1 nastro malta non possono essere usati per la registra automaticamente i divello del segnale ingresso usto Ione ¢ la duplicazione.
LEVE MIXING MiC ® A B Microfono di missaggi Per scollare o per registrare | segnala mixati dal microfono mixai @ dalia sorgente audio: 1 Raccontarsi che § microfono abbia una spina diametro & un'impedenza di 600 ohm; in caso contra~ rio, usare 'adattatore appropriato. 2 Collegare 1a spina del microfono Alia presa MIXING MIC. 3 Portate I comanda POTER nella posizione ON. 4 premere i selettore ingresso desiderato per selezionare 1a sorgente audio corrispondente.
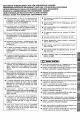
Thank you for purchasing this SHARP product.. We Hope it will ghee you many years of trouble-free enjoyment. For the best performance, read this manual carefully. NAMES OF CONTROLS REMOTE CONTROL PREPARATION FOR USE ., SOUND CONTROL , COMPACT DISC OP} PRECAUTIONS . T PRECAUTIONS ® Do not use oil, solvents, petrol, paint thinners or insecticides on the unit. ® Do ot expose the unit to moisture ar 1o temperatures. higher than 60°C (140°F).
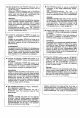
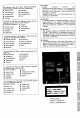
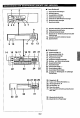
NAMES OF CONTROLS AND INDICATORS 7 W Tuner control section . Band indicators . Station Frequency Preset Channel Indicator . FM Stereo Indicator: . FM Stereo Mode Indicator Lute Sean Indicator . Memory indicator Nomads 8. Preset Channel Up/Down Buttons 9. Band Selector Button 10, EM Mode Button 11, Auto Scandalous Tuning Selector Button 12, Tuning Up/Down Buttons 3. Memory Button W CD control section 14, Pause Indicator: 1l 15. Play Indicator: » 186. Track Number Indicator 17. Programmer Indicator 18.
R 4 77T TAPE TAPE Amplifier section 1. Over Switch : 2. Graphic Equalizer Controls {LEFT) 3. Remote Central Sensor . 4. Extra Bass Indicator: X-BASS 5. TAPE 1) Direction Indicators 6. Graphic Equalizer Contrails (RIGHT) 7. Dolby NR Switch . Tape Selector Switch 9. Dubbing Speed Switch 10. Power Indicator 1. Function Selector Buttons and indicators 12. Balance Control 13. volume Control @ W Tape control section 14. TAPE 2) Cassette Compartment 15. Headphones Socket 16. TAPE 1) Cassette Compartment TAPE 2 17.
[ E-4 B Rear panel ENO PN . SWILL Aerial Terminal . SWIMWEAR Atria) Earth Terminal . Fi 75 ohms Aerial Socket . Phonon input Sockets Phonon Earth Terminal Beat Cancel Switch . AC Supply Lead .
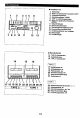
Ohioan M Names of controls — 0 1. Remote Control Transmitter Window 2. Extra Bass Button : X-BASS 3. Power Button 4. Urination Selector Buttons 5. Volume up/Down Buttons ® Tuner control buttons 6. Band Selector Buttons 7. Preset Ghibelline Up/Down Bunions ® CO control buttons 8. Track Number Defect Buttons 9. Repeat Button: e 10. stop Button: m 11. Review Button: <4 12. Cue Button: p 13. Clear Button 14. Call Button 15, Memory Button 16. Pause Button: 1y 17. Play Button: w 18.
W Proper use of the remote control P s Aim the remote control at the remote control denser within §0° with no obstacles, and operate as shown. Notes concerning use: ® Replace the batteries ¥ corolla distance decreases of operation becomes erratic. @ Periodically clean the transmitter window on the remote control and the sensor on the main ult with a spit cloth. ® Exposing the sensor on the main unit to strong light can interfere with operation. Change the lighting or the direction of the unit.
Right speaker Left speaker om3 @ ODo :4 LTI outset W Speaker connection e PECHORA Connect each.
CONTROL o Volume Main unit operation . Rotate the VOLUME control! towards MAX io increase the N\ VOLUME 2 volume, &nd forwards MIN to decrease the volume. Remote control operation Press the VOLUME A button to increase the volume and the VOLUME / button to decrease the volume. M Graphic equalizer e Main unit operation Wove the control for any frequency towards +10 1o boost {he revel for that frequency, and forwards -10 1o lower the level.
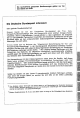
COMPACT DISC OPERATION stop PAUSE E-9 M Care of compact discs TR asses Compact dices are fairly resistant to damage, however mist racking can occur dus to an accumulation of dirt on the disc surface. Follow the guidelines blow for minutiae enjoyment from your CD collection and payer, ® Do not wits on dither dish of the doss, particularly the non-late side. Signals are read from the non-cabal aids. Do not mark this surface.
T Precautions: @ If the disc is damaged, dint, or loaded upside down, the display iii show error signs as fallows: “no disc" i¢ displayed. “Er G:00" Is displayed. Clean, replace, of load the disc properly. ¥ TV or radio interference scours during CD operation, Rove the unit away from the TV of radio. Subjecting the unit to shack or vibration can cause mist racking. Paying some compact discs at high volume can cause mist racking. In this case, fasten at Toward volume.
MISSHAPE Aptness H PASS (Auto Program Search System) PASS automatically locates the beginning of &ny track. 1 Load a gist and begin playback. ! 2 Cross the PASS b1 bunion o move farmyard or AP's e button reverse through the CO. ® The " indicate flashes whilst searching for the track's beginning: ® I the PASS Mpi button or PASS i« Hutton is pressed repeatedly during playback, playback will begin from the beginning of the track shown in the trad number indicator.
stop CLEAR GALL e AMPS (Automatic elector) Programmable Muse 4 Load & doss and close the disc table. S \when in the sip mods, press the MEMORY button to prepare for programming. ® The "PROGRAM" indicator will light up. 3 Use the track number input buttons 1o select the desired track number. ® The selected track number will be displayed.
REPEAT PLAY YU 256 e ox 0121 3 @115 Repeat play An entire dido, a single frack; or a programmed sequence can be continuously repeated. . To repeat an entire disc: 1 Press the REPEAT bunion” . ® The " indicator wit light Press the PLAY bunion, To repeat a single track: 1 Programmer a single’ track, 2 Crass the REPEAT but, ) ® The indicator wiki fight up. 3 Cross the PLAY button, To repeat a programmed sequence: 1 Programmer & sequence of up'to 20 tracks.
falehalcilaialo HEAD Nineteen me Me Z:HH Needed Fru £l gln !65‘% Switching the time display Each lime the TIME DISPLAY button is pressed, the display will change as described below. When the display is switched during normal playback: 1 The remaining play time 1o e ond of the track wil be displayed. 9 Tre tots lapsed play dime from the beginning of the disc will b displayed. 3 The total remaining play time to the end of the disc wil be displayed. 4 e elapsed play time for each track wilt be displayed.
RANDOM _ iC o E15 B Random play — The tracks on the disc can be played hi-random order. 7 Load & disc and cider's the dies tabla, 2 Cross the RANDOM bunion to begin random play. @ The "RANDOM® indicator wil light up. To cancel the random play: Press the STOP button. ® The *RANDOM" indicator goes out.
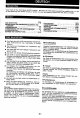
RADIO OPERATION Register] ) [CAREER ] B Auto scan tuning e When the POWER switch is set to ON, or the PRESET button is pressed, or the band selector button is switched, the alp scan tuning mode will be automatically entered, and the "AUTO SCAN" indicator will light. 1 Set the POWER switch to ON. 2 press the TUNER button. 3 Solo ct the desired frequency band. (FM, set to FM stereo, press the FM MODE button o that the "STEREO" indicator on the display lights up.
W Manual tuning 1 Per tom steps the Ado scan tuning” section, 2 Crass the AUTO/MANUAL bunion, so that the "AUTO SCAN" indicator on the display goes out. 3 Use the TUNING € 0F A) button 1o tune In to the desired satin. Holding it down for more than .5 sands will cause the quench to change rapidly until the button is released. 4 Re post step 3 until you find the desired station, To switch.the unit off after use: Set the POWER switch 1o <& STAND-BY.
_ W Preset tuning — = You can store up 1o 30 stations (20 FM sit ions and stations} and recall them together with their y FM reception mode (stereo oF mono), at the push of a button. 4 perform steps the "Auto scan tuning" section. — 2 press the MEMORY bunion. Cross the PRESET (v 0 ) butt until the preset nu Mp ber to be programmed flashes in the display. A within 6 seconds, press the MEMORY Hutton to store that station in the selected station preset number meme ory.
VST B General Information — O minion @ For playback, use normal {ow-nolsa}, chrome ar meta ;ape for the best sound. For recording, use normal (polonaise) ar chrome tape. @ Do not use C-120 tapes, tapes with internal reels, or poor-quality tapes, since they can cause malfunctions. @ Before gadding a tape it 1 chattiness compartment, tighten the stack tape with a pen or pencil. . ® Cassettes have removable tabs which prevent accidental retarding or erasing from taking place.
To change the play direction: TAPER DIRECTION Press the DIRECTION switch during payback. fasten to side A(1}, the TAPE 1 DIRECTION A indicator will be fulminated. ® To listen to side B(2), the TAPE 1 DIRECTION B indicator will be illuminated. ® In the o setting of the REVERSE MODE switch, If the tape Is stopped or ¥ it automatically stops at the tape end, the TAPE 1 DIRECTION indicator will automatically return to P A (side A}, M TAPE 2 playback (one tape side only) 1 get the POWER switch to ON.
Continuous playback (TAPE 1.to TAPE 2) 1 set the Pow Er switch fo ON, 2 Press the TAPE bunion, 3 Press the STOP/EJECT buttons arid load cassettes into the TAPE 1 and TAPE 2 causative compartments, 4 Set the REVERSE MODE Swish 1o . ® The continuous playback function will not operate when the REVERSE MODE switch is 86t to e, 5 Press thg PLAY button of Tape 1. ® TAPE 1 starts to play, , 6 Select side A1y or side of TAPE 1 with the DIRECTION switch.
CORDING ® When recording important selections, be sure fo make & preliminary ties to ensure that the desired material is bang properly recorded. ® The ALG {Automatic Record Level Control} circuit automatically contrails ihe level of the input signal used for recording. The VOLUME, BALANCE, X-| ASS and GRAPHIC EQUALIZER contorts may be adjusted with no effect on the recorded signal. (Variable Sound Monitor) #® Metal tape cannot be used for recording or dubbing.
e O FR888 — Binning &sry exchange a CD for another CO whilst recording ‘ 1 Press ths STOP button on e cb during recording. The tape stops after about 2 seconds and enters recording stand-by made. 2 Replace the Cp, 3 Choose the music to record next by using the PASS ppt or PASS e button, ‘ 4 Press the FLAY button on the cp, ® Recording begins automatically.
M Dubbing 1 Saf the POWER switch Press the TAPE button. 3 Load = prerecorded cassette Into the TAPE 1 cassette compartment. Insert a blank tape into the TAPE 2 cassette compartment. 4 56t the TAPE SELECTOR switch to Crs for chrome tape and to NORMAL for normal tape. 5 5ot the DUBBING SPEED switch to NORMAL for actual speed rubbing, HIGH for high-speed dubbing. ® Do not change the setting of ihe DUBBING SPEED switch during dubbing. B Press the PAUSE button of TAPE 2.
EERIE | B Erasing recorded tapes 7T Pes 1 sot the POWER switch 10 ON, 2 Cross the TAPE button 3 Load the tape to be erased into the TAPE 2 cassette compartment, ; . 4 Set the: TAPE. SELECTOR ‘switch 1o Cre: for shimmed e and lo NORMAL for. normal tape. 5 Cross the RECORD Burton 10 begin erasing. Notes: not connect anything fo the MIXING MIC socked. ® Heck to ensure that TAPE 1 is out of operation. : W Plano input ® Set the POWER switch to @ STAND-BY before connecting or disconnecting the stereo turntable.
B Mixing microphone To fasten to or record the mixed signals from the mixing microphone and audit source: 1 Be sure that the microphone has a 8.5 mm {1/8% diameter plug, and is of BOD ohms impedance; If not, use an appropriate adapter. 2 Conn est the microphone plug to the MIXING MIC socket. 3 set the POWER switch to ON. 4 press ihe desired function selector button io select the corresponding audit source. B Use the MIXING MIC LEVEL control to adjust volume of the sound farm the microphone.
L v W Internal care L ® Dina and pinch riflers can cause poor sound and-gaps jams, Clan these parts with a cation slaw moistened with commercial headbanging ooy cleaner or saprophytic! alcohol, | ® After long use, the deck’s heads and ‘capstans may ! become magnetized, causing Poor sound. Demagnetize | these parts once Avery 30 hours of playing/fecarding time ety | by using a commercial taps head demagnetize.
part of policy of continuous improvement, SHARP reserves the right to make design and pacification changes for product improvement without prior notice. The performance pacification figures indicated are nominal values of production unis. “There may be some deviations from these values in individual units.