802.
Chapter 1 About the Wireless MINI PCI .................................. 3 1-1 Features .......................................................................... 3 1-2 Applications.................................................................... 3 1-3 Product Kit ....................Error! Bookmark not defined. Chapter 2 Network Configuring and Planning .......................... 4 2-1 Network Topology.......................................................... 4 2-2 Roaming ..............................
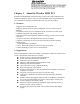
Chapter 1 About the Wireless MINI PCI Windows 98/2000/ME/XP will automatically recognize the wireless MINI PCI and initiate the installation process. Upon successful installation, the wireless MINI PCI will communicate seamlessly with other IEEE 802.11g wireless products. 1-1 Features 1. Supports up to 54 Mbps data rate. 2. Supports point-to-point and point-to-multipoint access provides increased flexibility. 3.
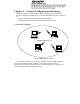
Chapter 2 Network Configuring and Planning The wireless MINI PCI supports legacy Ethernet LAN network configuration options as defined by the IEEE 802.11g. The wireless MINI PCI can be configured as: . Ad-Hoc mode for no Access Point wireless environment. . Infrastructure mode for wireless environment with Access Point. 2-1 Network Topology Notebook with T60L198/T60L244 Desktop PC with T60L198/T60L244 Ad-Hoc Wireless LAN Desktop PC with T60L198/T60L244 Notebook with T60L198/T60L244 Fig.
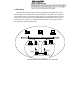
File Server Desktop PC Desktop PC ¤A¤Óºô¸ô Desktop PC with Access Point T60L198/T60L244 Desktop PC with T60L198/T60L244 Access Point Desktop PC with Desktop PC with Notebook with T60L198/T60L244 Notebook with T60L198/T60L244 T60L198/T60L244 T60L198/T60L244 Fig.2 Infrastructure Wireless LAN Configuration A group of wireless users and an Access Point compose a Basic Service Set (BSS). Wireless clients can talk to any computer in both wired and wireless LAN network via the Access Point.
2-2 Roaming Infrastructure mode also supports roaming capabilities for mobile users. More than one BSS can be configured as an Extended Service Set (ESS). The continuous network allows users to roam freely within ESS. All wireless MINI PCI and Access Point within one ESS must be configured with the same ESSID in order to utilize roaming function. Properly Access Point positioning with a clear radio signal can greatly enhance wireless performance.
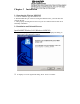
Chapter 3 Installation 3-1 Inserting the Wireless MINI PCI 1. Locate an available Type II PCMCIA slot. 2. With the MINI PCI pin connector facing the MINI PCI slot, you must insert the card into the slot. 3. After properly inserting the wireless card, you can continue with wireless driver and utility installation. 3-2 Installation and Uninstall Process Install AMBIT Wireless LAN (Windows 98/2K/XP) e Execute the program ‘Setup.exe’ in the CD. Windows displays the dialog as below.
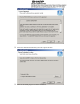
e Select the destination folder that you want to place the files. e Wait for the install program to do the installation.
e Congratulations! AMBIT Wireless LAN has been installed successfully. Please click ‘Finish’ to go to the next step. e Please remove any disks from any drives before your click ’Finish’. Then click ‘Finish’ to complete setup.
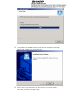
Uninstall Wireless LAN (Windows 98/2K/ME/XP) e One can remove the AMBIT Wireless LAN via the Add/Remove Programs’ in the ’Control Panel’. Select AMBIT Wireless LAN’ and click Add/Remove’ button, the dialog as below displays. e Select ’Remove’ and then click the ‘Next’ button to perform the un-installation. Click ’OK’ button if you really want to remove the AMBIT Wireless LAN.
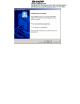
e Wait for the un-installation to do its work. e Click ‘Finish’ to complete the un-Installation. 5 If you want to restart your computer now. Please remove any disks from any drives before your click ‘Finish’. Then click ‘Finish’ to complete uninstallation.
Chapter 4 Wireless Utility and Configuration The following sections describe the Wireless Network Configuration Utility. This utility provides quick access and friendly interface to configure the card setup. 4-1 Windows 98/2000 Wireless Utility After installation is completed, a Wireless LAN Utility icon will appear in Desktop screen. Click it, then you will see the screen below. If you cannot find the icon, you can select “Start” ->”Program”-> ireless LAN Configuration Utility” Icon.
If you have no idea how to fill in these columns, then you can choose the Profile Name: Default to connect AP nearby. Since it is a default setting and it cannot be changed the contents of these columns. If you want to change this Card configuration, then select Profile Name as PROFILE1, then you can start changing these columns. There are two network types: Ad-Hoc: This mode is used for a simple peer-to-peer network. It offers file sharing between wireless clients without a wireless Access Point (AP).
Hexadecimal numbers. If you choose 128-bit keys, then you must enter 13 ASCII Characters or 26 Hexadecimal numbers. Site Survey Use the Site Survey Tool. You can identify each AP or Adapter Card current usage channel , with WEP key or not, Network Type and their signal strength. About You will find the Network Driver, Configuration driver and NIC Firmware at About.
4-2 Windows XP Wireless Utility 1. To configure the wireless card setting, you can select Start\Settings\Network Connection in the Windows XP. Choose the wireless network connection, then you will see below screen. From this screen, you can see wireless connection status and wireless signal level. e Select roperties’ in the above screen. The following windows will show up. In eneral’ page, Wireless LAN card information and networking protocol have been displayed.
3. Select Wireless Networks page, you can see available wireless networks in your nearby area. You can add your preferred wireless Access Point to your list, so your wireless card will search for specific wireless networks.
Configure To connect to an existing access point (infrastructure) network, under Available networks, click the network name, and then click ‘Configure’ to setup wireless security and data encryption. Refresh To update the list of available networks that are within range of your computer, click Refresh. Add To connect to an access point (infrastructure) network that you know is available but that does not appear under Available networks, under Preferred networks, click Add.
Advanced *If your network are configuring to a computer-to-computer (ad hoc) network, select computer-to-computer (ad hoc) network only’. *If you want to connect to a computer-to-computer and access point (infrastructure) networks are within range of your computer, click Access point (infrastructure)network only’.
Define your network name (SSID) in the following windows, so your can join a specific wireless network. Check AP has WEP on or not. You wireless network will need to have same WEP setting with AP in order to communicate. If your wireless network don have any AP, check the his is computer-to computer (ad-hoc) network; wireless access points are not used’ This window provides authentication via 802.1X. 802.1X, an IEEE standard that provides an authentication framework for 802-based LANs. 802.
The ‘Advanced’ window offers Firewall and Internet Connection Sharing functions. Depends on your networking environment, you can select below functions.
Appendix A Troubleshooting Problem Solving 1. My computer does not recognize the wireless network card. Solution: e The wireless network card is not properly inserted into the PCMCIA slot. e Ensure that the wireless network card has been inserted into an available PCMCIA slot. 2. The wireless network card does not work properly. Check and Solution: e Insert the MINI PCI into Notebook slot again. A beep should be heard if the card properly inserted.
the card status page after launch Wireless Utility. Appendix B Glossary Access Point - An internetworking device that seamlessly connects wired and wireless networks together. Ad-Hoc - Ad-Hoc is a peer- to-peer wireless network without Access Point. A group of wireless clients consistent an independent wireless LAN. Backbone - The core infrastructure of a network, the portion of the network that transports information from one central location to another central location.
Warning "NOTE: THE MANUFACTURER IS NOT RESPONSIBLE FOR ANY RADIO OR TV INTERFERENCE CAUSED BY UNAUTHORIZED MODIFICATIONS TO THIS EQUIPMENT. SUCH MODIFICATIONS COULD VOID THE USER'S AUTHORITY TO OPERATE THE EQUIPMENT." 1. T60H424 is for OEM installation only. 2. "The antenna used for this transmitter must be installed to provide a separation distance of at least 20 cm from all persons and must not be co-located or operating in conjunction with any other antenna or transmitter. 3.