mxc402_us_sta.fm Page -1 Thursday, June 17, 2010 11:20 AM MODEL: MX-C402SC DIGITAL FULL COLOR MULTIFUNCTIONAL SYSTEM START GUIDE Keep this manual close at hand for reference whenever needed.
mxc402_us_sta.fm Page 0 Thursday, June 17, 2010 11:20 AM Each instruction also covers the optional units used with these products. Caution! For complete electrical disconnection, pull out the main plug. The socket-outlet shall be installed near the equipment and shall be easily accessible. To reduce the risk of fire, use only UL-Listed No. 26 AWG or larger telecommunication line cord. FAX interface cable and Line cable: These special accessories must be used with the device. FOR YOUR RECORDS ...
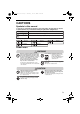
mxc402_us_sta.fm Page 1 Thursday, June 17, 2010 11:20 AM Contents 3 3 3 4 5 6 8 SETUP IN A WINDOWS ENVIRONMENT . . . . . . . . . . . . 29 OPENING THE SOFTWARE SELECTION SCREEN (FOR ALL SOFTWARE) . . . . . . . . . . . . . . 29 INSTALLING THE PRINTER DRIVER / PC-FAX DRIVER . . . 31 OPERATION MANUALS AND HOW TO USE THEM . . . . . . . . . . . . . . . 9 REGULAR MAINTENANCE . . . 37 DIGITAL MULTIFUNCTIONAL SYSTEM FUNCTIONS . . . . . . . . 10 SPECIFICATIONS . . . . . . . . . .
mxc402_us_sta.fm Page 2 Thursday, June 17, 2010 11:20 AM Note: • Considerable care has been taken in preparing this manual. If you have any comments or concerns about the manual, please contact your dealer or nearest SHARP Service Department. • This product has undergone strict quality control and inspection procedures. In the unlikely event that a defect or other problem is discovered, please contact your dealer or nearest SHARP Service Department.
mxc402_us_sta.fm Page 3 Thursday, June 17, 2010 11:20 AM CAUTIONS Symbols in this manual To ensure safe use of the machine, this manual uses various safety symbols. The safety symbols are classified as explained below. Be sure you understand the meaning of the symbols when reading the manual. Symbol Meaning WARNING Indicates a risk of death or serious injury. CAUTION Indicates a risk of human injury or property damage.
mxc402_us_sta.fm Page 4 Thursday, June 17, 2010 11:20 AM CAUTIONS Installation notes CAUTION Do not install the machine on an unstable or slanted surface. Install the machine on a surface that can withstand the weight of the machine. Risk of injury due to the machine falling or toppling. If peripheral devices are to be installed, do not install on an uneven floor, slanted surface, or otherwise unstable surface. Danger of slippage, falling, and toppling.
mxc402_us_sta.fm Page 5 Thursday, June 17, 2010 11:20 AM CAUTIONS Installation notes (continued) CAUTION Near a wall Be sure to allow the required space around the machine for servicing and proper ventilation. (The machine should be no closer than the distances indicated below from walls. The indicated distances are for the case when a saddle finisher and large capacity paper tray are not installed.) 11-13/16" (30 cm) 11-13/16" 17-23/32" (30 cm) (45 cm) Locations subject to vibration.
mxc402_us_sta.fm Page 6 Thursday, June 17, 2010 11:20 AM CAUTIONS Handling precautions WARNING Do not place a container of water or other liquid, or a metal object that might fall inside, on the machine. If the liquid spills or the object falls into the machine, fire or electrical shock may result. Do not remove the machine casing. High-voltage parts inside the machine may cause electrical shock. Do not make any modifications to this machine.
mxc402_us_sta.fm Page 7 Thursday, June 17, 2010 11:20 AM CAUTIONS The machine includes the document filing function, which stores document image data on the machine's hard drive. Stored documents can be called up and printed or transmitted as needed. If a hard drive failure occurs, it will no longer be possible to call up the stored document data.
mxc402_us_sta.fm Page 8 Thursday, June 17, 2010 11:20 AM CAUTIONS Laser information Wave length 790 nm ±10 nm Pulse times (North America and Europe) 4.1 µs ±4.1 ns /7 mm Output power Max 0.6 mW (LD1+ LD2) Caution Use of controls or adjustments or performance of procedures other than those specified herein may result in hazardous radiation exposure. This Digital Equipment is CLASS 1 LASER PRODUCT (IEC 60825-1 Edition 1.
mxc402_us_sta.fm Page 9 Thursday, June 17, 2010 11:20 AM OPERATION MANUALS AND HOW TO USE THEM Printed manuals and a manual in PDF format are provided with the machine. Printed manuals This section explains precautions to ensure safe usage, part names and functions and basic software. Refer to the PDF instruction manual for instructions on how to use the machine.
mxc402_us_sta.fm Page 10 Thursday, June 17, 2010 11:20 AM DIGITAL MULTIFUNCTIONAL SYSTEM FUNCTIONS This machine provides four major areas of functionality. Refer to the Operation Guide for details on using the various functions within each area.
mxc402_us_sta.fm Page 11 Thursday, June 17, 2010 11:20 AM ACCESSING THE WEB SERVER IN THE MACHINE When the machine is connected to a network, the machine's built-in Web server can be accessed from a Web browser on your computer. Opening the Web pages Access the Web server in the machine to open the Web pages. Start a Web browser on a computer that is connected to the same network as the machine and enter the IP address of the machine. Recommended Web browsers • Internet Explorer: 6.
mxc402_us_sta.fm Page 12 Thursday, June 17, 2010 11:20 AM CHECKING THE IP ADDRESS To check the IP address of the machine, print out the all custom setting list in the system settings. 1 Press the [SYSTEM SETTINGS] key.
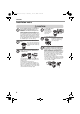
mxc402_us_sta.fm Page 13 Thursday, June 17, 2010 11:20 AM PART NAMES AND FUNCTIONS (12) (13) (1) (2) (3) (4) (5) (6) (11) (1) Automatic document feeder This automatically feeds and scans multiple originals. Both sides of 2-sided originals can be scanned at once. (2) Original exit tray 1 Originals are delivered to this tray after scanning. (3) Operation panel (4) Document feeder tray Place the originals in this tray when using the automatic document feeder.
mxc402_us_sta.fm Page 14 Thursday, June 17, 2010 11:20 AM SUPPLIES (18) (17) (14) (15) (14) Front cover Open to replace a toner cartridge. (15) Bypass tray Special types of paper and envelopes can be fed from the bypass tray. (16) (17) LAN connector Connect the LAN cable to this connector when the machine is used on a network. (18) USB connector (type A) his connector is the same as (6). (16) USB connector (B type) Supports USB 2.0 (Hi-Speed).
mxc402_us_sta.fm Page 15 Thursday, June 17, 2010 11:20 AM OPERATION PANEL Image send indicators LINE indicator This lights up during transmission or reception in fax mode. The indicator also lights up during transmission in scan mode. DATA indicator When a received fax cannot be printed because of a problem such as out of paper, the indicator blinks. The indicator lights steadily when there is data that is waiting to be transmitted.
mxc402_us_sta.fm Page 16 Thursday, June 17, 2010 11:20 AM Numeric keys [CLEAR] key Main power indicator These are used to enter the number of copies, fax numbers, and other numbers. Press this key to return settings such as the number of copies to "0". This indicator lights when the main power is switched on. The main power switch is on the left side of the machine. [LOGOUT] key ( ) When user authentication is enabled, press this key to log out after using the machine.
mxc402_us_sta.fm Page 17 Thursday, June 17, 2010 11:20 AM TURNING THE POWER ON AND OFF The machine has two power switches. One is the main power switch on the left side of the machine, and the other is the [POWER] key ( ) on the upper right side of the operation panel. Main power switch [POWER] key When the main power switch is switched on, the main power indicator on the operation panel lights up.
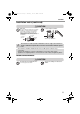
mxc402_us_sta.fm Page 18 Thursday, June 17, 2010 11:20 AM PLACING ORIGINALS The automatic document feeder can be used to automatically scan many originals at once. This saves you the trouble of manually feeding each original. For originals that cannot be scanned using the automatic document feeder, such as a book or a document with notes attached, use the document glass. Using the automatic document feeder When using the automatic document feeder, place the originals in the document feeder tray.
mxc402_us_sta.fm Page 19 Thursday, June 17, 2010 11:20 AM PLACING ORIGINALS Using the document glass Take care that your fingers are not pinched when closing the automatic document feeder. After placing the original, be sure to close the automatic document feeder. If left open, parts outside of the original will be copied black, causing excessive use of toner. Place the original face down. Align the middle of the original with the tip of the mark in the center of the glass.
mxc402_us_sta.fm Page 20 Thursday, June 17, 2010 11:20 AM CHANGING PAPER IN A TRAY Names of the trays The names of the trays are shown below.
mxc402_us_sta.fm Page 21 Thursday, June 17, 2010 11:20 AM CHANGING PAPER IN A TRAY Loading paper in a tray A maximum of 500 sheets of paper from size 5-1/2" x 8-1/2" to size 8-1/2" x 14" (A5 to A4) can be loaded in trays 1 and 2. A maximum of 500 sheets of paper from size 7-1/4" x 10-1/2" to size 8-1/2" x 14" (B5 to A4) can be loaded in trays 3 and 4. Gently pull out the paper tray. If paper remains in the tray, remove it. Move the two guides on the tray.
mxc402_us_sta.fm Page 22 Thursday, June 17, 2010 11:20 AM CHANGING PAPER IN A TRAY Loading paper in bypass tray The side to be or printed copied on must be face down! Load the paper in the horizontal orientation. When loading paper larger than 8-1/2" x 11" or A4, pull out the tray extension. Example: Loading an envelope Only the address side of envelopes can be printed on. Place envelopes with the address side face down. Do not place heavy objects on the bypass tray or press down on the tray.
mxc402_us_sta.fm Page 23 Thursday, June 17, 2010 11:20 AM BEFORE INSTALLING THE SOFTWARE This chapter describes the software programs that allow you to use the printer and scanner functions of the machine, the CD-ROMs that contain the software, and the pages where the basic installation procedures can be found. For details on installation procedures, refer to Chapter 1 of the Operation Guide.
mxc402_us_sta.fm Page 24 Thursday, June 17, 2010 11:20 AM BEFORE INSTALLING THE SOFTWARE Disc 1 Software for Windows • Printer driver These allow the machine to be used as a printer. - PCL6 printer driver The machine supports the Hewlett-Packard PCL6 printer control languages. - PS printer driver The PS printer driver supports the PostScript 3 page description language developed by Adobe Systems Incorporated.
mxc402_us_sta.fm Page 25 Thursday, June 17, 2010 11:20 AM BEFORE INSTALLING THE SOFTWARE Disc 2 Software for Windows • PC-Fax driver This enables you to send a file from your computer as a fax using the same procedure as when printing the file. (When the fax option is installed.
mxc402_us_sta.fm Page 26 Thursday, June 17, 2010 11:20 AM BEFORE INSTALLING THE SOFTWARE VERIFYING SYSTEM REQUIREMENTS SYSTEM REQUIREMENTS Before installing the software described in this manual, make sure that your computer satisfies the following requirements. Windows*1 Macintosh*4 Operating system Windows 2000 Professional, Windows XP Professional*2, Windows XP Home Edition, Windows 2000 Server, Windows Server 2003*2, Windows Vista*2, Windows Server 2008*2, WIndows 7*2 Mac OS 9.0 to 9.2.
mxc402_us_sta.fm Page 27 Thursday, June 17, 2010 11:20 AM BEFORE INSTALLING THE SOFTWARE • For users of Mac OS 9.0 to 9.2.2/X10.2.8/X10.3.9 The CD-ROM does not include software for Mac OS 9.0 to 9.2.2/X10.2.8/X10.3.9. Contact your dealer or nearest authorized service representative if you want software.
mxc402_us_sta.fm Page 28 Thursday, June 17, 2010 11:20 AM BEFORE INSTALLING THE SOFTWARE CONNECTING THE MACHINE CONNECTING TO A NETWORK To connect the machine to a network, connect the LAN cable to the machine's network connector. Use a shielded LAN cable. After connecting the machine to a network, be sure to configure the IP address and other network settings before installing the software.
mxc402_us_sta.fm Page 29 Thursday, June 17, 2010 11:20 AM SETUP IN A WINDOWS ENVIRONMENT This section explains how to install the software on a Windows computer. For more details regarding installation procedures and instructions for installation in Macintosh environments, see Chapter 1 of the Operation Guide. OPENING THE SOFTWARE SELECTION SCREEN (FOR ALL SOFTWARE) 1 Insert the "Software CD-ROM" into your computer's CD-ROM drive.
mxc402_us_sta.fm Page 30 Thursday, June 17, 2010 11:20 AM SETUP IN A WINDOWS ENVIRONMENT 5 Read the message in the "Welcome" window and then click the [Next] button. 6 The software selection screen appears. Before installing the software, be sure to click the [Display Readme] button and view the detailed information on the software. * The above screen appears when using the "Disc 1" CD-ROM. For the steps that follow, see the appropriate page below for the software that you are installing.
mxc402_us_sta.fm Page 31 Thursday, June 17, 2010 11:20 AM SETUP IN A WINDOWS ENVIRONMENT INSTALLING THE PRINTER DRIVER / PC-FAX DRIVER To install the printer driver or the PC-Fax driver, follow the appropriate procedure in this section depending on whether the machine is connected to a network or connected by USB cable.
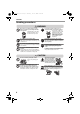
mxc402_us_sta.fm Page 32 Thursday, June 17, 2010 11:20 AM SETUP IN A WINDOWS ENVIRONMENT X Standard installation When the software selection screen appears in step 6 of "OPENING THE SOFTWARE SELECTION SCREEN (FOR ALL SOFTWARE)" (page 29), perform the steps below. 1 Click the [Printer Driver] button. To install the PC-Fax driver, click the [PC-Fax Driver] button on the "Disc 2" CD-ROM. * The above screen appears when using the "Disc 1" CD-ROM. 2 32 Click the [Standard installation] button.
mxc402_us_sta.fm Page 33 Thursday, June 17, 2010 11:20 AM SETUP IN A WINDOWS ENVIRONMENT When [Custom installation] is selected, you can change any of the items below. When [Standard installation] is selected, the installation will take place as indicated below.
mxc402_us_sta.fm Page 34 Thursday, June 17, 2010 11:20 AM SETUP IN A WINDOWS ENVIRONMENT 4 A confirmation window appears. Check the contents and then click the [Next] button. 5 When the printer driver selection window appears, select the printer driver to be installed and click the [Next] button. Click the checkbox of the printer driver to be installed so that a checkmark ( appears. ) When the PC-Fax driver is being installed, this screen does not appear. Go to the next step.
mxc402_us_sta.fm Page 35 Thursday, June 17, 2010 11:20 AM SETUP IN A WINDOWS ENVIRONMENT If you clicked the [Custom installation] button in step 2, the following windows will appear. • Printer name window If you wish to change the printer name, enter the desired name and click the [Next] button. • Window confirming installation of the display fonts To install the display fonts select [Yes] and click the [Next] button. • When the PC-Fax driver is being installed, this screen does not appear.
mxc402_us_sta.fm Page 36 Thursday, June 17, 2010 11:20 AM SETUP IN A WINDOWS ENVIRONMENT This completes the installation. • After installation, see "CONFIGURING THE PRINTER DRIVER FOR THE OPTIONS INSTALLED ON THE MACHINE" (page 1-96 in the Operation Guide) to configure the printer driver settings. • If you are using the machine as a shared printer, see "USING THE MACHINE AS A SHARED PRINTER" (page 1-94 in the Operation Guide) to install the printer driver on each of the client computers.
mxc402_us_sta.fm Page 37 Thursday, June 17, 2010 11:20 AM REGULAR MAINTENANCE To ensure that the machine continues to provide top quality performance, periodically clean the machine. Warning Do not use a flammable spray to clean the machine. If gas from the spray comes in contact with hot electrical components or the fusing unit inside the machine, fire or electrical shock may result. • Do not use thinner, benzene, or similar volatile cleaning agents to clean the machine.
mxc402_us_sta.fm Page 38 Thursday, June 17, 2010 11:20 AM SUPPLIES Standard supplies for this product that can be replaced by the user include paper, toner cartridges, and staple cartridges for the finisher. Be sure to use only SHARP-specified products for the toner cartridges, finisher staple cartridge, and transparency film. For best copying results, be sure to use only Sharp Genuine Supplies which are designed, engineered, and tested to maximize the life and performance of Sharp products.
mxc402_us_sta.fm Page 39 Thursday, June 17, 2010 11:20 AM SPECIFICATIONS Machine specifications / copier specifications Name Digital Multifunctional System MX-C402SC Type Desktop Display 8.
mxc402_us_sta.fm Page 40 Thursday, June 17, 2010 11:20 AM SPECIFICATIONS Machine specifications / copier specifications (Continued) Warm-up time 90 seconds or less (This may vary depending on the ambient conditions.) First-copy time Color copy time: 8.9 seconds or less Black and white copy time: 8.0 seconds or less (This may vary depending on the state of the machine.
ERRATA Please refer to this sheet when reading the item listed below. Page 40 Incorrect Correct First-copy time First-copy time Color copy time: 8.9 seconds Color copy time: 8.5 seconds or less or less Black and white copy time: Black and white copy time: 8.0 seconds or less 6.5 seconds or less (This may vary depending on (This may vary depending on the state of the machine.) the state of the machine.
mxc402_us_sta.fm Page 41 Thursday, June 17, 2010 11:20 AM SPECIFICATIONS Machine specifications / copier specifications (Continued) Paper sizes: 8-1/2" x 14", 8-1/2" x 13-1/2", 8-1/2" x 13-2/5", 8-1/2" x 13", 8-1/2" x 11", 7-1/4" x 10-1/2", 5-1/2" x 8-1/2", envelopes, A4, B5, A5, 16K (includes automatic paper size detection function. Paper size from 3-15/16" x 5-53/64" (100 mm x 148 mm) to 8-33/64" x 14-1/64" (216 mm x 356 mm) can be entered.) Bypass tray Paper weights: Thin paper (15 lbs. to 16 lbs.
mxc402_us_sta.fm Page 42 Thursday, June 17, 2010 11:20 AM SPECIFICATIONS Machine specifications / copier specifications (Continued) Interface port LAN connectivity: 10Base-T / 100Base-TX / 1000Base-T USB connectivity: Type A connector supports USB 2.0 (Hi speed)* Compatibility requirements of USB 2.0 Disk Format: FAT Type B connector supports USB 2.0 (Hi speed) Required power supply AC 120 V ±10% 60 Hz Power consumption 1.
mxc402_us_sta.
mxc402_us_sta.fm Page 44 Thursday, June 17, 2010 11:20 AM SPECIFICATIONS Acoustic noise emission (measurement according to ISO7779) Sound power level LwA Printing mode (continuous printing) 6.8 B Standby mode 4.
ERRATA Please refer to this sheet when reading the item listed below. Page 44 Incorrect Correct Original sizes Original sizes 8-1/2"x14" to 5-1/2"x8-1/2", 8-1/2"x14" to 5-1/2"x8-1/2", A4 to A5, long paper (max. A4 to A5, long paper (max. width 8-1/2" (216mm) x max. width 8-1/2" (216mm) x max.
mxc402_us_sta.fm Page 45 Thursday, June 17, 2010 11:20 AM Information that the administrator of the machine requires is printed on the back of this page. (Separate this page from the manual and keep it in a safe place. In addition, fill in the name of the administrator and the administrator's contact information in the left hand margin.
mxc402_us_sta.fm Page 46 Thursday, June 17, 2010 11:20 AM TO THE ADMINISTRATOR OF THE MACHINE (Separate this page from the manual and keep it in a safe place.) Factory default passwords When accessing the system settings, the administrator password is required to log in with administrator rights. The system settings can be configured in the Web pages as well as on the operation panel. To access the system settings using the Web pages, a password is also required.
mxc402_us_sta.
mxc402_us_sta.fm Page 48 Thursday, June 17, 2010 11:20 AM TO THE ADMINISTRATOR OF THE MACHINE FCC Notice to users: This equipment complies with Part 68 of the FCC rules and the requirements adopted by the ACTA. On this equipment is a label that contains, among other information, a product identifier in the format US:AAAEQ##TXXXX. If requested, this number must be provided to the telephone company. The REN is used to determine the number of devices that may be connected to a telephone line.
mxc402_us_sta.fm Page 49 Thursday, June 17, 2010 11:20 AM TO THE ADMINISTRATOR OF THE MACHINE NOTICE for users in the USA BE SURE TO ASK YOUR AUTHORIZED SHARP DEALER ABOUT THE WARRANTY THAT YOUR SELLING DEALER EXTENDS TO YOU.
mxc402_us_sta.fm Page 50 Thursday, June 17, 2010 11:20 AM TO THE ADMINISTRATOR OF THE MACHINE NOTICE FOR USERS IN CANADA AVIS POUR NOS UTILISATEURS AU CANADA "NOTICE : This product meets the applicable Industry Canada technical specifications." AVIS : Le présent matériel est conforme aux spécifications techniques applicables d'Industrie Canada. "NOTICE : The Ringer Equivalence Number is an indication of the maximum number of devices allowed to be connected to a telephone interface.
mxc402_us_sta.fm Page 51 Thursday, June 17, 2010 11:20 AM TO THE ADMINISTRATOR OF THE MACHINE Trademark acknowledgments The following trademarks and registered trademarks are used in conjunction with the machine and its peripheral devices and accessories. • Microsoft®, Windows®, Windows® 98, Windows® Me, Windows NT® 4.
mxc402_us_sta.
mxc402_us_sta.
mxc402_us_sta.fm Page 54 Thursday, June 17, 2010 11:20 AM MX-C402SC Start Guide SHARP ELECTRONICS CORPORATION 1 Sharp Plaza, Mahwah, New Jersey 07495-1163. www.sharpusa.com SHARP ELECTRONICS OF CANADA LTD. 335 Britannia Road East, Mississauga, Ontario, L4Z 1W9 PRINTED IN CHINA This manual has been printed using a vegetable-based soy oil ink to help protect the environment.