DIGITAL TV RECORDER MODEL TU-TV322H OPERATION MANUAL Digital TV recorder TU-TV322H PRESS Important: This product can only receive Digital Terrestrial TV signals, subject to coverage an aerial upgrade may be required. Test your postcode followed by your house name or number to 83331* or go to www.freeview.co.uk (*Costs no more than a normal text). 1. Read this operational manual carefully. 2.
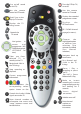
Turn on/off sound (on the TV). Turns the DTR (or TV) on or off. Sets the remote control to DTR mode. Sets the remote control to TV mode. “Quick” key to the Top Up TV services. Displays the recorded programmes screen. Displays the TV listings screen. Controls the TV sound Navigation in menus and programmes (Up/ Down for channels, Left/Right for time). Takes you from delayed TV in memory to live TV. Rewind and -24Hr in the TV listings. Stop recording or playback. Current programme information.
Contents Getting Started 4 Introduction 5 Quick Start Guide 11 Basic Functions Using Your DTR 12 Basic Operation 13 Using the Quick TV Guide 14 Using the Menus 15 Using the Programme Guide 17 Top Up TV Anytime 19 Using your Programme Library 21 How to make Recordings 23 Additional DTR Functions Setting Up 24 25 26 27 28 29 Scan For Channels Customise your DTR Customising Top Up TV Anytime Recording Preferences, Messages Child Lock, Channel Lock Languages, Help Informatio
Introduction Congratulations on your choice of this state-of-the-art Digital Television Recorder (DTR). We hope you will enjoy all the new features this technology brings to your home for many years. Your DTR is going to revolutionise the way you watch TV. You can pause live TV, for example while you answer the phone and then resume watching where you left off. You can also record two different channels at the same time.
Getting Started Quick Start Guide A Quick Start Guide to setting up your Top Up TV+ Digital TV Recorder First things first Ensure you can receive Digital Terrestrial TV (Freeview) services in your area. If you are not sure, you should ask your retailer to check your postcode for you or try one of the following: • Text your postcode to 83331 (standard rates apply) • Visit www.freeview.co.uk or www.digitaluk.co.
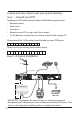
quick and easy steps to get you up and running Step 1 – Unpack your DTR Unpack your DTR and check you have all the following accessories: • Remote control • Mains lead • Scart lead • Remote control TV set-up codes (loose sheet) • 2 x AA batteries to place in your remote control (refer to page 37) Please record the CAN number from the label on your DTR below Please write your viewing card number below Step 2 – A typical installation VCR TV Aerial DO NOT REMOVE AUX SCART ANTENNA 1 IN 35025746 A
Getting Started A Unplug the aerial cable from your VCR (or TV) and plug it into the Aerial In socket of your DTR. B Using the SCART lead, connect the TV SCART socket on your DTR to the AV1/EXT1/AUX1 SCART socket at the back of your TV. C Connect the mains lead to the mains socket and switch on at the mains. Reconnect the power to all your existing equipment and turn your TV on. When you plug your DTR into the power supply, a red light and the message PLS WAIT will be displayed.
Step 4 – Channel Scan You will see this screen showing that your DTR is now searching for all available channels. In the event that your DTR does not find any channels, or has missed some, see the section on what to do if your Installation fails, on page 10. When your DTR has successfully found all channels, your DTR will search for and install the extended 14 day Programme Guide software.
Getting Started Step 6 – Top Up TV Anytime set up With Top Up TV Anytime you’ll get up to 600 carefully selected programmes downloaded to your Top Up TV+ DTR every month. That’s up to 150 extra programmes available at any one time on top of your normal Freeview channels. You can also upgrade to PictureBox which gives you an additional 30 movies a month or take Setanta Sports, a must-have for sports fans.
Insert your card into the slot with the chip upwards. To ensure the best operation of your DTR, we recommend that you leave your DTR in STANDBY whenever it is not in use. Note that turning the power off at the mains will prevent your DTR from receiving Top Up TV programmes. If the installation fails, check the points below and try to rescan for channels again. • C heck that all the connections have been made as shown in the diagram on page 6 and the power is switched on to all of the equipment.
Getting Started Basic Functions Using your DTR remote control The next few pages of this manual will help you to get the most out of your DTR. It is worth keeping this manual to hand for a few days whilst you get to know how it works. For reference, a few of the basic functions are shown below. Note they are all described in more detail later on in this manual. Turning your DTR on Press the button. Changing channels Press the CH+ or CH- buttons.
Basic Operation Turning On and Off To turn on your DTR, press the indicator light will go green. button. The red standby To turn off your DTR, press the button. The standby indicator light will turn red again. The message ‘OAD’ will indicate the box is updating and that you should wait before pressing any further buttons. The DTR must be on or left in standby if you want to keep the Programme Guide and Top Up TV programmes updated. Changing channels To change channel press the CH+ or CH- buttons.
Using Your DTR Using the Quick TV Guide Shows the current date and time Shows the channel name Now Shows the programme name and start time Next Shows the programme name and start time Shows short details of the programme (synopsis) When you are watching TV you can find out what’s on other channels without interrupting your viewing using the Quick TV Guide. This is the small banner that appears at the bottom of the screen during channel changes or when you press an arrow button.
Using the Menus Please refer to the inside front cover for a full colour image of your remote control and its primary functions. To use these menus, you must first press the MENU button which will then display the main menu. Now choose the item (called a sub menu) that you want to look at. You do this by using the UP arrow (r), to move the yellow box up the list and the DOWN arrow (s) to move it down the list.
Using the Programme Guide Using Your DTR Your DTR has access to two programme guides. Initially your DTR will provide the standard Freeview 7 day Programme Guide, but as soon as your DTR has acquired the Top Up TV on-screen programming guide, you will have access to 14 day listings. The Programme Guide screen gives you a fast way of planning your viewing and recording. To access this guide, press the GUIDE button. The guide shows the next three periods of 30 minutes, for each channel.
Across the bottom of the screen are a number of functions that can be activated by pressing the coloured buttons on your remote control. Go to day Pressing the GREEN button will bring up an overlay box (pop-up). This is the GO TO DAY menu. Using the UP and DOWN arrows you will move the highlighter to a day in the future. Pressing OK will take you back to the Programme Guide, but now the guide is showing programmes on the day you selected. From here you can set up recordings or reminders.
Top Up TV Anytime Using Your DTR In addition to the standard Freeview channels, your DTR can also give you access to a wider range of programmes on Top Up TV Anytime. By subscribing to Top Up TV Anytime for a small monthly fee, your DTR will automatically record and download programmes from channels such as Discovery, UKTV Gold, Warner TV, the Disney Channel, National Geographic channel and more, for you to watch whenever it suits you.
Note: Buttons 0 and 1 provide punctuation such as spaces and full-stops. If you enter the wrong character, use the LEFT and RIGHT arrows to move the cursor. Use the RED button to delete a character and GREEN to insert. To move between the search criterias use the REWIND and FAST-FORWARD buttons. Use the COLOUR buttons to delete and insert as indicated on screen. Date and time options are also selected using the COLOUR buttons. When selecting the time, the NUMBER buttons can be used to enter the time.
Using your Programme Library Your Programme Library is where all of your recorded and Top Up TV Anytime programmes are stored. To access it, press the Library button or Option 2 from the Main Menu. Using Your DTR Your Programme Library will be empty at first, but as you start to record programmes and Top Up TV Anytime programmes are downloaded to your DTR, it will fill up. Note that it will take 7 days from set up for your Top Up TV Anytime programmes to be fully downloaded.
Folders Programmes on y our DTR are automatically placed in folders to help organise your library and make them easy to find later. Each recording can reside in more than one folder, the ALL category and typically one other genre folder, for example, Movies, Sport, Kids etc. To move between folders use the LEFT and RIGHT arrow buttons. To highlight a programme use the UP and DOWN buttons. To view the programme, press the OK button.
How to make Recordings Your DTR will allow you to customise the way your record a programme. Using Your DTR In this section, we will show you just what options are available to you. Typically you will have pressed the button in the Programme Guide which will have automatically taken you to this screen, but you may also wish to set a recording manually.
Space for recordings When you add a recording to the Planned Recordings, your DTR will check to see if there is enough space to complete all the scheduled recordings. If there is a risk that there is not enough space, you will see this pop-up. You have the option to cancel the recording or continue with the event. If you continue with the recording, you should go to the Programme Library menu and try to clear space by deleting programmes that you have already watched and no longer wish to keep.
Additional DTR Functions Tuner swap Using Your DTR Your DTR has two tuners which means it can receive two different channels at the same time. You can switch between these two channels by pressing 0 on your remote control. If that channel is paused, it will automatically switch to play to allow you to watch the programme. Furthermore, if you are watching a recorded programme, your DTR will pause that programme and switch to the programme currently being received by one of the tuners.
Setting Up From the MAIN MENU, press 4 or select Set-Up. Use the UP and DOWN buttons to highlight the sub-menu you wish to enter and press the OK button, or press the number button that is associated with the sub-menu. If you have trouble scanning for channels or with any aspect of the installation, refer to page 10 for more information or check the Troubleshooting guide in this manual.
Customise your DTR Use the UP and DOWN arrow buttons to select an option and use the LEFT and RIGHT arrow buttons to cycle around the available settings. TV Picture format Use the LEFT and RIGHT arrow buttons to choose from 4:3 Letterbox (black bars top and bottom), 4:3 Centre Cut-Out (full screen, but lost picture on left and right), 4:3 Full Frame (if your 4:3 TV supports 16:9 switching, check your TV manual) or 16:9 Widescreen (for widescreen TVs).
Customising Top Up TV Anytime One of the great things about Top Up TV Anytime is that you don’t have to download all the programmes available. You can choose to record and download only those programmes from channels you watch. So for example, if you don’t have kids, you can save space on your hard drive by de-selecting the kids channels, giving you more space to download those you do want to watch.
Recording Preferences There are two options available to change, the guard time and the rewind buffer size. Use the UP and DOWN arrow buttons to move between the two options and the LEFT and RIGHT arrows to scroll through the available values for that option. Recording guard time A guard time is a small amount of time added to the start and end of a recording to help protect against programmes starting slightly ahead of schedule or more typically over-running their scheduled finishing time.
Child Lock This menu option enables you to set-up Parental Control levels and to determine the access you and your family have to programmes. As soon as you select this option, you will be prompted to enter your Personal Identification Number (PIN). The default number for this is 0000. It is highly recommended that you change this number as soon as possible. Once you have entered a valid PIN you are given the option to change the PIN by pressing the RED button and following the simple steps on-screen.
Languages Preferred audio language This option sets the Preferred Audio Language output. In a multi-language broadcast, your DTR will attempt to acquire your preferred language. If your preferred language is not available, your DTR will switch to the default language. Preferred subtitle language This has the same action as Preferred Language, but for Subtitles in place of the audio output itself. Setting Up To select an option, use the UP or DOWN arrow buttons.
Troubleshooting Reception problems When you purchased your DTR, your dealer should have checked your postcode to ensure that you can receive digital terrestrial TV. If you wish to check this yourself, please look on the internet websites:- www.freeview.co.uk or www.digitaluk.co.uk Once you have established that your area should be able to receive digital terrestrial TV, there are a few reasons why you may be experiencing problems.
Problems after installation Not every picture or sound problem is caused by a defect in your DTR. Leads having been accidentally pulled out or worn out batteries in the remote control can also cause impairment. If your unit does something unexpected while you are using it, please unplug it, wait a few seconds, plug it in again, then wait for the lights on your DTR to change to solid red or green.
Tuner conflict resolution In some cases there may not be enough tuners for all the functions your DTR is trying to perform, for example if two recordings are taking place and you try to change channels, you will see this pop-up menu. If you really wish to change channels, go to the Planned Recordings menu and cancel the recording. Pressing the RED button will take you to the Planned Recordings menu.
If your DTR fails to respond In very exceptional circumstances, your DTR ma y not respond as expected when switching it on. If this does happen, it is most likely to have been caused by corruption of programmes stored on your disk. This can occasionally cause the DTR to remain in standby mode or fail to respond to the remote control while not displaying any picture. However, normal DTR operation can usually be restored, by performing a reset as noted below.
Accessories User Manual Quick Guide Mains lead Remote control TV set-up codes 2 x AA Batteries SCART Lead 34 Remote Control
Product Details Rear panel connections DO NOT REMOVE ANTENNA 1 IN ANTENNA 2 OUT ANTENNA 1 OUT 35025746 AUX SCART ANTENNA 2 IN TV SCART 1 2 3 OPTICAL OUT RS 232 AC IN 4 5 1. AERIAL 2 IN 2. AERIAL 2 OUT 3. AERIAL 1 OUT 4. AERIAL 1 IN 5. TV SCART 6. AUX SCART 7. ANALOGUE AUDIO LEFT/RIGHT 8. OPTICAL AUDIO 9. RS232 10.
Further Connections The scart lead allows rapid connection to your TV, in order to get you going as quickly and easily as possible. If you should wish to adopt the more advanced connections please purchase additional leads as explained below. Archiving off the DTR onto a VCR or other recorder Add a second scart lead to link the VCR SCART socket on your DTR to the AV1/EXT1/AUX1 socket of your VCR. This connection will allow you to archive to a permanent media.
Remote Control Inserting the batteries Insert the batteries into the handset as shown. Point the remote control at the DTR and press the DTR button. The DTR button will flash once to confirm that the remote control is working correctly. Important information regarding the batteries Do not mix different types of batteries or new and old batteries. Do not use re-chargeable batteries. Do not throw batteries into a fire, do not recharge them.
Safety Information Power cord (mains lead) Do not place the product where a piece of furniture or other heavy object could trap the power cord (mains lead). Handle the power cord by the plug. Do not pull out the plug by tugging the cord and never touch the power cord when your hands are wet as this could cause a short circuit or electric shock. Never make a knot in the cord or tie it with other cords. The power cords should be routed in such a way that they are not likely to be stepped on.
How to replace the fuse Open the fuse compartment with a blade screwdriver and replace the fuse. When replacing the fuse in the plug, use an ASTA or BSI approved 3 Amp fuse and be sure to re-fit the fuse cover. If the plug supplied with this equipment has a detachable fuse cover, be sure attach the fuse cover after you change the fuse. Never use the plug without the fuse cover. If you should lose the fuse cover, please contact an electrical goods retailer.
Don’t continue to use this equipment if you have spilt liquids on it, if it is damaged in any way or if it does not work normally. Immediately unplug the equipment and get expert advice. Pull the mains plug out of the wall socket during thunderstorms and disconnect the aerial lead. This product is only designed for household or similar general use. Any other use may invalidate the guarantee and might be dangerous.
Functions OTE: This product can be upgraded from software updates broadcast over the air to your DTR. N Top Up TV reserves the right to transmit software updates that it would consider appropriate in order to improve the functionality of the product, without degrading the quality level. 1. Menu Language: English. 2. Channel lock, Menu lock. 3. Channel list sorted by D-book logical channel numbers. 4. BBC UK Compliant Over Air Download. 5. Time shift – pause live TV. 6.
Technical Specifications GENERAL CHARACTERISTICS Supply Voltage Input Frequency Maximum Power Consumption Standby Power Consumption Operating Temperature Storage Temperature Humidity Physical Dimensions Weight HARDWARE CONFIGURATION Main Processor Flash Memory DDRRAM DIGITAL CAPABILITIES Transmission Standards DEMODULATION COFDM FEC VIDEO ALL MPEG-2 MP@ML Video Decoder Aspect Ratio RGB analogue outputs 220 - 240V AC ~ 50Hz 470 Mhz – 862 Mhz 22 W 19 W 5oC to +40oC -15oC to +55oC 25 to 75% rel 360x280x48 mm
Information Wide Dynamic Range 16-bit resolution REMOTE CONTROL Operating Distance 10m max. Batteries 2x1.
TUTV Terms & Conditions This document sets out the basis of your Agreement with Top Up TV Europe Limited in respect of the DTR (as defined below). In this Agreement we refer to Top Up TV Europe Limited as “us” or “we” and we refer to you as “you”. 1.0 THE TERMS WE USE 1.1 We have used words with capital letters where those words have particular meanings.
For Customer Services, call 08444 159 159 (calls are charged at 5p per minute from a BT landline. Call from mobiles or other networks may be considerably more). This line is open between 9am and 5pm, Monday to Friday. Information correct at April 2009. For correspondence, write to PO Box 801, Kirkcaldy, Fife, KY2 6WW or email enquiries@topuptv.com 45 Information 6.2 You must allow us, and only us, to update the software in the DTR by sending signals via the digital terrestrial network to the DTR. 6.
Digital Switchover IMPORTANT NOTICE: DIGITAL SWITCHOVER AND YOUR TV EQUIPMENT What you need to do to enjoy watching TV during and following Digital Switchover Starting in 2008 and ending in 2012, television services in the UK will go completely digital, TV region by TV region. To continue using this digital TV equipment during and following digital switchover, you will need to “reset” your digital TV channels.
Index Banner .Programme Information....................................................................... 13 . Reminder................................................................................................................ 16 Changing . Channel.......................................................................................................... 11, 12 . Language............................................................................................................... 29 .PIN. .............
INFORMATION ABOUT PRODUCT DISPOSAL ENGLISH A. Information on Disposal for Users (private households) 1. In the European Union Attention: If you want to dispose of this equipment, please do not use the ordinary dust bin! Used electrical and electronic equipment must be treated separately and in accordance with legislation that requires proper treatment, recovery and recycling of used electrical and electronic equipment.
TERMS OF GUARANTEE Sharp Electronics (UK) Ltd. (“Sharp”) guarantees to provide for the repair, or at its option the replacement, of this product subject to the conditions listed below: 1. This guarantee shall only apply to faults which are due to inferior workmanship or materials. It does not cover faults or damage caused by accident, misuse, fair wear and tear, signal related issues, neglect, tampering with the product, or repair other than by a Service Facility appointed by Sharp. 2.