UX-600M MODEL UX-600M MULTIFUNCTION FACSIMILE MULTIFUNCTION FACSIMILE OPERATION MANUAL 1. Installation 2. Initial Settings 3. Sending Documents 4. Receiving Documents 5. Making Copies 6. Making Telephone Calls 7. Answering Machine Hookup 8. Special Functions 9. Optional Settings 10. Printing Reports and Lists 11. Maintenance 12.
UX600MU FCC-1Laser WARNING FCC Regulations state that any unauthorized changes or modifications to this equipment not expressly approved by the manufacturer could void the user’s authority to operate this equipment. Note: This equipment has been tested and found to comply with the limits for a Class B digital device, pursuant to Part 15 of the FCC Rules. These limits are designed to provide reasonable protection against harmful interference in a residential installation.
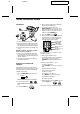
RT UX600MU-QRQR Quick Reference Guide Installation 4. Enter your fax number (max. of 20 digits) by pressing the number keys. ♦ If you make a mistake, press the HOLD/SEARCH key to move the cursor TEL SET. EXT . PHO NE back to the mistake, then enter the correct number or letter. (To move the cursor forward, press the SPEAKER key.) TEL LIN . E 5. Press the START key: 6. Enter your name by pressing the appropriate number keys as shown below.
Quick Reference Guide Setting the date and time To set the date and time, press the following keys: FUNCTION 3 DATE & TIME SET will appear in the display. Press the START key: START Enter two digits for the Month (01 through 12). To clear a Speed Dial number, press the following sequence of keys: FUNCTION 3 Press "2" and then enter the 2-digit Speed Dial number. Press: STOP START (See Pages 27-29 of your operation manual.) Enter two digits for the Day (01 through 31).
Quick Reference Guide Receiving Documents Press the RECEPTION MODE key until "AUTO" or "MANU" appears in the display. Installing the imaging film RECEPTION MODE AUTO reception: The fax will automatically answer after four rings and receive the incoming document. MANUAL reception: Lift the handset when the fax rings. If you hear a fax tone, wait until RECEIVING appears in the display, then hang up (if RECEIVING doesn’t appear, press the START key).
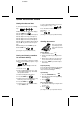
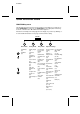
Quick Reference Guide FUNCTION key menu The following chart shows the layout of the functions and settings accessed by pressing the FUNCTION key. First press the FUNCTION key, the appropriate numeric key as shown, and then "#" or " " until the desired item appears. * Instructions for making each setting appear in the display. If you have any difficulty, refer to the detailed instructions on the page shown below the setting.
Quick Reference Guide 5 6 7 Cover Sheet Print Set-up Program/Group Cover Sheet Header (35) Initialize Film (5) Program Entry Mode (69) Reception Ratio (44) 2 in 1 Print (44) Paper Type Set (14) Paper Size Set (14) Copy Cut-off (47) Group Mode (30) En t ry
UX600MU-INBU Introduction Welcome to the UX-600M and thank you for choosing Sharp! The UX-600M is a multifunction facsimile machine that can also be used as convenience copier, scanner, and printer for your computer. Fax operations can be performed either from the operation panel of the UX-600M, or from your computer using the provided Multifunction Interface software.
Important safety information • If your facsimile equipment is not operating properly, you should immediately remove it from your telephone line, as it may cause harm to the telephone network. • The power outlet must be installed near the equipment and must be easily accessible. • Never install telephone wiring during a lightning storm. • Never install telephone jacks in wet locations unless the jack is specifically designed for wet locations.
UX600MU-TCTC Table of Contents 1 Installation 1 Unpacking Checklist . . . . . . . . . . . . . . . . . . . . . . . . . . . . . . . . . . . . . . . . 1 Loading the Imaging Film . . . . . . . . . . . . . . . . . . . . . . . . . . . . . . . . . . . 2 Connections. . . . . . . . . . . . . . . . . . . . . . . . . . . . . . . . . . . . . . . . . . . . . . . 6 Installing the Multifunction Interface Software . . . . . . . . . . . . . . . . . . . 9 Attachments. . . . . . . . . . . . . . . . . . . . . . . . . . . .
7 Answering Machine Hookup 50 Using the Hookup . . . . . . . . . . . . . . . . . . . . . . . . . . . . . . . . . . . . . . . . 50 Optional Hookup Settings . . . . . . . . . . . . . . . . . . . . . . . . . . . . . . . . . . 56 8 Special Functions 58 Blocking Reception of Unwanted Faxes . . . . . . . . . . . . . . . . . . . . . . . Memory . . . . . . . . . . . . . . . . . . . . . . . . . . . . . . . . . . . . . . . . . . . . . . . . . Broadcasting . . . . . . . . . . . . . . . . . . . . . . . . . . . .
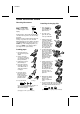
RT UX600MU-ISUN Chapter 1 Installation Unpacking Checklist After unpacking your fax, make sure you have all the items shown below. If any are missing, contact your dealer or retailer.
YF Chapter 1 UX600MU-ISIF Installation Loading the Imaging Film The printer unit in your fax creates printed text and images by applying heat to the imaging film, which causes ink to be transferred from the film to the page. Follow the steps below to install or replace the imaging film. 1 Press the release marked OPEN and open the print compartment cover. • Caution! The printing head (the strip of metal on the underside of the cover) applies heat to the imaging film.
Chapter 1 3 Installation Take the new film out of its package, and insert two of the gears provided with the fax into the ends of the spool with film. Make sure that the two tabs on the gears fit properly into the slots in the ends of the spool. • Do not yet remove the band which holds the spools together. 2 tabs 4 5 Hold the empty spool so that the end with only one slot is on the left, and lower the spools into the front of the printing compartment.
Chapter 1 Installation 6 Pull the empty spool toward the back of the compartment, unwinding the film as you pull. 7 Insert the empty spool into the back of the compartment so that the gear and the flange fit into the slots on the sides of the compartment. • Make sure that the gear engages with the gear below it. 8 4 Wind the film slightly (rotate the gear on the right side of the empty spool) so that there is no slack in the film.
Chapter 1 9 Installation Close the print compartment cover, making sure it clicks into place. • Caution! Close the cover slowly to make sure it doesn’t pinch your fingers. 10 If you replaced the film, initialize the new film by pressing the FUNCTION key, the "6" key, and the "#" key on the operation panel. Make sure that INITIALIZE FILM appears in the display, and then press the START key. (Do not perform this step if you installed the initial sample roll of film.
DD UX600MU-ISCO Chapter 1 Installation Connections Connect the power cord, telephone line cord, and handset as shown below. If desired, you can also connect an answering machine or an extension telephone to your fax. ♦ Connecting an answering machine to the fax will allow you to receive both voice and fax messages on the same line while you are out. For details on using this feature, see Chapter 7.
Chapter 1 3 Installation Connect the handset as shown and place it on the handset rest. Handset 4 TEL SET. TEL LIN . E Insert one end of the telephone line cord into the TEL. LINE jack. Insert the other end into a standard (RJ11C) single-line telephone wall jack. Be sure to insert the telephone line cord into the TEL. LINE jack. Do not insert it into the TEL. SET jack. Wall jack Note: Your fax is set for touch-tone dialing.
Chapter 1 Installation Connecting the fax to your computer The Multifunction Interface kit which comes with your fax machine allows you to use your fax as a printer and scanner, and lets you perform fax operations from your computer via the fax modem in your fax machine. Follow the steps below to connect the PC Interface box and cables. Important: Use only the provided interface cable and modular plug cable.
DB UX600MU-ISIM Chapter 1 Installation Installing the Multifunction Interface Software The Multifunction Interface software allows you to perform fax operations from your computer and lets you use your fax as a scanner and printer. Install the software from your Sharp Multifunction Interface CD-ROM. ♦ You must be running Microsoft Windows(TM) 3.1 or higher, or Windows ’95 to install the Sharp Multifunction Interface as a Windows application.
Chapter 1 Installation 7 From the Welcome screen, select Next to continue the installation process or Cancel to stop installation. Enter the Registration and Fax Cover Page information as requested, clicking Next until all information is complete. 8 The Choose Destination Location window will appear, displaying the Destination Directory dialog box. The Destination Directory text box contains the name of the system directory and the drive where program files will be stored.
Chapter 1 Installation All changes will now be in effect and you will be able to successfully run your Multifunction Interface software. After your Sharp Multifunction Interface install is complete, you will return to the main installation screen. You now have the opportunity to try out the Xerox TextBridge Pro enhanced OCR program included on your Sharp Multifunction Interface CD-ROM. Just click on the Install TextBridge Pro button for a 15-day free trial of this award winning software.
DD Chapter 1 UX600MU-ISLP Installation Attachments Insert the paper tray into the back of the fax as shown. If desired, attach the original document support by inserting the ends into the holes in the bottom of the fax as shown.
Chapter 1 Installation Loading Printing Paper The paper tray holds the paper on which received documents and copies are printed. Up to 200 sheets of letter or legal size paper from 16 to 20 lbs. (60 to 75 g/m2) can be loaded in the tray. Less sheets can be loaded when using heavier paper. The maximum allowed paper weight is 24 lbs. (90 g/m2). Note: When receiving or copying documents, do not allow more than 100 pages to collect in the received document outlet.
Chapter 1 4 Installation Replace the paper cover on the paper tray and then push the paper release plate back down. LETTER LEGAL • Important: Be sure to replace the paper cover before you push the paper release plate down. 5 Your fax has been set at the factory to scale the size of the printed image to letter size paper. If you have loaded legal paper, you must change this setting to legal.
RT Chapter 2 UX600U-IPSG Initial Settings Setup Guide Before you can begin using your fax, there are some settings that must be made with the keys on the operation panel. Some of the settings are required for basic use of your fax, others may or may not be necessary depending on how you want to use the fax. The procedures for making the settings are described in this chapter in the order shown below.
DD UX600MU-IPOP Chapter 2 Initial Settings A Look at the Operation Panel Before you make the settings, take a moment to familiarize yourself with the operation panel. SPEED DIAL key REDIAL key Press this key to automatically redial the last number dialed. Press this key to dial a 2-digit Speed Dial number. ABC 1 GHI Number keys Use these keys to dial numbers, and enter numbers and letters during number/name storing procedures.
Chapter 2 Initial Settings VOLUME keys Press these keys to adjust the volume of the handset when the handset is lifted, the volume of the speaker when the SPEAKER key has been pressed, or the volume of the ringer at all other times. Display This displays various messages during operation and programming. FUNCTION key Press this key to select various special functions. RESOLUTION key MEMORY key Press this key to adjust the resolution and contrast before sending or copying a document.
RT UX600MU-IPSN Chapter 2 Initial Settings Entering Your Name and Fax Number To have your name and fax/telephone number printed at the top of every page you transmit, program them by pressing the panel keys as shown below. ♦ You must program your name and fax number in order to comply with the Consumer Protection Act of 1991 (see inside of front cover). ♦ If you make a mistake, press the HOLD/SEARCH key to move the cursor back to the mistake, then enter the correct number or letter.
RT UX600MU-IPEL Chapter 2 Initial Settings Entering Letters for Names Names are programmed by pressing the number keys. You will notice that letters are marked above each of the number keys "2" through "9". To enter a letter (or number), press the appropriate key one or more times until the letter appears in the display (the number will appear first, followed by the letters in the order marked above the key). The keys used for entering letters and editing are shown below.
Chapter 2 Initial Settings Symbol list * To enter a symbol from the list below, press the "#" key or the " " key repeatedly until the desired symbol appears. #→ ← + . / ! " # $ % & ’ ( ) + , - : ; < = > ? @ [ ¥ ] ^ _ p * { | }→ ← Example The following is an example of entering the name "ABC Co. #1".
UX600MU-IPSD RT Chapter 2 Initial Settings Setting the Date and Time The date and time appear in the display and reports, and are printed at the top of every page you transmit. Set the date and time by pressing the keys on the operation panel as shown below. ♦ To correct a mistake, press the SPEED DIAL key to move the cursor back to the mistake, and then enter the correct number. 1 Press the FUNCTION key and then the "3" key. ENTRY MODE will appear in the display.
Chapter 2 Initial Settings * 8 Press " " to select A.M., or "#" to select P.M. 9 Press the START key and then the STOP key. or START Daylight Saving Time If desired, you can have the clock in your fax move forward and backward automatically at the beginning and end of Daylight Saving Time. To turn on this function, press the panel keys as follows: 1 Press the FUNCTION key and then the "3" key. ENTRY MODE will appear in the display. 2 Press the " " key two times.
DD UX600MU-IPRM Chapter 2 Initial Settings Selecting the Reception Mode Your fax has two modes for receiving incoming calls and faxes: AUTO mode: In AUTO mode, the fax will automatically answer all calls after four rings and receive the incoming document. MANUAL mode: In MANUAL mode, you must answer all calls, including fax messages, using the fax’s handset or an extension phone connected to the same line.
Chapter 2 Initial Settings Selecting the receiving unit If you have connected the fax machine to a personal computer with the provided Multifunction Interface box, you can choose whether to have incoming faxes received to the fax machine or to your computer. The initial setting is FAX (reception to the fax machine). To change the setting, follow the steps below. 1 Press the FUNCTION key and then the "#" key. RECEIVE UNIT will appear in the display.
DD UX600MU-IPDR Chapter 2 Initial Settings Distinctive Ring Distinctive ring is a service offered by some local telephone companies which allows you to use up to four different telephone numbers, each with a different ring pattern, on your regular single line. If you subscribe to a distinctive ring service you can set your fax to automatically answer when it detects one of those ring patterns, allowing you to use the number corresponding to that pattern as an exclusive fax number.
Chapter 2 Initial Settings 1 Press the keys shown at right. OPTION SETTING will appear in the display. 2 Press the keys shown at right. DISTINCTIVE RING will appear in the display. 3 Select a ring pattern by entering the appropriate number ("1" to "5" as shown in the list on the previous page). 4 Press the STOP key.
UX600MU-IPAD RT Chapter 2 Initial Settings Storing Numbers for Automatic Dialing Automatic dialing is a quick and convenient way of dialing which is done by either pressing a Rapid Key (Rapid Key Dialing), or pressing the SPEED DIAL key and entering a 2-digit number (Speed Dialing). Automatic dialing can be used for both fax transmissions and voice calls. To use automatic dialing, you must first store the full number in your fax and assign a 2-digit Speed Dial number to it.
Chapter 2 3 4 Initial Settings Enter a two-digit number (from "01" to "99") by pressing the number keys. This will be the Speed Dial number. Enter the fax or voice number by pressing the number keys (max. of 32 digits including pauses). 5 Press the START key. 6 Enter the name of the location or party by pressing the appropriate number key for each letter several times until the letter appears in the display (max. of 20 characters).
Chapter 2 Initial Settings Clearing numbers 1 Press the keys shown at right. FAX/TEL. # MODE will appear in the display. 2 Press "2" to select CLEAR. 3 Enter the Speed Dial number that you want to clear by pressing the number keys. 4 Press the START key. 5 Return to Step 3 to clear another number, or press STOP to exit. FUNCTION 3 2 0 1 (Example) START STOP Step 3 or Making changes To make changes in a number previously stored, repeat the storing procedure.
Chapter 2 Initial Settings Storing numbers in Group Keys Group Keys allow you to dial a group of fax numbers by simply pressing the appropriate Group Key once. They are convenient for the Broadcasting function, which is used to transmit a document to a group of fax machines. Rapid Keys 18/G1 and 19/G2 can be programmed as Group Keys. To program or clear a Group Key, follow the steps below. Note that one key cannot be simultaneously programmed as both a Rapid Key and a Group Key.
DD UX600MU-IPVA Chapter 2 Initial Settings Volume Adjustment You can adjust the volume of the speaker, handset, and ringer using the UP and DOWN keys on the operation panel. Speaker The speaker has three volume levels: HIGH, MIDDLE, and LOW. To adjust the volume of the speaker, press the SPEAKER key and then press the UP or DOWN key until the desired level appears in the display. Press the SPEAKER key again to turn the speaker off.
RT UX600MU-BOPS Chapter 3 Sending Documents Transmittable Documents Your fax can transmit most standard office documents. Specific guidelines are as follows: Size and weight The size and weight of documents which you can load in the document feeder depend on whether you load one sheet at a time or several sheets at once. One sheet at a time: 14 lbs. 2 36 lbs. (52 g/m ) 5.0" 2 (135 g/m ) 39.4" (128 mm) (1.0 m) 5.8" (148 mm) 8.5" (216 mm) Several sheets at once: 14 lbs.
Chapter 3 Sending Documents Loading the Document Up to 20 pages can be placed in the feeder at one time. The pages will be automatically fed into the fax starting from the page on the bottom. ♦ If you need to send or copy more than 20 pages, place the additional pages gently and carefully in the feeder just before the last page is scanned. Do not try to force them in, as this may cause double-feeding or jamming.
Chapter 3 Sending Documents Optional Transmission Settings If desired, there are several transmission settings which are possible before dialing and transmitting the document. Note: To make the settings, the document must first be loaded in the feeder. Resolution Your fax has 4 resolution settings. If you do not make a setting, the fax will automatically send the document in STANDARD resolution. STANDARD: Use STANDARD for ordinary documents.
Chapter 3 Sending Documents Cover Sheet You can have your fax generate a cover sheet and send it as the last page of the transmission. The cover sheet includes the date and time, the sender’s name and number, and the receiver’s name and number if an automatic dialing number is used. The total number of pages sent is indicated on the bottom. ♦ Your name and number must be programmed in order for them to appear on the cover sheet. (See "Entering Your Name and Fax Number" in Chapter 2.
Chapter 3 Sending Documents Batch Page Numbering This setting is used to change the page numbering of the transmitted document from simple numbering ("P.1", "P.2", etc.) to batch numbering, which means that a slash and the total number of pages being sent are added after each page number (for example, "P. 1/5", "P.2/5", etc.). This allows the receiver to check for any missing pages. ♦ If you are sending a cover sheet, do not include the cover sheet in the total number of pages.
YF UX600MU-BOSD Chapter 3 Sending Documents Dialing and Transmission Once you have loaded the document and made any desired transmission settings, you are ready to dial the number of the receiving fax machine and transmit the document. There are several ways of dialing, and you can select the one which best suits your needs. Normal Dialing With Normal Dialing, you pick up the handset (or press the SPEAKER key) and dial as you would to make a telephone call.
Chapter 3 4 Sending Documents When you hear the reception tone, press the START key. Replace the handset if you used it. COPY/ HELP START STOP • When transmission is completed, the fax will beep. Direct Keypad Dialing If you do not need to talk with the other party before sending the fax, you can just dial; it isn’t necessary to pick up the handset or press the SPEAKER key.
Chapter 3 Sending Documents Rapid Key Dialing If the number you want to dial has been stored for automatic dialing as a Speed Dial number from 01 to 38 (see "Storing Numbers for Automatic Dialing" in Chapter 2), you can dial it by pressing the corresponding Rapid Key. (If the Speed Dial number is from 20 to 38, press the SHIFT key and then press the Rapid key.
Chapter 3 Sending Documents Using the HOLD/SEARCH key If you don’t remember the Rapid Key or Speed Dial number in which you have stored a particular fax number, you can search for the number by following the steps below. Once you have found the number, you can dial it and transmit the loaded document by simply pressing the START key. 1 Press the HOLD/SEARCH key.
Chapter 3 Sending Documents Automatic redialing If you use automatic dialing (including Direct Keypad Dialing) and the line is busy, your fax will automatically redial the number. Your fax was set at the factory to make 2 redialing attempts at intervals of 5 minutes. ♦ To stop automatic redialing, press the STOP key.
YF Chapter 4 UX600MU-BORD Receiving Documents Using Auto Mode When the reception mode is set to AUTO (press the RECEPTION MODE key until AUTO appears in the display), your fax automatically answers all calls on 4 rings and receives the incoming documents. ♦ You can change the number of rings on which the fax answers incoming calls by changing Option Setting 2 (see Chapter 9, "Optional Settings"). Any number from 1 to 5 can be selected.
Chapter 4 Receiving Documents Note: If you have set Option Setting 13 (Fax Signal Receive) to NO and you hear a fax tone when you pick up the handset, you must press the START key to begin reception.
Chapter 4 Receiving Documents 2 in 1 Print To save paper, you can have the size of your incoming faxes reduced by 55%. This will allow you to receive, for example, a 2-page document on one page (note that this may not be possible if the document pages are longer than your printing paper). To turn on this function, follow the steps below. 1 Press the keys shown at right. 2 IN 1 PRINT will appear in the display. 2 Press "1" to turn on the function, or "2" to turn it off. 3 Press the STOP key.
YF UX600MU-BOCY Chapter 5 Making Copies Your fax can also be used to make copies. Single and multiple copies (up to 99 per original) can be made, enabling your fax to double as an office copier. ♦ The default resolution for copying is SUPER FINE. ♦ If you are making multiple copies of more than one original, you can choose whether to have the copies sorted (SORT COPY) or not sorted (MULTI COPY).
Chapter 5 3 4 Making Copies Press "1" (MULTI COPY) if you don’t want the copies sorted, or "2" (SORT COPY) if you want them sorted. Enter the desired number of copies with the number keys. • If the desired number of copies is from 1 to 9, enter "0" first. Multi 1 1 Sort or 2 2 (Example) • If you don’t want to make a reduction or enlargement setting, press the START key. Copying will begin.
Chapter 5 Making Copies Copy Cut-off When making a copy, your fax has been set at the factory to not print the remaining part of a document if the document is longer than the printing paper. If you want your fax to always print the remaining part of the document on a second page, follow the steps below. 1 Press the keys shown at right. COPY CUT-OFF will appear in the display.
RT UX600MU-BOVC Chapter 6 Making Telephone Calls Your fax can be used like a regular telephone to make and receive voice calls. ♦ To make or receive a phone call, the power must be on. ♦ The fax may interrupt a voice call received on an extension phone if there is a period of silence during the conversation, the fax’s reception mode is set to AUTO, and Option Setting 9 (TAD CONNECTED) is set to YES.
Chapter 6 Making Telephone Calls Using the HOLD/SEARCH key You can use the HOLD/SEARCH key to search for a Rapid Key or Speed Dial number. First search for the number as described in "Using the HOLD/SEARCH key" in "Dialing and Transmission" in Chapter 3, then pick up the handset or press the SPEAKER key. The number will be dialed automatically (do not press the START key).
DD Chapter 7 UX600MU-UAUA Answering Machine Hookup Using the Hookup If you have connected an answering machine to your fax as described in "Connections" in Chapter 1, you can receive both voice messages and fax transmissions on the same line while you are out. To use the hook-up, change your answering machine’s outgoing message and then activate the hookup before you go out as described on the following page.
Chapter 7 Answering Machine Hookup Activating the hookup Before you go out, activate the answering machine hookup as follows: 1 Set Option Setting 9, TAD CONNECTED, to YES: • Press the FUNCTION key and then the "4" key. OPTION SETTING will appear in the display. FUNCTION 4 • Press the "#" key nine times. TAD CONNECTED will appear in the display. • Press "1" to select YES. (To deactivate the hookup, press "2" for NO.) • Press the STOP key to return to the date and time display.
Chapter 7 Answering Machine Hookup How the hookup operates While you are out, all of your incoming calls will be answered by your answering machine and its outgoing message will play. Voice callers can leave a message. During this time, your fax machine will quietly monitor the line. If your fax machine detects a fax tone or a duration of silence equal to four seconds (called "Quiet Detect Time"), it will take over the line and begin reception.
Chapter 7 4 Answering Machine Hookup If you still do not hear a fax tone, turn off the Quiet Detect Time function and have callers send faxes by pressing "5", " ", " " and then their Start key. For more information on this method, see "If it still doesn’t work" in this chapter. * * If you have problems If you have problems with the hookup, first check the following: ♦ Is the answering machine connected properly to the fax? One end of the answering machine line should be inserted in the "TEL.
Chapter 7 Answering Machine Hookup ♦ Are you having trouble receiving documents sent by automatic dialing? Make sure that your answering machine’s outgoing message is less than 10 seconds long, and that your answering machine is set to answer on two rings.
Chapter 7 Answering Machine Hookup How fax transmissions are detected: Your fax detects fax transmissions in two ways when an answering machine is connected, depending on whether the document is being sent automatically or manually: Automatic dialing: If the document is sent using a form of automatic dialing, such as Rapid Key or Speed Dialing, the transmitting fax machine will send a "calling tone" at 3-second intervals for a period of about 30 to 40 seconds after dialing.
DD UX600MU-UAOS Chapter 7 Answering Machine Hookup Optional Hookup Settings If necessary, you can use the following settings to improve the response of the answering machine hookup to incoming calls. Quiet Detect Time This function causes the fax machine to take over the line and begin reception if a certain duration of silence is detected after the answering machine answers. Time selections for the period of silence are one to ten seconds.
Chapter 7 3 Set the time in seconds by entering a twodigit number from "01" to "10" (enter "01" for one second, "02" for two seconds, etc.). To turn off the function, enter "00". Answering Machine Hookup 0 4 (Example) • Note: We recommend that you do not set Quiet Detect Time below three seconds. 4 STOP Press the STOP key to return to the date and time display.
YF UX600MU-SFAJ Chapter 8 Special Functions Blocking Reception of Unwanted Faxes The Anti Junk Fax function allows you to block reception of faxes from parties which you specify. This saves paper by not printing out unwanted "junk" faxes. To use this function, first turn it on by setting Option Setting 14 to YES as described in Chapter 9, and then enter the fax numbers from which you do not want to receive faxes as shown below.
Chapter 8 4 Special Functions Enter the fax number (max. of 20 digits). 5 5 5 1 2 3 4 (Example) 5 Press the START key. 6 Return to Step 3 to enter (or clear) another number, or press STOP to exit.
YF UX600MU-SFME Chapter 8 Special Functions Memory Your fax has a memory which can be used to temporarily store both incoming and outgoing documents. ♦ Approximately 37 pages of average content can be held in memory if they are all going to be transmitted (25 pages if Option Setting 18, Error Correction Mode, is set to YES), or 30 pages if they are all received (27 pages if Option Setting 18 is set to YES). Less can be held if any were scanned using fine or halftone resolution.
Chapter 8 4 Press the START key if you entered a Speed Dial number or a full number. Special Functions START • The document will be scanned and stored in memory. Your fax will then dial the receiving machine and transmit the document (redialling will be done automatically if necessary). If the memory becomes full... If the memory becomes full while the document is being scanned, MEMORY IS FULL will appear in the display.
UX600MU-SFBR YF Chapter 8 Special Functions Broadcasting This function allows you to send the same document to as many as 20 different locations with just one operation. First store the document in memory, then enter the numbers of the receiving machines. The document will be transmitted to each location. ♦ You can only use Rapid Keys or Speed Dial numbers to dial the numbers of the receiving machines. 1 Load the document(s). 2 Press the MEMORY key and then "2".
Chapter 8 5 Press the START key. Transmission will begin. Special Functions START • A Transaction Report is automatically printed out after Broadcasting is completed. Check the "Note" column of the report to see if any of the locations are marked "Busy" or have a communication error code. If so, send the document to those locations again.
RT UX600MU-SFPO Chapter 8 Special Functions Polling (Requesting a Fax Transmission) Polling allows you to request another fax machine to send a document to your fax machine. In other words, the receiving fax machine, not the transmitting fax machine, initiates the transmission. You can use your fax to both poll and be polled by others. To use the polling function, you must first reset Rapid Key 15/POLL for use as a polling key.
Chapter 8 Special Functions Being polled (polling standby) To let another fax machine poll your fax, simply set the reception mode to AUTO, and load the document(s) to be sent. Transmission will take place when the other fax machine calls your fax and activates polling. Automatic reception is possible whilst your fax is on polling standby. Polling security Polling Security allows you to prevent unauthorized polling of your fax.
Chapter 8 Special Functions Storing and clearing fax numbers for polling permission You can store up to 10 fax numbers in your fax’s list of permitted numbers. 1 Press the keys shown at right. ENTRY MODE will appear in the display. 2 Press the "#" key four times. PASSCODE # MODE will appear in the display. 3 Press "1" to store a number, or "2" to clear a number. 4 Storing: Enter a 2-digit number from "01" to "10". This number identifies the fax number you will store in the next step.
YF UX600MU-SFTI Chapter 8 Special Functions Timer Operations The Timer function allows you to set a transmission and/or polling operation to be performed automatically at a time you specify. One transmission operation and one polling operation can be set at the same time, and the times they will be performed can be specified up to 24 hours in advance.
Chapter 8 7 Special Functions Enter the Speed Dial number of the receiving fax machine. 0 5 • If this is a polling operation, go to Step 10. 8 Press the START key. 9 Adjust the resolution and/or contrast (skip this step if you don’t want to change settings). 10 Press the START key and then the STOP key. If this is a transmission operation, load the document in the feeder sometime before the specified time of transmission.
YF UX600MU-SFEU Chapter 8 Special Functions Entering and Using Programs If you frequently perform the same operation involving the same party, you can program all the steps of the operation into one Program Key. This allows you to perform the operation by simply pressing that key. ♦ Rapid Keys 16/P1 and 17/P2 can be used as Program Keys. However, a key cannot be used if it is already being used for Rapid Key Dialing.
Chapter 8 Special Functions 5 Press the START key. 6 Press the "#" key or the " " until the desired operation appears in the display. The operations will appear in the following order: • Transmission ("SEND") • Polling • Broadcasting 7 START * Press the START key and then continue with the specific procedure for your operation (see the following pages). or START Transmission (Continued from "Initial procedure".
Chapter 8 12 Enter the Speed Dial number of the receiving fax machine. 2 Special Functions 5 (Example) 13 Press the START key. 14 If desired, set the resolution and/or contrast by pressing the RESOLUTION key (otherwise, skip this step). 15 Press the START key and then the STOP key. START RESOLUTION STOP START Polling (Continued from "Initial procedure".) 8 9 Enter the time at which you want the operation to take place (2 digits for the hour and 2 digits for the minute).
Chapter 8 Special Functions Broadcasting (Continued from "Initial procedure".) 8 9 Enter the Speed Dial numbers of the receiving machines. Press the START key. 10 If desired, set the resolution and/or contrast by pressing the RESOLUTION key (otherwise, skip this step). 11 Press the START key and then the STOP key. 2 5 3 5 (Example) START RESOLUTION STOP START Clearing a Program key To clear a Program key, follow these steps: 1 Press the keys shown at right. PRG.
Chapter 8 Special Functions Using a Program key A programmed operation is performed as follows: 1 Load the document. 2 Press the appropriate Program Key. 16/P1 35 (Example) Note: A maximum of 2 timer operations can be set at any one time, including both timer operations set by pressing a Program Key and operations set as described in "Timer Operations" in this chapter.
RT UX600MU-OSOS Chapter 9 Optional Settings A variety of optional settings are available which you can use to customize your fax to better suit your needs. The settings are made by pressing the panel keys, and each setting is described in the list below. Accessing the Settings 1 Press the keys shown at right. OPTION SETTING will appear in the display. 2 Move through the list of settings by pressing "#" to move forward, or " " to move backward.
Chapter 9 Optional Settings Setting 3: RECALL INTERVAL This sets the amount of time your fax will wait between automatic redials when the line is busy. Enter "01" for 1 minute, "02" for 2 minutes, etc., up to a maximum of 15 minutes. • Initial setting: "05" Setting 4: RECALL TIMES This sets the maximum number of times your fax will automatically redial if the line is busy. Enter any number from "00" to "15".
Chapter 9 Optional Settings Setting 9: TAD CONNECTED Press "1" (YES) if an answering machine is connected to the fax and turned on, or "2" (NO) if not. See Chapter 7 for more details on using an answering machine hookup. (Note: Select "NO" if you are using the distinctive ring function.) • Initial setting: "2" Setting 10: QUIET DETECT TIME This sets the duration of silence (in seconds) after which the fax will take over the line and begin reception when an answering machine is connected.
Chapter 9 Optional Settings Setting 14: JUNK FAX NUMBER CHECK Press "1" to prevent reception from fax numbers entered in the Anti Junk Fax List. Press "2" to allow reception from all numbers. • Initial setting: "2" Setting 15: POLLING Press "1" if you want to use Rapid Key 15/POLL as a polling key. Press "2" if you want to use it as a regular Rapid Key.
Chapter YF 10 UX600MU-PRPR Printing Reports and Lists You can print out a variety of lists showing settings and information entered in the fax. You can also have the fax automatically print out a report on transactions after they are made. The lists and the report are described below. Printing a list 1 Press the keys shown at right. LISTING MODE will appear in the display. 2 Press the "#" key or the " " key until the desired list appears in the display. 3 Press the START key.
Chapter 10 Printing Reports and Lists Explanation of headings SENDER/ The fax number of the other machine involved in the transaction. If this RECEIVER machine does not have an ID function, the communication mode will appear (for example, "G3"). PAGES Number of pages transmitted or received. NOTE OK - Transmission/reception was normal. P.FAIL - A power failure occurred. JAM - A problem with the fax paper or document occurred. NO PAPER - You ran out of fax paper during reception.
Chapter 10 Printing Reports and Lists Reception errors E-0 Able to recognize handshake signal, but it has errors. E-1 Line disconnected during reception. E-2 Cannot recognize the handshake signal from the transmitter side. E-3 Cannot recognize the last handshake signal from the transmitter side. E-4 Cannot recognize the handshake signal for next page from the transmitter side in the case of mode change. E-5 Cannot recognize the handshake signal for next page from transmitter side.
Chapter 10 Printing Reports and Lists Telephone Number List This list shows the fax and voice numbers which have been stored for automatic dialing. Passcode List This list shows settings made for polling security, your name and fax/telephone number as entered in the machine, and a sample of the header printed at the top of every page you transmit (HEADER PRINT). Option Setting List This list shows the current status of the optional settings.
Chapter 10 Printing Reports and Lists Anti Junk Number List This list shows the fax numbers from which reception is not allowed. Program and Group List The top part of this list shows the programs which have been entered. The bottom part shows the fax numbers which have been stored in each Group Key.
Chapter 10 Printing Reports and Lists Print Setup List This list shows the current status of the printing settings made by pressing the FUNCTION key and the "6" key. Transaction Report This report is printed out automatically after an operation is completed to allow you to check the result. Your fax is set at the factory to print out the report only when an error occurs. If desired, you can change the setting to have it printed out under a variety of other conditions.
RT UX600MU-MAMA Chapter 11 Maintenance Fax print head Clean the print head frequently to ensure optimum printing performance. To clean the print head, first unplug the power cord, open the print compartment cover (press the release marked OPEN), and remove the imaging film. Wipe the print head, frame and roller with a soft cloth dampened with denatured alcohol. Print head Frame Rollers Caution! • Do not use benzene or thinner. Avoid touching the print head with hard objects.
Chapter 11 Maintenance Scanning glass and rollers Clean the scanning glass and rollers frequently to ensure the quality of transmitted images and copies. Open the operation panel by pulling the front edge up (grasp it at the PANEL RELEASE mark), and clean the scanning glass and rollers as shown below. Wipe the scanning glass, white backplate, and rollers with a soft cloth.
RT UX600MU-TSPS Chapter 12 Troubleshooting Problems and Solutions Note: For problems with an answering machine hookup, see "If you have porblems" in Chapter 7, "Answering Machine Hookup". Problem Nothing appears in the display. Check and remedy • Make sure the power cord is properly plugged into a power outlet. • Connect another electrical appliance to the outlet to see if it has power. The fax does not respond when you press any of its keys. Dialing is not possible.
Chapter 12 Troubleshooting Automatic document feeding does not work for transmission or copying. • Check the size and weight of the document (see Nothing is printed at the receiving end. • Make sure that the document for transmission is "Transmittable documents" in Chapter 3). placed face down in the feeder. • Make sure that the fax paper is properly loaded in the receiving machine. A distorted image is received at the other end. • Noise on the telephone line may cause distortion.
Chapter 12 Troubleshooting • If reception or copying has been done Reception/copying is interrupted. continuously for a long time, the print head may have become overheated. Turn off the power and let it cool down. • The fax may interrupt during a voice call if Voice calls taken on an extension phone are interrupted by the fax. No reception occurs when polling is attempted. Option Setting 9 is set to YES and the reception mode is set to AUTO.
DD UX600MU-TSDM Chapter 12 Troubleshooting Messages and Signals Display messages CHECK PAPER SIZE The paper size setting is incorrect. Change the paper size setting as described in "Loading the Paper" in Chapter 1. COVER OPEN The printing compartment cover is open. Close it. DOCUMENT JAM The original document is jammed. See the following section, "Clearing Paper Jams".
Chapter 12 Troubleshooting Audible signals Continuous tone 3 seconds Indicates the end of transmission, reception, or copying. Intermittent tone (3 beeps) 5 seconds (1 second on, 1 second off) Indicates incomplete transmission, reception, or copying. Rapid intermittent tone 35 seconds (0.7 seconds on, 0.3 seconds off) Indicates that the handset is off hook.
UX600U-TSCP RT Chapter 12 Troubleshooting Clearing Paper Jams Clearing a jammed document If a document doesn’t feed properly during transmission or copying, or DOCUMENT JAMMED appears in the display, first try pressing the START key. If the document doesn’t feed out, open the operation panel (grasp the front edge at the "PANEL RELEASE" mark and pull up) and pull it out gently. Clearing jammed fax paper 1 Press the release marked OPEN and open the print compartment cover.
Chapter 12 Troubleshooting 3 Gently pull the jammed paper out of the printing compartment. 4 Replace the imaging film, making sure that the flange goes into the rear slot on the left side of the printing compartment. Also, make sure that the right, rear gear engages with the gear below it. 5 Wind the film slightly (rotate the gear on the right side of the rear spool) so that there is no slack in the film. Make sure that both edges of the film wind onto the spool evenly.
YF UX600MU-SPSP Specifications Applicable telephone line: Public switched telephone network Compatibility: ITU-T (CCITT) G3 mode Configuration: Half-duplex, desktop transceiver Memory size*: 512 KB (approx. 30 average pages with ECM function off) Compression scheme: MH, MR, MMR Scanning method: Flat-bed, solid-state CCD Resolution: Horizontal: 203 lines/inch (8 lines/mm) Vertical: Standard 98 lines/inch (3.85 lines/mm) Fine /Halftone 196 lines/inch (7.
Specifications Contrast control: Automatic/Dark selectable Copy function: Single/Multi-copy/Sort-copy (99 copies/page) Telephone function: Standard (cannot be used if power fails) Power requirements: 120 V AC, 60 Hz Operating environment: 41 - 95°F (5 - 35°C), 20 to 80% RH Power consumption: Stand-by: 5 W Maximum: 100 W Dimensions: Width: 14.4" (365 mm) Depth: 13.9" (353 mm) Height: 7.6" (193 mm) (Without attachments) Weight: Approx. 10.4 lbs. (4.
UX600MU MSDS-Front 1/2 SHARP Date Issued: Feb. 9,1996 MATERIAL SAFETY DATA SHEET MSDS No. B-1006 Section 1. Product Identification UX-15CR Product Code: Imaging Film Section 2. Supplier’s Name and Address Sharp Corporation 22-22 Nagaike-cho, Abeno-ku, Osaka, Japan Local suppliers are listed below. Please contact the nearest supplier for additional information. (Country) U.S.A.
UX600MU MSDS-Front 2/2 SHARP Date Issued: Feb. 9,1996 MATERIAL SAFETY DATA SHEET MSDS No. B-1006 Section 6. Physical Chemical Characteristics Boiling/Melting Point Vapor Pressure Vapor Density Evaporation Rate Appearance Odor m.p. about 70 °C for ink not applicable not applicable negligible thin film coated with ink slight wax odor Specific Gravity about 1 Solubility PH Viscosity Color negligible (water) not applicable not applicable black Section 7.
UX600MU-FCC FCC Regulatory Information This equipment complies with FCC rules, Part 68. On this equipment is a label that contains, among other information, the FCC Registration Number and Ringer Equivalence Number (REN) for this equipment. If requested, this information must be provided to your telephone company. An FCC compliant telephone cord and modular plug is provided with this equipment.
UX600MU-QRSP Guia de Consulta Rapida 3. Presione: START Instalación START 4. Introduzca su número de fax empleando el teclado. Se pueden introducir un máximo de 20 dígitos. ♦ Si se equivoda, presione la tecla HOLD/SEARCH para mover el cursor al TEL SET. EXT . PHO NE TEL LIN . E TEL LIN . E error. Al introducir el dato correcto, se borra el error. 5. Presione la tecla de inicio: START START 6. Introduzca su nombre empleando el teclado. 1. Conecte el microteléfono como se muestra. 2.
Guia de Consulta Rapida Insercion de Fecha y Hora Para insertar la fecha y la hora, presione las teclas siguientes en el órden indicado: FUNCTION 3 El visualizador mostrará: DATE & TIME SET Presione: START START Para borrar un número de discado automático, presione las teclas siguientes en el orden indicado FUNCTION 3 Presione "2" y luego introduzca un número de dos dígitos para asignar el número de discado rapido: Presione: START STOP Introducir dos dígitos para el mes (01 al 12) Introducir dos díg
Guia de Consulta Rapida Recepción de documentos Presione RECEPTION MODE hasta que AUTO o MANU aparezca en el visualizador. RECEPTION MODE Recepción AUTO: El fax suena cuatro veces y comienza a recibir los documentos que entran. Recepción MANUAL: Levante el teléfono cuando suena el fax. Cuando se oiga un tono de fax, presione START y cuelgue el receptor, o puede esperar a que aparezca RECEIVING en el visualizador, entonces cuelgue. Cargar el papel 1.
UX600MU-INDEX Index A Activity Report, 78 Automatic printing, 77 Answering machine hookup Connecting, 6 Fax answer when TAD fails, 57 Problems, 53 Quiet Detect Time, 52, 56 TAD connection setting, 51 Touch-tone fax activation, 54 Anti Junk Fax, 58, 77 Anti Junk Number List, 82 Audible signals, 90 Auto cover sheet, 77 Auto reception mode, 23, 42 Automatic dialing, 27, 39 Direct Keypad Dialing, 38 Display, 17 Display messages, 89 Distinctive Ring, 25 Document feeder, 33 Document guides, 33 Document restrict
Index J R Jams, clearing, 91 Junk fax number check, 77 Rapid Dial Keys, 17 Rapid Key Dialing, 39, 48 Recall Times, 75 Recall Wait Interval, 75 Receive Unit setting, 24 Reception mode Auto, 23, 42 Manual, 23, 42 Setting, 23 Reception mode key, 17, 23 Reception Ratio setting, 44 Redial key, 16, 27, 41, 49 Redialing, 41, 49 Resolution, 34 Resolution key, 17, 34 Ringing volume, 31 Rollers, cleaning, 85 L Letters, entering, 19 Loading the document, 33 M Manual reception mode, 23, 42 Memory, 60 Transmission
Index Timer List, 80 Timer operations, 67 Transaction Report, 83 Transaction Report Print Select, 75 Two-in-one printing, 44 V Volume keys, 31 103
changed 98.3.18 UX600MU-CALL-AD LIMITED WARRANTY SHARP ELECTRONICS CORPORATION warrants to the first end user purchaser that this Sharp brand product (the "Product"), when shipped in its original container, will be free from defective workmanship and materials, and agrees that it will, at its option, either repair the defect or replace the defective Product or part thereof with a new or remanufactured equivalent at no charge to the purchaser for parts or labor for the period(s) set forth below.
UX600MU-BACK SHARP ELECTRONICS CORPORATION Sharp Plaza, Mahwah, New Jersey 07430-2135 SHARP CORPORATION PRINTED IN THAILAND (TINSE3728XHZB)