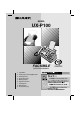
MODEL UX-P100 FACSIMILE OPERATION MANUAL 1. 2. 3. 4. 5. 6. 7. 8. 9.
all.book Page 1 Friday, July 13, 2001 5:09 PM WARNING - FCC Regulations state that any unauthorized changes or modifications to this equipment not expressly approved by the manufacturer could void the user’s authority to operate this equipment. Note: This equipment has been tested and found to comply with the limits for a Class B digital device, pursuant to Part 15 of the FCC Rules. These limits are designed to provide reasonable protection against harmful interference in a residential installation.
all.book Page 1 Friday, July 13, 2001 5:09 PM Introduction Welcome, and thank you for choosing a Sharp fax machine! The features and specifications of your new Sharp fax are shown below. Automatic dialing 30 numbers Imaging film Initial starter roll (included with machine): 32 ft. (10 m) (approx. 30 letter-size pages) Replacement roll (not included): UX-5CR 164 ft. (50 m) (one roll yields approx. 150 letter-size pages) Memory size* 448 KB (approx.
all.book Page 2 Friday, July 13, 2001 5:09 PM Applicable telephone line Public switched telephone network Paper tray capacity (20-lb. paper at room temperature) Letter: 50 sheets (max. stack height: 5 mm) Legal: 5 sheets Compatibility ITU-T (CCITT) G3 mode Input document size Automatic feeding: Width: 5.8 to 8.5" (148 to 216 mm) Length: 5.5 to 11" (140 to 279 mm) Manual feeding: Width: 5.8 to 8.5" (148 to 216 mm) Length: 5.5 to 23.6" (140 to 600 mm) Effective scanning width 8.3" (210 mm) max.
all.book Page 3 Friday, July 13, 2001 5:09 PM Important safety information Do not disassemble this machine or attempt any procedures not described in this manual. Refer all servicing to qualified service personnel. Do not install or use the machine near water, or when you are wet. For example, do not use the machine near a bath tub, wash bowl, kitchen sink or laundry tub, in a wet basement, or near a swimming pool. Take care not to spill any liquids on the machine.
all.book Page 4 Friday, July 13, 2001 5:09 PM Table of Contents A Look at the Operation Panel 6 1. Installation 8 Unpacking Checklist . . . . . . . . . . . . . . . . . . . . . . . . . . . . . . . . . . . . . . 8 Connections . . . . . . . . . . . . . . . . . . . . . . . . . . . . . . . . . . . . . . . . . . . . 9 Loading the Imaging Film . . . . . . . . . . . . . . . . . . . . . . . . . . . . . . . . . 12 Loading Printing Paper . . . . . . . . . . . . . . . . . . . . . . . . . . . . . . . . . . .
all.book Page 5 Friday, July 13, 2001 5:09 PM Table of Contents 7. Printing Lists 61 8. Maintenance 64 9. Troubleshooting 67 Problems and Solutions . . . . . . . . . . . . . . . . . . . . . . . . . . . . . . . . . . 67 Messages and Signals . . . . . . . . . . . . . . . . . . . . . . . . . . . . . . . . . . . 71 Clearing Paper Jams . . . . . . . . . . . . . . . . . . . . . . . . . . . . . . . . . . . .
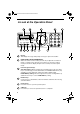
all.book Page 6 Friday, July 13, 2001 5:09 PM A Look at the Operation Panel 1 2 3 4 ABC UP 1 TEL FAX GHI Z A STOP COPY/HELP START/MEMORY FUNCTION 4 7 OpenLCR SPEAKER D OW N 6 7 8 9 10 11 DEF 2 JKL PQRS RESOLUTION/ REDIAL RECEPTION MODE 5 3 MNO 5 6 WXYZ TUV 8 9 0 12 1 Display This displays messages and prompts to help you operate the machine.
all.book Page 7 Friday, July 13, 2001 5:09 PM 7 COPY/HELP key When a document is in the feeder, press this key to make a copy of a document. At any other time, press this key to print out the Help List, a quick reference guide to the operation of your fax machine. 8 START/MEMORY key Press this key after dialing to begin fax transmission. Press this key before dialing to send a fax through memory. 9 FUNCTION key Press this key followed by the arrow keys to select special functions and settings.
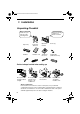
all.book Page 8 Friday, July 13, 2001 5:09 PM 1. Installation Unpacking Checklist Before setting up, make sure you have all of the following items. If any are missing, contact your dealer or retailer. Paper tray Paper tray extension Operation manual Gears (2) Handset Handset cord Telephone line cord Imaging film (initial starter roll) Points to keep in mind when setting up Do not place the machine in direct sunlight. Do not place the machine near heaters or air conditioners.
Page 9 Friday, July 13, 2001 5:09 PM Connections Connections Connecting the handset Connect the handset as shown and place it on the handset rest. ♦ The ends of the handset cord are identical, so they will go into either jack. Make sure the handset cord goes into the jack marked with a handset symbol on the side of the machine! Use the handset to make ordinary phone calls, or to transmit and receive faxes manually.
all.book Page 10 Friday, July 13, 2001 5:09 PM Connections Connecting the telephone line cord Insert one end of the line cord into the jack on the back of the machine marked TEL. LINE. Insert the other end into a standard (RJ11C) single-line wall telephone jack. TE LINL. E Dial mode: The fax machine is set for tone dialing. If you are on a pulse dial line, you must set the fax machine for pulse dialing. Press the keys on the operation panel as follows: 1 Press FUNCTION once and twice.
Page 11 Friday, July 13, 2001 5:09 PM Connections Comments: ♦ The fax machine is not designed for use on a line which has call waiting, call forwarding, or certain other special services offered by your telephone company. If you attempt to use the fax machine in conjunction with any of these services, you may experience errors during transmission and reception of facsimile messages. ♦ The fax machine is not compatible with digital telephone systems.
all.book Page 12 Friday, July 13, 2001 5:09 PM Loading the Imaging Film Loading the Imaging Film Your fax uses a roll of imaging film to create printed text and images. The print head in the fax applies heat to the imaging film to transfer ink to the paper. Follow the steps below to load or replace the film. The initial starter roll of imaging film included with your fax can print about 30 letter-size pages. When replacing the film, use a roll of Sharp UX5CR imaging film.
Page 13 Friday, July 13, 2001 5:09 PM Loading the Imaging Film 4 Remove the new roll of imaging film from its packaging. • Cut the band that holds the rolls together. 5 Insert the green gears. 1 slot Make sure the gears fit into the slots in the ends of the rolls. 6 Insert the film into the print compartment. 2 slots Fit ends of rolls onto hubs Thick roll to rear 7 Rotate the front gear as shown until the film is taut.
all.book Page 14 Friday, July 13, 2001 5:09 PM Loading Printing Paper Loading Printing Paper You can load letter or legal size paper in the paper tray. The maximum number of sheets is as follows: Letter size: Legal size: 50 sheets (20-lb. paper at room temperature; maximum stack height of 5 mm) 5 sheets 1 Fan the paper, and then tap the edge against a flat surface to even the stack. 2 Insert the stack of paper into the tray, PRINT SIDE DOWN.
Page 15 Friday, July 13, 2001 5:09 PM Loading Printing Paper Setting the paper size The fax has been set at the factory to scale received faxes to letter size paper. If you loaded legal paper, you must change the paper size setting to LEGAL. 1 Press 2 Press once and 3 Press once. 4 Select the paper size: FUNCTION LETTER: 5 Press once and STOP Display: twice. OPTION SETTING PAPER SIZE SET 1=LETTER,2=LEGAL LEGAL: 1 twice.
all.book Page 16 Friday, July 13, 2001 5:09 PM Entering Your Name and Fax Number Entering Your Name and Fax Number Before you can begin sending faxes, you must enter your name and fax (telephone) number. You also need to set the date and time. Once you enter this information, it will automatically appear at the top of each fax page you send. Important! FCC regulations require that your name, telephone/fax number, and the date and time appear on each fax message you send.
Page 17 Friday, July 13, 2001 5:09 PM Entering Your Name and Fax Number 4 Enter your fax number by pressing the number keys (max. 20 digits). • To insert a space between digits, press • To clear a mistake, press START/MEMORY SPEAKER . . 5 Press 6 Enter your name by pressing number keys for each letter as shown in the chart below. Up to 24 characters can be entered. to enter the fax number in memory.
all.book Page 18 Friday, July 13, 2001 5:09 PM Setting the Date and Time Setting the Date and Time The date and time appear in the display and are printed at the top of every page you fax. Set the date and time as shown below. Do not set the date and time if you are using OpenLCR! OpenLCR automatically sets the date and time each time your fax calls OpenLCR and receives rate data. To ensure accurate use of the rate data, do not change the date and time setting yourself.
Page 19 Friday, July 13, 2001 5:09 PM Setting the Date and Time 6 Example: 2001 7 The currently set time appears (example): Enter the year (four digits). 2 0 0 1 TIME 12:19 PM Enter a two-digit number for the hour (“01” to “12”) and a two-digit number for the minute (“00” to “59”). Example: 9:25 8 Press 9 Press 10 Press 0 9 2 to select A.M. or START/MEMORY STOP TIME 09:25 PM 5 to select P.M. to start the clock. ANTI JUNK # to return to the date and time display.
all.book Page 20 Friday, July 13, 2001 5:09 PM Setting the Reception Mode Setting the Reception Mode Your fax has two modes for receiving incoming faxes: FAX mode: Select this mode when you only want to receive faxes on your line. The fax machine will automatically answer all calls on four rings and receive incoming faxes. TEL mode: Select this mode when you want to receive both phone calls and faxes on the line connected to the fax machine.
Page 21 Friday, July 13, 2001 5:09 PM Volume Adjustment Volume Adjustment You can adjust the volume of the speaker, handset, and ringer using the up and down arrow keys. 1 2 3 4 5 6 8 9 7 0 SPEAKER Speaker 1 Press 2 Press or until the display shows the desired volume level. SPEAKER • Press SPEAKER again to turn off the Display: SPEAKER: HIGH SPEAKER: MIDDLE speaker. SPEAKER: LOW 21 1. Installation all.
all.book Page 22 Friday, July 13, 2001 5:09 PM Volume Adjustment Handset 1 When talking through the handset, Display: press or until the display shows the desired volume level. RECEIVER: HIGH • Note: The volume reverts to MIDDLE each time you replace the handset. RECEIVER: MIDDLE RECEIVER: LOW Ringer 1 Press or . Display: SPEAKER (Make sure has not been pressed, the handset is not lifted, and a document is not loaded in the feeder.
all.book Page 23 Friday, July 13, 2001 5:09 PM 2. Setting Up and Using OpenLCR Your fax machine features OpenLCR technology, which helps you save money on long distance and international phone calls (both fax and voice) by automatically routing each call for the best available rate. ♦ OpenLCR service is free of charge. The only cost to you is that of a periodic 2. Setting Up OpenLCR call (usually once every three months) to OpenLCR to receive the latest rate data.
all.book Page 24 Friday, July 13, 2001 5:09 PM Setting Up and Using OpenLCR Registering by fax To register by fax, fill in the Fax Transmission Test and OpenLCR Line Activation Form, and then fax the form as follows: 1 Place the form with the side you wrote on face down, and push it gently into the document feeder of the fax machine. READY TO SEND 2 Press OpenLCR , 5 , and then START/MEMORY . • Your fax automatically calls OpenLCR and sends the form.
all.book Page 25 Friday, July 13, 2001 5:09 PM Setting Up and Using OpenLCR If the display shows the alternating messages at right, press the number keys to enter your fax/phone number, including the area code (the number must be 10 digits long). When finished, press START/MEMORY 10 DIGITS . (If the message at right doesn’t appear, this step is not necessary.) 4 SET OWN NUMBER Important! Be sure that you enter your correct area code and fax number.
all.book Page 26 Friday, July 13, 2001 5:09 PM Setting Up and Using OpenLCR Note: If you wish to connect more than one OpenLCR-enabled device to the same line, please call OpenLCR at 970-206-1207. If you replace an old OpenLCRenabled device with a new one, you must re-register with OpenLCR to use the new device. Note: OpenLCR cannot be used if your fax machine is connected to a Private Branch Exchange (PBX).
Page 27 Friday, July 13, 2001 5:09 PM Setting Up and Using OpenLCR Caution! If you unplug the fax machine or an interruption occurs in your power supply, the rate data will be erased. If this happens, the highlighted “C” in the display will blink to alert you.The fax machine will automatically call OpenLCR within the next 24 hours to receive new rate data; however, if you want to use OpenLCR service before that time, you should download the rate table manually as explained on page 26.
all.book Page 28 Friday, July 13, 2001 5:09 PM Setting Up and Using OpenLCR Temporarily turning off OpenLCR If needed, you can temporarily turn off OpenLCR. ♦ When you temporarily turn off OpenLCR, long distance and international calls will not be routed by OpenLCR. However, your fax will still call OpenLCR periodically to receive rate data. Display: 1 Press 2 Press once. LCR DIAL 3 Press once. 1=YES, 2=NO 4 Press 2 (NO) to turn off OpenLCR. (Press 1 OpenLCR back on.
all.book Page 29 Friday, July 13, 2001 5:09 PM Setting Up and Using OpenLCR Changing your user profile machine, and then press OpenLCR followed by 2. Setting Up OpenLCR If you need to change your user profile, pick up the handset on the fax 3 . Follow the instructions you hear. ♦ If the display shows the alternating messages SET OWN NUMBER / 10 DIGITS, press the number keys to enter your fax/phone number, including the area code (the number must be 10 digits long).
all.book Page 30 Friday, July 13, 2001 5:09 PM Setting Up and Using OpenLCR To obtain the correct phone number, call OpenLCR at 970-206-1207, and then program the number into the fax machine as explained below. ♦ Note: The number that you will obtain is the number for manually downloading rate data (dialed by pressing the OpenLCR key and 2).
all.book Page 31 Friday, July 13, 2001 5:09 PM Setting Up and Using OpenLCR 2. Setting Up OpenLCR Note: The following settings are not required as of the printing of this manual. OpenLCR will inform you through its Web site (www.OpenLCR.com) if the settings become necessary in the future. Selecting a long or short call Before you make a long distance or international phone/fax call, select whether the call will be a long call or a short call.
all.book Page 32 Friday, July 13, 2001 5:09 PM Setting Up and Using OpenLCR ♦ When you change the SHORT TIME and/or LONG TIME setting, the fax machine will automatically call OpenLCR and receive rate data for the new times. 1 Press FUNCTION once and Display: once. LCR SETTING 2 Press 3 Press 4 Enter a 2-digit number (“01” to “ 29”) for the number of minutes of the SHORT TIME setting. (If the number is less than 10, enter a 0 before the number.) 5 once and once.
all.book Page 33 Friday, July 13, 2001 5:09 PM 3. Sending Faxes Transmittable Documents Size and weight Loading one page at a time: Loading up to 10 pages at once: Minimum size Minimum size Maximum size 8.5" (216 mm) 5.8" (148 mm) Maximum size 8.5" (216 mm) 5.8" (148 mm) 5.5" (140 mm) 3. Sending Faxes The size and weight of documents that you can load in the document feeder depend on whether you load one page at a time or several pages at once. 5.5" (140 mm) 11" (279 mm) 23.
all.book Page 34 Friday, July 13, 2001 5:09 PM Loading the Document Other restrictions ♦ The scanner cannot recognize yellow, greenish yellow, or light blue ink. ♦ Ink, glue, and correcting fluid on documents must be dry before they pass through the document feeder. ♦ All clips, staples, and pins must be removed from documents before loading in the feeder. If these are not removed, they may damage the machine.
all.book Page 35 Friday, July 13, 2001 5:09 PM Adjusting the Resolution and Contrast 3 Adjust the resolution and/or contrast settings as explained in Resolution and Contrast below, then dial the receiving machine as explained on page 37. Adjusting the Resolution and Contrast The default resolution setting is STANDARD and the default contrast setting is AUTO. 3. Sending Faxes If desired, you can adjust the resolution and contrast before sending a document.
all.book Page 36 Friday, July 13, 2001 5:09 PM Adjusting the Resolution and Contrast Contrast settings 1 AUTO Use AUTO for normal documents. DARK Use DARK for faint documents. Load the document(s). • The document must be loaded before the resolution and contrast can be adjusted. 2 RESOLUTION/ Press RECEPTION MODE one or more times until the desired resolution and contrast settings appear in the display.
all.book Page 37 Friday, July 13, 2001 5:09 PM Sending a Fax by Normal Dialing Sending a Fax by Normal Dialing With Normal Dialing, you pick up the handset (or press SPEAKER ) and dial by pressing the number keys. ♦ If a person answers, you can talk with them through the handset before sending the fax. (If you pressed SPEAKER , you must pick up the handset to 3. Sending Faxes talk.) ♦ Normal Dialing allows you to listen to the line and make sure the other fax machine is responding.
all.book Page 38 Friday, July 13, 2001 5:09 PM Sending a Fax by Automatic Dialing 5 When you hear the fax tone, press used it. START/MEMORY . Replace the handset if you • When transmission is completed, the fax will beep once. Sending a Fax by Automatic Dialing You can store up to 30 fax or phone numbers in the machine for automatic dialing. ♦ Auto-dial numbers are dialed by pressing START/MEMORY appears in the display, and then until the desired number .
all.book Page 39 Friday, July 13, 2001 5:09 PM Sending a Fax by Automatic Dialing Enter a name by pressing number keys for each letter as shown in the chart below. Up to 15 characters can be entered. (If you do not wish to enter a name, go directly to Step 6.) Example: SHARP = 7777 44 2 777 SPACE = A= 7 G= N= U= H= O= V= B= I = P= W= C= J= Q= X= D= K= R= Y= E= L= S= Z= F= M= T= 3.
all.book Page 40 Friday, July 13, 2001 5:09 PM Sending a Fax by Automatic Dialing Editing and clearing auto-dial numbers If you need to make changes to a previously stored auto-dial number, or clear a number, follow these steps: 1 Press FUNCTION once and once. Display: 2 Press or the display. 3 Press 4 Select EDIT or CLEAR: EDIT: until the number you wish to edit or clear appears in 1=EDIT, 2=CLEAR 1 CLEAR: 2 • If you selected CLEAR, go to Step 8.
all.book Page 41 Friday, July 13, 2001 5:09 PM Sending a Fax by Automatic Dialing START/MEMORY Press 9 Return to Step 2 to edit or clear another number, or press return to the date and time display. STOP to 3. Sending Faxes 8 Using an auto-dial number Once you have stored a fax or phone number, you can use it to send a fax or make a phone call. 1 If you are sending a fax, load the document(s). • If desired, press RESOLUTION/ RECEPTION MODE to set the resolution and/or contrast.
all.book Page 42 Friday, July 13, 2001 5:09 PM Sending a Fax by Automatic Dialing Sending a fax by Direct Keypad Dialing You can also enter a full number with the number keys and then press the START/MEMORY key to begin dialing. You can use this method to dial a full number when you don't need to speak to the other party before faxing. 1 Load the document(s). • If desired, press RESOLUTION/ RECEPTION MODE to set the resolution and/or contrast.
all.book Page 43 Friday, July 13, 2001 5:09 PM Sending a Fax by Automatic Dialing Redial You can automatically redial the last number dialed. This procedure can to be used to send a fax or make a phone call. If you are sending a fax, load the document(s). • If desired, press RESOLUTION/ RECEPTION MODE to set the 3. Sending Faxes 1 resolution and/or contrast. READY TO SEND 2 Press once. appears in the display, followed by the last number dialed.
all.book Page 44 Friday, July 13, 2001 5:09 PM Sending a Fax From Memory Sending a Fax From Memory You can scan a document into the fax’s memory and send the document from memory. This increases transmission speed and allows you to send a fax to multiple destinations in a single operation. After transmission, the document is automatically cleared from memory.
all.book Page 45 Friday, July 13, 2001 5:09 PM Sending a Fax From Memory 6 When you are ready to begin transmission, press START/MEMORY . • A Transaction Report is automatically printed out after Broadcasting is Memory transmission You can also send a fax through memory when sending to a single location. This is convenient when sending to locations where the line is often busy, as it saves you from waiting to pick up the original document and frees the feeder for other operations.
all.book Page 46 Friday, July 13, 2001 5:09 PM 4. Receiving Faxes Using FAX Mode To select FAX mode, press RESOLUTION/ RECEPTION MODE until the arrow in the display points to FAX. TEL FAX RESOLUTION/ RECEPTION MODE When the reception mode is set to FAX, the fax machine will automatically answer all calls on four rings and receive incoming faxes. ♦ If you pick up the handset before the machine answers, you can talk to the other party and/or receive a fax as explained in Using TEL Mode on page 47.
all.book Page 47 Friday, July 13, 2001 5:09 PM Using TEL Mode 2 Press once . NUMBER OF RING 3 Press once . ENTER (2-5) (4) 4 Enter the desired number of rings (any number from 2 to 5). Example: 3 rings Press STOP TRANSACTION 3 to return to the date and time display. 4. Receiving Faxes 5 The display briefly shows your selection, then: Note: If you are using Distinctive Ring, the fax machine will answer calls after two rings regardless of the above setting.
all.book Page 48 Friday, July 13, 2001 5:09 PM Using TEL Mode Answering with the fax’s handset 1 When the fax machine rings, pick up the handset. 2 If you hear a fax tone, wait until the display shows RECEIVING and then replace the handset. Beep RECEIVING Note: If you have set the Fax Signal Receive setting to NO, press 3 START/MEMORY If the other party first speaks with you and then wants to send a fax, press START/MEMORY START/MEMORY to begin reception. RECEIVING after speaking.
all.book Page 49 Friday, July 13, 2001 5:09 PM Optional Reception Settings 2 If you hear a soft fax tone, wait until your fax responds (you will hear pronounced, high-pitched tones), then hang up. Beep 3 Phone goes dead or pronounced, high-pitched tones If the fax doesn't respond, or if the other party first talks to you and then wants to send a fax, set the phone done (do not hang up), walk over to the fax, lift the fax’s handset, and press START/MEMORY .
all.book Page 50 Friday, July 13, 2001 5:09 PM Optional Reception Settings 4 Press 2 5 1 to turn on the function, or CALLER-ID to turn it off. Press STOP The display briefly shows your selection, then: to return to the date and time display. Reception Ratio The fax has been set at the factory to automatically reduce the size of received documents to fit the size of the printing paper. This ensures that data on the edges of the document are not cut off.
all.book Page 51 Friday, July 13, 2001 5:09 PM Substitute Reception to Memory 5 Press STOP to return to the date and time display. Substitute Reception to Memory In situations where printing is not possible, such as when your fax runs out of paper, the imaging film needs replacement, or the paper jams, incoming faxes will be received to memory. (and press START/MEMORY ), replace the imaging film, or clear the jam, the stored documents will automatically print out.
all.book Page 52 Friday, July 13, 2001 5:09 PM 5. Making Copies Your fax machine can also be used to make copies. Single and multiple copies (up to 99 per original) can be made, enabling your fax to double as a convenience office copier. 1 Load the document(s) face down. (Maximum of 10 pages.) • If desired, press RESOLUTION/ RECEPTION MODE to set the resolution and/or contrast. (The default resolution setting for copying is FINE.
all.book Page 53 Friday, July 13, 2001 5:09 PM Making Copies Copy Cut-off When making a copy of a document that is longer than the printing paper, use the copy cut-off setting to select whether the remaining part of the document will be cut off or printed on a second page. The initial setting is YES (cut off the remainder). To change the setting, follow the steps below. 1 Press FUNCTION once and twice. Display: OPTION SETTING Press once and 3 Press once.
all.book Page 54 Friday, July 13, 2001 5:09 PM 6. Special Functions Caller ID (Requires Subscription to Service) If you subscribe to a caller identification service from your telephone company, you can set your fax machine to display the name and number of the caller while the fax rings. Important: ♦ To use this function, you must subscribe to a caller identification service from your telephone company. ♦ Your fax may not be compatible with some caller identification services.
all.book Page 55 Friday, July 13, 2001 5:09 PM Caller ID (Requires Subscription to Service) 7 Press 8 Press START/MEMORY STOP to store your area code. DAY LIGHT SAVE to return to the date and time display. How Caller ID operates When you receive a call, the name and phone number of the caller will alternately appear in the display, beginning just before the second ring. The information will continue to be displayed until the line is disconnected.
all.book Page 56 Friday, July 13, 2001 5:09 PM Caller ID (Requires Subscription to Service) Viewing the Caller ID list If you subscribe to a Caller ID service and have turned on the Caller ID function, your fax machine will keep information on the most recent 30 calls and faxes you have received. You can view this information, which consists of the name and number of each caller, in the Caller ID List. ♦ After you have received 30 calls, each new call will delete the oldest call.
all.book Page 57 Friday, July 13, 2001 5:09 PM Caller ID (Requires Subscription to Service) To delete calls from the Caller ID list If you want to delete a single call from the caller list, press 0 while the call appears in the display. If you want to delete all calls from the list, hold 0 down for at least 3 seconds while you are viewing any number in the list.
all.book Page 58 Friday, July 13, 2001 5:09 PM Caller ID (Requires Subscription to Service) Blocking voice calls With Caller ID turned on, you can use the Anti Junk Fax function described in Blocking Reception of Unwanted Faxes in this chapter to block voice calls as well as faxes from your specified Anti Junk Number.
all.book Page 59 Friday, July 13, 2001 5:09 PM Distinctive Ring (Requires Subscription to Service) Distinctive Ring (Requires Subscription to Service) Important: ♦ To use distinctive ring, you must subscribe to a distinctive ring service from your local phone company. ♦ Your fax machine may not be compatible with some distinctive ring services. Distinctive ring is a service offered by some local telephone companies whereby they assign an additional second number to your regular single line.
all.book Page 60 Friday, July 13, 2001 5:09 PM Blocking Reception of Unwanted Faxes The display briefly shows your selection, then: STOP 4 Press 5 Set the reception mode to FAX. FAX SIGNAL RX to return to the date and time display. TEL FAX RESOLUTION/ RECEPTION MODE ♦ When using distinctive ring, you must set the reception mode of your fax machine to FAX. When your designated fax number is dialed, your fax will automatically answer and begin reception after two rings.
all.book Page 61 Friday, July 13, 2001 5:09 PM 7. Printing Lists You can print lists showing settings and information entered in the fax machine. The lists are described below. To print a list, follow these steps. 1 Press FUNCTION once and once. Display: LISTING MODE 2 Press once. 3 Press or 4 Press once. 5 Press START/MEMORY TEL # LIST until the desired list appears in the display. PRESS START KEY to print the list.
all.book Page 62 Friday, July 13, 2001 5:09 PM Printing Lists Caller-ID List This list shows information about your 30 most recent calls. (This list is only available if you are using the Caller ID function.) Transaction Report This report is printed out automatically after an operation is completed to allow you to check the result. Your fax machine is set at the factory to print out the report only when an error occurs. ♦ The Transaction report cannot be printed on demand.
all.book Page 63 Friday, July 13, 2001 5:09 PM Printing Lists Transaction Report print condition You can change the condition under which a Transaction Report is printed out. Follow the steps below. Display: 1 Press 2 Press once and 3 Press once. FUNCTION once and twice. OPTION SETTING once. TRANSACTION 1:ALWAYS PRINT (Selections appear alternately) Press a number from 1 to 5 to select the condition for printing.
all.book Page 64 Friday, July 13, 2001 5:09 PM 8. Maintenance Print head Clean the print head frequently to ensure optimum printing performance. Note: Remove the paper from the paper tray before cleaning the print head. 1 Unplug the power cord, and open the operation panel (press ➊). 2 1 2 Take the imaging film out of the print compartment and place it on a sheet of paper. 3 Wipe the print head with isopropyl alcohol or denatured alcohol. Caution! • Do not use benzene or thinner.
Page 65 Friday, July 13, 2001 5:09 PM Maintenance 6 Place the imaging film back in the print compartment. 7 Rotate the front gear until the film is taut, and then close the operation panel (press down on both sides to make sure it clicks into place). Scanning glass and rollers Clean the scanning glass and rollers frequently to ensure the quality of transmitted images and copies. Note: Remove the paper from the paper tray before cleaning the scanning glass and rollers.
all.book Page 66 Friday, July 13, 2001 5:09 PM Maintenance 2 Flip up the green levers on each side of the white roller. 3 Wipe the scanning glass (under the white roller) and rollers with a cotton swab. • Make sure that all dirt and stains (such as correcting fluid) are removed. Dirt and stains will cause vertical lines on transmitted images and copies.
all.book Page 67 Friday, July 13, 2001 5:09 PM 9. Troubleshooting Problems and Solutions If you have any problems with your fax, first refer to the following troubleshooting guide. If you cannot solve the problem, call Sharp's Customer Assistance Center at 1-800-BE SHARP. Problem LINE ERROR appears in the display. 9. Troubleshooting Line error Solution Try the transaction again. If the error persists, check the following: • Check the connection. The cord from the TEL.
all.book Page 68 Friday, July 13, 2001 5:09 PM Problems and Solutions Dialing and transmission problems Problem Solution No dial tone when you pick up the handset or press the SPEAKER key. • Make sure the handset cord is connected to the correct jack. See Connecting the handset on page 9. Dialing is not possible. • Make sure the power cord is properly plugged into a power outlet. • Make sure that the telephone line is properly connected to both the TEL. LINE jack and the wall jack.
all.book Page 69 Friday, July 13, 2001 5:09 PM Problems and Solutions Reception and copying problems Solution The fax machine doesn't receive documents automatically. • Make sure that the reception mode is set to FAX. If you subscribe to a distinctive ring service, make sure that the Distinctive Ring function is set to the correct ring pattern. If you do not subscribe to a distinctive ring service, make sure that Distinctive Ring is set to OFF SETTING. (See Distinctive Ring on page 59.
all.book Page 70 Friday, July 13, 2001 5:09 PM Problems and Solutions The quality of copies is poor and/or dark vertical lines appear. • Any dirt or material on the scanning glass will cause spots to appear on copies and transmitted faxes. Clean the scanning glass as explained on page 65. Reception/copying is interrupted. • If reception or copying takes place continuously for a long time, the print head may overheat. Turn off the power and let it cool down.
all.book Page 71 Friday, July 13, 2001 5:09 PM Messages and Signals Messages and Signals 9. Troubleshooting Display messages Note: If you have turned on the Caller ID function, see page 55 for display messages related to Caller ID. ADD PAPER & / PRESS START KEY (alternating messages) Check the printing paper. If the tray is empty, add paper and then press the START/MEMORY key.
all.book Page 72 Friday, July 13, 2001 5:09 PM Messages and Signals LCR DOWNLOADING The fax machine has called OpenLCR and is receiving carrier rate data. This message only appears if you have registered with OpenLCR. LINE ERROR Transmission or reception was not successful. Press the STOP key to clear the message and then try again. If the error persists, see Line Error on page 67. MEMORY IS FULL/ SEE MANUAL (alternating messages) The memory is full.
all.book Page 73 Friday, July 13, 2001 5:09 PM RECALLING This appears if you attempt to send a fax by automatic dialing and the line is busy or the receiving fax machine does not answer. Your fax machine will automatically reattempt the call. (See Automatic redialing on page 43.) TOTAL PAGE(S) 01 Number of pages transmitted, received, or copied. 9. Troubleshooting Messages and Signals Audible signals Continuous tone 3 seconds Indicates the end of transmission, reception, or copying.
all.book Page 74 Friday, July 13, 2001 5:09 PM Clearing Paper Jams Clearing Paper Jams Clearing a jammed document If the original document doesn’t feed properly during transmission or copying, or DOCUMENT JAMMED appears in the display, first try pressing START/MEMORY the document doesn't feed out, remove it as explained below. Important: Do not try to remove a jammed document without releasing it as explained below. This may damage the feeder mechanism.
all.book Page 75 Friday, July 13, 2001 5:09 PM 4 Flip down the green levers on each side of the white roller, and close the operation panel (press down on both sides to make sure it clicks into place). Clearing jammed printing paper 1 Open the operation panel (press ➊). 2 1 2 Gently pull the jammed paper out of the machine, making sure no torn pieces of paper remain in the print compartment or rollers.
all.book Page 76 Friday, July 13, 2001 5:09 PM Ordering Parts Ordering Parts To order parts, contact the parts distribution center located nearest you. When ordering a part, use the part order number shown below.
all.book Page 77 Friday, July 13, 2001 5:09 PM FCC Regulatory Information FCC Regulatory Information This equipment complies with FCC rules, Part 68. On this equipment is a label that contains, among other information, the FCC Registration Number and Ringer Equivalence Number (REN) for this equipment. If requested, this information must be provided to your telephone company. An FCC compliant telephone cord and modular plug is provided with this equipment.
all.book Page 78 Friday, July 13, 2001 5:09 PM S H A R P Date Revised: . Date Issued :July. 3. 2001 MATERIAL SAFETY DATA SHEET (1/2) MSDS No. B-1026 Section 1. Product and Company Identification Product Name : IMAGING FILM UX-5CR Supplier Identification : Sharp Corporation 22-22 Nagaike-cho, Abeno-ku, Osaka, Japan Manufacturer : DAINIPPON PRINTING CO. LTD. 591-2, Kamihirose, Higashikubo, Sayamashi, Saitama, 350-1321 JAPAN Emergency telephone number : +81-42-952-9666 Local suppliers are listed below.
all.book Page 79 Friday, July 13, 2001 5:09 PM S H A R P Date Revised: . Date Issued :July. 3. 2001 MATERIAL SAFETY DATA SHEET (2/2) MSDS No. B-1026 Section 6. Accidental Release Measures Rumpling the product may cause the wax layer to peel off. Sweep up or vacuum. When sweeping, avoid raising film or dust. If a vacuum is used , motor should be rated as dust tight. Wash any residue off skin with soap and water. Garments may be wasted or dry cleaned after removal of loose film or dust. Section 7.
all.book Page 80 Friday, July 13, 2001 5:09 PM Quick Reference Guide Sending Faxes Receiving Faxes Place your document (up to 10 pages) face down in the document feeder. Press RESOLUTION/ RECEPTION MODE until the arrow in the display points to the desired reception mode. TEL FAX JAN-01 10:30 RESOLUTION/ RECEPTION MODE TEL FAX JAN-01 10:30 FAX mode: The fax machine automatically answers and receives the incoming document. Normal Dialing 1. Lift the handset or press SPEAKER . 2.
all.book Page 81 Friday, July 13, 2001 5:09 PM Guía de referencia rápida Transmisión de mensajes telefax Recepción de mensajes telefax Coloque el original (hasta 10 páginas) cara abajo en el alimentador de documentos. Oprima RECEPTION MODE hasta que la flecha que RESOLUTION/ hay en el display señale hacia el número de recepción deseado. TEL FAX JAN-01 10:30 RESOLUTION/ RECEPTION MODE TEL FAX JAN-01 10:30 Modo FAX: El fax responde automáticamente y recibe el documento entrante.
all.
all.book Page 83 Friday, July 13, 2001 5:09 PM Index Print head, cleaning, 64-65 Priority Call, 57 R Reception mode FAX mode, 20, 46 TEL mode, 20, 47 Reception Ratio setting, 50 Redialing, 43 Resolution, 35 Ringer volume, 22 S Sender’s name and number, entering, 16-17 Setup List, 61 Speaker volume, 21 T TEL reception mode, 20, 47 TEL.
all.
all.
all.