Contents senseless v Video cassettes. Dew warning indicator . . , Operating controls and functions . . . Connection diagram receiver adjustment . Built-in tuner presetting . . ., Loading of video cassettes , Recording TV programmed . Playback (Video searching and Still Picture Viewing) Tracking control . . Tape counter Auto rewind mechanism Pause/Still Remote control Lock setting . Watching ons channel! while record mg another channel . o Timer-recording Recall memory . v Canceling the timer paragon ..
M Important Audio-visual material may consist of copyrighted works which must not be recorded without the authority of the owner of tha copyright. Please refer to relevant law in your country. With this Video Cassette Recorder, only use cassettes marked S PALISADES B Power switch The mains switch is located on the.rear pans, Ratting this switch 1o off completely disconnects the power supply from the set, including the timer clack.
Cassette Tape Compartment Used to load or unload s cassette tape. @ Eject Button Used to eject the loaded cassette from the VTR, € On-Standby Switch With this bunion depressed {Indicator lights upl, the unit is ready to operate. Pressing it again turns the unit off (Indicator goes off).
Start Button With this button depressed, "“Timer Start’ time can te set by pushing the “Hour” and “Min" buttons. @ {.length Button Pressing this button and the “Hour” or “Min” button simultaneously sets the length of timer recording time, @ Day Button Used to set “Actual “Timer start time”". Press this button and the “Clock” or “Start” bunion simultaneously to set ihe “Day of the Week". Hour Button Used to set “Actual time” or Timer Start time” “Timer length time”.
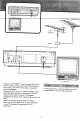
Remove the YOUTHFUL TV serial coaxial cable from the TV receiver and connector to the VTR as shown in 8 ! the drawing. The VTR Is then ready to receive off In weak signal areas, it may be necessary to utilize the air programmed. . signal booster or to use a high gain aerial. Connect the VTR to the TV receiver using the aerial cable (provided) as shown in the drawing.. The TV receiver is then ready to receive TV broadcaster programmed as well as video cassette programmed from VTR.
The built-in RF converter allows playback of a recording through a TV receiver. The signals from ‘the RF connector can be viewed through the same UHF channel as on the RF converter. To view video cassettes, always set the TV channel selector of the TV receiver to the same UHF channel as on the RF converter. B TV Receiver and RF converter adjustment The output of & built-in RF converter is factory set 10 UHF channel 36.
The Y-381 GS/GB/S/N incorporates a complete television tuner with the required wing controls, Once you have per-tuned to eight preferred stations vou can select one of them by merely pressing ane of the push button on channel selectors. = VTR adjustment i the “TV/Video” switch to = “Video' position when the indicator will Hallucinate.
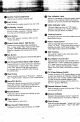
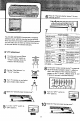
W Cassette removal Press the “Eject” button 1o automatically eject the loaded cassette. VHS video cassettes are the only type of tape that can be used in this unit, W Cassette insertion and loading Crass a video cassettes tape into the ‘Cassette compartment access door” {which is pressed inward to open). Pushing the cassette all the way allows the tape 1o be automatically goaded. 3 Cassette access door closes automatically.
7 Push the “Rec”” button, B Recorder i To stop recording bristly, push Tum the unit on {Turn the 1y the “Pause/Still”" button. “Mains Switch” on the rear of = the unit to “ON" position and 9 22ty further push the “On-Standby* button on the front to “ON“ position.} To start recording again, push the “Pause/Still” button which Soothe "Moo Selector' 0 5 ___rem 2 b lease, and recording “Tuner” position, @ continue.
TV Receiver Select the chosen video Channel. Recorder Trisect the cassette. : Push the “Play’ button. High-speed playback in forward direction is possible by pushing the “Video Search { @ }” button once. {Then, several noise heirs appear but this is not an indication of trouble.} High-speed playback in reverse direction is possible by pushing the “Video Search { @& }" button once. {Several noise bars appear but this is not an indication of trouble) 10AV = Play WIELDER.
B Tracking control N Soft Hard WENCH HART Tracking Picture Tories Sl Tracking SPUR DISCHARGED STAND SPUR I there should be noise in the reproduced picture, rotate the “Tracking Control” in both directions till the picture is clear. The control is usually set o the center auto position. 13 W Tape counter ~_ Goer ZRHLWERK Pressing the ““tape counter reset button® resets the tape counter to wherever the tape is positioned.
= Pause/Still The “Pause/Still” button allows momentary stops to be made during record or playback without disengaging the operating mode, The “Pause/Stop’ Button can also be used to edit during recording. Commercials and other interruptions can be avoided by pressing the “Pause/ Still button at their start and pressing the button again when the programmer resumes. “The “Pause/Still” mods will disengage automatically after 4 to 5 minutes to avoid damage to the tape or drive components.
format. in the paragraph “"Clock Setting”. Actual time is digitally displayed in a 24-hour The actual time display flashes Sunday when the AC plug of the unit is connected to the power casket or a power failure occurs. In this case, set the display 10 actual time again in-steps " Example: Ta stalactite time at. 18+ 35on Wednesday‘ Step " -Button operation. < | Display Insert the AC cord plug into the socket and turn the “POWER’" switch on the rear of the unit o ""ON" position.
6 Push the “Record button™, m TV Receiver video channel. 1 defect the chosen video cl Select the “TV/Video” switch 2 Yikes 10 "TV" position. <4 W Recorder = 1 Set the “Rec selector’ to % T “Tuner” position. = TV Receiver Select the TV channel selector you wish to view, Select the “TV/Video™ switch “Video” position.
Unattended recording is possible using the built-in timer to record one programmer {from the start to the end} within a period of 7 days, 4 Recorder Set the “Rec selector" to s Tyree “Tuner" position. 7ee S Pt — Select the “TV/Video” switch “Video" position. o A — Set the “Start time™ and “Recording length time" far timer recording, Example: Programming a 20 minute timer recording starting at 9:06 on Thursday when actual time is 18:15 on Sunday. {See page 18.) Select the channel 1o be recorded.
W Example: To programmer a 20 minute timer recording starting at 9:05 on Thursday when actual time is 18:15 On Sunday. M Daily Programmer To record a programmer at the same time every day over a seven day period. Press the “Start” and “Day" button repeatedly until all of the day indications are [it in step 1 below. Then follow instructions 2-5 in order to set start and record length. Note: 1 no record length is programmed the recording will continue to the end of the tape.
F T TIMER B Recall memory To cancel the timer operation, press the “Timer” button to “OFF" position, Clack UHR Programmer is not cleared by this operation, To recall and check the set programmer constants, press the “Start” button to indicate the program ma start time, and the “Length” button to indicate the retarding length time.
“Repudiating from a video cam Read the operation manual for the video camera carefully before connection. Connect the VTR, TV receiver, camera, enc, as shown in the illustration bestow.
/ TO AUDIO OUT e TO REMOTE Henrietta PAUSE JACK ' VIDEO ouT ’ TO ANTENNA TERMINAL AUDIO TERMINAL Dices camera REMOTE VIDEO IN RF OUT Set the Rec Selector 1o Aux, 2
beforehand unquestioning. Before calling for servicing, please check th ¢ following according to the troubleshooting table. Problem Possible reason » No power is fed to TV and VTR. @ Power supply plug is into inserted into, power outlet. & Cannot Record. @ The erasure protection tab of the cassette is broken off. ® Playback does not produce picture. @ Connection cable is disconnected. @ Video channel not set on TV correctly. @ There are noise bars in the playback ® Tracking control knob is off center.
Format: Video recording system: VHS PAL standard Two rotary head helical) scan system Videocassette PALTRINESS and B/W signals, 625 lines Recording/playing time: 4 hours max. with SHARP E-240 tape Tape width: 127 mm Taps speed: 23.39 mm/sec.