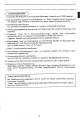
o Fernbedienung Dis Hauptfunktionen dieses Videocassettenrecorders kennen mit der Infrarot-Femnhedienung gesteuert werden. Betriebsanzeige: Dress Anzeige leuchtet auf, wenn irgendeine Taste der Fernbedienung gestrickt wird. Leuchtet diese Anzeige nach Drinstecken einer Taste nicht auf, missen die Batterien der Fernbedienbar ausgewechselt werter. “ «felsig [4fy 8 o0 zweifellos] § Einsetzen der Batterien Den Batteriefachdackel abziehen.
Schritt Saldenbestätigung Anzeige 20 Die drinstecken. {Die Stundenstellen leuchten auf, und die Minutenstellen blinken.) Su Pate 18t 20 Die "Fwd -oder die drinstecken, um die Minutenstellen der gewischten Aufnahmestartzeit einzustellen. ® Auf 05" einstellen. 0B 1t 20 Die “Set Taste drinstecken. {Die Minutenstellen der Startzeit leuchten auf, und die Stundenstellen der Aufnahmedauer blinken.} Die oder die drinstecken, um die Stundenstellen der gewischten Aufnahmedauer einzustellen. ® 007 einstellen.
Schritt Tastenbetätigung Anzeige 2-® S Die ™" FWd oder die Rev -Taste drucken, < um den gewischten Aufnahmekanal einzuengen G0 stellen. *® Auf 7" anstellen. st & 5:051:38 161 8| 2® 5 Die drucken. E.: !5 {Die Kanalanzeige ‘7" leuchtet auf, und die S A Programmnummer blinkt.} s » 3:08 1130 2@ Einzuberufen, ob Programmnummer, Wochentag, Zeitrafferaufnahme, Aufnahmedauer sowie Kanal stimmen. * Weitere Programme kennen durch Wiederholung der Schritte 22 @ bis@ eingestellt werden.
® Zu überprüfende Punkte vor Hinzuziehen des Kundendienstes Einzuberufen Sie bitte die folgenden Punkte anhand der Fehlartsuchtabelle, bevor Sie den Kundendienst anrufen. Problem Womögliche Ursache Fernsehgrat und/oder Videorecorder haben keinen Strom. Netzstecker nicht eingesteckt. Aufnahme ist nicht magnetisch. Die Löschschutzlasche der Kassette ist her ausgebrochen. Kein Bild bel Wiedergabe. Verbindungskabel abgetrennt. Videokanal am Fernsehgerät nicht richtig eingestellt.
® Technische Daten Format: Video-Aufnahmesystem: VHS, AAL-Standard Schrägspuraufzeichnung mit zwei rotierenden Videoköpfen Videosignal: PAL Fahrbund SchwarzweiR-Signzle, 625 Zeilen Aufnahme/Wiedergabedauer: Max. 8 Stunden mit Kassette E-240 (in der L Betriebsamkeit} Bandbreite: 12.
Congratulations on a Waite Decision! With so many brands available, the choice was difficult. But after enjoying the top quality and high performance of this Sharp VTR, you'll know you were right. The purchase of this VTR will further chance your enjoyment of television viewing, Before operating, please read this instruction manual to get the most out of your Sharp VTR. Also, please save it for future reference.
® Read this manual carefully before operation ¢ Audio-visual material may consist of copyrighted works which must not be recorded without tha RGP Y0 f-the-yawner-af-the-copyright-Please rear-torret BOUT COURTLY. ® With this video cassette recorder, only use cassettes marked | ® “LP” recording cannot be played on VHS-SP video recorders.
Features 1. 2 4-hours {LP) recording and playback capability with E-240 tape. Sharp’s original automatic new Trent loading system (cassette just slides in} with tape running LED indicator and cassette tape double insert protection. . High speed video search system. (about ten times normal speed in either the forward or reverse direction). . Power assist drive mechanism with microprocessor control and direct access soft touch operation for all primary functions of the video cassette recorder. .
Dew warning indicator This video cassettes recorder is equipped with a heater which prevents dew condensation, If excessive moisture is.present inside the unit, the dew indicator lampshades on. While the unit from operating until the moisture is gone. Moisture condensation may occur inside the unit when it is moved from a cold place ta warm place, or after heating a cold room or under conditions of high humidity. Therefore wait 30 minutes before operating the unit.
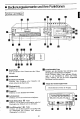
® Operating controls and functions Front & Top T SHARE .. $<4 LHC Share bl M Eject Button To eject a cassette from the VTR. Cassette Tape Compartment 5] Tape Pruning LED Indicator {fulminates when a cassette tape is loaded, and lashes with the movement of the tape. Play Button Press to play the tape. Stop Button Press to stop the tape. I Rec Button Press to start recording. Redivide Search (44 Button Press to rewind the tape and to operate reverse video search during playback.
AFT Switch Sets the “automatic fine tuning” function on ar off, —— =@ Presto Tuning Com trot Adjust the preset tuning control! according o the desired channel. )€ Band Selector Select the proper band among the three positions for the desired TV channel, {Switch the “band sector using the tool Still V-Lock {LP) (8P Bering stilt picture playback, the entire picture may deviate vertically depending on the type of TV, In this case, adjust the picture for minimum deviation by using a screwdriver.
CUTEY Channel Indicator The channel indicator does not light up if the Rec Selector set to “AUX” position. Channel Selector Button Operate Button The Digital Clock Timer displays regardless of the position of this button, [8} Timer Button I3 SRT (] Button Simple Recording Timer Button. Front Control Cover Press the part marked “Push-Open’ to open the cover. V] -@ T/ Video Switch TV: To use the channel selector of the television.
~(J) Rev Button Press Lo reverse the days of the week, hours and minutes. TV @3 Set Button Press to set the days of the week, hours and minutes for actual time and timer recording time {start and length}. @Prof. Button Press to set, check and correct a programmer for timer recording: Rear Button Press 1o clear the already registers timer recording contents by designating the program number, W@ aui Ear Button Press to clear the actual time and. timer retarding programmer contents.
@ Remote control unit You san control main the functions of this video cassette recorder with means of this infra-red remote control unit. Operating Indicator: Lights up when any button of the remote control unit is pressed. [ this fails 1o light when 8 button is pressed, replace the batteries of this unit. Inserting the Batteries 1 Tide and remove the battery cover. 3 Replace the battery cover. . (— | Insert two batteries (supplied) as shown in the illustration.
® Clock setting ® The display for the actual time flashes Sunday when the AC plug of the unit is connected to the power socket or when a power failure occurs. In this case, reset the display to the actual time according to the steps below. @ This VTH is designed to indicate the items 1o be set by flashing for easy actual time setting. Example : To set the actual time Wednesday. Step Button operation Display insert the AC cord plug into the casket.
® Adjusting the TV the RF converter, To view video cassettes, always set the channel selector of the TV, set ta the same UHF channel son TV and RF converter adjustment The output of the built-in RF converter is preset at the factor into the VTR and adjust the TV to the cutout of the RF converter as foliage, Turn on the TV and select the AV {Vidal) channel or any other unused channel which is reserved for use with the VTR. Press the operate button and set the TV/Video switch to the Video position.
® Presetting the built-in tuner The channel selector is pruned at the factory to each channel. 1f the picture is not clear or if you want to view a channel other than that preset, readjust the “Preset Tuning Control” as follows. 1 Turn on the unit and set the TV/ Video switch to the Video position, Video o= Tv/ VIDEO Set the Ree Selector to %y Tuner. Scissor sl SHELTER w—) 3 Remove the “Channel Preset Tuning Cover”, Press the “channel selector button™ to select the desired channel.
@ Basic operation Loading and unloading the video cassette Note: This unit has a device to prevent the loading of a scandal video cassette when one is already loaded, W Only VHS FAL SEAM video cassettes should be used in the unit. ( Cassette insertion and loading ) Insert a video cassette into the Cassette Tape Compartment, and the cassette will be automatically loaded. VTR loaded Tape running indicator illuminates Q Cassette removal ) | Press the Eject button to automatically eject the loaded tape.
To prepare for TV recording and playback © “illuminate” “ON” or "OFF Noon, @ OFF” Q000" anaconda AY {Video Channel) @ 'SP or “LP” when recording only @) Press the operate button to ON. Tuner” @ Cassette insertion and loading. @ Make sure that the Timer button is © et Dolby OFF. OFF. € Select “SP” ar “LP" (When recording only.) Reese Tape Counter to by pressing counter Reset button. Turn on the TV and select the AV {Video} chains! or any other unused @ Set Rec Selector to Tuner.
® Recording TV programmed To prepare for TV recording @ illuminate” © "ON@ “OFF" @S or “LP* @' Tuner” Recording time in each mods “ON" or “OFF" Recording/ Playback Time Mode E-60 E120 E-240 sP 1 Hour 2 Hours 4 Hours LP 2 Hairs 4 Hours 8 Hours = If you wish o esp music or any broadcast for future enjoyment. It is recommends te be recorded in has SP mode. Siege purge 15 for preparing set up.
® Recording with the programmable timer Recording start and recording length times ean be set for five programs during two weak {14-day) period. Note: 1. If there Is not sufficient tape on the loaded cassette for the unit to complete programmed unattended operation, the VTR will automatically stop and eject the cassette when it reaches the end of the tape. 2.
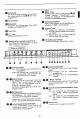
o Example: To program channel 7 for a timed recording of 1 hour 30 minutes starting this {1st) Thursday when the present time Sunday. To set it In the No. 3 program position, -Programmer To record a programmer at the mass time every day over a seven day period, Press the “Fwd” or “Rev” button repeatedly until “DAILY” is displayed in step 2-@ below. Then follow instructions 20~2 0 i order to set the starting time and recording length.
Step Button Operation Display 26 ¥ or Press the “Set” Button, Heir {The Hour digits light up and Minute digits RO5 @ will flash.} Press the “Fwd” Button ar “Rev” Button to g set the Minute digits you desired to record. LS e ® Set 1o the “05". 15t Y _ 3:y50: Press the “Set” Button. F: 15 (The Minute digits of start time light up and PR3 3 the Hour digits of retarding length time will flash). Press the ““Fwd” Button or **Rev” Button ta F: 15 set the Hour digits of recording length time s you desire to record.
Step Button Operation Display 2-® set the Channel you desire to record. ® Seethe 7", g:06 1:3¢0 16| ]E 181 29 s Press the *“Set” Button. [ }5 (The channel Indicator “7" lights up and the s programmer number will flash}. "~ st = 2:p81:30 161 g 181 2 ® S Cheek to see that “PRIG" and programmer h: ,'5 number, recording start time, recording mos N5 length time and channel you desire ta record. an ® [f additional programs are to be set repeat e 18t Tac 1.
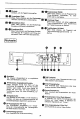
® Recall memory # To recall the programmed contents and check them, press the Program Button so that the programmer start time, programmer length and channel are displayed. . Press the “Prof” Button to set the programmer number you desires to S — check. RECENTNESS L {The recording start time and length = time will be displayed.} @ Press the Normal Button. @ To Clear Programming Press the “Prof” Button to set the programmer. number you desire to change. @ Press the “Clear” Button.
® Simple recording timer To prepare for simple recording timer See page 15 for preparing set up, 0 “oN" “humiliate’ @ “OFE” “Tuner*” “gPr o PULPY 1f the present time is not set ({the time display portion then fiascoes, the “simple recording timer"’ cannot be used, “ON" ar “OFE" Q000" & @ON and AV {Video) Chance! 1 The recording mods can be entered by pressing the )@ button.
® Playback To prepare for playback See page 16 for preparing set up. @ “Ruminate” 1. 11 is not necessary to switch the Rec Speed Sectary for Playback, 2. The LP {8P) indicator lights up when playing back a tape prerecorded i the LP (P} made. 3. During a still or idea search in the LF mode, the color may not appear.
@ Recording from a video camera Read the operation manual for the video camera carefully before connection, Connect the VTR, camera, etc., s shown in this illustration, To prepare for recording from a video camera Refer page 15 for preparing set up.
® Before requesting service Before calling for servicing please check the following. & The operating indicator will not Eight up even If the “Operate” button is pressed. Problem Passable Reason ® No power is supplied to the TV or the VTR. & Power supply plug is not inserted into mains outlet. ® Cannot record. ® The erasure protection tab of the cassette is broken off. ® No picture produced in playback. ® Connection cable(s) disconnected. ® TV not tuned correctly to VTR.
® Specifications Format: Video recording system: Video signal: Recording/Playing time: Receiving channels: RF converter output signal: Rawer requirement: Power consumption: Operating temperatures: Storage temperature: Weight: Dimensions: VIDEO Input: Output: AUDIO nut: Output: ACCESSORIES INCLUDED: Note: VHS PAL standard Two rotary head-helical Sean system PAL color and B/W signals, 625 lines 8 hours max. with E-240 tape {in LP mode) TZ7mm 23.39 mm/sec. {SP) / 11.7 mm /sec.