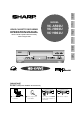
General Information Setting Up MODEL OPERATION MANUAL Basic Operations VIDEO CASSETTE RECORDER VC-A560U VC-H960U VC-H961U Please read this operation manual carefully before using the VCR. Recording Special Functions Helpful Hints (VC-H960U) [IMPORTANT] EZ SET UP (AUTO CHANNEL /CLOCK SET UP) POWER TIMER VCR REC Flashing ! Connect Antenna/Cable to VCR first. @ Then, plug into AC Power Outlet. # Do not press the POWER button until completion of EZ SET UP.
This video cassette recorder (VCR) uses “ONLY” cassette tapes, NTSC video signals and 120 V AC, 60 Hz (standard household current). For future reference, record the model and serial number (located on the rear of the VCR) in the space provided. Model No.: ————————— Serial No.: ————————— WARNING:TO REDUCE THE RISK OF FIRE OR ELECTRIC SHOCK, DO NOT EXPOSE THIS APPLIANCE TO RAIN OR MOISTURE. CAUTION: TO PREVENT ELECTRIC SHOCK, MATCH WIDE BLADE OF PLUG TO WIDE SLOT, FULLY INSERT.
CAUTION PLEASE READ ALL OF THESE INSTRUCTIONS BEFORE YOU OPERATE YOUR THIS PRODUCT AND SAVE THESE INSTRUCTIONS FOR LATER USE. Electrical energy can perform many useful functions. This product has been engineered and manufactured to assure your personal safety. BUT IMPROPER USE CAN RESULT IN POTENTIAL ELECTRICAL SHOCK OR FIRE HAZARDS. In order not to defeat the safeguards incorporated in this product, observe the following basic rules for its installation, use and servicing. 1. 2. 3. 4. 5. 6. 7. 8. 9.
IMPORTANT SAFEGUARDS AND PRECAUTIONS 15. Lightning For added protection for this product during a lightning storm, or when it is left unattended and unused for long periods of time, unplug it from the wall outlet and disconnect the antenna or cable system. This will prevent damage to the product due to lightning and power-line surges. 16.
CONTENTS General Information IMPORTANT SAFEGUARDS AND PRECAUTIONS ................................................... Features ................................................................. Accessories ........................................................... Major Components of Your VCR ......................... Remote Control ..................................................... • Inserting the Batteries Recording 3 6 6 7 8 Setting Up Connecting the VCR .............................................
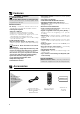
Features Only for VC-H960U, VC-H961U • Hi-Fi Stereo Sound • Built-in MTS (Multi-channel TV Sound) Decoder — Lets you record stereo or SAP (Separate Audio Programme) broadcasts. Common Features • EZ Set Up — VCR tuner channels and clock are automatically set for both Air and Cable channels. • S-VHS Quasi Playback Notes for S-VHS tape • Playback of S-VHS recorded tapes is possible. • Playback of S-VHS image quality is not available.
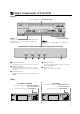
Major Components of Your VCR [Front] Cassette compartment (see Playback/Recording) (VC-H960U) Basic function controls (see Playback/Recording) POWER button (When pressed to turn on the VCR, POWER LED indicator will light up. When the power is turned off, POWER LED indicator will turn off.) • The design may be slightly different depending on the model.
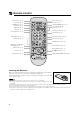
Remote Control TV/VCR buttons (p. 17) PLAY button (p. 23) POWER button (p. 17) REW button (p. 24) STOP button (p. 23) EJECT button (p. 23) FF button (p. 24) TAMPER PROOF button (p. 35) CH (CHANNEL) ∂/ƒ buttons (p. 29) REC button (p. 26) Numbered buttons (p. 19) 100/AM/PM button (p. 19) SLOW button (p. 24) PAUSE/STILL button (p. 24) INPUT button (p. 28) SKIP SEARCH button (p. 34) REPLAY button (p. 34) ZERO BACK button (p. 33) j/k buttons (SLOW j/k, DPSS j/k) (p. 34) MENU button (p. 15) SET button (p.
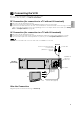
Connecting the VCR The connection method differs depending on the type of TV. If you have cable TV (CATV), see Cable TV Connections. ! Disconnect the TV antenna from the TV. @ Connect the TV antenna cable to the ANTENNA IN terminal on the rear of the VCR. # Connect the TV OUT terminal on the rear of the VCR with the antenna terminal on the TV using a coaxial cable. Select the TV channel 3 or 4 corresponding to the 3 ↔ 4 output channel of the VCR. (See Setting the 3 ↔ 4 Output Channel on page 10.
Connecting the VCR Setting the 3 ↔ 4 Output Channel The 3 ↔ 4 Output Channel lets you change the VCR OUTPUT to standard TV broadcasting signals. Both your TV and VCR must be set to the same channel (i.e TV on channel 3 and VCR OUTPUT channel on 3 too). ! Press POWER to turn the power off. @ Press TV/VCR and if POWER, TIMER and VCR LED indicator lights up flashing. The VCR Output Channel is 3. POWER, TIMER, VCR and REC LED indicator lights up flashing. The VCR Output Channel is 4.
Cable TV Connections Your VCR is capable of receiving the following non-scrambled channels. • Scrambled channels can be received with the cable box supplied by your cable TV company. Set the 3 ↔ 4 Output Channel of the VCR to 3 or 4. See Setting the 3 ↔ 4 Output Channel on page 10.
Cable TV Connections Connection with cable box • Connect as shown. With this connection, it is possible to record descrambled CATV signals. Then go to “After the Connection”. VCR Rear (Hi-Fi model) Cable Box IN OUT Coaxial cable (Not supplied) TV Rear From CATV system ANT/CABLE Coaxial cable (Supplied) • If the cable box is turned off, it will not output any signals, thus making it impossible to record or view a programme from the CATV system.
Cable TV Connections Connection with cable box, A/B switch and splitter By using an A/B switch or splitter, it is possible to switch between the cable box and the VCR output. For example, while recording a TV programme with the VCR, it is possible to watch a CATV programme (including descrambled programmes) using the A/B switch. • Connect as shown. Then go to “After the Connection”.
Cable TV Connections Connection with two cable boxes, A/B switch and splitter The following connection is necessary to record a cable TV programme (even those scrambled by a cable company) while watching another cable TV programme. The following connection requires two cable boxes, a 2-way splitter and an A/B switch. • Connect as shown. Then go to “After the Connection”.
Menu Screen MENU screen is a home screen used to select various screen functions. A submenu will appear once you select an item from the menu. ! Turn on the TV and select the video channel. (See Setting the 3 ↔ 4 Output Channel on page 10.) @ Press POWER (POWER LED indicator will light up) and then TV/VCR to select “VCR” (VCR LED indicator will light up). # Press MENU to display the MENU screen.
EZ Set Up (With Auto Clock Setting) IMPORTANT (Caution during EZ Set Up): • Do not press the POWER button on the VCR or remote control. • Do not insert a video cassette into the VCR. The EZ Set Up function automatically sets the tuner channels and clock when the antenna cable is connected to the rear of the VCR and the power plug is then connected to an AC outlet. IMPORTANT: When using a cable box: • See Cable TV Connections.
Setting the Language When you use the VCR for the first time or the power is interrupted for more than 5 seconds (power failure, etc.), you should set the language to be used for the MENU screen. (Remote Control) ∂ MENU ß • Turn on your TV and select the video channel. (See Setting the 3 ↔ 4 Output Channel.) • Press POWER (POWER LED indicator will light up) and then TV/VCR to select “VCR”. (VCR LED indicator will light up.) ƒ ! Press MENU. LANGUAGE screen will appear.
Setting the Clock EDS CH SET AUTO MANUAL EDS CH ß 07 Normal Screen 佡 $ Select a channel that carries EDS signals with ß /©. Ex.: 07 • The number of channels that can be selected depends on the mode setting on the CHANNEL PRESET screen. See NOTE. When using a cable box: Input the output channel (02, 03 or 04) of the cable box. © % Press SET to enter. The screen returns to normal. Press POWER to turn off the VCR (VCR LED indicator will turn off and POWER LED indicator will turn off).
Setting the Clock CLOCK TIME 1 0 : 2 8 AM DATE YEAR DST 7/04THU 02 ON ß /© and SELECT : ENTER :SET ∂/ƒ CHANGE: EXIT :MENU 佡 # Select “TIME” with ß/© and set time by holding ∂/ƒ. Ex.: 10:28 AM Numbered buttons can be used instead of ∂/ƒ to set time and date. Press AM/PM (100) to select AM or PM during time setting. $ Select and set “DATE”, “YEAR” and “DST” in turn, in the same manner as in Step #. • See Automatic Daylight Saving-Time (D.S.T.) Adjustment. Ex.: Jul.
Setting the Channels Your VCR can receive a maximum of 181 channels as shown below by presetting the channels into memory. (VHF: 2 to 13, UHF: 14 to 69, CATV: 1 to 125) • Make sure that the cable (antenna or CATV) is connected to the IN terminal on the rear of the VCR. ! Press MENU. Select “CHANNEL PRESET” with ∂/ ƒ and then press SET.
Setting the Channels Adding Channel Memory/Erasing Channel Memory Use this function to manually add or erase channels to/from the memory. ! Select the channel to be added with the numbered buttons and the channel to be erased with the CH ∂/ƒ or numbered buttons. @ Press MENU. Select “CHANNEL PRESET” with ∂/ƒ and press SET.
Mode Selection MODE SELECTION You can use the SET UP–selection screen to select the mode for basic features. • Turn on the TV and select the video channel. Press POWER (POWER LED indicator will light up) and then TV/VCR to select “VCR” (VCR LED indicator will light up). ! Press MENU. MENU 佡 ∂ ƒ TIMER SET UP CHANNEL PRESET CLOCK LANGUAGE SELECT : ENTER :SET @ Select “SET UP” with ∂/ ƒ and then press SET. 佡 EXIT :MENU # Set AUTO REPEAT mode to ON or OFF with ß /©. Then press ƒ.
Playback Inserting a Video Cassette Gently insert the video cassette into the cassette compartment. The VCR turns on automatically and POWER LED indicator light up. If the cassette is inserted incorrectly, the loading system will not function. Do not force the cassette into the VCR. To remove the cassette, press EJECT during stop mode. Playback Basic Operations • Turn on the TV and select the video channel. (See Setting the 3 ↔ 4 Output Channel.
Playback Fast Forward and Rewind ! When the VCR is in stop mode, press FF or REW to fast forward or rewind the cassette. (The picture cannot be viewed in this mode.) @ Press STOP to halt fast forward or rewind. • The FF and REW speeds may be slower for cassette tapes other than T-60, T-90 or T-120. • After rewinding the T-120 cassette tape for about 2 minutes, you can fast forward the cassette tape. Video Search Use the following procedure to quickly find the section you want, while viewing the picture.
Playback Blue Screen Noise Elimination Set the BLUE SCREEN mode to ON on the SET UP–selection screen. (See Mode Selection.) This function eliminates monitor noise and mutes sound during playback of unrecorded portions of a tape and when receiving a non-broadcasting channel. Blue Screen will also appear if the VCR is set to the Auxiliary mode but no video signal is fed to the VCR. (The BLUE SCREEN mode is set to ON at the factory.
Recording a TV Programme • Turn on the TV and select the video channel. (See Setting the 3 ↔ 4 Output Channel.) • Press POWER (POWER LED indicator will light up) and then TV/VCR to select “VCR” (VCR LED indicator will light up). Only for Hi-Fi model • If necessary, set “SAP” on the SET UP-selection screen. (See Mode Selection.) Without a Cable Box or Digital Satellite Receiver ! Insert the cassette, with the erasure protection tab covered. (See Cassette Erase Protection below.
Recording a TV Programme Only for Hi-Fi model Recording Hi-Fi Stereo Sound Your VCR records AUDIO signals on two types of audio tracks. Hi-Fi: Using specialized rotary heads, audio signals are recorded on the video track in FM format. Multi-sound broadcasts (Stereo or SAP [Separate Audio Programme]) are recorded on two channels. Linear: All audio signals are recorded in mono on the linear audio track.
Recording a TV Programme Tape Dubbing Connection Instructions Your VCR can dub (copy) video material from another video device. It can also output video and audio signals for recording on other video or audio equipment. Audio/Video dubbing cannot be done separately. ! Switch your VCR to the auxiliary input by pressing INPUT on the remote control. (You can also use CHANNEL ∂/ƒ on the VCR or CH ∂/ƒ on the remote control.) @ Begin recording on the dubbing VCR and playback on the source VCR simultaneously.
Simple Recording Timer SIMPLE RECORDING TIMER The Simple Recording Timer (SRT) enables you to set the recording stop time. The SRT can be set on the TV screen by using the remote control. The SRT cannot be set if the clock has not been set. Make sure the clock is set before setting the SRT. • Turn on the TV and select the video channel. (See Setting the 3 ↔ 4 Output Channel.) • Insert a cassette with the erasure protection tab opening covered.
Recording with the Timer • Turn on the TV and select the video channel. • Insert a cassette with the erasure protection tab opening covered. Power will turn on automatically (POWER LED indicator will light up). • Press TV/VCR to select “VCR” (VCR LED indicator will light up). • Check that the clock is displaying the correct time. Only for Hi-Fi model • If necessary, set “SAP” on the SET UP–selection screen. (See Mode Selection.
Recording with the Timer 1/2 佡 佡 DATE CH 8/10 07 --/-- ----/-- ----/-- --- START STOP 9 : 0 5 PM 1 0 : 3 5 PM S P -:--:-- --:--:-- --:--:-- -- TURN VCR POWER OFF FOR TIMER RECORDING. 佡 Normal Screen & Press SET. • To programme the additional timer settings, press SET and repeat steps @–&. * Press MENU to finish settings. The display shown to the left appears on the screen for 5 seconds, after which the normal screen returns. ( Press POWER to enter the timer standby mode.
Recording with the Timer Confirming Timer Programmes You can see on the Timer setting screen a list of all timer programmes that are already set. • Turn on the TV and select the video channel. • Press POWER (POWER LED indicator will light up) and then TV/VCR to select “VCR” (VCR LED indicator will light up).
Sharp Super Picture This function creates clearer picture quality only during playback. S. PICTURE ON Press S. PICTURE on the VCR. “S.PICTURE ON (or OFF)” will appear on the TV screen for a few seconds. Each time the button is pressed, the mode switches between ON and OFF. (The Sharp Super Picture is preset to ON at the factory.) ON: Normally leave the mode set to ON. This high picture quality function will create a clearer image during playback.
DPSS (Digital Programme Search System) You can quickly locate a desired section of the tape with this feature. Index Signal An index signal is automatically recorded on the tape at the start of ordinary recording, simple recording timer and timer recording. Current tape position Rewind 1 –1 2 3 Fast forward Index signals ! Insert a tape containing index signals. @ Select the index number of the desired programme with DPSS k/j on the remote control.
Tamper Proof With this feature, you can lock all VCR modes to prevent accidental change. This function works even when the VCR power is off, thus preventing children from operating the VCR or viewing select programmes while you are away from home. Tamper Proof ! Press TAMPER PROOF on the remote control for about 2 seconds. VCR and REC LED indicator will flash for about 2 seconds then all four POWER, TIMER, VCR and REC LED indicator will flash to show the Tamper Proof has been activated.
Specifications Format: Video Recording System: Number of Video Heads: Video Signal Standard: Audio Recording System: Tape Width: Tape Speed: Maximum Recording Time: Channel Coverage: Antenna Input: Video Input: Video Output: Audio Input: Audio Output: Hi-Fi Audio (Only for Hi-Fi model) Dynamic Range: Frequency Response: Memory Backup: Operating Temperature: Storage Temperature: Power Source: Power Consumption: Dimensions (approx.
Troubleshooting Check this list before calling for service. Possible Cause/Solutions • NO OPERATION WHEN ANY BUTTON IS PRESSED. • MAKE SURE THAT THE “TAMPER PROOF” MODE IS NOT ENGAGED (VCR and REC LED indicator will light up). • No power. • Make sure the power cord is plugged in. • Check the outlet, fuse or circuit breaker. • VCR does not receive CATV channels. • Use the CHANNEL PRESET screen to change from AIR mode to CATV. (See Setting the Channels.) • VCR does not operate. • Turn on the power.
VALID IN CANADA ONLY LIMITED WARRANTY Consumer Electronics Products Congratulations on your purchase! Sharp Electronics of Canada Ltd. (hereinafter called “Sharp”) gives the following express warranty to the first consumer purchaser for this Sharp brand product, when shipped in its original container and sold or distributed in Canada by Sharp or by an Authorized Sharp Dealer: Sharp warrants that this product is free, under normal use and maintenance, from any defects in material and workmanship.