
Specifications
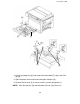
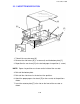

17. Plug in the machine and turn on the main switch, then place a few sheets
of white paper (A3 or 11"x17") on the exposure glass and lower the
platen cover.
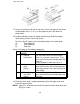
18. Perform 220/240 Conversion (240V machine only), Black Developer
Initial Setting, and the Toner End Check.
To access the SP modes, press the following keys in the order given.
(1) Clear Mode key
(2) Clear/Stop key
(3) Enter key
Access SP modes in the following sequence:
Step SP MODE
NUMBER
PROCEDURE
1 12 220/240
Conversion
This SP mode is only for 240 volt areas.
Enter "12" using the numeral keys. Then,
press the Enter key while holding down the
Point key.
Finally, change the data from "0" to "1".
2 65 Developer
Initial
Setting
Enter "65" using the numeral keys and
press the Enter key. "20" will be displayed
in the copy counter. Press the Start key for
initial setting.
3 63 Toner Supply
Unit Initial
Setting
Enter "63" using the numeral keys and
press the Enter key while holding down the
Point key.
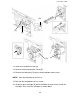
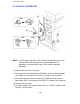
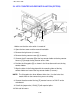
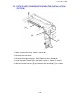
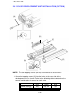
19. Place the outer decal (symbol explanation) [A] on the upper cover and
install the receiving tray.
NOTE: If the DF is installed on the machine, place the outer decal [A] on the
DF [B] as shown.
[A]
[A]
[B]
1 December 1990
3-8