
Specifications

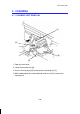


4.7 ENTRANCE SEAL REPLACEMENT
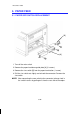
1. Remove the cleaning unit and the following parts:
• Cleaning Blade
• Cleaning Brush
2. Remove the used toner. (See Used Toner Collection.)
3. Clean the cleaning unit with a vaccum cleaner.
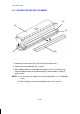
4. Remove the entrance seal [A] together with the strip of 2-sided tape se-
curing it to the lower casing.
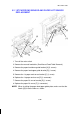
5. Clean the lower casing [B] with alcohol; make sure that no tape remains
on the casing surface.
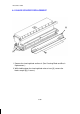
6. Place a new strip of 2-sided tape [C] on the lower casing surface. The
lower edge [D] of the tape must be flush with the edge [E] of the projec-
tion as shown in the illustration.
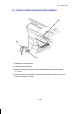
7. Place the new entrance seal on the 2-sided tape. Extend the seal so that
both edges [F] align with the edges [G] of the tape.
NOTE: a) The lower edge [H] of the entrance seal must be aligned with the
edge [E] of the projection on the lower casing.
b) Make sure that there are no waves in the upper edge [I] of the
entrance seal.
[A]
[B]
[C]
[I]
[F]
[G]
[H]
2.5mm
[E]
[D]
1 December 1990
5-42