GB) VIDEO CASSETTE RECORDER "OPERATION MANUAL @LABRADOR DE VID) RETIE. MANUAL DE FUNCTIONALISM ANVANDARHANDBOK " @SHARP SUPER PICTURE .
BEFORE USING YOUR VCR Important antes on your VCR . Unpacking the accessories . . INSTALLING YOUR VCR Connecting the cables Toning the TV into the VCR Auto installation BASIC OPERATION Important notes an your VCR and Video Opes . How to play buck a video gape Pausing and Slow mason ., . . Fast Forwarding/Rewinding . . immediate Recording « voicemail s How 1o use SHOW VIEW 1o make a recording . How to set a deployed recording cen S Checking, changing and canceling a recording .
BEFORE USING YOUR VCR IMPORTANT NOTES ON YOUR VCR DEAL VCR LOCATION PLACE THE VCR.. ® _.on a flat level surface away from radiators or other heat sources and out of direct sunlight. @ ..and video ropes away from magnetic sources such as speakers or microwave ovens. ® ..at least 87 {20cm) way fom the TV, & ..away from curtains, carpets or other materials and allow ventilation space around the VCR. DO NOT.. @ _block the air vent openings. ® ..expose the YCR fo excessive dust, mechanical vibration or shock.
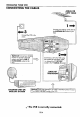
BEFORE USING YOUR VCR UNPACKING THE ACCESSORIES CHECK ALL THESE ACCESSORIES ARE SUPPLIED WITH YOUR VCR, CONTACT' YOUR DEALER IF ANY ARE MISSING. A {TYPE AA/R6/UM3] BATTERIES (X2) for the remote control unit. é@ RF CONNECTION CABLE / connects the VCR to the TV. To fit the batteries into the remote control Remove the battery cover on the back of the remote control. Fit the batteries: @10 @ and &to® terminals. Place the battery cover back Battery cover Into position.
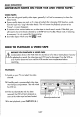
UNINSTALL YOUR VCR TUNING THE TV INTO THE VCR IMPORTANT NOTE: By pressing the STANDBY button, the VCR will toggle between STANDBY ond LOW POWER modes. The VCR display will not be laminated in low power mode. 1. Ensure your VCR is sill in the STANDBY mods (ot low power). bl 2. Switch on the TV. Select an unused channel an your TV for your VCR ff here may be o dedicated video channel refer to your TV operation manual. 3, Press and hold the MENU button for 3 seconds.
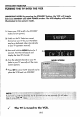
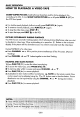
INSTALLING YOUR VCR AUTO INSTALLATION Tress STOP fo switch on your VCR. This model will automatically tune in the TV channels in your area, sort them info a standard order and sef the clock. The screen opposite should be showing en your TV, Follow the instructions from the screens. {Auto sort will foe a few minutes to complete) On completion, the MOVE MENU will appear showing the present channel order, Press MENU fo exit.
! BASIC OPERATION IMPORTANT NOTES ON YOUR VCR AND VIDEO TAPES VIDEO TAPES ® If you use only good quality video tapes, generally it will riot be necessary fo clean the video heads. ® [f poor quality tapes are used, or if o taps is loaded after changing VCR location, oxide from the tape may "clog" the video heads. This will cause the playback picture to be *snowy?, or even disappear. ® To remove minor contamination run o video tape in visual search mode.
BASIC OPERATION HOW TO PLAYBACK A VIDEO TAPE SHARP SUPER PICTURE should enhance the pictures quantity during playback. It is normally set to ON. Ta turn SHARP SUPER PICTURE on or off press SUPER P. (SET] on tha VCR Front panel. ® For double speed playback {without sound), press PLAYTEX (] again. ® To revert fo normal playback, press PLAYTEX again. ® To stop the video tape, press STIR defect the tape press EJECT & on the VCR.
BASIC OPERATION HOW TO PLAYBACK A VIDEO TAPE FAST FORWARDING/REWINDING A VIDEO TAPE 1.Press STOP (M ) to stop the video tape. 2. Prass FAST FORWARD [P}/ REWIND (44} on the remote control oF turn the shuttles ring on the VCR to the right/left and release. 3.To stop fast forward/rewind, press STOP (M ] . FORWARD/REVERSE VISUAL SEARCH 1.During playback, press FAST FORWARD {4 on the remote control, or turn the shuttle ring fully fo the right/ left. 2.
BASIC OPERATION IMMEDIATE RECORDING SELECTION OF A CHANNEL Select the channel by using the number buttons on the cremate control, or select the next/previous channel by pressing CHANNEL change between single digit and digit channel numbers, press For example, for channel 24, press then press 2 4. You can record the channel you are chinning or a different channel. 1. Insert a video tape info your VCR. 2. Select the channel you wish fo record on the VCR. 3.To star recording, press RECORD (@ . 4.
BASIC OPERATION HOW TO USE SHOW VIEW TO MAKE A RECORDING « i E] appears on the VCR display, press TIMER ON/OFF before starling. » Check that the clock Is displaying the correct time, SHOW VIEW allows you fo program the VCR to record up fo eight programmers using the SHOW VIEW numbers published in TV losings. V.Press on the remote control. 2.Enter the SHOW VIEW number from the TV listing using the NUMBER BUTTONS. 3.Press [ a/w Jto select ONCE, WEEKLY, DAILY. 4.
BASIC OPERATION HOW TO USE SHOW VIEW TO MAKE A RECORDING 7.l your VCR hos long play faculty and you wish to change the RECORDING SPEED, use the highlight SP. Press select standard play or long play as required. 8. [See NOTE below]. For VPS/PDC effing use [ €/P ]to highlight the final column. Using the [ ] will [ select VPS/PDC ON or OFF OFF}. 9. Press SET fo confine the programmer. The SHOW VIEW menu will reappear. I you wish to enter further SHOW VIEW recordings repeat this procedure, 10.
BASIC OPERATION HOW TO SET A DELAYED RECORDING You can make o maximum of eight delayed recordings up o @ yer in advance. The example shown is for 24-hour clock operation. 12-hour clock operation can be selected from the maul clock effing menu. 12+hour clock am/pm can be sledded using the AM/PM bunion on the remote control. « 1t &) appears on the VCR display, press TIMER ON/OFF before starting. o Check that the clock is displaying the correct time.
BASIC OPERATION HOW TO SET A DELAYED RECORDING 8.Enter the start time using the NUMBER BUTTONS hours first then minutes {when entering less than 10 minutes odd @ '0" before the number), for example for 21:05 start, press Then press SET to confirm. 9. Rents the stop time, for example for 22:30 stop, press 22 3 0. 10,5 your VCR has long play facilely and you wish fo change the RECORDING SPEED, use the highlight SP. Press select standard play or long play as required. NOTE below].
BASIC OPERATION HOW TO SET A DELAYED RECORDING CHECKING, CHANGING AND CANCELING A RECORDING CHECKING A RECORDING 1.Fin TIMER STANDBY mod, press TIMER ON/OFF fo exit MENU SCREEN 2,Press STOP to switch on the YCR. 'MER 3. Press MENU. 4,Press [ A /W Jio select TIMER. Press SET to confirm. @ All the delayed recordings in the VCR memory will be shown. ® You con sack the settings and change or cancel them. CHANGING A RECORDING 1.Follow sleeps CHECKING A RECORDING. 2.
ADVANCED OPERATION PLAYBACK OF A VIDEO TAPE CHECKING THE AMOUNT OF TAPE REMAINING When you load o video tape info the VCR Tt can calculate approximately he amount of dives dope remaining in hours and minutes. This is useful in determining whether o not there is sufficient rope left to make recording. When a video tape is playing, the amount of tape remaining s calculated for you automatically. To display the amount of video pule remaining: T.Load the video tape into the VCR. 2.
ADVANCED OPERATION PLAYBACK OF A VIDEO TAPE PLAYING BACK AN SCENT TAPE SCENT {National Television Standards Committed) is o different TV standard ta PAL and is used in some Non European Countries, Your VCR can playback per-recorded SCENT tapes onto a PAL system TV, but cannot record an SCENT signal onto a video tape. Note that.. ® You cannot record SCENT signals or dub SCENT ropes onto other VCR from this VCR.
ADVANCED OPERATION DIGITAL DISPLAY TIME OF DAY Shows current time of day, if the clock is set. ¥ Press DISPLAY unfit the time of day g appears. For example, 21:20 appears: OPERATION MODE Shows status of tape. Press DISPLAY unfit . . 5% the display appears, for sample: & LY &3 TAPE COUNTER AND ZERO BACK Tape counter measures the current position of the video gape in real dime, ZERO BACK uses the tape counter fo determine a pacific point on & jape you may with to return fo. 1.
ADVANCED OPERATION BLUE MUTE The TV screen will be blue i o TV Shanna! with no signal is selected, an unrecorded section of type is played or the quality of the retarding on the tape is poor. Select OFF to disable this feature MODE MENU SCREEN 1.Press MENU fo display the main menu on the screen. 2.Press select MODE. 3.Press SET. &.Crass | AW 1o select BLUE MUTE. 5.Press select OFF 6.
ADVANCED OPERATION SEARCHING THE VIDEO TAPE SKIP SEARCHING THE VIDEO TAPE You can search the gape in 30 second dime intervals. To do this folio the procedure below: 1.Press PLAYTEX (W} to start the video tape playing. 2.Press SKIP SEARCH on the remote control. The entomb of dimes you press SKIP SEARCH determines the forward | press = 30 seconds. search dime. 2 presses = 1 minute, 3 presses = 1 mingle 30 secants. @ After searching, normal playback will 4 presses = 2 minutes. resume automatically.
ADVANCED OPERATION SEARCHING THE VIDEO TAPE DIGITAL PROGRAMMER SEARCH SYSTEM (DOSS) Your VCR records a marker signal on the tape of the start of each recording. These signals can be used later o locate the strafing point of o recording. Press DOSS [scale a previous programmer or the next programmer. For example, 1. Lood the video gape info the VCR 2,Press DOSS ® three times. A 3 will appear on the on-screen display, and the VCR will Fast forward to locale the third recording coffer the current one. 3.
ADVANCED OPERATION RECORDING FROM OTHER EQUIPMENT You can record video and audit signals from various sources, for example a camcorder, onto a video gape using your VCR. For sample, recording from a camcorder connected fo UNE 1 IN/DECODER an your VCR: Optional SCARY connection [not supplied). 1 Mono/Stereo camcorder 1.load tape info the VCR. 2.Press INPUT SELECT on the cremate control turtle the VCR display shows If you with fo record from a source 0] connects fo URINE T IN/OUT, select L1.
SPECIAL FEATURES ON YOUR VCR LOW POWER FEATURE To meet new power regulations your VCR can ke placed in LOW POWER mode. In LOW POWER mode the VCR power consumption fs reduced to below 1 Walt, LOW POWER MODE 1.Press STANDBY {(D) to place the VCR in STANDBY mode. 2.Press STANDBY ((B) again to place the VCR in LOW POWER mode. The VCR digital display will appear blank. The VCR power consumption will now be below 1 Watt, DISENGAGING LOW POWER MODE Either Cross STANDBY {(D] fo rectum the VCR to STANDBY mode.
CUSTOMIZED INSTALLATION. MANUALLY TUNING A CHANNEL It should not be necessary to tune in a broadcast channel manually except in unusual circumstances such as poor signal. To manually dune in a channel follow the procedure below. 1. Press MENU. 2. Press select SET UP. Press SET to confirm. 3. CHANNEL PRESET will be highlighted. Press SET.4.Press select CHANNEL. 5. Crass (42 o select CH or CC. This will determine whether off air {CH} or cable {CC) is tuned first.
CUSTOMIZED INSTALLATION MANUALLY SORTING CHANNELS SORTING THE CHANNELS INTO YOUR PREFERRED ORDER When your VCR tunes In broadcast channels automatically it sorts them info @ standard order using teletext information. You can change the order of the channels with the following procedure, 1.Press MENU. 2. Press select SET UP. Press SET to confirm, 3.Press [ /W J1o select CHANNEL SORT. Press SET to confirm. 4.The MOVE position will be highlighted. Press SET to confirm. 5.
CUSTOMIZED INSTALLATION MANUALLY SORTING CHANNELS DELETING CHANNELS Here s o channel you wish to delete from the VCR memory you can follow the procedure below. 1. Pross MENU. 2 MENU SCREEN 2, Press select SET LIP. Press SET to confirm, 3.Press select CHANNEL SORT. Press SET 1o confirm. 4.Press [ A/W ]to select CANCEL. Press SET to confirm. 5.Press highlight the channel fo be canceled. 6.Press SET twice to conceal the channel. 7.When alt the channels you wish have bean concealed, press MENU.
CUSTOMIZED INSTALLATION MANUALLY SORTING CHANNELS RE-NAMING CHANNELS When your VCR tunes in broadcast channels automatically, it names them using teletext information. You can change the name of a channel with the fallowing procedure. 1.Press MENU. 2. Press select SET UR Press SET fo confirm. 3.Press select CHANNEL SORT. Press SET to confirm. 4.Press highlight NAME. Press SET to confirm. 5.Press highlight the channel to be named. Press SET fo confirm. &.Press [ /W /4/P] to rename the channel.
CUSTOMIZED INSTALLATION CHANGING THE ON-SCREEN DISPLAY LANGUAGE Changing the language used by the onscreen display will not change the operation of the VCR ot make it suitable for any other broadest standard. 1.Press MENU. 2.Press select SET UP. f the display is nef in o language you can understand, this Is the fourth option from the top. Press SET to confirm. 3.Press select LANGUAGE (the last option]. 4.Then press SET fo confirm. 5.Press [ /W /4[] 1o select your language. Then press SET to confirm.
MORE INFORMATION ABOUT YOUR VCR VCR DIGITAL DISPLAY Vial e BV 0 I’ilju I (D TIMER indicator. &) VIDEO PROGRAMMING (2 AUDIO OUTPUT indicators. REPROGRAMMING DELIVERY (3) RECORDING indicator. CONTROL indicator. CHILD Lock indicator, 9 LONG PLAY indicator. & AM/PM indicators. Q) STANDARD PLAY Indicator (6) STOP indicator. 43 VIDEO TAPE indicator. (@ VER mode indicator. 43 DECODER indicator PRESET CHANNEL indicator.
MORE INFORMATION ABOUT YOUR VCR ON-SCREEN DISPLAY Al the information you dean on the VCR status will be summarized on the on-screen display. f you are recording, playing back @ gape or watching a broadcast on the video honcho! you can call up throe standard onscreen displays. The display can be selected by pressing the MODE OSD button on the remote control, 1,2,3 or 4 dimes. 1.AUTO, the current mode and channel 1. umber will bs displayed for 3 seconds when an aeration or number bison is pressed. 2.
MORE INFORMATION ABOUT YOUR VCR SPECIFICATIONS Format: Number of heads: Video signal system: Maximum playing dime: Tape width: Tape speed; Antenna: Reception channels: RF cutout signal: Power requirement: Power consumption: Operating temperature: Stooge temperature: Video input: Voids output: Audio input: Audi output: Dimensions; Weight: Supplied accessories: VHS PAL standard Four heads (VCMS1GM] Two head (VG 1GM) PARAMEDICAL color or monochrome signal: 625 lines 480 min, with £-240 video cassette in Long p
TROUBLESHOOTING TROUBLESHOOTING PROBLEM ANSWER Display is not working. @ toke sure ha VCR fs not in LOW POWER mode. ® Mike sure the power card is plugged in. @ ks sure the wall socks has power [plug another appliance In). YCR will not proffer E1 appears in VCR display. ® Crass the TIMER ON-OFF button 1o disengage miler. VCR will not respond fo any commands. @ Check CHILD LOCK is not engorged. @ Safely device roofing: unplug VCR for 2 hours. Taps cannot be bloodshed.