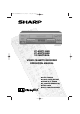
TINS-A079UMZZCover 4/11/02 1:55 pm Page 1 VC-MH715HM Shown VC-MH715HM VC-MH705HM VC-MH705LM VIDEO CASSETTE RECORDER OPERATION MANUAL ® ● AUTO TUNING ● SHARP SUPER PICTURE ● NICAM Hi-Fi STEREO ● 6 HEAD EXTENDED PLAY ● CHILD LOCK ● NTSC SIMPLE PLAYBACK
TINS-A079UMZZCover 4/11/02 1:55 pm Page 2 Dear SHARP Customer Thank you for buying this SHARP VCR. Given proper care it will provide years of entertainment for the whole family. Please read this operation manual carefully before attempting to operate the VCR. Copyright ● Audio-visual material may consist of copyrighted works which must not be recorded without the authority of the owner of the copyright. Please refer to the relevant laws in your country.
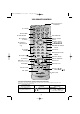
TINS-A079UMZZCover 4/11/02 1:55 pm Page 3 VCR REMOTE CONTROL 14. BASIC SHARP TV CONTROLS STANDBY 1. STANDBY TV OPERATE CH VOL + INPUT SELECT CH VOL AUDIO OUT SKIP SEARCH ZERO BACK 2. CHILD LOCK 3. TIMER ON/OFF 4. AUDIO OUT TIMER ON/OFF MENU SET 16. SKIP SEARCH 17. SET VIDEO Plus+ CLEAR 18. MENU SELECT / / / 19. CLEAR 5. MENU 6. VIDEO Plus+ (VC-MH715HM only) 7. NUMBER BUTTONS MODE OSD 20. MODE ON SCREEN DISPLAY 1 2 3 4 5 6 21. DISPLAY 7 8 9 22.
TINS-A079UMZZCover 4/11/02 1:55 pm Page 4 CALLING FOR SERVICE ● If you are unable to resolve a problem using the TROUBLESHOOTING guide, do not remove the cabinet or attempt to service this VCR yourself. ● For service please contact your dealer. If this is not possible, please call our Customer Information Centre for details of your nearest Sharp Service Centre.
TINS-A079UMN1.book Page 1 Monday, November 4, 2002 1:01 PM CONTENTS BEFORE USING YOUR VCR Important notes on your VCR ....................................................................................................... 2 Unpacking the accessories........................................................................................................... 3 INSTALLING YOUR VCR Connecting the cables .............................................................................................................
TINS-A079UMN1.book Page 2 Monday, November 4, 2002 1:01 PM BEFORE USING YOUR VCR IMPORTANT NOTES ON YOUR VCR IDEAL VCR LOCATION PLACE THE VCR.. • ... on a flat level surface away from radiators or other heat sources and out of direct sunlight. • ... and video tapes away from magnetic sources such as speakers or microwave ovens. • ... at least 8” (20cm) away from the TV. • ... away from curtains, carpets or other materials and allow ventilation space around the VCR. DO NOT... • ...
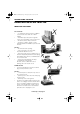
TINS-A079UMN1.book Page 3 Monday, November 4, 2002 1:01 PM BEFORE USING YOUR VCR UNPACKING THE ACCESSORIES CHECK ALL THESE ACCESSORIES ARE SUPPLIED WITH YOUR VCR. CONTACT YOUR DEALER IF ANY ARE MISSING. (TYPE AA/R6/UM3) BATTERIES (X2) REMOTE CONTROL for the remote control unit. For a more detailed picture of your remote control refer to page (ii). RF CONNECTION CABLE connects the VCR to the TV. To fit the batteries into the remote control Remove the battery cover on the back of the remote control.
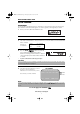
TINS-A079UMN1.book Page 4 Monday, November 4, 2002 1:01 PM INSTALLING YOUR VCR CONNECTING THE CABLES 1 Connect your existing aerial cable to the AERIAL IN socket on your VCR.
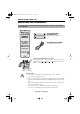
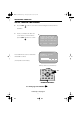
TINS-A079UMN1.book Page 5 Monday, November 4, 2002 1:01 PM INSTALLING YOUR VCR AUTO TUNING PROCEDURE This model automatically tunes the TV channels for your area. If the VCR has not previously been tuned-in, instructions will be given on screen to guide you through this procedure. 1. Ensure your VCR is still in the STANDBY mode. 2. Switch on the TV. 3. Select the next available or unused channel on your TV, this will become the dedicated video channel.
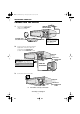
TINS-A079UMN1.book Page 6 Monday, November 4, 2002 1:01 PM INSTALLING YOUR VCR AUTO TUNING CONTINUED 6. Press the SET SET button to store the RF channel setting and continue with the installation. 7. Ensure your Aerial/Scart cables are connected to your VCR and then 7. P L E A S E B E S UR E T H E A E R I A L / S CAR T CAB L E I S CONN E C T E D T O YOUR V CR . press the SET SET button to confirm.
TINS-A079UMN1.book Page 7 Monday, November 4, 2002 1:01 PM INSTALLING YOUR VCR On completion the MOVE MENU will appear showing all the channels the VCR was able to tune in. By pressing MODE OSD button, the VCR will change to a blue background. This may help you see which channel your VCR has tuned in. Using the [ / / / ] menu select buttons scroll through the channels to find BBC1. Some channels may be duplicated but with more interference than others.
TINS-A079UMN1.book Page 8 Monday, November 4, 2002 1:01 PM INSTALLING YOUR VCR The clock setting screen will now appear. To set the time and date follow the steps below: 1. Press the [ / 24 hour example: ] menu select buttons to select either 12 or 24 hour clock operation. 2. Press [ / C L OCK MOD E 2 4H ] to select TIME.
TINS-A079UMN1.book Page 9 Monday, November 4, 2002 1:01 PM BASIC OPERATION SCART LEAD CONNECTION (NOT SUPPLIED) A scart lead can be connected at any time. It is recommended to connect your TV and VCR in this way as it will provide improved picture and sound quality. Please refer to the connection diagram on page 4. IMPORTANT NOTES ON YOUR VCR AND VIDEO TAPES VIDEO TAPES • If you use only good quality video tapes, generally it will not be necessary to clean the video heads.
TINS-A079UMN1.book Page 10 Monday, November 4, 2002 1:01 PM BASIC OPERATION HOW TO PLAYBACK A VIDEO TAPE • For double speed playback (without sound), press the PLAY/X2 • To revert to normal playback, press the PLAY/X2 • To stop the video tape, press STOP • To eject the tape press PLAY / X2 PLAY / X2 button again. button again. . EJECT on the VCR. SHARP SUPER PICTURE SHARP SUPER PICTURE should enhance the picture quality during playback. It is normally set to ON.
TINS-A079UMN1.book Page 11 Monday, November 4, 2002 1:01 PM BASIC OPERATION HOW TO PLAYBACK A VIDEO TAPE FAST FORWARDING/REWINDING A VIDEO TAPE 1. Press STOP to stop the video tape. FF 2. Press the FAST FORWARD REW /REWIND buttons on the remote control or on the VCR front panel. 3. To stop fast forward/rewind, press STOP . FORWARD/REVERSE VISUAL SEARCH search mode, press the 1.
TINS-A079UMN1.book Page 12 Monday, November 4, 2002 1:01 PM BASIC OPERATION IMMEDIATE RECORDING CONTINUED TAPE SPEED SELECTION Cassette Length E-240 Your VCR has three tape speeds: SP (Standard Play) , LP (Long Play) and EP (Extended Play). Press the TAPE SPEED Recording Time In Minutes SP LP EP button on the remote control to select the desired setting. 240 480 720 It is recommended that EP recordings are only played back on the VCR on which they were originally recorded.
TINS-A079UMN1.book Page 13 Monday, November 4, 2002 1:01 PM BASIC OPERATION HOW TO USE THE VIDEO Plus+® SYSTEM TO MAKE A RECORDING (VC-MH715HM ONLY) Before you start! • If the Timer Standby symbol display, press the remove the • appears on the VCR TIMER ON/OFF button to symbol. Check that the VCR clock is displaying the correct time.
TINS-A079UMN1.book Page 14 Monday, November 4, 2002 1:01 PM BASIC OPERATION HOW TO USE THE VIDEO Plus+® SYSTEM TO MAKE A RECORDING (VC-MH715HM ONLY) 6. If you wish to change the RECORDING SPEED, use the [ [ / / ] to select either standard play (SP), long play (LP) or extended play (EP) as required. 7. Press the SET 6. ]to highlight SP.
TINS-A079UMN1.book Page 15 Monday, November 4, 2002 1:01 PM BASIC OPERATION HOW TO SET A DELAYED RECORDING You can make a maximum of eight delayed recordings up to a year in advance. The example shown is for 24-hour clock operation. To change to12-hour clock operation refer to the MANUALLY SETTING THE CLOCK section of this manual. 12-hour clock am/pm can be selected using the AM/PM control.
TINS-A079UMN1.book Page 16 Monday, November 4, 2002 1:01 PM BASIC OPERATION HOW TO SET A DELAYED RECORDING 7. Enter the start time using the[ / ] or 7. 1/2 NUMBER BUTTONS, hours first then minutes (when entering less than 10 hours or minutes add a '0' before the number), for DA T E P R S T AR T S T OP 21 / 06 02 12 : 00 13 : 00 9 / 0 7D0 3 2 1 : 0 5 - : - - - / - - - - : - - : - - - / - - - - : - - : - - SP SP - - - example for 21:05 start, press 2 1 0 5. Then press to move to the next setting.
TINS-A079UMN1.book Page 17 Monday, November 4, 2002 1:01 PM BASIC OPERATION HOW TO CHECK, CHANGE AND CANCEL A DELAYED RECORDING Before you start! • If the Timer Standby symbol appears on the VCR display, press the TIMER ON/OFF button to remove the symbol. CHECKING A RECORDING 1. Press STOP to switch on the VCR. 2. Press the MENU button. 3. Press[ / ]to select TIMER. Press the SET SET • MENU SCREEN T I ME R MOD E SE T UP button to confirm.
TINS-A079UMN1.book Page 18 Monday, November 4, 2002 1:01 PM ADVANCED OPERATION AUDIO AND YOUR VCR HI-FI STEREO SOUND Stereo sound is possible from this VCR if you have a stereo TV connected to the VCR with a scart lead, or audio equipment connected with audio phono leads. The VCR is normally set so that stereo sound is possible. The sound output from the VCR is controlled by the AUDIO OUT button on the remote control.
TINS-A079UMN1.book Page 19 Monday, November 4, 2002 1:01 PM ADVANCED OPERATION AUDIO AND YOUR VCR CONNECTING TO AUDIO EQUIPMENT The diagram below shows how to connect your VCR to audio equipment. When connected in this way stereo sound is possible from the speakers.
TINS-A079UMN1.book Page 20 Monday, November 4, 2002 1:01 PM ADVANCED OPERATION PLAYBACK OF A VIDEO TAPE CHECKING THE AMOUNT OF TAPE REMAINING When you load a video tape into the VCR it can calculate approximately the amount of video tape remaining in hours and minutes. This is useful in determining whether or not there is sufficient tape left to make a recording. When a video tape is playing, the amount of tape remaining is calculated for you automatically.
TINS-A079UMN1.book Page 21 Monday, November 4, 2002 1:01 PM ADVANCED OPERATION PLAYBACK OF A VIDEO TAPE PLAYING BACK AN NTSC TAPE NTSC (National Television Standards Committee) is a different TV standard to PAL and is used in some Non-European Countries. Your VCR can playback pre-recorded NTSC tapes onto a PAL system TV, but cannot record an NTSC signal onto a video tape. Note that.. • You cannot record NTSC signals or dub NTSC tapes onto other VCR’s from this VCR.
TINS-A079UMN1.book Page 22 Monday, November 4, 2002 1:01 PM ADVANCED OPERATION LCD DISPLAY TIME OF DAY Shows current time of day, if the clock is set. Press the DISPLAY button until the time of day appears. For example, 21:20 appears: CHANNEL STATUS Shows the current VCR channel preset. Press the DISPLAY button until the channel number appears, for example PRESET 1: TAPE COUNTER AND ZERO BACK Tape counter measures the current position of the video tape in real time.
TINS-A079UMN1.book Page 23 Monday, November 4, 2002 1:01 PM ADVANCED OPERATION BLUE MUTE The TV screen will be blue if a TV channel with no signal is selected, an unrecorded section of tape is played or the quality of the recording on the tape is poor. Select OFF in the mode menu to disable this feature. 1. Press the MENU button to display the main menu on the screen. 2.
TINS-A079UMN1.book Page 24 Monday, November 4, 2002 1:01 PM ADVANCED OPERATION SEARCHING THE VIDEO TAPE SKIP SEARCHING THE VIDEO TAPE You can search the tape in 30 second time intervals. To do this follow the procedure below: 1. Press PLAY/X2 PLAY / X2 to start the video tape 1 press = 2 presses = 3 presses = 4 presses = playing. SKIP 2. Press the SKIP SEARCH SEARCH button on the remote control. The number of times you press SKIP SEARCH 30 seconds. 1 minute. 1 minute 30 seconds. 2 minutes.
TINS-A079UMN1.book Page 25 Monday, November 4, 2002 1:01 PM ADVANCED OPERATION RECORDING FROM OTHER EQUIPMENT You can record video and audio signals from various external sources, such as a camcorder, onto a video tape using your VCR.
TINS-A079UMN1.book Page 26 Monday, November 4, 2002 1:01 PM OTHER FEATURES ON YOUR VCR CHILD LOCK You can lock your VCR with this feature. It will work even when the VCR is in STANDBY, preventing children from operating the VCR. TO ENGAGE CHILD LOCK Press and hold the CHILD LOCK flashes and then button on the remote control for about 2 seconds. remains lit on the VCR display confirming that CHILD LOCK has been activated.
TINS-A079UMN1.book Page 27 Monday, November 4, 2002 1:01 PM OTHER FEATURES ON YOUR VCR DECODER SWITCHING OPERATION If you have a separate decoder connected to the VCR’s L2 input as previously shown in the “Connecting the Cables” section, you will need to set the decoder function to ON in order to record the descrambled signal and/or watch it on your TV. Now, when the VCR receives a scrambled signal it is output via LINE 2 terminal to the decoder.
TINS-A079UMN1.book Page 28 Monday, November 4, 2002 1:01 PM CUSTOMISED INSTALLATION MANUALLY TUNING A CHANNEL • It should not be necessary to tune in a broadcast channel manually except in unusual circumstances such as poor signal. To manually tune in a channel follow the procedure below. 1. Press MENU 2. Press the [ . / ] menu select buttons to select SET UP. Press SET SET to confirm. 3. CHANNEL PRESET will be highlighted. Press SET 4. Press [ SET CHANNE L CHANNE L PRESET SOR T C L OCK .
TINS-A079UMN1.book Page 29 Monday, November 4, 2002 1:01 PM CUSTOMISED INSTALLATION MANUALLY SORTING CHANNELS SORTING THE CHANNELS INTO YOUR PREFERRED ORDER 1. Press the MENU button. MENU SCREEN 2. 2. Press the [ / V I D EOP L U S T I ME R MOD E SE T UP ] menu select buttons to select SET UP. Press the SET SET button to confirm. 3. Press [ the SET / SET ] to select CHANNEL SORT. Press 5. button to confirm. 4. The MOVE position will be highlighted. Press the SET SET 5.
TINS-A079UMN1.book Page 30 Monday, November 4, 2002 1:01 PM CUSTOMISED INSTALLATION MANUALLY SORTING CHANNELS DELETING CHANNELS If there is a channel you wish to delete from the VCR memory, you can follow the procedure below. 1. Press the MENU button. MENU SCREEN 2. 2. Press the [ / ] menu select buttons to select SET UP. Press the SET SET V I D EOP L U S T I ME R MOD E SE T UP button to confirm. 3. Press [ the SET 4. Press [ SET SET 5. Press [ / SET ] to select CHANNEL SORT. Press 5.
TINS-A079UMN1.book Page 31 Monday, November 4, 2002 1:01 PM CUSTOMISED INSTALLATION MANUALLY SETTING THE CLOCK This procedure will allow you to set the clock manually. 1. Press the MENU 2. Press the [ / button. ] menu select buttons to select SET UP. Press the SET SET SET SET 4. Press [ / ] to select CLOCK. Press the button to confirm. / SE T UP button to confirm. 3. Press [ 3.
TINS-A079UMN1.book Page 32 Monday, November 4, 2002 1:01 PM MORE INFORMATION ABOUT YOUR VCR VCR DISPLAY 1. TIMER RECORD indicator. 7. TAPE SPEED indicator. 2. VCR MODE indicator. 8. VIDEO PROGRAMMING SYSTEM/PROGRAMME DELIVERY CONTROL indicator. 3. TAPE MOTION STATUS indicator 4. RECORDING indicator. 9. DECODER indicator. 5. AUDIO OUTPUT indicator. 10. CLOCK, TAPE COUNTER, TAPE STATUS AND CHANNEL PRESET STATUS . 6. CHILD LOCK indicator.
TINS-A079UMN1.book Page 33 Monday, November 4, 2002 1:01 PM MORE INFORMATION ABOUT YOUR VCR ON-SCREEN DISPLAY All the information you need on the VCR status will be summarised on the on-screen display. If you are recording, playing back a tape or watching a broadcast on the video channel you can call up three standard on-screen displays. The display can be selected by pressing the MODE OSD button on the remote control, 1,2,3 or 4 times. 1. AUTO, the current mode and channel 1.
TINS-A079UMN1.
TINS-A079UMN1.book Page 35 Monday, November 4, 2002 1:01 PM MORE INFORMATION ABOUT YOUR VCR TROUBLESHOOTING BEFORE REQUESTING SERVICE! The following conditions do not always denote trouble. Therefore, perform the checks described below before calling for service. If the problem cannot be corrected by the use of this guide, remove the mains plugs from the wall socket and contact the dealer or supplier from whom the unit was purchased in order to obtain service.
TINS-A079UMN1.book Page 36 Monday, November 4, 2002 1:01 PM MORE INFORMATION ABOUT YOUR VCR TROUBLESHOOTING AREA RECORDING PROBLEM The VIDEO Plus+ system does not record desired programme. POSSIBLE CAUSE/CURE • Ensure date and time are correctly set on the VCR. (VC-MH715HM only) TAPE TRANSPORT/ MECHANISM Tape can not be loaded. Rewind is not possible. • Make sure there is no other tape in the VCR. • Make sure you are loading the tape correctly. • Make sure the tape is not at the start.
TINS-A079UMN1.book Page 37 Monday, November 4, 2002 1:01 PM MORE INFORMATION ABOUT YOUR VCR VCR RESET 1. Press the STOP STOP button on the front of the VCR. 2. Press and hold MENU and CHANNEL UP CHANNEL K buttons together on the front of the VCR for 10 seconds. ✔ VCR RESET IS NOW COMPLETE Please continue with your previous procedure. RF CHANNEL TUNING If you have a preferred RF output channel this can be set manually between channels 21 and 69 by following the procedure below. 1.
TINS-A079UMN1.book Page 38 Monday, November 4, 2002 1:01 PM MORE INFORMATION ABOUT YOUR VCR GUARANTEE SHARP Electronics (UK) Ltd. (hereafter called Sharp) guarantee to provide for the repair, or at its option the replacement, of this product subject to the conditions listed below: 1. This guarantee shall only apply to faults which are due to inferior workmanship or materials.
TINS-A079UMN1.book Page 39 Monday, November 4, 2002 1:01 PM MORE INFORMATION ABOUT YOUR VCR CONNECTING TO THE MAINS This VCR is suitable only for connection to UK mains. The unit is fitted with a moulded 3-pin mains plug with a 3-amp fuse. The VCR does not have a mains power switch. When connected to the mains, the unit will draw current at all times to power the clock. Be sure to unplug the VCR when it is not to be used for several months.