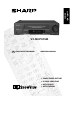
ENGLISH GB 1- GB 35 VC-MH741SM OPERATION MANUAL ● SHARP SUPER PICTURE ● 4 HEAD LONG PLAY ● AUTO CLOCK ● AUTO TUNING 1 SVENSKA 135 PORTUGUÊSE 135 GB VIDEO CASSETTE RECORDER
GB Dear SHARP customer Thank you for buying this SHARP VCR. GIven proper care it will provide years of entertainment for the whole family. Please read this operation manual carefully before attempting to operate the VCR. Copyright ● Audio-visual material may consist of copyrighted works which must not be recorded without the authority of the owner of the copyright. Please refer to the relevant laws in your Country.
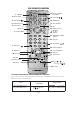
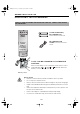
VCR REMOTE CONTROL STANDBY 1. STANDBY 2. INPUT SELECT 3. CHILD LOCK 4. TIMER ON/OFF 5.AUDIO OUT 6. MENU TIMER ON/OFF TV OPERATE CH VOL + INPUT SELECT CH VOL AUDIO OUT SKIP SEARCH ZERO BACK MENU SET SV/V+ /TIMER CLEAR 7. SV/V+/TIMER MODE OSD 1 2 3 DISPLAY 4 5 7 8 6 / 16. ZERO BACK 17. SKIP SEARCH 18. SET 19. MENU SELECT / / / 20. CLEAR 21. MODE ON SCREEN DISPLAY 9 CHANNEL 23. CHANNEL / 0 8. AM/PM or REW FF 9. REWIND PAUSE/STILL REC 24. INPUT SELECT 25. FAST FORWARD 26.
GB This equipment complies with the requirements of Directives 89/336/EEC and 73/23/EEC as amended by 93/68/EEC. D Dieses Gerät entspricht den Anforderungen der EG-Richtlinien 89/336/EWG und 73/23/EWG mit Änderung 93/68/EWG. F Ce matériel répond aux exigences contenues dans les directives 89/336/CEE et 73/23/CEE modifiées par la directive 93/68/CEE. NL Dit apparaat voldoet aan de eisen van de richtlijnen 89/336/EEG en 73/23/EEG, gewijzigd door 93/68/EEG. DK Dette udstyr overholder kravene i direktiv nr.
741 eng.book Page 1 Tuesday, April 27, 1999 11:35 AM CON T EN T S BEFORE U SI N G Y OU R V CR Important notes on your VCR ....................................................................................................... 2 Unpacking the accessories........................................................................................................... 3 I N ST A LLI N G Y OU R V CR Connecting the cables .................................................................................................
741 eng.book Page 2 Tuesday, April 27, 1999 11:35 AM BEFORE U SI N G Y OU R V CR I M PORT A N T N OT ES ON Y OU R V CR I D EA L V CR LOCA T I ON PLACE THE VCR.. • ... on a flat level surface away from radiators or other heat sources and out of direct sunlight. • ... and video tapes away from magnetic sources such as speakers or microwave ovens. • ... at least 8” (20cm) away from the TV. • ... away from curtains, carpets or other materials and allow ventilation space around the VCR. DO NOT... • ...
41 eng.book Page 3 Tuesday, April 27, 1999 11:35 AM BEFORE U SI N G Y OU R V CR U N PA CK I N G T H E A CCESSORI ES CHECK ALL THESE ACCESSORIES ARE SUPPLIED WITH YOUR VCR. CONTACT YOUR DEALER IF ANY ARE MISSING. ( T Y PE A A /R6 /U M 3 ) BA T T ERI ES ( X 2 ) REMOTE CONTROL for the remote control unit. RF CON N ECT I ON CA BLE connects the VCR to For a more detailed picture of your remote control refer to page (ii).. the TV.
741 eng.book Page 4 Tuesday, April 27, 1999 11:35 AM I N ST A LLI N G Y OU R V CR CON N ECT I N G T H E CA BLES A ERI A L OR CA T V CA BLE Connect your existing aerial cable to the A N T EN N A I N socket on your VCR. Connect the VCR to the mains Opt ional: Connect your Satellite receiver or decoder to the VCR using a scart lead to LI N E 2 I N /D ECOD ER socket on the VCR. Connect your TV to the VCR using the supplied rf connection cable, i.e.
741 eng.book Page 5 Tuesday, April 27, 1999 11:35 AM I N ST A LLI N G Y OU R V CR T U N I N G T H E T V I N T O T H E V CR I M PORT A N T N OT E: By pr essing t he ST A N D BY but t on, t he V CR w ill t oggle bet w een ST A N D BY and LOW POWER m odes. T he V CR display w ill not be illum inat ed in low pow er m ode. 1. Ensure your VCR is still in the STANDBY mode (not low power). 2. Switch on the TV.
741 eng.book Page 6 Tuesday, April 27, 1999 11:35 AM I N ST A LLI N G Y OU R V CR A U T O I N ST A LLA T I ON Press ST OP to switch on your VCR. This model will automatically tune in the TV channels in your area, sort them into a standard order and set the clock. The screen opposite should be showing on your TV. AU T O Follow the instructions from the screens.
741 eng.book Page 7 Tuesday, April 27, 1999 11:35 AM BA SI C OPERA T I ON I M PORT A N T N OT ES ON Y OU R V CR A N D V I D EO T A PES V I D EO T A PES • If you use only good quality video tapes, generally it will not be necessary to clean the video heads. • If poor quality tapes are used, or if a tape is loaded after changing VCR location, oxide from the tape may "clog" the video heads. This will cause the playback picture to be "snowy", or even disappear.
741 eng.book Page 8 Tuesday, April 27, 1999 11:35 AM BA SI C OPERA T I ON H OW T O PLA Y BA CK A V I D EO T A PE SH A RP SU PER PI CT U RE should enhance the picture quality during playback. It is normally set to ON. To turn SH A RP SU PER PI CT U RE on or off press SU PER P. on the VCR front panel. • For double speed playback (without sound), press PLA Y /X 2 ( • To revert to normal playback, press PLA Y /X 2 ( • To stop the video tape, press ST OP ( • To eject the tape press ) again. ) again.
741 eng.book Page 9 Tuesday, April 27, 1999 11:35 AM BA SI C OPERA T I ON H OW T O PLA Y BA CK A V I D EO T A PE FA ST FORWA RD I N G/REWI N D I N G A V I D EO T A PE 1. Press ST OP ( ) to stop the video tape. 2. Press FA ST FORWA RD ( )/REWI N D ( ) on the remote control or turn the shuttle ring on the VCR to the Right/Left and release. 3. To stop fast forward/rewind, press ST OP ( ). FORWA RD /REV ERSE V I SU A L SEA RCH 1.
741 eng.book Page 10 Tuesday, April 27, 1999 11:35 AM BA SI C OPERA T I ON I M M ED I A T E RECORD I N G SELECT I ON OF A CH A N N EL Select the channel by using the number buttons on the remote control, or select the next/previous channel by pressing CH A N N EL [ or ]. To change between single digit and 2-digit channel numbers, press A M /PM For example, for channel 24, press A M /PM . then press 2 4 . You can record the channel you are watching or a different channel. 1.
741 eng.book Page 11 Tuesday, April 27, 1999 11:35 AM BA SI C OPERA T I ON H OW T O U SE T O M A K E A RECORD I N G appears on the VCR display, press T I M ER ON /OFF before starting. • If • Check that the clock is displaying the correct time. SHOWVIEW allows you to program the VCR to record up to eight programmes using the SHOWVIEW numbers published in TV listings... 1. Press [SV /V + ] on the remote control 2. Enter the SHOWVIEW number from the TV listing using the N U M BER BU T T ON S.
741 eng.book Page 12 Tuesday, April 27, 1999 11:35 AM BA SI C OPERA T I ON H OW T O U SE T O M A K E A RECORD I N G 7. If your VCR has long play facility and you wish to change the RECORD I N G SPEED , use the [ / ] to highlight SP. Press [ / ] to select standard play (SP) or long play (LP) as required. 8. [See N OT E below]. For VPS/PDC setting use [ / ] to highlight the final column. Using the [ / ] will select VPS/PDC ON or OFF (✱ = ON - = OFF).
741 eng.book Page 13 Tuesday, April 27, 1999 11:35 AM BA SI C OPERA T I ON H OW T O SET A D ELA Y ED RECORD I N G You can make a maximum of eight delayed recordings up to a year in advance. The example shown is for 24-hour clock operation. 12-hour clock operation can be selected from the manual clock setting menu. 12-hour clock am/pm can be selected using the A M /PM button on the remote control. appears on the VCR display, press T I M ER ON /OFF before starting.
741 eng.book Page 14 Tuesday, April 27, 1999 11:35 AM BA SI C OPERA T I ON H OW T O SET A D ELA Y ED RECORD I N G 8. Enter the start time using the [ / ] or the N U M BER BU T T ON S hours first then minutes (when entering less than 10 minutes add a '0' before the number), for example for 21:05 start, press 2 1 0 5 . Then press SET to confirm. 9.
741 eng.book Page 15 Tuesday, April 27, 1999 11:35 AM BA SI C OPERA T I ON H OW T O SET A D ELA Y ED RECORD I N G CH ECK I N G, CH A N GI N G A N D CA N CELLI N G A RECORD I N G CH ECK I N G A RECORD I N G M EN U SCREEN 1. If in TIMER STANDBY mode, press T I M ER ON /OFF to exit. T I ME R MOD E SE T UP 2. Press ST OP to switch on the VCR. 3. Press M EN U . 4. Press [ / ] to select TIMER. Press SET to confirm • All the delayed recordings in the VCRs memory will be shown.
741 eng.book Page 16 Tuesday, April 27, 1999 11:35 AM A D V A N CED OPERA T I ON A U D I O A N D Y OU R V CR ( H iFi V CR’S ON LY ) H I - FI ST EREO SOU N D Stereo sound is possible from this VCR if you have a stereo TV connected to the VCR with a scart lead, or audio equipment connected with audio phono leads. The VCR is normally set so that stereo sound is possible. The sound output from the VCR is controlled by the A U D I O OU T button on the remote control.
741 eng.book Page 17 Tuesday, April 27, 1999 11:35 AM A D V A N CED OPERA T I ON A U D I O A N D Y OU R V CR ( H iFi V CR’S ON LY ) CON N ECT I N G T O A U D I O EQU I PM EN T The diagram below shows how to connect your VCR to audio equipment. When connected in this way stereo sound is possible from the speakers.
741 eng.book Page 18 Tuesday, April 27, 1999 11:35 AM A D V A N CED OPERA T I ON PLA Y BA CK OF A V I D EO T A PE CH ECK I N G T H E A M OU N T OF T A PE REM A I N I N G When you load a video tape into the VCR it can calculate approximately the amount of video tape remaining in hours and minutes. This is useful in determining whether or not there is sufficient tape left to make a recording. When a video tape is playing, the amount of tape remaining is calculated for you automatically.
741 eng.book Page 19 Tuesday, April 27, 1999 11:35 AM A D V A N CED OPERA T I ON PLA Y BA CK OF A V I D EO T A PE PLA Y I N G BA CK A N N T SC T A PE NTSC (National Television Standards Committee) is a different TV standard to PAL and is used in some Non-European Countries. Your VCR can playback pre-recorded NTSC tapes onto a PAL system TV, but cannot record an NTSC signal onto a video tape. N ot e t hat .. • • You cannot record NTSC signals or dub NTSC tapes onto other VCRs from this VCR.
741 eng.book Page 20 Tuesday, April 27, 1999 11:35 AM A D V A N CED OPERA T I ON D I GI T A L D I SPLA Y T I M E OF D A Y Shows current time of day, if the clock is set. Press D I SPLA Y until the time of day appears. For example, 21:20 appears: Pr OPERA T I ON M OD E Shows status of tape. Press D I SPLA Y until the display appears, for example: Pr T A PE COU N T ER A N D Z ERO BA CK Tape counter measures the current position of the video tape in real time.
741 eng.book Page 21 Tuesday, April 27, 1999 11:35 AM A D V A N CED OPERA T I ON BLU E M U T E The TV screen will be blue if a TV channel with no signal is selected, an unrecorded section of tape is played or the quality of the recording on the tape is poor. Select OFF to disable this feature. 1. Press M EN U to display the main menu on the screen. 2. Press [ / N I CAM AU T O OF F CO L OUR AU T O P A L ME S E CAM B L U E MU T E AU T O OF F ] to select MODE. 3. Press SET . 4. Press [ 5.
741 eng.book Page 22 Tuesday, April 27, 1999 11:35 AM A D V A N CED OPERA T I ON SEA RCH I N G T H E V I D EO T A PE SK I P SEA RCH I N G T H E V I D EO T A PE You can search the tape in 30 second time intervals. To do this follow the procedure below: 1. Press PLA Y /X 2 ( ) to start the video tape playing. 2. Press SK I P SEA RCH on the remote control. 1 press = 2 presses = 3 presses = 4 presses = The number of times you press SK I P SEA RCH determines the forward search time.
741 eng.book Page 23 Tuesday, April 27, 1999 11:35 AM A D V A N CED OPERA T I ON RECORD I N G FROM OT H ER EQU I PM EN T You can record video and audio signals from various sources, for example a camcorder, onto a video tape using your VCR. For example, recording from a camcorder connected to LINE 2 IN/DECODER on your VCR: Optional Scart connection (not supplied) ANTENNA IN ENTREE RF OUT SORTIE ANTENNE Mono/Stereo Camcorder 1. Load tape into the VCR. 2.
741 eng.book Page 24 Tuesday, April 27, 1999 11:35 AM A D V A N CED OPERA T I ON D ECOD ER SWI T CH I N G OPERA T I ON If you connect a separate decoder to the VCR connected to L2 as previously shown, you will need to set the decoder function to ON in order to record the descrambled signal and/or watch it on your TV. Now, when the VCR receives a scrambled signal it is output via LINE 2 terminal to the decoder.
741 eng.book Page 25 Tuesday, April 27, 1999 11:35 AM SPECI A L FEA T U RES ON Y OU R V CR LOW POWER FEA T U RE To meet new power regulations your VCR can be placed in LOW POWER mode. In LOW POWER mode the VCR power consumption is reduced to below 2 Watt. LOW POWER M OD E 1. Press ST A N D BY ( ) to place the VCR in STANDBY mode. 2. Press ST A N D BY ( ) again to place the VCR in LOW POWER mode. The VCR digital display will appear blank. The VCR power consumption will now be below 2 Watt.
741 eng.book Page 26 Tuesday, April 27, 1999 11:35 AM CU ST OM I SED I N ST A LLA T I ON M A N U A LLY T U N I N G A CH A N N EL It should not be necessary to tune in a broadcast channel manually except in unusual circumstances such as poor signal. To manually tune in a channel follow the procedure below. 1. Press M EN U . 2. Press [ / ] to select SET UP. Press 3. SET to confirm. CH A N N EL PRESET will be highlighted. Press SET . Press [ / ] to select CH A N N EL.
741 eng.
741 eng.book Page 28 Tuesday, April 27, 1999 11:35 AM CU ST OM I SED I N ST A LLA T I ON M A N U A LLY SORT I N G CH A N N ELS SORT I N G T H E CH A N N ELS I N T O Y OU R PREFERRED ORD ER When your VCR tunes in broadcast channels automatically it sorts them into a standard order using teletext information. You can change the order of the channels with the following procedure. 1. Press M EN U . 2. Press [ / 2. ] to select SET UP. Press SET to confirm. 3.
741 eng.book Page 29 Tuesday, April 27, 1999 11:35 AM CU ST OM I SED I N ST A LLA T I ON M A N U A LLY SORT I N G CH A N N ELS D ELET I N G CH A N N ELS If there is a channel you wish to delete from the VCR memory you can follow the procedure below. 1. Press M EN U . 2. Press [ / 2. ] to select SET UP. Press SET to confirm. 3. Press [ / M EN U SCREEN T I ME R MOD E SE T UP ] to select CHANNEL SORT. Press SET to confirm. 4. Press [ / ] to select CANCEL. Press SET to 5. confirm.
741 eng.book Page 30 Tuesday, April 27, 1999 11:35 AM CU ST OM I SED I N ST A LLA T I ON M A N U A LLY SORT I N G CH A N N ELS RE- N A M I N G CH A N N ELS When your VCR tunes in broadcast channels automatically, it names them using teletext information. You can change the name of a channel with the following procedure. 1. Press M EN U . 2: . M EN U SCREEN 2. Press [ / ] to select SET UP. Press SET to confirm. MOD E SE T UP 3. Press [ / ] to select CHANNEL SORT. Press SET to confirm. 5. 4.
741 eng.book Page 31 Tuesday, April 27, 1999 11:35 AM CU ST OM I SED I N ST A LLA T I ON CH A N GI N G T H E ON - SCREEN D I SPLA Y LA N GU A GE Changing the language used by the on-screen display will not change the operation of the VCR or make it suitable for any other broadcast standard. 1. Press M EN U . 2. Press [ / ] to select SET UP. If the display is not in a language you can understand, this is the fourth option from the top. Press SET to confirm.. 3.
741 eng.book Page 32 Tuesday, April 27, 1999 11:35 AM M ORE I N FORM A T I ON A BOU T Y OU R V CR V CR D I GI T A L D I SPLA Y 1 2 3 4 5 AM LR 6 PM STOP OP 7 8 VCR Pr 9 VPS PDC SP LP 12 11 D 10 13 1. T I M ER indicator. 2. A U D I O OU T PU T indicators. 3. RECORD I N G indicator. 4. CH I LD LOCK indicator. 5. A M /PM indicators. 6. STOP indicator. 7. V CR m ode indicator. 8. PRESET CH A N N EL indicator. 9.
741 eng.book Page 33 Tuesday, April 27, 1999 11:35 AM M ORE I N FORM A T I ON A BOU T Y OU R V CR ON - SCREEN D I SPLA Y All the information you need on the VCR status will be summarised on the on-screen display. If you are recording, playing back a tape or watching a broadcast on the video channel you can call up three standard on-screen displays. The display can be selected by pressing the M OD E OSD button on the remote control, 1,2,3 or 4 times. 1. A U T O , the current mode and channel 1.
741 eng.
741 eng.book Page 35 Tuesday, April 27, 1999 11:35 AM T ROU BLESH OOT I N G T ROU BLESH OOT I N G PROBLEM Display is not working. VCR will not operate appears in VCR display. A N SWER • Make sure the VCR is not in LOW POWER mode. • Make sure the power cord is plugged in. • Make sure the wall socket has power (plug another appliance in). • Press the T I M ER ON /OFF button to disengage timer. VCR will not respond to • Check CHILD LOCK is not engaged. any commands.
SHARP CORPORATION SHARP ELECTRONICS (EUROPE) GmbH Sonninstraße 3, 20097 Hamburg, Germany Printed in U.K.