Before using the VIEWCAM, please read this operation manual carefully, especially page i. OPERATION MANUAL WARNING TO PREVENT SHOCK HAZARD, DO NOT EXPOSE THIS APPLIANCE TO RAIN OR MOISTURE. ENGLISH CAUTION To prevent shock, do not open the cabinet. No user serviceable parts inside. Refer servicing to qualified dealer or service centre. l This equipment should be used with DC 7.4 V only or recommended AC adapter.
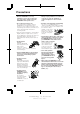
Precautions • When the VIEWCAM is not in use, remember to remove the cassette tape, turn off the power, and disconnect the VIEWCAM from the power source. • Always respect prohibitions or restrictions on the use of electronic equipment on commercial flights or in other sensitive areas. • Do not aim the lens at the sun. Do not allow direct sunlight to strike the VIEWCAM lens or LCD monitor screen, whether or not recording is in progress, as it may damage the CCD sensor or LCD screen surface.
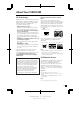
About Your VIEWCAM DV Technology DV and conventional video cassette tapes Digital video, DV, is a revolutionary technology that enables recording and playback of high quality images with the use of special digital features previously unavailable with conventional analog formats. There are two kinds of DV-format video cassette tapes: the Mini DV cassette and the larger DV cassette used for extended playback and recording. This VIEWCAM only operates with Mini DV cassettes. DV cassettes cannot be used.
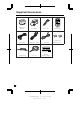
Supplied Accessories Battery pack BT-L241 AC adapter Power cord Infrared remote control Digital cable Audio/video cable S-video cable CR2025 type lithium battery 2 2 Shoulder strap Lens cap 30-minute Mini DV cassette iii VL-SD20S-GB/pp. i-iv; 99/8/18/18:00 G. K .
Optional Accessories Standard type battery pack BT-L241 Extended type battery pack BT-L441 Video capture software VR-PK100S iv VL-SD20S-GB/pp. i-iv; 99/8/18/18:00 G. K .
Operation References Contents Operation References Part Names .................................................................... 3 On-screen Display Index ................................................ 5 Quick Reference Index ................................................... 6 Warning Indicators ......................................................... 7 Preparation Inserting and Removing the Battery Pack .................... 8 Charging the Battery Pack ............................................
Operation References Useful Features Preparation Auto Focus ................................................................... 35 Macro Shots ................................................................. 35 Wide Screen (16:9) ...................................................... 35 Still Recording ............................................................. 36 Multiple Strobe Recording ............................................ 37 Using the Remote Control ........................................
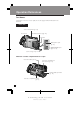
Operation References Operation References Part Names For details on the use of each part, refer to the page number indicated in the brackets. Front view Stereo microphone [p. 66] Zoom lens Shoulder strap loop [p. 12] Speaker MICrophone jack [p. 66] AUDIO/VIDEO jack [pp. 21, 64] Jack cover [p. 21] When the cassette compartment door is open Cassette holder [p. 11] Cassette compartment door release [p. 11] Lithium battery holder [p. 13] Cassette compartment door [p. 11] 3 VL-SD20S-GB/pp.
Operation References Rear view RECord START/STOP button [p. 17] LCD monitor screen Power Zoom Wide angle/ Telephoto control [p. 18] VOLume control [p. 20] CONTROL switch [p. 23] SNAPshot button [pp. 36, 37, 60] PC CONNECTion jack [p. 68] Shoulder strap loop [p. 12] Terminal cover [p. 21] Hand strap [p. 12] S-VIDEO socket [pp. 21, 64] Operation buttons [p. 24] DC IN jack [pp. 9, 10] Power switch (CAMERA/VCR select switch) [p. 23] CHARGE indicator [p. 9] Remote sensor [p.
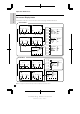
Operation References Operation References On-screen Display Index For details on the use of each function, refer to the page number indicated. Camera Mode p. 31 pp. 29, 30 p. 31 SP SP AUTO AUTO E X - GAMA QK . T END E F F . F ADE REW p. 28 FOCUS p. 33 MAN UAL p. 28 p. 27 ----------- 1 ---------DI S ON E X T E ND 2 OFF DGT L ZOOM NORMAL F ADE MUL T I FRAME 1 PHO TO SNAP SNAP p. 33 p. 50 pp. 51–54 p. 37 p. 36 p. 15 p. 56 p. 55 p. 49 p. 32 pp. 44–46 SP SP AUTO AUTO P I C - SC E NE P I C .
Operation References Quick Reference Index This index lists some example uses of the VIEWCAM’s features. • To record powerful close-up images. —See page 27 (Setting the Digital Zoom) • To instantly zoom in on a subject. —See page 28 (Digital Quick Zoom) • To record a backlit subject. —See page 29 (Gamma Brightness Compensation) or page 54 (Manual Iris) • To record in a dark or poorly-illuminated location. —See page 30 (Gain-up) • To quickly check what you have just recorded.
Operation References Operation References Warning Indicators Displayed for the first 3 seconds Displayed after 3 seconds E J E C T T HE CAS SE T T E . E J E C T THE CAS SE T T E . DEW DEW Description of warning The video cassette is defective and should be removed (see page 11). Dew has formed inside the VIEWCAM. Wait for a few␣ hours until the dew disappears (see page 72). About 10 seconds after this warning appears, the VIEWCAM automatically turns off. The battery is almost depleted.
Preparation Preparation Inserting and Removing the Battery Pack 4 Firmly press the door closed (Q), and slide the release to CLOSE (W). Inserting the Battery Pack Make sure that the Power switch is set to OFF. Preparation 1 Removing the Battery Pack Power switch 2 With the lens facing up, slide the battery compartment door release to OPEN (Q), and open the battery compartment door (W). 1 2 Perform steps 1 and 2 above. Press the battery release as shown (Q), and remove the battery pack (W).
Preparation Charging the Battery Pack Preparation 1 Charging time and maximum continuous camera recording and playback times Insert the battery pack into the VIEWCAM (see page 8). Make sure that the Power switch is set to OFF. Battery pack Charging time • The battery pack is not charged when the Power switch is set to CAMERA or VCR. Max. continuous recording time Max.
Powering the VIEWCAM from an AC Outlet 1 Connect the power cord to the AC adapter, then insert the AC plug into a power outlet. 2 Make sure that the Power switch on the VIEWCAM is set to OFF. 3 Insert the DC plug of the AC adapter into the DC IN jack on the VIEWCAM. Power switch DC IN jack To power outlet 4 Hold down the Lock button and slide the Power switch to CAMERA or VCR. Lock button 10 VL-SD20S-GB/pp. 008-016; 99/8/10/18:00 G. K .
Preparation Inserting and Removing a Mini DV Cassette 1 Wait for the cassette holder to fully retract. Close the compartment door by pressing the centre until it clicks into place. Supply power to the VIEWCAM, then slide the cassette compartment door release and open the cassette compartment door. • The cassette holder extends and opens automatically. Cassette compartment door release Removing a Cassette Perform step 1 above, then take out the cassette.
Adjusting the Grip Strap 1 Open the hand strap flap (Q) and grip strap (W). When recording, remove the lens cap (Q) and attach the lens cap cord to the fastener (W) so the lens cap will not get in the way. Fastener Preparation 2 3 Loosen the grip strap, pass your hand through the loop and put your thumb close to the Power Zoom control. Then pull the grip strap tight until it fits snugly. Seal the velcro closure of the grip strap (Q) and close the hand strap flap (W).
Preparation 5 Installing the Lithium Memory Battery Close the cassette compartment door by pressing the centre until it clicks into place. Preparation The supplied lithium battery is used to store the memory of the date and time settings. 1 Slide the cassette compartment door release and open the cassette compartment door. Cassette compartment door release Removing the Lithium Battery Perform steps 1 and 2 above, then lift out the battery from the battery holder.
Selecting the Language for the On-screen Display This VIEWCAM allows you to choose from among English, German or French for the onscreen display language. Changing the Language In Recording Standby mode, display the menu screen (see page 25). 2 Toggle the CONTROL switch (Q) to select “LANGUAGE” (“SPRACHE” or “LANGUE”), then press the CONTROL switch (W). CONTROL switch Preparation 1 • The language selection screen appears.
Preparation 3 Setting the Area, Date and Time Press the MENU button (C) to display the menu screen. ME NU Preparation Example: Setting the date to 2 June 2000 (2. 6.2000) and the time to 10:30 am (10:30) in Paris. Notes: • Before performing the procedure below, make sure that the lithium battery has been installed (see page 13). • If you are in an area that observes summer time, set the time to the standard time. You can then correct for summer time by performing the procedure on page 56.
8 Press the C or D button to select “2000” (year), then press the SET button. S E T T I NG Press the C or D button to select “10” (hour), then press the SET button. S E T T I NG 10 • The example screens for this feature are for Camera mode. 2. 6. 2000 10 00 Press the C or D button to select “30” (minute), then press the SET button. • The internal clock now starts operating. S E T T I NG 11 Follow the procedure below to display the date, or both the date and time, of recording on the screen.
Basic Operations Camera Recording Easy Camera Recording with Full Auto Mode Before you start recording, perform the operations described on pages 8 through 16 to prepare your VIEWCAM for recording. To Pause Recording Press the REC START/STOP button again. Recording pauses, and the VIEWCAM enters the Recording Standby mode. REC START/STOP button Basic Operations Note: • When recording at the beginning of a tape, advance the tape about 15 seconds before you begin recording.
Zooming Tips on Recording Positions Zooming allows you to move visually closer to or farther from a subject without physically changing your position. The rotating LCD monitor screen lets you enjoy easy video recording in a more relaxed posture without having to hold the VIEWCAM up to your eye. The LCD monitor also makes it easier to record high-angle and low-angle shots.
Basic Operations Camera Recording Remaining Battery Power Display When the VIEWCAM is recording in Camera mode, an on-screen indicator displays the approximate remaining recording time. When using the VIEWCAM with the battery pack as the power source, you can turn on and off the remaining battery power display by pressing the MODE DISPLAY button. If the battery power becomes very low, a warning indicator will appear. Replace the battery pack.
Basic Operations Playback Playback To Stop Playback The LCD monitor screen makes it possible to play back and see what you have just recorded. Nothing needs to be connected, allowing instant on-screen playback with the sound through the built-in speaker. LCD monitor screen ST OP Auto Tape Rewind Power switch Hold down the Lock button and slide the Power switch to VCR. • The PLAY/ REW S T I L L F F Notes: • If you wish to turn the Operation button indicators on or off, press the MODE DISPLAY button.
Basic Operations Playback Watching the Playback on a TV 2 Connect the VIEWCAM to your TV (or VCR) with the supplied audio/video cable, as shown. You can also connect the VIEWCAM to a TV to allow a larger audience to enjoy video playback. Basic Operations Caution: • Make sure that the VIEWCAM, TV, VCR and other equipment to be connected have been turned off before you make connections. Making connections with any of the components left turned on may cause picture noise or a malfunction.
Video Search Still The video search function makes it easy to search for a desired scene on the tape. The still function makes it possible to pause playback. 1 During playback, press the PLAY/STILL button ( ). During playback, press the Forward Search (B) (or Reverse Search [C]) button. • The playback picture fast forwards (or reverses).
Useful Features Operations of the On-screen Displays Using the Controls CONTROL switch The following controls on the VIEWCAM can be used to select and operate the various functions, settings and on-screen displays. The CONTROL switch is used to select the mode screens. Each time you press the CONTROL switch, the mode screen changes from to . CONTROL switch Camera mode SP AUT O Power switch SP AUT O E X - GAMA QK . T E ND E F F .
Operation buttons • Press the SET button (B) when indicated to press the CONTROL switch. The Operation buttons are used to select recording and playback functions on the screens. Press the Operation button corresponding to the indicator of the desired function displayed on the screen. Example MANUAL SE T SHUT . SPEE D NORMAL WH I T E BAL ANC E AUTO IRIS SE T Note: • The Operation button indicators are normally displayed in blue. When a function is selected, its indicator is displayed in yellow.
Operations of the On-screen Displays 4 Using the Menu Screens The menu screens can be used to adjust the various settings of the VIEWCAM. • You can display additional menu items by continually pressing the D or C button or toggling the CONTROL switch in either direction. • The example screens on this page are for Camera mode. 1 Press the D or C button (C or ) or toggle the CONTROL switch to select the desired menu item. Example Hold down the Lock button and slide the Power switch to CAMERA or VCR.
Useful Features Camera Recording Recording in LP (Long Play Recording) Mode This VIEWCAM allows you to record in LP (Long Play Recording) mode for approximately 50% more recording time with the same picture quality as that in SP (Standard Play Recording) mode. 1 In Recording Standby mode, display the menu screen (see page 25). 2 Toggle the CONTROL switch (Q) to select “TAPE SPEED”, then press the CONTROL switch (W) to select “LP”.
Useful Features Camera Recording Selecting the 16-bit Audio Recording Mode Setting the Digital Zoom This VIEWCAM allows you to select between the 12-bit and 16-bit audio recording modes. The VIEWCAM normally records audio in the 12-bit audio recording mode. For higher-quality audio, select the 16-bit audio recording mode. 1 In Recording Standby mode, display the menu screen (see page 25). 2 Toggle the CONTROL switch (Q) to select “AUDIO MODE”, then press the CONTROL switch (W) to select “16BIT”.
Digital Quick Zoom (Extend Zoom) The digital quick zoom function allows you to instantly zoom in on a subject. You can select from among three digital quick zoom ranges, 22, 42 or 102. Using Digital Quick Zoom 1 Press the CONTROL switch until appears (Camera mode). Notes: • The picture quality decreases when the Digital Quick Zoom is used. • The Digital Quick Zoom cannot be used in the digital zoom range or together with the STRETCH or SLIM EFF. picture effects.
Useful Features Camera Recording Gamma Brightness Compensation To obtain a brighter picture Press the GAMA EFF. button ( • The When the subject is backlit, the image will be darkened if it is recorded normally. The gamma brightness compensation function improves the picture by increasing the brightness of the subject while leaving the brighter portions of the image unaffected. 1 Press the GAMA EFF. button ( once. GAMMA GAMA E F F. SP AUT O E X - GAMA QK . T END E ND E F F .
Gain-up (Cat’s Eye) To cancel the gain-up function When you are recording in a dark or poorlyilluminated location, “LIGHT” is displayed on the screen. Use the gain-up function to record a brighter picture. 1 Press the CONTROL switch until appears (Camera mode). Press the GAMA EFF. button until “GAMMA” disappears. Notes: • Gain-up mode will disengage automatically if the VIEWCAM is moved to a bright location. • Some picture noise appears in Gain-up mode.
Useful Features Camera Recording Digital Image Stabilization (DIS) Quick Review The digital image stabilization (DIS) function is factory preset to on to stabilize the image by electronically compensating for relatively small image shakes that are often annoying in closeup shots. The quick review function lets you check the last 5 seconds of tape just recorded without switching to VCR mode, to make sure that the recording has come out right.
Quick Return Edit Search When you have been playing back what you have recorded, and wish to quickly return to recording again from the end of the last recorded scene, use the quick return function. The edit search function lets you search, without switching from Camera mode to VCR mode, for the point on the tape where you wish to start recording next. 1 In Recording Standby mode, press the CONTROL switch until appears.
Useful Features Camera Recording Fade In and Fade Out The fade function allows you to gradually bring the image and sound in or out at the beginning or end of a scene to create a scene transition. This VIEWCAM features one normal and four animated fade modes. Type of Fade Modes VACATION: The picture fades in from an animated car sequence with the title “HAPPY VACATION!”, and fades out to white.
3 Selecting Fade Mode 1 In Recording Standby mode, display the menu screen (see page 25). 2 Toggle the CONTROL switch (Q) to select “FADE”, then press the CONTROL switch (W) to select the desired fade mode. Press the REC START/STOP button to begin recording. • The picture and sound fade in with the selected fade mode.
Useful Features Camera Recording Auto Focus Wide Screen (16:9) The VIEWCAM is preset to Auto Focus mode, which is designed to focus on most types of subjects. In Auto Focus mode, the VIEWCAM automatically focuses on whatever is in the centre of the scene. Always keep the subject in the centre of the screen. The wide screen function lets you record scenes with the wide-screen feel of a movie shown in a theatre.
Using Still Recording Still Recording You can record still images of subjects with normal sound by selecting one of three still recording modes. 1 In Recording Standby mode, press the SNAP button. • A still image of the subject is displayed. SNAP button Type of Still Recording Modes SNAP: A still picture (snapshot) is recorded for 6 seconds. STILL: A continuous still image is recorded.
Useful Features Camera Recording 3 Multiple Strobe Recording The multiple strobe recording function allows you to record a fast-moving subject at intervals of 1/10 of a second using a 9- or 16-frame picture. This is useful when you want to check your form in sports such as tennis or golf. Toggle the CONTROL switch (Q) to select “MULTI FRAME”, then press the CONTROL switch (W) to select “9” (9frame picture) or “16” (16-frame picture).
Using the Remote Control Operating the Remote Control Use the remote control to operate the VIEWCAM from a distance, such as when you want to record yourself in a scene, or when the VIEWCAM is connected to a TV for use as a VCR. Aim the remote control at the remote sensor of the VIEWCAM, and press the control buttons for operation. Installing the Battery 1 2 3 Hold the remote control facing down, and pull out the battery holder while pressing the tab toward the centre.
Useful Features Camera Recording 4 Self Recording The LCD monitor can be rotated 180° vertically so that the monitor screen faces the subject. This lets you record yourself while watching your image on the screen. You can enjoy recording a portrait of yourself, or recording yourself and your friends together at a party, using the remote control. Press the REC START button (B) to begin recording. ME S SAGE RE C START To pause recording, press the REC STOP button (B).
Self-recording Message When the remaining recording time reaches 5␣ seconds, “EXTEND” will begin flashing. In Self Recording mode, you can record a short video message for somebody. This feature is convenient for editing video letters. ME S - E X SAGE T END • Complete steps 1 to 3 of “Normal Self Recording” on page 39, then perform the procedure below.
Useful Features Camera Recording Setting the VIEWCAM to Full Auto Mode 3 This VIEWCAM is equipped with auto exposure, auto focus, auto shutter speed, auto white balance, and auto iris functions. For easy, highquality camera recording, record subjects in Full Auto mode. Press the CONTROL switch until appears. If “SCENE MENU” is not displayed above the B button, press this button until “SCENE MENU” appears.
Useful Features Playback You can operate the functions on this page using the supplied remote control. SLOW button PLAY button F. ADV/STROBE button Strobe Playback The strobe playback function allows you to quickly play back a series of still images. During normal playback, press the F. ADV/ STROBE button ( ). • The VIEWCAM plays back one frame at a time at approximately 1/4 sec. intervals. To return to normal playback, press the PLAY button (D).
Useful Features Playback 3 Programme Search Press the REW (C) (or FF [B]) button. • The tape rewinds (or fast forwards) to the beginning of a scene immediately before (or after) the current tape position; playback then starts automatically. The programme search function automatically finds and plays back the beginning of a number of previously recorded scenes. Up to 10 different scenes can be found on one tape.
Using the Time Code The time code shows the hour, minute and second of recording, and the frame number (1 frame = approx. 1/25 sec.). This is automatically recorded along with the subject. You can display the time code on the screen as an accurate counter in both VCR and Camera modes. • When images are played back in Still or Frame Advance mode (see pages 22 and 42), the frame number is displayed for each frame.
Useful Features Playback 4 Using the Tape Counter Press the CONTROL switch until appears, then begin playback. • You can check the playback time with the tape counter. The tape counter shows elapsed playback or recording time in hours, minutes and seconds. (The counter continues to count internally even while it is not being displayed.) This feature can be set and used in both VCR and Camera modes. VCR mode 1 AUD I O 1 + 2 0 00 02 PLAY/ REW S T I L L F F Press the CONTROL switch until appears.
5 Counter Memory Press the REW button (C). • The tape will automatically stop when the counter reaches “M 0:00:00”. Use the counter memory feature when you want to return to the beginning of a particular scene. The position where the counter was reset (M 0:00:00) is stored in memory to make it easier to return to that point on the tape. REW VCR mode 1 AUD I O 1 + 2 M 0 11 24 PLAY/ REW S T I L L F F During playback, press the CONTROL switch until appears.
Useful Features Playback Beep This VIEWCAM provides confirmation sounds in the following situations. Useful Features Situation Sound Before the cassette holder extends or retracts. Single beep When the Power switch is set from OFF to CAMERA or VCR. Single beep When the Power switch is set from CAMERA or VCR to OFF. Single beep When the REC START/STOP button is pressed to begin recording. Single beep When the REC START/STOP button is pressed to stop recording.
Advanced Features Camera Recording Scene Menu (Programme AE) To cancel the scene setting Select “SCENE MENU” in step 2 above. You can select one of four scene settings to create the best results for a specific type of recording situation. The VIEWCAM will automatically set the exposure, white balance, and shutter speed to produce the optimum picture quality for the selected situation. Type of Scene Settings SPORT: When you want to record a fastmoving subject. SUNLIGHT: When the background is very bright.
Advanced Features Camera Recording Picture Effects 3 These picture effects let you record the subject with a more dramatic effect. To cancel the picture effect Select “PIC. EFF.” in step␣ 2 above. Type of Picture Effects B/W EFF.: The picture is recorded in blackand-white. SEPA EFF.: The picture is recorded in sepia colour similar to that of an old photograph. MOSAIC: The picture is divided up into tiles. SOLARI: The contrast of the subject is enhanced, creating a unique artistic image.
1 Manual Focus In Recording Standby mode, press the CONTROL switch until appears. The Auto Focus may not be able to focus on the subject in the situations shown below. In such situations, set the VIEWCAM to Manual Focus mode and focus manually. SP AUTO FOCUS Subject is too dark. Lack of contrast, e.g. snow scene. 2 Fast-moving subject. MAN UAL Background is too bright. Press the FOCUS button ( ) to set the VIEWCAM to Manual Focus mode (“MAN’L FOCUS”).
Advanced Features Camera Recording 4 Setting the Shutter Speed The shutter speed of the VIEWCAM is preset to the standard speed (1/50 sec.). According to the subject or situation, you may want to select the appropriate shutter speed to create a higher-quality picture. 1 MANUAL SHUT . S P E E D IRIS Shutter speed indicator 10000 4000 2000 1000 500 250 120 NORMAL 30 SP AUTO 2 MAN UAL Press the MANUAL button (A) to display the manual setting screen. SHUT . S P E E D 1/10,000 sec. 1/4,000 sec.
Recommended Shutter Speeds The faster the shutter speed, the darker the picture becomes. Select the most appropriate shutter speed for the ambient light. Situation Recommended shutter speed • Recording sports action in bright daylight. • Recording in bright daylight at a ski resort. 1/10,000 sec. l 1/1,000␣ sec. • Recording outdoor sports on a partially cloudy day. • Recording an outside scene through a car window (when you want to minimize blurs caused by camera shake). 1/1,000 sec. l 1/250␣ sec.
Advanced Features Camera Recording 5 White Balance Lock Press the CONTROL switch to set the white balance. • “LOCK” flashes during the locking procedure. The colour of the subject on the screen tends to look different depending on the lighting condition. The VIEWCAM is preset to Auto White Balance mode, which automatically adjusts the hue of the picture for the current lighting condition. MANUAL SHUT .
3 Manual Iris The VIEWCAM is preset to Auto Iris mode, which automatically chooses the optimal aperture. When there is too much contrast in brightness between the subject and background, however, you may not be able to record a clear image. In this case, use the manual iris function to correct the iris value. Toggle the CONTROL switch (Q) to select “IRIS”, then press the CONTROL switch (W). MANUAL SHUT .
Advanced Features Camera Recording 4 Picture/Backlight Adjustments If the monitor picture is difficult to see due to ambient lighting, etc., adjust the picture settings. This feature can be adjusted in both Camera and VCR modes. • The example screens for this feature are for Camera mode. 1 Press the CONTROL switch until appears. 2 Press the PICTURE button ( ) to display the adjustment screen.
Windbreak Selecting Summer Time The windbreak function allows you to reduce annoying noise from strong winds when recording. Perform the procedure below to advance the clock of the VIEWCAM one hour to summer time. 1 In Recording Standby mode, display the menu screen (see page 25). 1 In Recording Standby mode, display the menu screen (see page 25). 2 Toggle the CONTROL switch (Q) to select “WIND”, then press the CONTROL switch (W) to select “ON”. 2 Toggle the CONTROL switch to select “SUMR TIME”.
Advanced Features Camera Recording 3 World Clock Press the CONTROL switch to select “1 LONDON”. • The VIEWCAM is now set to London time. The world clock function allows you to easily adjust the clock to the local time when you use the VIEWCAM while travelling anywhere around the world. ME NU • Set the area, date and time for your home time zone if they have not already been set (see page␣ 15). ----------- 2 ---------ARE A 1 L ONDON SUMR T I ME OFF D I S P L AY OFF 2. 6.
Area Table Area number Area name Countries or areas* LONDON England, Morocco, GMT (Greenwich mean time) 2 PARIS Austria, France, Germany, Italy, Netherlands, Spain, Sweden, Switzerland, Portugal, CST (Continental Standard Time), Tunisia 3 CAIRO Egypt, Finland, Greece, Turkey 4 MOSCOW Ethiopia, Iraq, Kenya, Mauritius, Saudi Arabia, Seychelles, Russia (Moscow) 5 DUBAI United Arab Emirates 6 KARACHI Maldives, Pakistan 7 DACCA Bangladesh, India, Myanmar 8 BANGKOK Cambodia, Indonesia (Ja
Advanced Features Advanced Features Playback Playback 4 Playback Zoom Press the B (C), A ( ), D (B) or C (A) button to shift the displayed image. The playback zoom function allows you to magnify the playback picture up to 10 times of the original size. 1 PB ZOOM During playback, press the CONTROL switch until appears. AUD I O 1 + 2 SP EX I T To cancel Playback Zoom SP AUD I O 1 + 2 PB AUD I O ZOOM DUB .
Gamma Playback Multiple Strobe Playback The gamma playback function improves the picture by increasing the brightness of the subject while leaving the brighter portions of the image unaffected. The multiple strobe playback function can be used to capture the action of a fast-moving subject at intervals of 1/10 of a second using a 9- or 16-frame picture. This is useful when you want to check your form in sports such as tennis or golf. 1 During playback, press the CONTROL switch until appears.
Advanced Features Playback 4 Still Image Overlap The still image overlap function can be used to create a dissolve effect between images during playback. A still image recorded in Still Recording mode fades out while the next image fades in. The two scenes momentarily overlap during the transition. Press the button to begin playback. • The still image fades out as the following image fades in, replacing it. The two scenes momentarily overlap.
4 Wipe The wipe function can be used to create an interesting presentation of playback images in which a still image is replaced with the next image appearing in the middle of the screen. Press the button to begin playback. • The still image is replaced with the next image appearing in the middle of the screen. Preparation 1 Plan the scene transition, and record still images with the still recording function (see page 36).
Advanced Features Playback Picture Effect Playback 3 These picture effects let you play back images with a more dramatic effect. To cancel Picture Effect Playback Select “PIC. EFF.” in step␣ 2 above. Type of Picture Effects B/W EFF.: The picture is displayed in blackand-white. SEPA EFF.: The picture is displayed in sepia colour similar to that of an old photograph. MOSAIC: The picture is divided up into tiles. SOLARI: The contrast of the subject is enhanced, creating a unique artistic image.
Editing Cutting Unwanted Sequences Video editing lets you refine your videos by removing unwanted sequences from your tape, or transposing one sequence with another. This VIEWCAM lets you monitor the source programme on the built-in LCD monitor without having to connect it to an external TV or video monitor. Connect the VIEWCAM to a VCR with the supplied audio/video cable, as shown.
Advanced Features Playback Editing to Video Equipment with the DV Terminal (IEEE1394) Cutting Unwanted Sequences This VIEWCAM enables you to perform digital video editing, using the VIEWCAM as the playback source. Connect the VIEWCAM to video equipment with a DV terminal using the supplied DV cable. The DV cable is able to transfer all dubbing signals including video, audio and subcode.
Audio Dubbing Feature Audio recording in normal recording mode You can add narrations to recordings made with the VIEWCAM using the built-in microphone or an external microphone, while preserving the original audio and video recordings. 12-bit audio recording The audio is recorded in stereo on two channels. The same stereo audio signals are recorded on both channels.
Advanced Features Playback Audio Dubbing If you wish to change the dubbed audio or dub additional scenes Note: • Audio dubbing cannot be used with recordings made in LP mode. 1 Play back the recorded Mini DV cassette and locate the tape position where you wish to start audio dubbing. 2 Press the PLAY/STILL button ( pause playback. 3 Press the CONTROL switch until appears. ) to SP AUD I O 1 + 2 PB AUD I O ZOOM DUB . 4 SE ARCH Press the AUDIO DUB. button ( ) to display the audio dubbing screen.
Selecting the Audio Playback Mode You can select any of the following audio playback modes. Audio 1~2 • 12-bit recording in stereo (Audio 1 and Audio 2 channels) • 16-bit recording in stereo (left and right channels) Audio 1 • 12-bit recording in stereo (Audio 1 channel only) • 16-bit recording in mono (left channel only) Audio 2 • 12-bit recording in stereo (Audio 2 channel only) • 16-bit recording in mono (right channel only) 1 Play back a Mini DV cassette with dubbed audio.
Appendix Appendix Useful Information Lighting Hints for Better Shooting For clear, good-quality recording, 500 to 100,000 lux is needed. Recording is possible with less light, but the picture quality may suffer. Adequate lighting is also essential for correct white balance. • Position the subject in the centre of the screen. When you are using auto focus, whatever is in the centre of the screen is kept in focus. Brightness (Lux) Situation (Lux) Blue sky 100,000 ○ Position the subject in the centre.
To protect recordings against accidental erasure Mini DV Cassette Slide the protect tab on the rear of the Mini DV cassette to the “SAVE” position. Erasure protect tab Precautions when using a Mini DV cassette • Be sure to use only Mini DV cassettes with the mark. • This VIEWCAM can record and play back using Mini DV cassettes with cassette memory, but it cannot record or play back this memory. • To record in LP mode, use a Mini DV cassette labelled for use with LP mode.
Appendix Storage Battery Pack This VIEWCAM uses a lithium-ion type battery pack. • The lithium-ion type battery pack gradually self-discharges even if stored in a fully charged state. —Charge the battery pack soon (a day) before use. • The lithium-ion type battery pack does not need to be stored in a fully discharged state. • Store the battery pack in a dry, cool place.
AC Adapter • The AC adapter may interfere with reception if used near a radio. • Prevent flammables, liquids, and metal objects from entering the adapter. • The adapter is a sealed unit. Do not attempt to open or modify it. • Do not damage, drop, or subject the adapter to vibration. • Do not leave the adapter in direct sunlight. • Avoid using the adapter in humid or extremely hot places. • How to prevent trouble due to dew formation.
Appendix Dirty Video Heads Cleaning • Many plastic parts are used in the VIEWCAM casing. Do not use thinners, benzenes or other strong chemical cleaners. These may cause discoloration and damage to the casing. If the video heads become clogged, the ␣ indi- • Clean the casing with a soft, dry cloth. If the cator appears on the screen. Contact the nearest casing is particularly dirty, wipe the casing SHARP service centre or your dealer for further with a tightly wrung cloth dampened with a advice.
Demonstration Mode You can watch a brief demonstration of the special VIEWCAM features in Demo mode. If the demonstration appears on the screen when you turn on the VIEWCAM for the first time, cancel the Demo mode to use your VIEWCAM. 4 Press the MENU button (C) to display the menu screen. 5 Toggle the CONTROL switch (Q) to select “DEMO MODE”, then press the CONTROL switch (W) to select “ON”. Note: • The demonstration is only displayed in English. ME NU • The demonstration begins.
Appendix Before Requesting Service Before calling for service, please check the following troubleshooting table. Symptom Possible cause Power No power. Camera mode REC START/STOP button does not work. VCR mode Power source is not properly connected. Connect power source properly (pp.␣ 8, 10). Battery pack is not charged. Charge battery pack sufficiently (p.␣ 9). Dew in VIEWCAM. Wait until dew dries (p. 72). Safety function is in effect.
VCR mode Symptom Possible cause Cannot play back, rewind Position at beginning or end of tape. or fast forward tape. Rewind or fast forward tape to desired point (p. 20). Video noise in image. Dirty video heads. Call for service, or use a commercially-available video head cleaning tape (p. 73). Old or worn tape. Use a new cassette. Power source is not properly connected. Connect power source properly (pp.␣ 8, 10). Battery pack is not charged. Charge battery pack sufficiently (p.␣ 9).
Appendix Specifications VIEWCAM Signal System: Recording System: Cassette: Recording/Playback Time: Tape Speed: Pickup Device: Lens: Lens Filter Diameter: Monitor: Microphone: Colour Temperature Compensation: Minimum Illumination: Video Output Level: Audio Output Level: Speaker Output: External Microphone Input: Power Requirement: Power Consumption: Operating Temperature: Operating Humidity: Storage Temperature: Dimensions (approx.): Weight (approx.