SVENSKA VIDEOKAMERA MED FLYTANDE KRISTALLSKÄRM CAMCORDER COM VISOR DE CRISTAL LÍQUIDO LIQUID CRYSTAL DISPLAY CAMCORDER VL-AX1S PORTUGUÊS ENGLISH ;;; ;; ;; ;;; BRUKSANVISNING MANUAL DE OPERAÇÃO OPERATION MANUAL
This equipment complies with the requirements of Directives 89/336/ EEC and 73/23/EEC as amended by 93/68/EEC. Dieses Gerät entspricht den Anforderungen der EG-Richtlinien 89/336/ EWG und 73/23/EWG mit Änderung 93/68/EWG. Ce matériel répond aux exigences contenues dans les directives 89/336/ CEE et 73/23/CEE modifiées par la directive 93/68/CEE. Dit apparaat voldoet aan de eisen van de richtlijnen 89/336/EEG en 73/ 23/EEG, gewijzigd door 93/68/EEG. Dette udstyr overholder kravene i direktiv nr.
Before using the camcorder, please read this operation manual carefully, especially page ix. OPERATION MANUAL WARNING TO PREVENT SHOCK HAZARD, DO NOT EXPOSE THIS APPLIANCE TO RAIN OR MOISTURE. ENGLISH CAUTION To prevent shock, do not open the cabinet. No user serviceable parts inside. Refer servicing to qualified dealer or service centre. This equipment should be used with the recommended AC adapter/battery charger or battery pack.
Quick Operation Guide Please consult this operation manual further for details on these and other functions of your camcorder. Charging the Battery Pack 1 Attaching the Battery Pack 1 Make sure that the POWER switch is set to OFF. 2 Pull out the viewfinder completely (1), then lift it up (2). Connect the supplied power cord to the AC power socket on the AC adapter/ battery charger, and insert the AC plug into a power outlet. 60˚ • The POWER indicator lights up.
Inserting a Cassette Inserting a Card 1 Attach the power source to the camcorder. 1 Make sure that the POWER switch is set to OFF. 2 Slide the cassette compartment door release (1) and open the cassette compartment door completely (2). 2 Press the LCD monitor PUSH OPEN release and open the LCD monitor. 3 Slide the card slot cover and open it in the direction of the arrow.
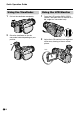
Quick Operation Guide Using the Viewfinder 1 Pull out the viewfinder completely. Using the LCD Monitor 1 Press the LCD monitor PUSH OPEN release, and open the LCD monitor to a 90° angle to a camcorder body. 90˚ 2 Raise the viewfinder to aim the camcorder better depending on your position. 60˚ 2 Adjust the LCD monitor to an angle that allows easy viewing of the on-screen picture.
Power Zoom control/ Media Selection switch Volume control STILL button Zooming Push the Power Zoom control to T (1) (telephoto) or W (2) (wide angle) side. Tape Playback REC START/ STOP button POWER switch Easy Camera Recording on Tape 1 2 Insert a cassette into the camcorder. 3 Hold down the Lock button and set the POWER switch to CAMERA. 1 Set the Media Selection switch to TAPE. 2 Hold down the Lock button and set the POWER switch to VCR.
Quick Operation Guide Card Recording 1 2 3 Card Playback Insert a card into the camcorder. Set the Media Selection switch to CARD. 1 Set the Media Selection switch to CARD. 2 Hold down the Lock button and set the POWER switch to VCR. • The images recorded on the card displays in a thumbnail format. Hold down the Lock button and set the POWER switch to CAMERA. 7 • The picture from the lens now displays.
About Your Camcorder DV Technology Digital video (DV) is a revolutionary technology that enables recording and playback of high quality images with the use of special digital features previously unavailable with conventional analog formats. DV and conventional video cassette tapes There are two kinds of DV-format video cassette tapes: the Mini DV cassette and the larger DV cassette used for extended playback and recording. This camcorder only operates with Mini DV cassettes. DV cassettes cannot be used.
Supplied Accessories Battery pack BT-L221 AC adapter/ battery charger Power cord DC cable ;; ;; ; vii Remote control CR2025 type lithium batteryK2 Audio/video cable Zoom microphone Shoulder strap Lens cap Lens hood 8 MB SD Memory Card PixLab Video Capture Software (Lite Version) PC connecting cable
Optional Accessories Standard-life battery pack BT-L221 Extended-life battery pack BT-L441 Standard-life intelligent battery pack BT-LS222 Extended-life intelligent battery pack BT-LS442A *IR & Flash light VR-3VIF Note: • When using the *IR & Flash light VR-3VIF with this camcorder, it can only be used as a flash.
Precautions • When the camcorder is not in use, remember to remove the cassette tape, turn off the power, and disconnect the camcorder from the power source. • Always respect prohibitions or restrictions on the use of electronic equipment on commercial flights or in other sensitive areas. • Do not aim the lens at the sun.
Dew Formation • What is “dew formation”? When cold water is poured into a glass, dew drops form on the glass. This clinging of water drops is called dew formation. • When dew forms in your camcorder Dew will gradually form on the head drum of your camcorder and make the video tape stick to the head. This causes damage both to the head and the tape. When dew forms, recording and playback may not function properly.
Precautions Dirty Video Heads When the video heads have become clogged with dirt (dust and tape coating particles), Striped noise Mosaic noise Using a Cleaning Tape (Commercially Available) Available mode: TAPE-VCR You can clean the video head with a commercially available cleaning tape. • mosaic-like noise appears on the playback picture. (see above illustration) • playback pictures do not move. • during playback, the whole screen becomes blue.
Operation References Part Names ............................................................... Quick Reference List ................................................. On-screen Display Index .......................................... Warning Indicators .................................................... Preparation Charging the Battery Pack ........................................ 9 Attaching and Removing the Battery Pack ............. 10 Powering the Camcorder from an AC Outlet ...........
Contents Useful Features Quick Return ............................................................ 36 Edit Search ............................................................... 36 Fade In and Fade Out .............................................. 37 Still Recording ......................................................... 38 Self Recording ........................................................ 40 Digital Picture Effects ...............................................
Operation References Digital Still Camera Features Camera Recording Selecting the Picture Quality and Image Size ......... 71 Card Recording ....................................................... 73 Recording with the Self-Timer .................................. 74 Using the Flash Light (Optional Accessory) ............ 75 Formatting a Card ................................................... 76 Preparation Appendix Basic Operations Playback Card Playback .............................................
Operation References Operation References Operation References Part Names For details on the use of each part, refer to the page number indicated in brackets. Front view FADE button [p. 37] RETURN button [p. 36] Accessory shoe [pp. 32, 75] GAMMA/ BRIGHTER button [pp. 34, 35] Stereo microphone FOCUS switch [p. 54] Zoom lens Manual Selection switch [pp. 53–62] Remote sensor [p. 45] CONTROL dial [p. 30] Manual Focus ring [p. 54] MENU button [p. 30] Earphones jack [p. 28] STILL button [pp.
Operation References Left view Power source UNLOCK release [p. 10] Dioptre adjustment dial [p. 19] Viewfinder [p. 19] LCD monitor [p. 20] Viewfinder eyepiece release [p. 98] RECord START/STOP button [p. 23] LCD monitor PUSH OPEN release [p. 20] Shoulder strap loop [p. 18] Power source mounting surface [pp. 10, 11] Operation button [p. 26] DISP. ON/OFF button [p. 44] DIS button [p. 43] MULTI button [p. 77] Advance/reverse buttons [p. 77] Lithium battery compartment door [p.
Operation References Operation References Right view STILL button [pp. 39, 73] Power Zoom Wide angle/ Telephoto control [p. 24]/ VOLume control [p. 26] Jack cover POWER switch (CAMERA/VCR select switch) [p. 22] DV terminal [p. 65] Media Selection switch (TAPE/ CARD selection switch) [p. 22] PC connection jack [p. 69] Speaker Jack cover Hand strap [p. 18] S-VIDEO socket [p. 64] AV jack [p. 64] To open the jack cover Cassette compartment door [p. 12] Cassette compartment door release [p.
Operation References Quick Reference List Below are some examples of camcorder’s features. • To record powerful close-up images. —See page 31 (Setting the Digital Zoom) • To record a backlit subject. —See page 34 (Gamma Brightness Compensation) or page 57 (Manual Exposure) • To quickly return the tape to the end of the last recorded scene after playback. —See page 36 (Quick Return) • To record yourself in the scene while monitoring the shot.
Operation References Operation References On-screen Display Index For details on the use of each function, refer to the page number indicated. TAPE-CAMERA mode p. 43 p. 25 p. 23 p. 53 p. 25 AU T O 3 0 min MA N U A L S E T P I C. E F F E C T R E T U RN MA N U A L S E T P I C. E F F E C T R E T U RN p. 41 C AME R A S E T PHO T O SNA P SNAP E F F . D G T L Z OOM T APE SPE ED 16 : 9 R E T U RN p. 38 p. 38 p. 31 p. 42 p.
Operation References CARD-CAMERA mode p. 73 p. 73 p. 25 CARD 9 / 31 E C ON OMY [ 1152] p. 71 p. 53 C AME R A S E T R E C MO D E I MA GE S I Z E S E L F T I ME R F L A SH R E T U RN p. 71 p. 72 p. 74 p. 75 LCD/ VF SE T BA CK L I GHT L C D B R I GH T L C D C O L O UR V F B R I GH T R E T U RN p. 88 OTHE RS DE F AUL T F ORMA T S OU N D L A NG UA G E R E T U RN p. 92 p. 76 p. 91 p. 15 CLOCK SE T D I SPLAY AREA S UMR T I ME S E T T I NG 12H / 24H R E T UR N p. 48 pp. 16, 89 p. 91 p. 16 p.
Operation References Operation References Warning Indicators If a warning indicator appears on the screen, follow the specified instructions. Displayed for the first 3 seconds Displayed after 3 seconds Description of warning There is no video cassette in the camcorder. Insert a cassette (see page 12). I NSER T A CASS E T TE. E J E C T T HE CAS SE T T E . E J E C T THE CAS SE T T E . The video cassette is defective and should be removed (see page 12). CASSE T T E NOT RE CORDA BL E. P RO T E C T .
Operation References Displayed for 5 seconds Description of warning NO MEMORY CARD The card is not inserted or is inserted improperly. Check that it is properly inserted (see page 13). MEMORY CARD FUL L The capacity of the card is full and cannot store any more images. Delete unnecessary images (see page 79) or replace the card with a new one (see page 13). NO DA T A ON MEMORY C ARD The card has no images recorded in the format the camcorder can recognize.
Preparation Preparation Charging the Battery Pack Preparation Charge the battery pack with the supplied AC adapter/battery charger before use. Note: • Remove the DC cable from the AC adapter/ battery charger when charging the battery pack. 1 Connect the supplied power cord to the AC power socket on the AC adapter/ battery charger, and insert the AC plug into a power outlet. • The POWER indicator lights up.
Attaching and Removing the Battery Pack Attaching 1 1 Make sure that the POWER switch is set to OFF. 2 Press and hold the power source UNLOCK release in the direction of the arrow (1), then slide the battery pack up and take it out (2). Preparation Make sure that the POWER switch is set to OFF. Removing Power source UNLOCK release POWER switch 2 Pull out the viewfinder completely (1), then lift it up (2).
Preparation Preparation Powering the Camcorder from an AC Outlet DC OUT jack POWER indicator You can also power the camcorder from a power outlet by using the supplied AC adapter/ battery charger and DC cable. Caution: • The supplied AC adapter/battery charger is specially designed for use with this camcorder, and should not be used as a power supply for other camcorders. 1 Make sure that the POWER switch is set to OFF. 2 Pull out the viewfinder completely, then lift it up.
Inserting and Removing a Cassette Inserting Attach the power source to the camcorder. 2 Hold the camcorder as shown below, slide the cassette compartment door release (1) and open the cassette compartment door completely (2). Wait for the cassette holder to fully retract. Close the compartment door by pressing the centre until it clicks into place. Preparation 1 5 • After confirmation sound, the cassette holder extends and opens automatically.
Preparation Inserting and Removing a Card Preparation You can use an SD Memory Card (supplied) or a MultiMediaCard (commercially available) for storing still images. Removing Perform steps 1 to 3 above, push the card (1) and pull the card straight out (2) as shown below. Inserting 1 Make sure that the POWER switch is set to OFF. 2 Press the LCD monitor PUSH OPEN release and open the LCD monitor. 3 Slide the card slot cover and open it in the direction of the arrow.
Installing the Lithium Batteries Installing the Battery to Remote Control Another supplied lithium battery is used to power the remote control unit. One of the supplied lithium batteries is used to store the memory of the date and time settings. 1 1 Press the LCD monitor PUSH OPEN release and open the LCD monitor. 2 Open the lithium battery compartment door using a pointed object such as the tip of a ballpoint pen.
Preparation Selecting the Language for the On-screen Display Preparation Available modes: TAPE-CAMERA, CARD-CAMERA This camcorder allows you to choose English, German or French as the on-screen display language. POWER switch MENU button Changing the Language 1 In TAPE-CAMERA or CARD-CAMERA mode, press the MENU button until the menu screen appears. 2 Turn the CONTROL dial to select I, then press the dial. 3 Turn the CONTROL dial to select “LANGUAGE” (“SPRACHE” or “LANGUE”), then press the dial.
Setting the Area, Date and Time 4 Then press the dial. CLOCK SE T D I SPLAY A RE A S UMR T I ME S E T T I NG 12H / 24H R E T UR N Available modes: TAPE-CAMERA, CARD-CAMERA 1 L ON DON MENU button POWER switch 5 Preparation Example: Setting the date to June 2, 2003 (2. 6. 2003) and the time to 10:30 am (10:30) in Paris. Turn the CONTROL dial until “2 PARIS” appears, then press the dial.
Preparation 10 Turn the CONTROL dial to select “10 ” (hour), then press the dial. Preparation SE T T I NG 11 2. 6 . 2 0 0 3 10 : 00 Using the Lens Cap Attach the strap of the lens cap to the hand strap as shown below. Turn the CONTROL dial to select “30” (minute), then press the dial. • The internal clock now starts operating. SE T T I NG 12 2. 6 . 2 0 0 3 10 : 30 Press the MENU button to turn off the menu screen.
Adjusting the Hand Strap 1 Loosen the grip strap, pass your right hand through the loop, and put your thumb on the REC START/STOP button and your forefinger on the Power Zoom control. Then, pull the grip strap tight until it fits snugly. 1 Hold the end of the strap and thread it through the loop on the left side of the power source mounting surface. 2 Loosen the strap in the buckle, and feed the end of the strap through the buckle, as shown. 3 Draw the strap in the direction of the arrow to secure.
Preparation Using the Viewfinder You can record the subject using the electronic LCD colour viewfinder. You can also watch video playback through the viewfinder. Closing the viewfinder Lower the viewfinder (1), and push it in completely (2). Preparation Viewfinder POWER switch 1 Pull out the viewfinder completely. • You can raise the viewfinder up to 60˚ to better aim the camcorder depending on your position. 60˚ Hold down the Lock button and set the POWER switch to CAMERA or VCR.
Using the LCD Monitor • You can also fold the LCD monitor into the camcorder with the screen facing out for watching playback on the monitor. You can use the LCD monitor to play back recordings that you have made or to watch the subject during recording. POWER switch Preparation 3 LCD monitor 1 Press the LCD monitor PUSH OPEN release, and open the LCD monitor to a 90˚ angle to the camcorder body. Hold down the Lock button and set the POWER switch to CAMERA or VCR.
Preparation Tips on Recording Positions Preparation To create images that are easy to watch during playback, try to record with a stable posture and steady hand to prevent a shaky image. Holding the camcorder Put your right hand through the hand strap, and place your left hand under the camcorder for support. Basic posture Place the viewfinder eyecup firmly against your eye. Shooting from a high angle Turn the LCD monitor so that the screen faces downward. Place your elbows against your sides.
Basic Operations Camera Recording Selecting the Camcorder Mode Media Selection switch This camcorder includes functions for use as both a video camera for recording and playing back images on a tape and as a digital still camera for recording and playing back still images on a card. One of the following camcorder modes needs to be set before starting any operation. POWER switch Camcorder modes TAPE-VCR mode For recording motion and still images on a tape.
Basic Operations Camera Recording Easy Camera Recording on Tape in Full Auto Mode Available mode: TAPE-CAMERA To pause recording Press the REC START/STOP button again. Recording pauses, and the camcorder enters Recording Standby mode. • Before you start recording, perform the operations described on pages 9 through 21 to prepare your camcorder for recording.
Zooming Auto Focus Available modes: TAPE-CAMERA, CARD-CAMERA Available modes: TAPE-CAMERA, CARD-CAMERA Zooming allows you to move visually closer to or farther from a subject without physically changing your position. When using the optical zoom, you can enlarge the subject up to 23K in TAPE-CAMERA mode, and up to 22K in CARD-CAMERA mode. The camcorder is preset to Auto Focus mode, which is designed to focus on most types of subjects.
Basic Operations Camera Recording Remaining Recording Time Display Remaining Battery Power Display Available modes: All modes When the camcorder is recording in TAPECAMERA mode, an on-screen indicator displays the approximate remaining tape time in minutes. You can turn on and off the indicator by pressing the DISP. ON/OFF button. When using the camcorder with the battery pack as the power source, you can turn on and off the remaining battery power indicator by pressing the DISP. ON/OFF button.
Basic Operations Playback Tape Playback To stop playback Press d. Available mode: TAPE-VCR The LCD monitor screen functions as a handy playback monitor. Nothing needs to be connected, allowing instant on-screen playback with the sound through the built-in speaker. Media Selection switch To turn the power off Set the POWER switch to OFF without pressing the Lock button. Basic Operations Note: • The tape is automatically rewound when playback reaches the end of the tape.
Basic Operations Playback Video Search Still Available mode: TAPE-VCR Available mode: TAPE-VCR The video search function makes it easy to search for a desired scene on the tape. The still function allows you to pause playback in TAPE-VCR mode. Searching for a Scene Near the Current Tape Position During playback in TAPE-VCR mode, press y on the Operation button. Basic Operations 1 During playback in TAPE-VCR mode, press r (or e) on the Operation button.
Using Earphones (Commercially available) Available modes: TAPE-VCR, TAPE-CAMERA You can monitor the sound via stereo earphones (commercially available) during playback or recording. Connect the plug of stereo earphones to the earphones jack on the camcorder as shown below. Watching Playback on a TV Available modes: TAPE-VCR, CARD-VCR You can connect the camcorder to a TV to allow a larger audience to enjoy playback. 1 Open the jack cover on the camcorder (see page 3).
Basic Operations Playback 2 Connect the camcorder to your TV (or VCR) with the supplied audio/video cable as shown. Notes: • If your TV or VCR has a 21-pin Euro-SCART connector, use the RCA/21-pin Euro-SCART conversion connector (QSOCZ0033TAZZ).
Useful Features Using the Menu Screens 4 Use the menu screens to adjust the various camcorder settings. Turn the CONTROL dial to select the desired menu screen (Y), then press the dial. Example C AME R A S E T PHO T O SNA P SNA P SNAP E F F . D G T L Z OOM T APE SPE ED 16 : 9 R E T U RN Example: Changing the DGTL ZOOM menu setting in TAPE-CAMERA mode. Media Selection switch 5 Turn the CONTROL dial to select the desired menu item (DGTL ZOOM), then press the dial.
Useful Features Useful features Camera Recording Camera Recording Setting the Digital Zoom Available mode: TAPE-CAMERA You can select three different zoom ranges: 1– 23K (optical zoom), 23–100K (digital zoom) or 23–690K (digital zoom). The digital zoom allows you to record powerful close-up pictures with the same operation as normal zooming. Useful Features Notes: • The digital zoom is in addition to the optical zoom giving a combined maximum zoom range of 1–690K.
Using the Zoom Microphone Select a Zoom Microphone mode when the zoom microphone is mounted. Available mode: TAPE-CAMERA With the zoom microphone, you can record audio according to the magnification of the zoom lens for producing the optimum sound. You can also set the zoom microphone to record only sounds at a distance. Mounting 1 Align the zoom microphone with the accessory shoe on the camcorder, and slide it in the direction of the arrow until it locks into place.
Useful features Camera Recording Windbreak Dialog Recording Available mode: TAPE-CAMERA Available mode: TAPE-CAMERA The windbreak function allows you to reduce annoying noise from strong winds when recording. When you want to record from a distance at a lecture, workshop, or other such occasion, the speaker’s voice may blend in with ambient sounds. You can use the Dialog Recording function to pick up the speaker’s voice more distinctly.
Gamma Brightness Compensation To obtain a brighter picture Press the GAMMA/BRIGHTER button again. • The x indicator appears. Available modes: TAPE-CAMERA, CARD-CAMERA GAMMA GAMMA/BRIGHTER button AU A UTO 3 0 min Note: • When the x indicator is displayed, the background will become slightly brighter. To cancel Gamma Brightness Compensation Press the GAMMA/BRIGHTER button until “GAMMA” disappears. Useful Features When the subject is backlit, the image will appear dark if it is recorded normally.
Useful features Camera Recording Gain-up To obtain a brighter picture Press the GAMMA/BRIGHTER button again. • The e indicator appears. Available modes: TAPE-CAMERA, CARD-CAMERA GAMMA GAMMA/BRIGHTER button AU T O 3 0 min To cancel the gain-up function Press the GAMMA/BRIGHTER button until “GAMMA” disappears. Useful Features When you are recording in a dark or poorly illuminated location, “LIGHT” is displayed on the screen. Use the gain-up function to record a brighter picture.
Quick Return Edit Search Available mode: TAPE-CAMERA Available mode: TAPE-CAMERA If while playing back your tape you want to quickly return to the last recorded scene and start recording again, use the quick return function. The edit search function lets you search, without switching from TAPE-CAMERA mode to TAPE-VCR mode, for the point on the tape where you wish to start recording next. Operation button RETURN button Set the camcorder to TAPE-CAMERA mode. 1 Set the camcorder to TAPE-CAMERA mode.
Useful features Camera Recording 2 Fade In and Fade Out Press the REC START/STOP button to begin recording. • The picture turns white, and the image and sound fade in. Available mode: TAPE-CAMERA The fade function allows you to gradually bring the image and sound in or out at the beginning or end of a scene for creating scene transitions. This is especially effective in creating a dramatic change in scenery.
Still Recording Still Recording Mode Available mode: TAPE-CAMERA SNAP: A still picture is recorded for 6 seconds. STILL: A continuous still image is recorded. Selecting In TAPE-CAMERA mode, press the MENU button until the menu screen appears. 2 Turn the CONTROL dial to select Y, then press the dial. Turn the CONTROL dial to select “PHOTO SNAP”, then press the dial. C AME R A S E T PHO T O SNA P SNA P ST I LL SNAP E F F .
Useful Features Camera Recording Using Still Recording STILL button To pause recording Press the REC START/STOP button. To cancel the still image In SNAP mode, press the STILL button fully while the camcorder is in Recording Standby mode. In STILL mode, press the STILL button fully. Useful Features REC START/STOP button 1 Set the camcorder to TAPE-CAMERA mode. 2 Select the still recording mode and effect. 3 In Recording Standby mode, press the STILL button fully.
Self Recording 3 Set the POWER switch to CAMERA. • The subject is displayed in the viewfinder, and a mirror image of the subject is displayed on the LCD monitor. Available modes: TAPE-CAMERA, CARD-CAMERA Open the LCD monitor and rotate it 180° vertically so that the screen faces the other way and the subject can monitor the shot while you are recording with the viewfinder. If the camcorder is steadied, you can record yourself in the scene by watching yourself on the LCD monitor.
Useful Features Camera Recording Digital Picture Effects 4 Available mode: TAPE-CAMERA • The selected digital picture effect is displayed on the menu screen. These digital picture effects let you record the subject with a more dramatic effect. Useful Features B/W: To record in black-and-white. SEPIA: To record in sepia colour similar to that of an old photograph. SOLARI: To record with enhanced contrast, creating a unique artistic image.
Recording in LP (Long Play Recording) Mode Available mode: TAPE-CAMERA This camcorder allows you to record in LP (Long Play Recording) mode for approximately 50% more recording time with the same picture quality as that in SP (Standard Play Recording) mode. 1 In TAPE-CAMERA mode, press the MENU button until the menu screen appears. 2 Turn the CONTROL dial to select Y, then press the dial. 3 Turn the CONTROL dial to select “TAPE SPEED”, then press the dial.
Useful Features Camera Recording Selecting the 16-bit Audio Recording Mode Digital Image Stabilization (DIS) Available mode: TAPE-CAMERA Available mode: TAPE-CAMERA This camcorder allows you to select between 12-bit and 16-bit audio recording modes. The camcorder normally records audio in the 12-bit audio recording mode. For higher-quality audio recording, select the 16-bit audio recording mode.
Wide Screen (16:9) Available mode: TAPE-CAMERA The wide screen function lets you record scenes with the wide-screen feel of a movie shown in a theatre. The top and bottom of the picture are masked with black bands to produce an effective screen aspect ratio of 16:9. Normal screen Turning on/off the Onscreen Indicators Available modes: All modes You can turn the on-screen indicators on and off as you like. Wide screen AU T O In TAPE-CAMERA mode, press the MENU button until the menu screen appears.
Useful Features Useful Features Playback Playback Using the Remote Control Use the supplied remote control to operate the camcorder from a distance, such as when you want to record yourself in a scene, or when the camcorder is connected to a TV for use as a VCR. Operating Aim the remote control at the remote sensor of the camcorder, and press the control buttons to operate.
Tape Playback Functions with the Remote Control Frame Advance The frame advance function allows you to play back still images frame by frame. 1 Available mode: TAPE-VCR You can use the following playback functions with the supplied remote control. (See page 45 for use of the remote control.) SLOW button PAUSE/STILL button Advance/reverse buttons 2 During playback in TAPE-VCR mode, press the PAUSE/STILL button (g) to pause playback. Press the h (or j) button.
Useful Features Playback Playback Zoom To cancel Playback Zoom Press the ZOOM W button, which zooms out to the widest angle. Available modes: TAPE-VCR, CARD-VCR The playback zoom function allows you to magnify the playback picture up to 10 times its original size and shift the magnified picture by using the remote control. (See page 45 for use of the remote control.) ZOOM buttons Useful Features Shift buttons • The example screens shown are for TAPEVCR mode.
Displaying the Date and Time of Recording Available modes: All modes Follow the procedure below to display the date, or both the date and time, of recording on the screen. You can display the date and time during both recording and playback by pressing the DISP. ON/OFF button. Notes: • Before recording, make sure that the date and time have been correctly set. If they have not been set, the display will be left blank when playing back the recording.
Useful Features Playback Gamma Playback To cancel Gamma Playback Press the GAMMA/BRIGHTER button until “GAMMA1” and “GAMMA2” disappear. Available mode: TAPE-VCR Note: • Gamma Playback has no effect during still playback. GAMMA/BRIGHTER button Useful Features The gamma playback function improves the playback picture in TAPE-VCR mode by increasing the brightness of the subject while leaving the brighter portions of the image unaffected.
Multiple Strobe Playback 5 Available mode: TAPE-VCR Turn the CONTROL dial to select “9 FRAMES” (9-frame picture) or “16 FRAMES” (16-frame picture), then press the dial. MULTI F RAME 1 6 FRAME S 6 Press the MENU button to turn off the menu screen, then begin playback. 7 Press the STILL button fully at the point where you want to begin the multiple strobe playback. • A multi-frame picture of the image is displayed.
Useful Features Playback Copying an Image from Tape to Card Available mode: TAPE-VCR 5 Press the STILL button fully to copy the image to the card. • The S indicator flashes red while the image is copied. CARD You can capture your favourite image frame from a video tape recording and save it on card. 1 Insert the recorded Mini DV cassette and a card in the camcorder. 2 Set the camcorder to TAPE-VCR mode, then begin tape playback. 3 Select the frame number of the image (see page 50).
Picture Effect Playback 4 Available modes: TAPE-VCR, CARD-VCR Turn the CONTROL dial to select the desired picture effect, then press the dial. P I C. E F F E C T B W These picture effects let you play back images with a more dramatic effect. B/W: The picture is displayed in black-andwhite. SEPIA: The picture is displayed in sepia colour similar to that of an old photograph. SOLARI: The contrast of the subject is enhanced, creating a unique artistic image.
Advanced Advanced FeaturesFeatures Camera Recording Camera Recording Setting the Camcorder to Full Auto Mode When the Manual Selection switch is set to MANUAL, MANUAL screen appears. MA NU A L Available modes: TAPE-CAMERA, CARD-CAMERA WH I T E B A L . E X POSUR E B R I GH T E R SHU T. SP E E D S C E N E ME NU AU TO AU TO AU TO AU TO OFF • In this mode, you can adjust white balance, exposure, gain, shutter speed and scene menu manually. (See page 56 to 62.
Manual Focus Available modes: TAPE-CAMERA, CARD-CAMERA 1 Set the camcorder to TAPE-CAMERA or CARD-CAMERA mode. 2 In Recording Standby mode, set the FOCUS switch to MANUAL. • “MF” appears. Auto Focus may not be able to focus on the subject in the situations shown below. In such situations, set the camcorder to Manual Focus mode and focus manually. MF Subject is too dark. Fast-moving subject. Lack of contrast, e.g. snow scene.
Advanced Features Camera Recording To temporarily use Auto Focus To cancel Manual Focus mode You can use this feature to shift away from a subject you have focused on manually to another subject, and it will automatically stay in focus to give you a smooth image. Set the FOCUS switch to AUTO. Push and hold the FOCUS switch to PUSH AUTO. • Auto Focus works while the switch is held to PUSH AUTO. AU T O 3 0 min Advanced Features Release the FOCUS switch to return to Manual Focus mode.
4 Adjusting White Balance • The camera recording screen appears. Available modes: TAPE-CAMERA, CARD-CAMERA Locking the White Balance The colour of the subject on the screen looks different depending on lighting conditions. Select a White Balance setting that matches the lighting conditions. 1 2 • “LOCK” flashes during the locking procedure. In TAPE-CAMERA or CARD-CAMERA mode, set the Manual Selection switch to MANUAL to display the MANUAL screen. Turn the CONTROL dial to select “WHITE BAL.
Advanced Features Camera Recording 3 Manual Exposure Available modes: TAPE-CAMERA, CARD-CAMERA Turn the CONTROL dial to select “MANUAL”, then press the dial to display the exposure setting screen. E X PO S U R E The camcorder is preset to Auto Exposure mode, which automatically selects the optimal aperture. However, when there is too much contrast in brightness between the subject and background, you may not be able to record a clear image.
3 Manual Gain Available modes: TAPE-CAMERA, CARD-CAMERA Turn the CONTROL dial to select “MANUAL”, then press the dial to display the BRIGHTER adjustment screen. BR I G H T E R When recording in a dark or poorly illuminated location with Auto Gain mode, the light sensitivity of the camcorder (gain) will be automatically adjusted and the recorded image may be brighter than the subject actually is. If you want to faithfully record a dark scene in this case, use the manual gain function.
Advanced Features Camera Recording Setting the Shutter Speed 4 • In TAPE-CAMERA mode, you can select 17 speeds from 1/25 sec. (“25”) (slowest shutter speed) to 1/10,000 sec. (“10000”) (fastest shutter speed). • In CARD-CAMERA mode, you can select 9 speeds from 1/25 sec. (“25”) to 1/500 sec. (“500”). Available modes: TAPE-CAMERA, CARD-CAMERA The shutter speed is preset to auto mode, which automatically selects the optimal shutter speed for the ambient light.
Recommended Shutter Speeds The faster the shutter speed, the darker the picture becomes. Select the most appropriate shutter speed for the ambient light. Situation Recommended shutter speed • Recording sports action in bright daylight. • Recording in bright daylight at a ski resort. 1/10,000 sec. l 1/1,000 sec. • Recording outdoor sports on a partially cloudy day. • Recording an outside scene through a car window (when you want to minimize blur caused by the camera shaking). 1/1,000 sec. l 1/250 sec.
Advanced Features Camera Recording Scene Menu (Program AE) 1 Available modes: TAPE-CAMERA, CARD-CAMERA MA NU A L WH I T E B A L . E X POSUR E B R I GH T E R SHU T. SP E E D S C E N E ME NU You can set the camcorder to the shooting mode that will create the best results for a specific situation. Just select one of the scene settings shown below. Advanced Features SHUT.SPEED: You can manually adjust the shutter speed.
Adjusting the SHUT.SPEED scene setting Adjusting the EXPOSURE scene setting 1 1 After performing step 2 on the previous page, turn the CONTROL dial to select “SHUT.SPEED”, then press the dial. S C E N E ME NU S C E N E ME NU OFF SHU T. SP E E D E X POSUR E S P OR T S UN L I GH T P AR T Y DU S K OFF SHU T. SP E E D E X POSUR E S P OR T S UN L I GH T P AR T Y DU S K 2 After performing step 2 on the previous page, turn the CONTROL dial to select “EXPOSURE”, then press the dial.
Advanced Advanced FeaturesFeatures Playback Playback Using the Time Code 5 • The time code appears. Available modes: TAPE-VCR, TAPE-CAMERA TC 0 : 0 5 : 3 5 The time code shows the hour, minute and second of recording, and the frame number (1 frame = approx. 1/25 sec.). This is automatically recorded along with the subject when you are recording on the tape. You can display the time code on the screen as an accurate counter in both TAPE-VCR and TAPE-CAMERA modes.
Editing Cutting Unwanted Sequences Available mode: TAPE-VCR Video editing lets you refine your videos by removing unwanted sequences from your tape, or transposing one sequence with another. This camcorder lets you monitor the source program on the built-in LCD monitor without having to connect it to an external TV or video monitor. Connect the camcorder to a VCR with the supplied audio/video cable, as shown.
Advanced Features Playback Editing with the DV Terminal (IEEE1394) Available mode: TAPE-VCR This camcorder enables you to perform digital video editing. Connect the camcorder to video equipment with a DV terminal using a commercially available DV cable. A DV cable is able to transfer all dubbing signals including video and audio. To Record from Video Equipment 1 Set the camcorder to TAPE-VCR mode, and insert a Mini DV cassette. 2 Begin playback on the video equipment connected to the camcorder.
Audio Dubbing Feature Available mode: TAPE-VCR You can add narration to recordings made with this camcorder, while preserving the original audio and video recordings. Microphone for Audio Dubbing You can use the built-in stereo microphone to record narration. Audio Recording In normal recording mode 12-bit audio recording The audio is recorded in stereo on Audio 1.
Advanced Features Playback Audio Dubbing To pause audio dubbing 1 Play back the recorded Mini DV cassette and locate the tape position where you wish to start audio dubbing. Press the CONTROL dial. To resume audio dubbing, press the CONTROL dial again. 2 3 Press y to pause playback. Press the MENU button until the menu screen appears. 4 Turn the CONTROL dial to select V, then press the dial. 5 Turn the CONTROL dial to select “AUDIO DUB”, then press the dial. • The audio dubbing screen appears.
Selecting the Audio Playback Mode Available mode: TAPE-VCR 3 Turn the CONTROL dial to select V, then press the dial. 4 Turn the CONTROL dial to select “AUDIO”, then press the dial. P L AY BACK SE T P I C. E F F E C T MULTI F RAME A U D I O DU B AUD I O 1+2 R E T U RN 1 2 You can select any of the following audio playback modes.
Advanced Features Playback Configuring Software for PC Connection This camcorder can transfer still playback images in TAPE-VCR mode or still images in TAPE-CAMERA and CARD modes to a personal computer by using the supplied Video Capture Software. Connecting the camcorder to a Personal Computer 1 2 Turn off the camcorder and PC. Connect the camcorder as shown below. • Before connecting the camcorder to the PC, make sure that the PC power is off to insure that images are transferred properly.
Using the Software 6 For tips on how to use the Video Capture Software, refer to the operation manual located on the CD-ROM in PDF format. Follow the steps below to open the PDF file containing the manual. Follow the instructions as they appear on the PC monitor until the installation is complete. 7 Restart the PC. Note: • For the latest product information, be sure to read the “Readme” text file located in the “Readme” folder of the Video Capture Software CD-ROM.
Digital Still Features Camera Features Digital Still Camera Camera Recording Camera Recording 1 In CARD-CAMERA mode, press the MENU button until the menu screen appears. Available mode: CARD-CAMERA 2 Turn the CONTROL dial to select Y, then press the dial. The picture quality of still images recorded on the card depends on the picture quality and image size setting. Select the appropriate setting to match your recording objectives. 3 Turn the CONTROL dial to select “REC MODE”, then press the dial.
Selecting the image size Still images recorded on a card are made up of pixels. You can select the number of pixels in still images. Larger numbers of pixels provide greater image detail, but also use more card memory. 1152G864 (1152): Images are recorded in 1152K864 pixels. 640G480 (640): Images are recorded in 640K480 pixels. 1 In CARD-CAMERA mode, press the MENU button until the menu screen appears. 2 Turn the CONTROL dial to select Y, then press the dial.
Digital Still Camera Features Camera Recording 5 Card Recording Adjust the Power Zoom control to frame the subject as you desire. • The zoom range is 1–22K in this mode. Available mode: CARD-CAMERA 6 You can take a still picture in the same way as you do with a standard camera and record that image on the card. Press the STILL button half-way down to focus on the subject. • The camcorder automatically focuses on the subject.
Recording with the SelfTimer Available mode: CARD-CAMERA 4 Press the STILL button fully to set the timer. • The self-timer operating indicator flashes while the timer counts down. Self-timer operating indicator The self-timer function allows you to record images after a time-lag of 10 seconds. This is convenient when you want to record an image of you and your friends together. 1 In CARD-CAMERA mode, press the MENU button until the menu screen appears.
Digital Still Camera Features Camera Recording Using the Flash Light (Optional Accessory) Available mode: CARD-CAMERA Using the flash function of the optional IR & Flash Light VR-3VIF enables you to record good-quality still images even in dark locations. Mounting 1 Align the IR & Flash Light with the accessory shoe on the camcorder, and slide it in the direction of the arrow until it locks into place.
Formatting a Card 4 • To cancel formatting, turn the CONTROL dial to select “NO”, then press the dial. Available mode: CARD-CAMERA OTHE RS DE F AUL T F ORMA T S OU N D L A N GU A G E R E T U RN Before using a commercially available card with this camcorder, you must first have it formatted. Also, if any of the following warning indicators displays, you will need to format your card.
Digital Still Features Camera Features Digital Still Camera Playback Playback Card Playback Note: • Holding down q or w increases the speed of motion of the selection frame. Available mode: CARD-VCR 4 Press the MULTI button. • The selected image is displayed in fullscreen. You can play back and view still images recorded on a card on the LCD monitor.
5 Delete Protection Press the CONTROL dial to set delete protection. • The R indicator appears. Available mode: CARD-VCR Delete protection indicator You can prevent your important images recorded on the card from accidental erasure. 1 2 3 1 In CARD-VCR mode, press the MENU button until the menu screen appears. 4 5 6 2 Turn the CONTROL dial to select S, then press the dial. 3 Turn the CONTROL dial to select “PROTECT”, then press the dial.
Digital Still Camera Features Playback Deleting Stored Images 6 • To cancel deletion, turn the CONTROL dial to select “NO”, then press the dial. Available mode: CARD-VCR 7 Deleting One Stored Image You can delete unwanted images to free up card memory for new one. Note: • Deleted images cannot be restored. Check whether or not you want the images before performing the procedure below. Turn the CONTROL dial to select “YES”, then press the dial to delete the image.
Deleting All Stored Images 4 You can delete all stored images on a card in one operation. P L AY BACK SE T P I C. E F F E C T S L I D E S HOW SL I DE EF F. R E T URN DE L E T E O N E I MAG E P RO T E C T A L L I MAG E S P R I . O RD E R R E T U RN Notes: • Deleted images cannot be restored. Check whether or not you want the images before performing the procedure below. • If you want to keep some images on the card, first delete-protect them (see page 78), and then perform the procedure below.
Digital Still Camera Features Playback 5 Slide Show Playback • Beginning from the image selected in step 2, the recorded images will display in full-screen one after another in order of recording. Available mode: CARD-VCR You can automatically play back consecutive still images recorded on a card at intervals of 5 seconds. This is useful when confirming the data recorded on a card. 1 2 P L AY BACK SE T P I C. E F F E C T S L I D E S HOW E X E CU T E SL I DE EF F. DE L E T E P RO T E C T P R I .
Slide Show Effects Available mode: CARD-VCR Use slide show effects to create an interesting transition between still images during slide show playback. Using 1 In CARD-VCR mode, press the MENU button until the menu screen appears. 2 Turn the CONTROL dial to select S, then press the dial. 3 Turn the CONTROL dial to select “SLIDE EFF.”, then press the dial. OVERLAP: A still image fades out as the next still image fades in, replacing the previous image. The two scenes momentarily dissolve.
Digital Still Camera Features Playback 5 Copying an Image from Card to Tape Press the REC START/STOP button. • The camcorder enters Recording Standby mode. Available mode: CARD-VCR Use the procedure below to select still images recorded on a card and insert them in a tape. 1 Insert the recorded card and a Mini DV cassette into the camcorder. 2 Set the camcorder to TAPE-VCR mode, then locate where you want to insert an image on the tape. 3 4 Set the camcorder to CARD-VCR mode.
5 Print Order Press q or w to select the image to which you want to assign a print order. Available mode: CARD-VCR 1 2 3 The print order function allows you to add print information called DPOF to still images recorded on a card. 4 5 6 PR I NT N O RMA L 100-0003 PAGE 1 / 2 About DPOF DPOF (Digital Printing Order Format) defines the print information for the specific images and number of each image on memory cards.
Digital Still Camera Features Playback To cancel the print order for an image 1 2 Select the image for cancelling out of print order in step 5 above, then press the CONTROL dial. Turn the CONTROL dial to select “0”, then press the dial. Assigning Print Order to All Images 1 Perform steps 1 to 3 in “Assigning Print Order to an Image”. 2 Turn the CONTROL dial to select “PRI.ALL”, then press the dial. • The M indicator disappears.
Using the Shortcut Menu Assigning Print Order to an Image Available menu: Delete Protection, Deleting Stored Images, Print Order Using the Shortcut menu, you can set the same functions of Delete Protection, Deleting Stored Images and Print Order easily. RE T U RN DE L E T E PR O T E C T PR I . O RD E R 1 In CARD-VCR mode, display the image to which you want to assign a print order. 2 Press the CONTROL dial to display the Shortcut menu screen. • To cancel, select “RETURN” and press the CONTROL dial.
Digital Still Camera Features Playback Transferring Data on Card to Computer Using a PC Card Adapter (Commercially Available) Using a commercially available PC card adapter for each card type, you can transfer still images directly from a card to a computer. Image Folders and File Names Still images recorded using the camcorder are stored on a card as shown below.
Appendix Picture/Backlight Adjustments Available modes: All modes If the picture is difficult to see due to ambient light or other factors, adjust the monitor picture settings. Adjusting the Backlight 1 Press the MENU button until the menu screen appears. 2 Turn the CONTROL dial to select O, then press the dial. 3 Turn the CONTROL dial to select “BACKLIGHT”, then press the dial. • The example screens shown are for TAPECAMERA mode.
Appendix 3 World Clock Turn the CONTROL dial to select “AREA”, then press the dial. Available modes: TAPE-CAMERA, CARD-CAMERA CLOCK SE T D I SPLAY A RE A S UMR T I ME S E T T I NG 12H / 24H R E T UR N The world clock function allows you to easily adjust the clock to the local time when you use the camcorder while travelling anywhere around the world. • Set the area, date and time for your local time zone if not already set (see page 16). Example: Changing the clock from Paris time to London time.
Area Table Countries or areas* Area number Area name 1 LONDON 2 PARIS Austria, France, Germany, Italy, Netherlands, Spain, Sweden, Switzerland, Portugal, CST (Continental Standard Time), Tunisia 3 CAIRO Egypt, Finland, Greece, Turkey 4 MOSCOW 5 DUBAI 6 KARACHI 7 DACCA 8 BANGKOK Cambodia, Indonesia (Jakarta), Thailand, Vietnam 9 HNGKNG Australia (Perth), China, Hong Kong, Indonesia (Borneo, Bali), Malaysia, Philippines, Singapore, Taiwan 10 TOKYO Japan, Korea 11 SYDNEY Australia
Appendix Selecting Summer Time Available modes: TAPE-CAMERA, CARD-CAMERA Perform the procedure below to advance the clock of the camcorder one hour to Summer time. 1 In TAPE-CAMERA or CARD-CAMERA mode, press the MENU button until the menu screen appears. 2 Turn the CONTROL dial to select P, then press the dial. 3 Turn the CONTROL dial to select “SUMR TIME”, then press the dial.
Setting the Camcorder to Factory Presettings Available modes: All modes You can set the camcorder to the factory presettings in one operation. 1 Press the MENU button until the menu screen appears. 2 Turn the CONTROL dial to select I, then press the dial. 3 Turn the CONTROL dial to select “DEFAULT”, then press the dial. OTHE RS DE F AUL T S OUND T I ME CO D E T C OU T D E MO MOD E L A N GU A G E R E T U RN E X E CU T E DE F A UL T R E T U RN T O F A C T OR Y P R E S E T T I NGS .
Appendix Useful Information Hints for Better Shooting • Position the subject in the centre of the scene. When using auto focus, whatever is in the centre of the scene is kept in focus. Lighting For clear, good-quality recording, 500 to 100,000 lux is needed. Recording is possible with less light, but the picture quality may suffer. Adequate lighting is also essential for correct white balance. Brightness (Lux) Situation (Lux) Blue sky • Avoid backlit subjects.
Mini DV Cassette To protect recordings against accidental erasure Slide the protect tab on the rear of the Mini DV cassette to the “SAVE” position. Erasure protect tab Precautions when using a Mini DV cassette To record over a previously recorded tape, slide the protect tab to the “REC” position.
Appendix MultiMediaCard Improper handling of the MultiMediaCard may cause damage to the card or images on the card. Follow the instructions below for correct use. Label • Do not peel off the label or paste any paper, tape, or other material over it. Contacts • This is the part of the card that makes contact with other equipment. Do not touch with your fingers, scratch, smudge or damage in any way. Precautions on handling MultiMediaCards • Be sure to insert the card in the correct direction.
SD Memory Card Precautions on handling SD Memory Cards • After removing the card from the camcorder, be sure to immediately store it in the card case. • Do not disassemble or modify the card. • Do not strike, bend, drop, or allow the card to become wet. • Do not touch the metal terminals with your hands or metallic objects. • Do not peel off the label from the card. • Do not attach other labels or stickers to the card.
Appendix Use Storage • To conserve battery power, be sure to turn off the camcorder power when not in use. • Battery consumption may vary depending on the condition of use. Recording with many starts and stops, frequent zooming, and recording in low temperatures will shorten actual recording times. • Use of a weak battery pack may cause loss of power while operating the camcorder. Use a fully charged battery pack to protect both the battery pack and the unit.
Cleaning Using Your Camcorder Abroad • Many plastic parts are used in the camcorder casing. Do not use thinner, benzene or other strong chemical cleaners. These may cause discolouration and damage to the casing. • Clean the casing with a soft, dry cloth. If the casing is particularly dirty, wipe the casing with a tightly wrung cloth dampened with a diluted, neutral detergent. Then wipe it again with a soft, dry cloth. • Use a soft cloth to wipe finger marks and other smudges off the LCD screen.
Appendix Demonstration Mode Available mode: TAPE-CAMERA You can watch a brief demonstration of the special camcorder features in Demo mode. If the demonstration appears on the screen when you turn on the camcorder for the first time, cancel the Demo mode to use your camcorder. Cancelling Demo Mode 1 During the demonstration, press the MENU button to pause the demonstration. 2 Turn the CONTROL dial to select I, then press the dial. 3 Turn the CONTROL dial to select “DEMO MODE”, then press the dial.
Before Requesting Service Before calling for service, please check the following troubleshooting table. Symptom Power No power. REC START/STOP button does not work. Possible cause Suggested solution Power source is not properly connected. Connect power source properly (pp. 10, 11). Battery pack is not charged. Charge battery pack sufficiently (p. 9). Dew in camcorder. Wait until dew dries (p. x). Safety function is in effect. Set POWER switch to OFF and remove battery pack.
Appendix CARD mode VCR mode Symptom Possible cause Position at beginning or end of tape. Rewind or fast forward tape to desired point (p. 26). Video noise in image. Dirty video heads. Call for service or use a commercially available cleaning tape (p. xi). Old or worn tape. Use a new cassette. Image is delete-protected. Cancel the protection setting (p. 78). Cannot delete image on card. Cannot format card. Cassette will not eject. No image on monitor. —— Contact your dealer for advise.
Specifications Camcorder Signal System: Recording System: Cassette: Recording/Playback Time: Tape Speed: Pickup Device: Lens: Lens Filter Diameter: Viewfinder: Monitor: Microphone: Colour Temperature Compensation: Minimum Illumination: Still Image Compression System: Still Image Recording Format: Still Image Recording Medium: Power Requirement: Power Consumption: Operating Temperature: Operating Humidity: Storage Temperature: Dimensions (approx.): Weight (approx.
Note
Note
SHARP CORPORATION ;;; ;; ;; ;;; Tryckt i Japan Impresso no Japão Printed in Japan TINSL0307TAZZ 01P12-JKG