
User Manual

Preparation
16
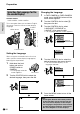
4 Then press the dial.
5 Turn the CONTROL dial until “2 PARIS”
appears, then press the dial.
Note:
• See “Time Zone Chart” and “Area Table” on
pages 89 and 90 for the area number and
name of the representative city for your time
zone.
6 Turn the CONTROL dial to select
“SETTING”, then press the dial.
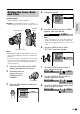
7 Turn the CONTROL dial to select “2”
(day), then press the dial.
8 Turn the CONTROL dial to select “6”
(month), then press the dial.
9 Turn the CONTROL dial to select “2003”
(year), then press the dial.
Setting the Area, Date
and Time
Available modes:
TAPE-CAMERA, CARD-CAMERA
Example: Setting the date to June 2, 2003 (2. 6.
2003) and the time to 10:30 am (10:30) in Paris.
Notes:
• Before performing the steps below, make sure
that the lithium battery has been installed (see
page 14).
• If you are in an area that observes summer time,
set the time to the standard time. You can then
correct it for summer time by performing the
steps on page 91.
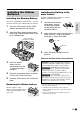
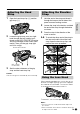
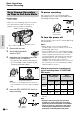
1 Press the LCD monitor PUSH OPEN
release and open the LCD monitor.
2 Hold down the Lock
button and set the
POWER switch to
CAMERA.
3 Press the MENU button to display the
menu screen.
2
AREA PARIS
CLOCK SET
DISPLAY
SUMR
AREA
TIME
12H 24H/
RETURN
SETTING
120
000:
02.
1.
000
:
1 2002.2.
SETT ING
000
:
6
2002.2.
SETT ING
0 00
:
SETT ING
6 2003.2.
CLOCK SET
DISPLAY
SUMR
SETTING
TIME
12H 24H/
RETURN
AREA LONDON
1
CLOCK SET
DISPLAY
SUMR
SETTING
TIME
12H 24H/
RETURN
AREA LONDON
1
CONTROL dial
MENU button
POWER
switch
Lock button