FRANÇAIS ENGLISH LIQUID CRYSTAL TELEVISION TÉLÉVISEUR ACL TELEVISOR CON PANTALLA DE CRISTAL LÍQUIDO TELEVISOR DE CRISTAL LÍQUIDO OPERATION MANUAL MODE D’EMPLOI MANUAL DE OPERACIÓN MANUAL DE OPERAÇÃO Products that have earned the ENERGY STAR® are designed to protect the environment through superior energy efficiency.
ENGLISH FRANÇAIS LC-20B6U LIQUID CRYSTAL TELEVISION ESPAÑOL ENGLISH OPERATION MANUAL IMPORTANT: To aid reporting in case of loss or theft, please record the TV’s model and serial numbers in the space provided. The numbers are located at the rear of the TV. Model No.: Serial No.: U.S.A. ONLY IMPORTANT INFORMATION WARNING: TO REDUCE THE RISK OF FIRE OR ELECTRIC SHOCK, DO NOT EXPOSE THIS PRODUCT TO RAIN OR MOISTURE.
IMPORTANT INFORMATION (Continued) CAUTION: TO PREVENT ELECTRIC SHOCK, MATCH WIDE BLADE OF PLUG TO WIDE SLOT, FULLY INSERT. CAUTION: DO NOT PLACE THIS PRODUCT ON AN UNSTABLE CART, STAND, TRIPOD, BRACKET, OR TABLE. THE PRODUCT MAY FALL CAUSING SERIOUS PERSONAL INJURY AND SERIOUS DAMAGE TO THE PRODUCT. USE ONLY WITH A CART, STAND, TRIPOD, BRACKET, OR TABLE RECOMMENDED BY THE MANUFACTURER OR SOLD WITH THE PRODUCT.
DEAR SHARP CUSTOMER Thank you for your purchase of the Sharp Liquid Crystal Television. To ensure safety and many years of trouble-free operation of your product, please read the Important Safety Precautions carefully before using this product. IMPORTANT SAFETY PRECAUTIONS Electricity is used to perform many useful functions, but it can also cause personal injuries and property damage if improperly handled. This product has been engineered and manufactured with the highest priority on safety.
IMPORTANT SAFETY PRECAUTIONS (Continued) ■ Cleaning—Unplug the power cord from the AC outlet before cleaning the product. Use a damp cloth to clean the product. Do not use liquid cleaners or aerosol cleaners. ■ Water and moisture—Do not use the product near water, such as bathtub, washbasin, kitchen sink and laundry tub, swimming pool and in a wet basement. ■ Stand—Do not place the product on an unstable cart, stand, tripod or table.
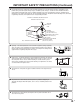
IMPORTANT SAFETY PRECAUTIONS (Continued) ■ If an outside antenna is connected to the television equipment, be sure the antenna system is grounded so as to provide some protection against voltage surges and built-up static charges.
Contents IMPORTANT INFORMATION ............................................ 1 SLEEP TIMER ............................................................ 37 Trademark ......................................................................... 2 WAKE-UP TIMER ....................................................... 38 DEAR SHARP CUSTOMER .............................................. 3 NO SIGNAL OFF ....................................................... 38 IMPORTANT SAFETY PRECAUTIONS ......................
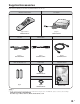
Supplied Accessories Make sure the following accessories are provided with the LCD TV set.
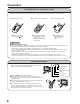
Preparation Installing Batteries in the Remote Control Before using the LCD TV set for the first time, install the two “AAA” size batteries supplied in the remote control. When the batteries become depleted and the remote control fails to operate, replace the batteries with new “AAA” size batteries. 1 Open the battery cover. 2 Insert two “AAA” size batteries. 3 Close the battery cover. – + + – ■ Slide the cover while pressing the ( ) part.
Preparation (Continued) Antenna Connection ANTENNAS • The antenna requirements for good color television reception are more important than those for black & white television reception. For this reason, a good quality outdoor antenna is strongly recommended. The following is a brief explanation of the type of connections that are provided with the various antenna systems. F-type connector 1.
Preparation (Continued) Antenna Connection (Continued) CABLE TV (CATV) CONNECTION • A 75-ohm coaxial cable connector is built into the set for easy hookup. When connecting the 75-ohm coaxial cable to the set, screw the 75-ohm cable to the ANT. terminal. • Some cable TV companies offer “premium pay channels”. Since the signals of these premium pay channels are scrambled, a cable TV converter/descrambler is generally provided to the subscriber by the cable TV company.
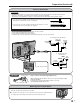
Part Names of Main Unit How to adjust the angle Controls Upper control panel MAIN POWER MENU VOL (Volume) (–)/(+) INPUT CH (Channel) ( )/( ) Tilt the display by grabbing onto the carrying handle while securely holding down the stand with your other hand. To change the vertical angle of the LCD TV set, tilt the screen up to 5 degrees forward or 10 degrees backward. The LCD TV set can also be rotated up to 25 degrees to right and left.
Part Names of Main Unit (Continued) Terminals Rear View Carrying handle ANALOG RGB PC-IN COMPONENT2/AV1 AUDIO AV-IN2/OUT VIDEO AUDIO (L) AUDIO (R) COMPONENT1 Y PB PR AUDIO (L) AUDIO (R) PR PB Y/VIDEO AUDIO (L) AUDIO (R) S-VIDEO ANT. (Antenna terminal) POWER INPUT (DC 12V) How to Fix the Cables • Pull the cables connected to each terminal through the holes and close the left and right terminal covers. Push the cables into the grooves of the support cover.
Part Names of Remote Control POWER (p. 17) Switches the Liquid Crystal Television power on or off. DISPLAY Displays the receiving channel and the current time for 10 seconds. PIC. FLIP (p. 39) Sets the orientation of the picture. AV MODE (p. 21) Selects preferred AV MODE. BACKLIGHT (p. 22) Adjusts the brightness of the screen. SLEEP (p. 37) Sets the sleep timer. ' / " / \ / | (Cursor control) (p. 19) Selects a desired item on the screen. ENTER Executes a command. MENU (p.
EZ SETUP (With AUTO CLOCK Setting) EZ SETUP during the First Power On 4 ■ When you turn on the TV for the first time, it will automatically memorize the broadcasting channels and clock. Please perform the following instructions before you press MAIN POWER. (1) Insert the batteries into the remote control. (See page 8.) (2) Connect the antenna cable to the LCD TV set. (See page 9.) (3) Connect the AC adapter to the POWER INPUT terminal of the LCD TV set and plug in the AC cord to the wall outlet.
Setting the CLOCK AUTO CLOCK Setting There are two methods of setting the clock: AUTO CLOCK and MANUAL CLOCK. AUTO CLOCK uses EDS signals, which are provided by some TV stations, to automatically adjust the clock. MANUAL CLOCK sets the clock manually in areas where no channel carries EDS signals. ● If you do not know the channel that carries EDS signals in your area, select “EDS CH” to “AUTO” and press ENTER.
Setting the CLOCK (Continued) MANUAL CLOCK Setting If there are no channels with EDS signals, set the clock manually using MANUAL CLOCK. Daylight Saving Time (DST) Adjustment The Daylight Saving-Time changes as shown below, set the DST to “ON” to forward the clock by 1 hour. To rewind the clock by 1 hour, set the DST to “OFF”. (Spring) On the first Sunday in April DST starts. 1:00AM 2:00AM Advances 1 hour. 3:00AM 4:00AM (Autumn) On the last Sunday in October DST finishes.
Basic Operation Turning On and Off the Main Power Switching the Input Modes (AV1/AV2/ COMPONENT/PC/TV) MAIN POWER POWER/WAKE UP TIMER indicator ● Press MAIN POWER. The POWER/WAKE UP TIMER indicator instantly changes from red to green and the LCD TV set is turned on. On-screen display 1 Turn on the power of the connected video equipment. 2 Press INPUT to select the applicable input source. The screen changes in order of COMPONENT1, COMPONENT2 or AV1, AV2, PC and TV mode each time INPUT is pressed.
Basic Operation (Continued) Sound Volume Changing Channels ■ To adjust the volume You can select channels using Channel Select or CH ( )/( ). ● Press VOL (+) to increase the sound volume. The bar indicator shifts right. VOLUME 50 ● Press VOL (–) to decrease the sound volume. The bar indicator shifts left. VOLUME 10 ■ To mute the sound • This LCD TV set allows you to select up to 125 channels (1 to 125). To select a channel, enter a 2- or 3-digit number.
Basic Operation (Continued) Selecting Menu Items The menus can be used to adjust the various settings of your LCD TV set. Select the desired menu item by following the steps below. See the next page for each Menu screen. A • The items displayed differ depending on the setting conditions. • The item selected is displayed in yellow. • Settings most recently adjusted will be saved in memory.
Basic Operation (Continued) ■ Menu setting screens 0 For details on setting each menu item, refer to the page number indicated below. A • The illustrations and on-screen displays in this manual are for explanation purposes and may vary slightly from the actual appearance. • Depending on the setting condition, such as an input mode, it may not be possible to adjust or set some items. In such cases, a message will be displayed on the menu setting screen.
Basic Adjustment Settings Directly setting the AV MODE AV MODE AV MODE gives you preset options to choose from, to best match the image based on room-brightness and playback software used. 1 Press MENU to display the Menu Screen. 2 Press \/| to select “PICTURE”. 3 Press '/" to select “AV MODE”, and press ENTER.
Basic Adjustment Settings (Continued) BACKLIGHT OPC Automatically adjusts the brightness of the screen. You can adjust the brightness of the picture. 1 Press MENU to display the Menu Screen. 1 Press MENU to display the Menu Screen. 2 Press \/| to select “PICTURE”. 2 Press \/| to select “PICTURE”. 3 Press '/" to select “OPC”, and press ENTER. 3 Press '/" to select “BACKLIGHT”.
Basic Adjustment Settings (Continued) PICTURE Adjustments COLOR TEMPERATURE You can adjust the picture to your preference with the following picture settings. You can adjust the color temperature to give a better white balance. 1 Press MENU to display the Menu screen. 1 Press MENU to display the Menu screen. 2 Press \/| to select “PICTURE”. 2 Press \/| to select “PICTURE”. 3 Press '/" to select a specific adjustment item. 3 Press '/" to select “ADVANCED”, and press ENTER.
Basic Adjustment Settings (Continued) I/P SETTING Adjusting the image and input signal can give you a more beautiful picture. A • “NOISE CLEAN” cannot be set when 1080I or 720P signal or no signal is received from the COMPONENT terminals. • “NOISE CLEAN” cannot be adjusted when the PC mode is selected as an input mode. • ”NOISE CLEAN” cannot be adjusted when “I/P SETTING” is set to “INTERLACE”. FILM MODE 1 Press MENU to display the Menu screen. 2 Press \/| to select “PICTURE”.
Useful Features AUDIO Adjustments WIDE SOUND You can adjust the sound quality to your preference with the following settings. This feature can increase the spread of the sound. 1 Repeat steps 1 and 2 of AUDIO Adjustments. 2 Press '/" to select “WIDE SOUND” and press ENTER. MENU[ AUDIO… W I D E S O U N D ] PICTURE AUDIO SETUP OPTION TREBLE [ 0 ]– BASS [ 0 ]– BALANCE[ 0 ]L WIDE SOUND SPEECH EMPHASIS PC SOUND SELECT RESET 1 Press MENU to display the Menu screen. 2 Press \/| to select “AUDIO”.
Useful Features (Continued) PC SOUND SELECT (for PC mode) You can switch the sound mode while the LCD TV set is connected to the PC. Make sure the PC mode is selected before making this setting. CH-SETTING ■ EZ SETUP When you move to an area with different broadcasting signals, you may have to set the channel numbers and the time with the EZ SETUP function. To activate EZ SETUP, perform the following procedures. 1 Press '/" to select “CH-SETTING” in the SETUP screen and press ENTER.
Useful Features (Continued) ■ Adding weak or additional channels or erasing unwanted channels from TV memory CH-SETTING (Continued) ■ Saving broadcast TV channels in the memory 1 Press MENU to display the Menu screen. 2 Press \/| to select “SETUP”. 3 Press '/" to select “CH-SETTING”, and press ENTER. M E N U [ SETUP… C H – S E T T I N G ] PICTURE AUDIO SETUP OPTION CH–SETTING MTS CLOCK COMP.
Useful Features (Continued) SETUP COMP.2/AV1 SELECT You can select the input mode according to the external device connected to the COMPONENT2/AV1 terminal. 1 Press MENU to display the Menu screen. 2 Press \/| to select “SETUP”. 3 Press '/" to select desired item, and press ENTER. M E N U [ SETUP] PICTURE AUDIO SETUP CH– MTS CLO COM AV2 V–C CLO COL PC LAN OPTION SETTING CK P.2 IN HIP SED OR SET GUA /AV /OU BL CA SYS TIN GE Press '/" to change the setting, and press ENTER. 5 Press MENU to exit.
Useful Features (Continued) V-CHIP Settings ■ V-CHIP • This function allows TV programs to be restricted and TV usage to be controlled based on FCC data. It prevents children from watching violent or sexual scenes that may be harmful. • Restriction of TV programs includes two ratings that contain information about the program: the MPAA (Motion Picture Association of America) rating and the TV Parental Guidelines. The MPAA rating is restricted by age. TV Parental Guidelines are restricted by age and content.
Useful Features (Continued) V-CHIP Settings (Continued) ■ Setting V-CHIP (TV GUIDELINES) ● Setting TV GUIDELINES ■ Setting V-CHIP (MPAA rating) 1 Press MENU to display the Menu screen. 2 Press \/| to select “SETUP”. 3 Press '/" to select “V-CHIP BLOCK”, and press ENTER. MENU[ SETUP… V – C H I P PICTURE AUDIO SETUP OPTION CH–SETTI MTS CLOCK COMP.2/A AV2 IN/O V–CHIP B CLOSED C COLOR SY PC SETTI LANGUAGE 4 1 Repeat steps 1 to 4 of Setting V-CHIP (MPAA rating).
Useful Features (Continued) ● Setting BLOCK CONTENT ■ Activating V-CHIP BLOCK ● Setting STATUS You can activate V-CHIP BLOCK after setting MPAA rating or TV GUIDELINES. 1 Repeat steps 1 to 4 of Setting V-CHIP (MPAA rating). (See page 30.) 2 Press '/" to select “TV GUIDELINES”, and press ENTER. MENU[ SETUP… V – C H I P TV GUIDELINES M T C C S 3 P V A A T AA G N. N. AT U E F U BLOCK] Repeat steps 1 to 4 of Setting V-CHIP (MPAA rating). (See page 30.
Useful Features (Continued) ■ Canceling the V-CHIP BLOCK screen while V-CHIP BLOCK is activated ■ Changing or clearing the SECRET NUMBER If you forget the secret number, clear the secret number as follows. Upper control panel of the main unit VOL 1 CH ( VOL (+) “V-CHIP HAS BEEN ACTIVATED” appears if you watch a program with the same Program Rating data you configured. V–CHIP HAS BEEN 2 Press MENU to display “INPUT SECRET NO.”. MENU[ SETUP… V – C H I P BLOCK] SETTING V–CHIP BLOCK. INPUT SECRET NO.
Useful Features (Continued) Canadian Rating Systems • The TV rating systems in Canada are based on the Canadian Radio-Television and Telecommunications Commission (CRTC) policy on violence in television programming. • While violence is the most important content element to be rated, the structure developed takes into consideration other program content like language, nudity, sexuality and mature themes.
Useful Features (Continued) ■ Setting V-CHIP (Canadian English ratings) ■ Setting V-CHIP (Canadian French ratings) 1 Press MENU to display the Menu screen. 1 Repeat steps 1 to 4 of Setting V-CHIP (Canadian English ratings). 2 Press \/| to select “SETUP”. 2 Press '/" to select “CAN. FRENCH RATINGS”, and press ENTER. 3 Press '/" to select “V-CHIP BLOCK”, and press ENTER. • Secret number setting menu is displayed only when “SECRET NO.” is set. (See page 30.
Useful Features (Continued) ■ Setting the CLOSED CAPTION on the Menu screen CLOSED CAPTION ■ Setting CLOSED CAPTION • This LCD TV set is equipped with an internal Closed Caption decoder. “Closed Caption” is a system which allows conversations, narration, and sound effects in TV programs and home videos to be viewed as captions on the TV screen (see the illustration). • Not all programs and videos will offer closed captioning. Please look for the “ ” symbol to ensure that captions will be shown.
Useful Features (Continued) VIEW MODE AUDIO ONLY You can select the picture display size for the playback image of the DVD player from the following four modes: “4:3”, “16:9”, “ZOOM” and “STRETCH”. When listening to music from a music program, you can set the Liquid Crystal display off and enjoy audio only. NOTE • VIEW MODE settings are not available when HDTV signals are input. All HDTV programs will be displayed in letter box format (bars at top and bottom of screen).
Useful Features (Continued) Directly setting the SLEEP TIMER SLEEP TIMER You can set the SLEEP TIMER to automatically turn off the TV. MAIN POWER 1 Press SLEEP to display the SLEEP TIMER screen. SLEEP 2 Setting the SLEEP TIMER on the Menu screen 1 Press MENU to display the Menu screen. 2 Press \/| to select “OPTION”. 3 Press '/" to select “SLEEP TIMER”, and press ENTER.
Useful Features (Continued) WAKE-UP TIMER NO SIGNAL OFF You can set the WAKE UP TIMER to automatically turn on the TV. Press MENU to display the Menu screen. 2 Press \/| to select “OPTION”. 3 Press '/" to select “WAKE-UP TIMER”, and press ENTER. 4 T T C V I I H O M M A L ER E NNEL UME MO O T UP GN ER M RE DE NLY IMER TIM AL O ATIO ANAG FLI 2 Press '/" to select “NO SIGNAL OFF”, and press ENTER.
Useful Features (Continued) Directly setting the PICTURE FLIP PICTURE FLIP You can set the orientation of the picture. Setting the PICTURE FLIP on the MENU screen 1 Press MENU to display the Menu screen. 2 Press \/| to select “OPTION”. 3 Press '/" to select “PICTURE FLIP”, and press ENTER. MENU[ OPTION… P I C T U R E PICTURE AUDIO SETUP OPTION VIEW AUDIO SLEEP WAKE– NO SI ED CA NO OP POWER PICTU 4 Press PIC.FLIP to display the PICTURE FLIP screen. 2 Press PIC.FLIP to change the setting.
Connecting a PC Viewing an Image from a PC Use the PC-IN terminals to connect a PC. A • The PC input terminals are DDC1/2B-compatible. • Refer to page 42 for a list of PC signals compatible with the System. • Make sure to select the same signal values for the output signal of a PC and the input signal of the LCD-TV before connecting with the PC. (See pages 41 and 42.) • Depending on the PC being used, images may not be shown without converting the output signals into external output.
Connecting a PC (Continued) INPUT SIGNAL (for PC mode) FINE SYNC. Adjustments (for PC mode) Select the computer input signal before displaying the PC image on the LCD TV screen. You can adjust the PC image using the FINE SYNC. menu. A • Make sure to select the input signal to “1024 × 768” or “640 × 480”, before connecting a PC. 1 Press MENU to display the Menu screen. 2 Press \/| to select “SETUP”. 3 Press '/" to select “PC SETTING”, and press ENTER. SETTING] OPTION ETTING K .
Connecting a PC (Continued) POWER MANAGEMENT (for PC mode) When this function is set to “ON”, the power will automatically shut down. PC Compatibility Chart PC/MAC Resolution 640 × 400 31.5 60 37.9 85 720 × 400 31.5 60 37.9 85 31.5 60 37.9 72 37.5 75 43.3 85 31.5 60 35.1 56 37.9 60 48.1 72 46.9 75 53.7 85 48.4 60 56.5 70 60.0 75 68.7 85 1,280 × 720 45.0 60 1,280 × 768 48.1 60 SXGA 1,280 × 1,024 64.0 60 MAC 13" VGA 640 × 480 34.
Connecting External Devices You can enjoy picture and sound by connecting a VCR or a home video game system to the terminals located on the rear of the main unit. When connecting an external device, turn off the MAIN POWER of the main unit first to prevent any possible damage. Example of External Devices that can be Connected To PC-IN terminal • PC To AV-IN2/OUT terminal • VCR • Laser disc player To COMPONENT1 terminal • DVD Player, etc.
Connecting External Devices (Continued) Connecting a VCR, DVD Player or a Camcorder to COMPONENT1/COMPONENT2/AV1/AV-IN2/PC-IN RGB cable (supplied) ø 3.5 mm stereo minijack cable (commercially available) PC Video Audio (L) Audio (R) VCR Y PB PR Audio (L) DVD Player Audio (R) PR PB Video Y Audio (L) Audio (L) Audio (R) Audio (R) S-Video DVD Player • When connecting this type of external device, select “COMPONENT2” on the COMP.2/AV1 SELECT of SETUP menu. (See page 28.
Connecting External Devices (Continued) Outputting Video and Audio (Video Output) You can output video and audio signals from the TV set through the AV output terminals (AV-OUT). • When using AV-IN2/OUT as an output terminal, select “SETUP” in the Menu and set “AV2 IN/OUT” to “OUT”. (See page 28.) • The factory setting for “AV2 IN/OUT” is “IN”. Connect to a VCR, audio amplifier, etc. A • The AV-IN2/OUT terminal has 2 output modes (see page 28).
Troubleshooting ■ Before calling for repair services, make the following checks for possible remedies to the encountered symptoms. LCD TV set Problem Sound There is no picture or sound. There is no picture. There is no picture from AV1 or AVIN2. • Make sure the BRIGHTNESS is properly adjusted. • Fluorescent lamp may have reached the end of service life. • Make sure the S-VIDEO terminal has nothing connected. • Make sure the AUDIO ONLY is not set to ON.
Troubleshooting (Continued) ■ Before calling for repair services, make the following checks for possible remedies to the encountered symptoms. Antenna Problem The picture is not sharp. Check item • • • • The reception may be weak. The quality of the broadcast may also be bad. Make sure the antenna is facing the right direction. Make sure the outside antenna is connected. The picture moves. The picture is doubled or tripled. • Make sure the antenna is facing the right direction.
Specifications Items LCD panel Number of dots Video color systems TV Standard (CCIR) TV Tuning System TV function STEREO CATV Y/C FILTER Brightness Lamp life (Fluorescent lamp) Viewing angles Audio amplifier Speakers COMPONENT1 COMPONENT2/AV1 Terminals AV-IN2 PC-IN Antenna Headphone OSD language Power supply Power consumption Weight Accessories Model LC-20B6U 20.1” Advanced Super View & BLACK TFT LCD 2,359,296 dots XGA N358, N443, PAL, PAL-M, PAL-N, SECAM, PAL-60 NTSC/PAL-M/PAL-N PLL 181 ch.
1 27/32 (47) 3 15/16 (100) 2 /64 (59) 21 16 11/64 (410.5) 17 23/32 (450) (including rubber foot) 12 5/32 (308.
Calling for Service For location of the nearest Sharp Authorized Service, or to obtain product literature, accessories, supplies, or customer assistance, please call 1-800-BE-SHARP.
VALID IN CANADA ONLY LIMITED WARRANTY Consumer Electronics Products Congratulations on your purchase! Sharp Electronics of Canada Ltd. (hereinafter called “Sharp”) gives the following express warranty to the first consumer purchaser for this Sharp brand product, when shipped in its original container and sold or distributed in Canada by Sharp or by an Authorized Sharp Dealer: Sharp warrants that this product is free, under normal use and maintenance, from any defects in material and workmanship.
SHARP ELECTRONICS CORPORATION Sharp Plaza, Mahwah, New Jersey 07430-2135 SHARP CORPORATION Printed on 100% post-consumer recycled paper. Imprimé sur 100% de papier recyclé. Impreso en 100% de papel reciclado de postconsumo. Papel 100% Reciclado-Cuidado do Meio Ambiente.