
Service manual


8
VL-NZ50U/NZ100U
VL-NZ150U
4. DISASSEMBLY OF THE SET
Note:
Before removing the cabinet, turn off the power supply, and ascertain that the battery have been removed.
1.
3.
4.
2.
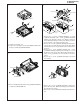
1) Remove the 1 screw ((c)XiPSN17P03000) and disconnect
the tilt FPC to detach the main PWB.
2) Remove the lid lock fitting.
3) Remove the 4 screws ((i)XiPSF17P03000) to detach the
battery cover.
4) Remove the 2 screws ((i)XiPSF17P03000) and disconnect
the connector to detach the lens section.
1) Remove the 1 screw ((i)XiPSF17P03000) and 2 screws
((h)XiPSF17P02000).
2) Remove the 2 screws ((c)XiPSN17P03000) to detach the
VCR operation PWB. Then remove the FPC of the LCD panel
and FPC of the reflector to detach the LCD panel.
3) Remove the 3 screws ((c)XiPSN17P03000) to detach the
radiation angle.
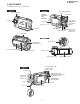
1) Remove the 1 screw ((q)LX-HZ0050TAFF) .
1) Remove the battery unit.
2) Remove the 4 screws ((c)XiPSN17P03000).
(c)
(c)
Battery Unit
(c)
(c)
(q)
(c)
(c)
LCD Panel
FPC
(h)
(h)
(i)
Radiation Angle
(c)
Lid Lock Fitting
Main PWB
(c)
Tilte FPC
Connector
Battery Cover
(i)
(i)
(i)
(i)
(i)