
Service manual


VL-NZ50U/NZ100U
VL-NZ150U
9
6.
7.
8.
5.
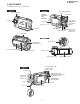
1) Remove the 3 screws ((c)XiPSN17P03000), 4 screws
((i)XiPSF17P03000) and 1 screw ((h)XiPSF17P02000)
(NZ50U only) fixing the camera rear cabinet to detach it.
(Note: When detaching the camera rear cabinet, pay atten-
tion to the FPC of the camera operation unit.)
2) Remove the 2 screws ((i)XiPSF17P03000) and detach the
camera side cover in the direction of the arrow. (Note: When
detaching the side cover, pat attention to the lead wire of the
speaker.)
3) Remove the 1 screw ((i)XiPSF17P03000) and 1 screw
((o)XiPSN17P06000) and detach the microphone cover in
the direction of the arrow. (Note: When detaching the micro-
phone cover, pay attention to the lead wire of the micro-
phone.)
4) Remove the 2 screws ((c)XiPSN17P03000) and camera
front cabinet.
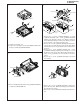
1) Take the mechanism out.
2) Remove the 3 floating screws A ((k)LX-BZ0251TAFD) and 1
floating screw B ((m)LX-BZ0253TAFN).
1) Remove the lithium holder and 2 screws ((r)XiPSN17P04000)
to detach the lithium PWB unit.
1) Remove the 1 screw ((c)XiPSN17P03000) to detach the
power SW unit. (Note: When detaching the power SW unit,
pay attention to the FPC.)
2) Remove the 1 screw ((c)XiPSN17P03000) to detach the lens
unit.
Power SW Unit
(c)
(c)
Mechanism
(m)
(k)
(k)
(k)
Lithium Holder
Lithium PWB Unit
(r)
(r)
Microphone Cover
(i)
(c)
Camera Front Cabinet
(c)
(i)
(o)
(i)
(c)
Camera Rear
Cabinet
NZ100U/NZ150U
NZ50U
Camera Rear
Cabinet
(i)
(i)
(i)
(c)
(i)
(c)
(h)