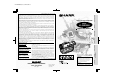
VL-WD255U/hyou; 00/12/26/18:00 Valid for warranty service in the U.S.
Thank you for purchasing this camcorder from SHARP. The camcorder will enhance your home video enjoyment and allow you to capture those special moments. Please read this operation manual to familiarize yourself with the camcorder’s features, so that you will get the most out of it. The video techniques section will help you fully enjoy the many features this camcorder offers, and expand your video world. Important Information for Consumers in the U.S.
WARNING—FCC Regulations state that any unauthorized changes or modifications to this equipment not expressly approved by the manufacturer could void the user’s authority to operate this equipment. NOTE This equipment has been tested and found to comply with the limits for a Class B digital device pursuant to Part 15 of the FCC Rules. These limits are designed to provide reasonable protection against harmful interference in a residential installation.
IMPORTANT SAFEGUARDS iii 1. Read Instructions—All the safety and operating instructions should be read before the product is operated. 2. Retain Instructions—The safety and operating instructions should be retained for future reference. 3. Heed Warnings—All warnings on the product and in the operating instructions should be adhered to. 4. Follow Instructions—All operating and use instructions should be followed. 5. Cleaning—Unplug this product from the wall outlet before cleaning.
15. Power Lines—An outside antenna system should not be located in the vicinity of overhead power lines or other electric light or power circuits, or where it can fall into such power lines or circuits. When installing an outside antenna system, extreme care should be taken to keep from touching such power lines or circuits as contact with them might be fatal. 16.
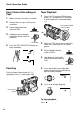
Quick Operation Guide Please consult this operation manual further for details on these and other functions of your camcorder. Turning the Power on Media Selection switch Power switch Charging the Battery Pack 1 Connect the supplied power cord to the AC power socket on the AC adapter/ battery charger, and insert the AC plug into a power outlet. 2 Align the s mark on the battery pack with the a mark on the charger (1) and guide the battery into the groove.
Inserting a Mini DV Cassette Inserting a SmartMedia Card 1 1 Make sure that the power switch is set to OFF. 2 Open the LCD monitor. Attach the power source to the camcorder, then slide the cassette compartment door release and open the cassette compartment door. Card slot cover 2 3 Open the card slot cover in the direction of arrow. 4 Insert a SmartMedia card into the slot as shown below, and push it in as far as it will go.
Quick Operation Guide Easy Camera Recording on Tape 1 Make sure that a cassette is inserted. 2 Remove the lens cap, and lift up the viewfinder. 3 Set the Media Selection switch to TAPE. 4 Hold down the Lock button and set the Power switch to CAMERA. 1 Press the LCD monitor OPEN release button (1), and open the LCD monitor to a 90° angle to the camcorder body (2).
Card Recording Card Playback 1 Make sure that a SmartMedia card (commercially available) is inserted. 1 2 Remove the lens cap, and lift up the viewfinder. 3 Set the Media Selection switch to CARD. 4 Hold down the Lock button and set the Power switch to CAMERA. LCD monitor OPEN release button 90 Lock button 5 Press the LCD monitor OPEN release button (1), and open the LCD monitor to a 90° angle to the camcorder body (2). Press the STILL button to begin recording.
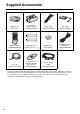
Supplied Accessories Battery pack BT-L221n* AC adapter/ battery charger UADP-0321TAZZ* Power cord QACCD0031TAPZ DC cable QCNW-1957TAZZ Remote control RRMCG0100TASA AA battery for remote control K 2 CR2025 type lithium battery Audio/video cable (RCA type) QCNW-2016TAZZ Lens cap GCOVH1271TASA PixLab Video Capture Software (Lite Version) CDSKA0059TA01 PC connecting cable QCNW-2022TAZZ * The part numbers for the AC adapter/battery charger and battery pack supplied with this camcorder are valid only
Optional Accessories Standard-life battery pack BT-L221n Extended-life battery pack BT-L441n Zoom microphone VR-5MCN Note: The listed model names are for U.S. accessories. For optional and additional accessories, contact your local dealer, call the Sharp Accessories and Supply Center at 1-800-642-2122, or visit SHARP’s website (http://www.sharp-usa.com).
Precautions • When the camcorder is not in use, remember to remove the cassette tape, turn off the power, and disconnect the camcorder from the power source. • Always respect prohibitions or restrictions on the use of electronic equipment on commercial flights or in other sensitive areas. • Do not aim the lens at the sun. Do not allow direct sunlight to strike the camcorder lens or LCD monitor screen, whether or not recording is in progress, as it may damage the CCD sensor or LCD screen surface.
Charging the Battery Pack ........................................ 9 Attaching and Removing the Battery Pack .............. 10 Powering the Camcorder from an AC Outlet ........... 11 Inserting and Removing a Mini DV Cassette .......... 12 Installing the Lithium Memory Battery ..................... 13 Selecting the Language for the On-screen Display .................................................................. 14 Setting the Area, Date and Time .............................
Contents Useful Features Quick Return ........................................................... 36 Edit Search ............................................................. 36 Fade In and Fade Out ............................................. 37 Wide Screen (16:9) ................................................. 38 Still Recording on Tape ........................................... 39 Still Recording Effects ............................................. 40 Letting the Subject Monitor the Shot .........
Appendix • Guía de operación rápida en español ................................................................... 97 • Visualizaciones en pantalla en español .............................................................. 105 • Affichages sur écran en français ........................................................................ 107 Useful Features Useful Information ................................................... 86 Demonstration Mode ...............................................
Operation References Operation References Operation References Part Names For details on the use of each part, refer to the page number indicated in brackets. Left view GAMMA/BRIGHTER button [pp. 33, 34, 61] W/B (White Balance) button [p. 52] CAT’S EYE switch [p. 35] AUTO ON/OFF button [p. 28] Operation button [p. 27] Lens hood Zoom lens Remote sensor [p. 43] Stereo microphone [p. 68] 1 ;; ;; MENU/DISPLAY button [p. 27] Media Selection switch (TAPE/CARD selection switch) [p.
Operation References Left view Viewfinder [p. 18] Zoom microphone mounting hole [p. 55] Diopter adjustment [p. 18] LCD monitor [p. 19] Power source PUSH release button [pp. 10, 11] LCD monitor OPEN release button [p. 19] Power source mounting surface [pp. 10, 11] Lithium battery compartment door [p.
Operation References Operation References Right view Power Zoom Wide angle/ Telephoto control [p. 21]/ VOLume control [p. 23] STILL button [pp. 39, 40, 61, 74] S-VIDEO socket [pp. 24, 65, 66] VIDEO jack [pp. 24, 65, 66] AUDIO L jack [pp. 24, 65, 66] Power switch (CAMERA/VCR select switch) [pp. 26, 27] AUDIO R jack [pp. 24, 65, 66] RECord START/STOP button [p. 20] Jack cover [pp. 24, 65, 66] Cassette compartment door [p. 12] Cassette compartment door release [p. 12] PC connection jack [p.
Below are some examples of camcorder’s features. Operation References Quick Reference List • To record the subject with higher-quality audio. — See page 31 (Selecting the 16-bit Audio Recording Mode) • To record powerful close-up images. — See page 32 (Setting the Digital Zoom) • To record a backlit subject. — See page 33 (Gamma Brightness Compensation) or page 51 (Manual Exposure) • To record subjects at night, e.g. a nocturnal animal.
Operation References Operation References On-screen Display Index For details on the use of each function, refer to the page number indicated. TAPE-CAMERA mode MANUAL SE T MAN. FOCUS SHU T. SP E ED E XPOSURE P I C. E F F E C T SCE NE MENU F ADE QK. RE TURN DI S p. 31 AU TO p. 20 pp. 20, 28 L I GHT AU TO 1 2 bit p. 22 p. 31 pp. 34, 35 3 0min SP p. 30 p. 22 Easy mode (p. 28) ME NU F ADE QK. RE TURN PHOTO SNAP SNAP E F F. WI ND SOUND D I SPL AY p. 37 p. 36 p. 39 p. 40 p. 56 p. 56 p.
p. 31 AUTO CARD p. 28 10 90 MANUAL SE T MAN. FOCUS SHU T. SP E ED E XPOSURE P I C. E F F E C T SCE NE MENU SE L F T I MER DI S CARD p. 74 CARD AUTO p. 22 p. 74 NORMAL 10 90 p. 75 Easy mode (p. 28) ME NU SE L F T I ME R RE C MODE SOUND D I SPL AY p. 76 p. 75 p. 56 p. 16 MANUAL SE T MAN. FOCUS SHU T. SP E ED E XPOSURE P I C. E F F E C T SCE NE MENU SE L F T I MER DI S CAMERA SE T RE C MODE SNAP E F F .
Operation References Operation References Warning Indicators If a warning indicator appears on the screen, follow the specified instructions. Displayed for the first 3 seconds Displayed after 3 seconds I NSER T A CASS E T TE. Description of warning There is no video cassette in the camcorder. Insert a cassette (see page 12). E J E C T T HE CAS SE T T E . E J E C T THE CAS SE T T E . The video cassette is defective and should be removed (see page 12). CASSE T T E NOT RE CORDA BL E. P RO T E C T .
Description of warning NO MEMORY CARD The SmartMedia card is not inserted or is inserted improperly. Check how the card is inserted (see page 73). MEMORY CARD FUL L The capacity of the SmartMedia card is full and cannot store any more images. Delete unnecessary images (see page 81) or replace the card with a new one (see page 73). NO DA T A ON MEMORY C ARD The SmartMedia card has no images recorded in the format the camcorder can recognize.
Preparation Preparation Charging the Battery Pack Preparation Charge the battery pack with the supplied AC adapter/battery charger before use. Note: • Remove the DC cable from the AC adapter/ battery charger when charging the battery pack. 1 Connect the supplied power cord to the AC power socket on the AC adapter/ battery charger, and insert the AC plug into a power outlet. • The POWER indicator lights up.
Attaching and Removing the Battery Pack 4 Lower the viewfinder. Attaching the Battery Pack 1 Make sure that the Power switch is set to OFF. Preparation Removing the Battery Pack Power switch 2 1 Perform steps 1 and 2 above. 2 Press the power source PUSH release button (1), and slide the battery pack up and take it out (2). Lift up the viewfinder.
Preparation Powering the Camcorder from an AC Outlet Preparation You can also power the camcorder from a power outlet by using the supplied AC adapter/ battery charger and DC cable. Caution: • The supplied AC adapter/battery charger is specially designed for use with this camcorder, and should not be used as a power supply for other camcorders. 1 Make sure that the Power switch is set to OFF. 2 Lift up the viewfinder.
Inserting and Removing a Mini DV Cassette 3 • A confirmation sound is made, and the cassette holder retracts automatically. Inserting a Cassette 1 Press the W mark gently until the cassette holder clicks into place. W mark Preparation Attach the power source to the camcorder, then slide the cassette compartment door release and open the cassette compartment door. • A confirmation sound is made, and the cassette holder extends and opens automatically.
Preparation Installing the Lithium Memory 5 Battery Installing the Lithium Battery Preparation The supplied lithium battery is used to store the memory of the date and time settings. 1 Press the LCD monitor OPEN release button (1) and open the LCD monitor (2). LCD monitor OPEN release button Close the LCD monitor until it clicks into place. Removing the lithium battery Perform steps 1 and 2 above. Lift up the battery using a pointed object, and take it out.
Selecting the Language for the On-screen Display 3 This camcorder allows you to choose from among English, French or Spanish for the onscreen display language. SET [ BUT TON] OTHERS REMOT E SOUND T I ME CODE T C OUT DEMO MODE L ANGUAGE MENU/DISPLAY button Power switch Preparation L ANGUAGE ENGL I SH F RAN Ç A I S E S PA Ñ OL Note: • The operation procedures in the following sections of this operation manual are based on the use of on-screen displays in English.
Preparation Setting the Area, Date and Time 4 Press r on the Operation button. CL OCK SE T D I SPL AY ARE A DYL T SAVE SE T T I NG Preparation Example: Setting the date to June 2, 2002 (JUN. 2. 2002) and the time to 10:30 am (10:30 AM) in New York. Notes: • Before performing the procedure below, make sure that the lithium battery has been installed (see page 13). • If you are in an area that observes daylight saving time, set the time to the standard time.
9 Press d or y to select “2002” (year), and then press r. SE T T I NG 10 JUN. 2 . 2 0 0 2 1 0 : 0 0 AM Press d or y to select “30” (minute), and then press e. Follow the procedure below to display the date, or both the date and time, of recording on the screen. You can display the date and time during both recording and playback. • The example screens for this feature are for TAPE-CAMERA mode. 1 Hold down the Lock button and set the Power switch to CAMERA or VCR.
Preparation Using the Lens Cap 1 Open the hand strap flap (1) and the grip strap (2). Attach the strap of the lens cap to the hand strap as shown below. 2 Loosen the grip strap, pass your right hand through the loop, and put your thumb on the REC START/STOP button. Then, pull the grip strap tight until it fits snugly. Preparation Adjusting the Hand Strap When attaching or removing the lens cap, press both tabs on the top and bottom of the cap.
Using the Viewfinder Closing the viewfinder You can record the subject using the electronic LCD viewfinder. You can also watch playback through the viewfinder. Viewfinder Lower the viewfinder. Cautions: • Do not use excessive force when moving the viewfinder. • Do not pick up the camcorder by the viewfinder. Preparation Notes: • The viewfinder automatically turns off when the LCD monitor is opened.
Preparation Using the LCD Monitor You can use the LCD monitor to play back recordings that you have made. You can also watch the subject on the LCD monitor while recording. Preparation Power switch 3 Hold down the Lock button and set the Power switch to CAMERA or VCR. Lock button Notes: • Battery consumption is larger when the LCD monitor is open. Use the viewfinder instead of the LCD monitor when you want to save battery power.
Basic Operations Camera Recording Easy Camera Recording on Tape in Full Auto Mode • Before you start recording, perform the To pause recording Press the REC START/STOP button again. Recording pauses, and the camcorder enters Recording Standby mode. operations described on pages 9 through 19 to prepare your camcorder for recording. PAUSE Media Selection switch Power switch 1 Remove the lens cap, and lift up the viewfinder. 2 Set the Media Selection switch to TAPE.
Basic Operations Camera Recording Zooming Tips on Recording Positions Zooming allows you to move visually closer to or farther from a subject without physically changing your position. To create images that are easy to watch during playback, try to record with a stable posture while steadying your camcorder to prevent the image from shaking.
Remaining Recording Time Display Remaining Battery Power Display When the camcorder is recording in TAPECAMERA mode, an on-screen indicator displays the approximate remaining tape time in minutes. When using the camcorder with the battery pack as the power source, you can turn on and off the remaining battery power indicator by pressing the MENU/DISPLAY button. If the battery power becomes very low, a warning indicator will appear. Replace the battery pack.
Basic Operations Basic Operations Playback Playback Tape Playback To stop playback The LCD monitor screen functions as a handy playback monitor. Nothing needs to be connected, allowing instant on-screen playback with the sound through the built-in speaker. Media Selection switch Basic Operations Power switch Press d. To turn the power off Set the Power switch to OFF without pressing the Lock button. Notes: • The tape is automatically rewound when playback reaches the end of the tape.
Watching the Playback on a TV 3 • When connecting to a TV via a VCR, turn on the VCR and set it to the “AV” or “LINE” input channel. Operate the TV as you normally do to see the signal from the VCR. (See the operation manuals of your TV and VCR.) You can connect the camcorder to a TV to allow a larger audience to enjoy playback. 1 Open the jack cover on the camcorder. 4 2 Connect the camcorder to your TV (or VCR) with the supplied audio/video cable, as shown.
Basic Operations Playback Video Search Still The video search function makes it easy to search for a desired scene on the tape. The still function makes it possible to pause playback in TAPE-VCR mode. Operation button Basic Operations 1 During playback in TAPE-VCR mode, press r (or e) on the Operation button. • The playback picture fast forwards (or reverses). During playback in TAPE-VCR mode, press y on the Operation button. AUDIO1+ 2 AUDIO1+ 2 2 To return to normal playback, press y again.
Useful Features Selecting the Camcorder Mode This camcorder includes functions for use as both a video camera for recording and playing back images on tapes and as a digital still camera for recording and playing back still images on SmartMedia cards. One of the following camcorder modes needs to be set before starting any operations. Media Selection switch Power switch Camcorder modes TAPE-VCR mode For recording motion and still images on tapes.
Useful Features Using the Controls MENU/DISPLAY button The following controls on the camcorder can be used to select and operate the various functions, settings and on-screen displays. MENU/DISPLAY button Power switch The MENU/DISPLAY button is used to turn the on-screen indicators and the menu screens on or off. Each time you press the MENU/DISPLAY button, the on-screen display changes as shown below.
Selecting the User Mode This camcorder features three user modes for the camera recording functions. The selectable items on the menu screen are different depending on the user mode. 3 Press the AUTO ON/OFF button. • Each time you press the AUTO ON/OFF button, the user mode changes between Auto mode and Manual mode. • To select Easy mode, hold down the AUTO ON/OFF button for more than two seconds. User mode Auto mode (AUTO): Lets you adjust all menu settings except manual settings.
Useful Features Using the Menu Screens 5 The menu screens can be used to adjust the various settings of camcorder. 1 Set the Media Selection switch to TAPE or CARD. 2 Hold down the Lock button and set the Power switch to CAMERA or VCR. Example CAMERA SE T PHOTO SNAP SNAP E F F. DG T L ZOOM OF F T AP E SP E E D 5 0 16 : 9 100 780 6 Lock button 3 Press the MENU/DISPLAY button until the menu screen appears. Useful Features MANUAL S E T MAN. FOCUS SHU T. SP E ED E XPOSURE P I C.
Useful Features Camera Recording Recording in LP (Long Play Recording) Mode This camcorder allows you to record in LP (Long Play Recording) mode for approximately 50% more recording time with the same picture quality as that in SP (Standard Play Recording) mode. 1 Set the camcorder to TAPE-CAMERA mode. 2 Press the MENU/DISPLAY button until the menu screen appears. MANUAL S E T MAN. FOCUS SHU T. SP E ED E XPOSURE P I C. E F F E C T SC E NE MENU F ADE QK.
Useful Features Camera Recording Selecting the 16-bit Audio Recording Mode Digital Image Stabilization (DIS) This camcorder allows you to select between the 12-bit and 16-bit audio recording modes. The camcorder normally records audio in the 12-bit audio recording mode. For higher-quality audio recording, select the 16-bit audio recording mode.
Setting the Digital Zoom You can select from among four different zoom ranges: 1–26K (optical zoom), 26–50K (digital zoom), 26–100K (digital zoom) or 26–780K (digital zoom). The digital zoom allows you to record powerful close-up pictures with the same operation as normal zooming. Notes: • The digital zoom is in addition to the optical zoom giving a combined maximum zoom range of 1–780K. • As the image is enlarged digitally, the picture quality decreases when higher digital zoom settings are used.
Useful Features Camera Recording Gamma Brightness Compensation To obtain a brighter picture Press the GAMMA/BRIGHTER button again. • The x indicator appears. When the subject is backlit, the image will appear dark if it is recorded normally. The gamma brightness compensation function improves the picture by increasing the brightness of the subject while leaving the brighter portion of the image unaffected.
Gain-up To obtain a brighter picture When you are recording in a dark or poorlyilluminated location, “LIGHT” is displayed on the screen. Use the gain-up function to record a brighter picture. Press the GAMMA/BRIGHTER button again. • The ` indicator appears. GAMMA AUT AUTO UTO Note: • At locations where lighting is adequate, “LIGHT” will not appear. The gain-up function cannot be used in this case.
Useful Features Camera Recording Night Recording (Cat’s Eye) The night recording function allows you to record the subject in darkness. This is useful when you want to record subjects at night, e.g. a nocturnal animal. Note: • Use Night Recording when “LIGHT” is displayed. Do not use in a bright location such as outdoors in broad daylight. CAT’S EYE switch To cancel Night Recording Set the CAT’S EYE switch to OFF. Notes: • The picture will turn white if you use Night Recording in a bright location.
Quick Return Edit Search When you have been playing back what you have recorded on the tape, and wish to quickly return to recording from the end of the last recorded scene, use the quick return function. The edit search function lets you search, without switching from TAPE-CAMERA mode to TAPE-VCR mode, for the point on the tape where you wish to start recording next. 1 Set the camcorder to TAPE-CAMERA mode. 2 In Recording Standby mode, press the MENU/DISPLAY button until the menu screen appears.
Useful Features Camera Recording Fade In and Fade Out 5 Press the MENU/DISPLAY button to turn off the menu screen. • “FADE” is displayed. The fade function allows you to gradually bring the image and sound in or out at the beginning or end of a scene for creating scene transitions. This is especially effective for indicating a dramatic change in scenery.
To cancel Fade mode Select “OFF” in step 4 in “Setting Fade Mode”. To use Fade Out only 1 During camera recording in TAPECAMERA mode, perform steps 2 to 5 in “Setting Fade Mode” to display “FADE”. 2 Press the REC START/STOP button at the point where you wish to stop recording. Wide Screen (16:9) The wide screen function lets you record scenes with the wide-screen feel of a movie shown in a theater.
Useful Features Camera Recording Still Recording on Tape You can record still images of subjects with normal sound on a tape by selecting one of two still recording modes. 6 PHOTO SNAP S T I L L 7 Type of Still Recording modes SNAP: A still picture is recorded for 6 seconds. STILL: A continuous still image is recorded. Selecting Still Recording Mode 1 Set the camcorder to TAPE-CAMERA mode. 2 Press the MENU/DISPLAY button until the menu screen appears.
Still Recording Effects Using PHOTO SHOT, 9 FRAMES or 16 FRAMES mode You can select one of these still recording effects to record the still images with an effect. 1 Perform the steps in “Selecting a still recording effect” to select “PHOTO SHOT”, “9 FRAMES” or “16 FRAMES”. 2 In Recording Standby mode, press the STILL button. Type of Still Recording Effects PHOTO SHOT: A still picture is recorded following the sound and visual effects of a camera shutter closing.
Useful Features Camera Recording Using P-IN-P mode 1 2 4 Perform the steps in “Selecting a still recording effect” to select “P-IN-P” (see page 40). In Recording Standby mode, press the STILL button. • An inset image of the subject is displayed. AU TO AUTO Press y to freeze the inset image. Note: • Pressing y, e or r while the inset image is frozen cancels the still image. 5 Press the REC START/ STOP button. • The still image of the subject will be recorded.
Letting the Subject Monitor the Shot 2 Set the Power switch to CAMERA. • The subject is displayed in the viewfinder, and a mirror image of the subject is displayed on the LCD monitor. Open the LCD monitor and rotate it 180° vertically so that the screen faces the other way and the subject can monitor the shot while you are recording with the viewfinder. If the camcorder is steadied, you can record yourself in the scene by watching yourself on the LCD monitor.
Useful Features Camera Recording Auto Focus Using the Remote Control The camcorder is preset to Auto Focus mode, which is designed to focus on most types of subjects. In Auto Focus mode, the camcorder automatically focuses on whatever is in the center of the scene. Always keep the subject in the center of the scene. Use the supplied remote control to operate the camcorder from a distance, such as when you want to record yourself in a scene, or when the camcorder is connected to a TV for use as a VCR.
3 Press d or y to select “ON”, then press e. ON REMOT E 4 Press the MENU/DISPLAY button to turn off the menu screen. Operating the Remote Control 1 Open the LCD monitor completely (1), then rotate it 180° vertically (2). REW button [pp. 23, 78] CARD REC button [p. 74] TAPE REC START/STOP button [p. 20] ZOOM W/T buttons [pp. 21, 60] VOL. +/L buttons [p. 23] PLAY button [pp. 23, 78] FF button [pp. 23, 78] STOP button [pp. 23, 78] 180 SLOW button [p. 45] 90 Shift buttons [p.
Useful Features Useful Features Playback Playback Playback Functions with the Remote Control These playback functions can be operated using the supplied remote control. (See pages 43 and 44 for use of the remote control.) Frame Advance The frame advance function allows you to play back still images frame by frame. 1 During playback in TAPE-VCR mode, press the PAUSE/STILL button (g) to pause playback. 2 Press the h (or j) button.
4 Using the Time Code The time code shows the hour, minute and second of recording, and the frame number (1 frame = approx. 1/30 sec.). This is automatically recorded along with the subject when you are recording on the tape. You can display the time code on the screen as an accurate counter in both TAPE-VCR and TAPE-CAMERA modes. Display format Frame number* Second Minute Hour * Displayed during still or frame advance playback. • The example screens for this feature are for TAPE-VCR mode.
Advanced Advanced FeaturesFeatures Camera Recording Camera Recording Manual Focus Auto Focus may not be able to focus on the subject in the situations shown below. In such situations, set the camcorder to Manual Focus mode and focus manually. Subject is too dark. 1 Set the camcorder to TAPE-CAMERA or CARD-CAMERA mode. 2 Press the AUTO ON/OFF button to select Manual mode. 3 Press the MENU/DISPLAY button until the menu screen appears. 4 Select T, then press r on the Operation button. Select “MAN.
7 Press d or y (1) to focus on the subject, then press e (2). MANUAL To cancel Manual Focus mode After performing step 4 above, select “AUTO”, then press e. MF 1 2 bit F OCUS F AR NE AR SP SET [ MANUAL BUT TON] MF 1 2 bit Notes: • The camcorder may not be able to focus correctly if the subject is within approximately 6 feet (1.8 m). Set the zoom control to wide angle, and then try refocusing. • If the lens is dirty or fogged, the camcorder may not be able to correctly focus.
Advanced Features Camera Recording Setting the Shutter Speed 6 The shutter speed is preset to auto mode, which automatically chooses the optimal shutter speed for the ambient light. However, depending on the subject or situation, you may want to set the shutter speed manually to create a high-quality picture. 1 Press the AUTO ON/OFF button to select Manual mode. 3 Press the MENU/DISPLAY button until the menu screen appears. 4 • The selected shutter speed is displayed on the menu screen.
Recommended Shutter Speeds The faster the shutter speed, the darker the picture becomes. Select the most appropriate shutter speed for the ambient light. Situation Recommended shutter speed • Recording sports action in bright daylight. • Recording in bright daylight at a ski resort. 1/10,000 sec. l 1/1,000 sec. • Recording outdoor sports on a partially cloudy day. • Recording an outside scene through a car window (when you want to minimize blur caused by the camera shaking). 1/1,000 sec. l 1/250 sec.
Advanced Features Camera Recording Manual Exposure 5 Press e to display the exposure setting screen. The camcorder is preset to Auto Exposure mode, which automatically chooses the optimal aperture. When there is too much contrast in brightness between the subject and background, however, you may not be able to record a clear image. In this case, use the manual exposure function to correct the exposure level. Background is too bright and subject too dark (backlit subject).
White Balance Lock 4 • “W/B LOCK” flashes during the locking procedure. To cancel the locking procedure, press the MENU/DISPLAY button while “W/B LOCK” flashes. The color of the subject on the screen tends to look different depending on the lighting condition. The camcorder is preset to Auto White Balance mode, which automatically adjusts the hue of the picture for the current lighting condition. Auto White Balance may not work properly for the following subjects.
Advanced Features Camera Recording Digital Picture Effects 4 • The selected digital picture effect is displayed on the menu screen. These digital picture effects let you record the subject with a more dramatic effect. P I C. E F F E C T B W Type of Digital Picture Effects Advanced Features B/W: To record in black-and-white. SEPIA: To record in sepia color similar to that of an old photograph. MOSAIC: To record a picture divided up into tiles.
Scene Menu (Program AE) 3 You can set the camcorder to the shooting mode that will create the best results for a specific situation. Just select one of four scene settings shown below. The camcorder will automatically set the exposure, white balance, and shutter speed to produce the optimum picture quality for the selected situation. Select T, then press r on the Operation button. Select “SCENE MENU” (1), then press r (2). MANUAL S E T MAN. FOCUS SHU T. SP E ED E XPOSURE P I C.
Advanced Features Camera Recording Using the Zoom Microphone (Optional Accessory) With the optional zoom microphone, you can record audio according to the magnification of the zoom lens for producing the optimum sound. You can also set the zoom microphone to record only sounds at a distance. Mounting the Zoom Microphone 1 Align the mounting pin of the zoom microphone with the mounting hole on the camcorder, and slide the zoom microphone in the direction of the arrow until it locks into place.
Windbreak The windbreak function allows you to reduce annoying noise from strong winds when recording. 1 Set the camcorder to TAPE-CAMERA mode. 2 Press the MENU/DISPLAY button until the menu screen appears. 3 Select U, then press r on the Operation button. Select “WIND” (1), then press r (2). AUD I O SE T AUD I O MODE ZOOM M I C OF F W I ND ON 4 A confirmation sound is made when you turn on or off the Power switch, press the REC START/STOP button, or perform other designated operations.
Advanced Features Camera Recording 3 World Clock The world clock function allows you to easily adjust the clock to the local time when you use the camcorder while travelling anywhere around the world. Select P, then press r on the Operation button. Select “AREA” (1), then press r (2). CL OCK SE T D I SPL AY ARE A DYL T SAVE SE T T I NG • Set the area, date and time for your home time zone if they have not already been set (see page 15).
Area Table Area number Area name Countries or areas* LONDON England, Morocco, GMT (Greenwich mean time) 2 PARIS Austria, France, Germany, Italy, Netherlands, Spain, Sweden, Switzerland, Portugal, CST (Continental Standard Time), Tunisia 3 CAIRO Egypt, Finland, Greece, Turkey 4 MOSCOW Ethiopia, Iraq, Kenya, Mauritius, Saudi Arabia, Seychelles, Russia (Moscow) 5 DUBAI United Arab Emirates 6 KARACHI Maldives, Pakistan 7 DACCA Bangladesh, India, Myanmar 8 BANGKOK Cambodia, Indonesia (Ja
Advanced Features Camera Recording Selecting Daylight Saving Time 5 Press the MENU/DISPLAY button to turn off the menu screen. • The Q indicator appears when the date/ time is displayed. Perform the procedure below to advance the clock of the camcorder one hour to daylight saving time. 1 Set the camcorder to TAPE-CAMERA or CARD-CAMERA mode. 3 0min SP JUN. 2 . 2 0 0 2 1 1 : 3 0 AM Daylight saving time indicator AUTO To reset to standard time Select “OFF” in step 4 above. 3 0min SP 2 JUN. 2 .
Advanced Features Playback Playback Zoom To cancel Playback Zoom The playback zoom function allows you to magnify the playback picture up to 10 times its original size and to shift the magnified picture by using the remote control (see pages 43 and 44 for use of the remote control). ZOOM buttons Press the ZOOM W button to zoom out to the widest angle. Notes: • Use of Playback Zoom may cause a reduction in picture quality for still images.
Advanced Features Playback Gamma Playback Multiple Strobe Playback The gamma playback function improves the playback picture in TAPE-VCR mode by increasing the brightness of the subject while leaving the brighter portions of the image unaffected. The multiple strobe playback function can be used to capture the action of a fast-moving subject at intervals of 1/10 of a second using a 9- or 16-frame picture. This is useful when you want to check your form in sports such as tennis or golf.
Playback Effects Playback effects can be used to create an interesting scene transition between a still image and the following image during playback in TAPE-VCR mode. Using Playback Effect 1 In TAPE-VCR mode, press the MENU/ DISPLAY button until the menu screen appears. 2 Select V, then press r on the Operation button. Select “PB EFFECT” (1), then press r (2). Type of Playback Effects OVERLAP: A still image fades out as the next image fades in, replacing the previous image.
Advanced Features Playback Picture Effect Playback These picture effects let you play back images with a more dramatic effect. Type of Picture Effects B/W: The picture is displayed in black-andwhite. SEPIA: The picture is displayed in sepia color similar to that of an old photograph. MOSAIC*: The picture is divided up into tiles. SOLARI: The contrast of the subject is enhanced, creating a unique artistic image. NEGA: The blacks and whites of the image are reversed and colors of the image are inverted.
Picture/Backlight Adjustments Adjusting the Backlight If the picture is difficult to see due to ambient lighting or other factors, adjust the monitor picture settings. 1 Press the MENU/DISPLAY button until the menu screen appears. 2 Select O, then press r on the Operation button. Press d or y to select “BACKLIGHT” (1), then press r (2). • The example screens for this feature are for TAPE-CAMERA mode.
Advanced Features Playback Editing Cutting Unwanted Sequences Video editing lets you refine your videos by removing unwanted sequences from your tape, or transposing one sequence with another. This camcorder lets you monitor the source program on the built-in LCD monitor without having to connect it to an external TV or video monitor. Connect the camcorder to a VCR with the supplied audio/video cable, as shown.
Recording from an External Source To Record from an External Source 1 Set the camcorder to TAPE-VCR mode. You can use this camcorder to record or edit videos from another source, such as a VCR, TV, or video disc player. 2 Begin playback on the source equipment connected to the camcorder. Connect the camcorder to the source equipment with the supplied audio/video cable, as shown. Recording • Check the camcorder screen to see if the picture is being properly received.
Advanced Features Playback Editing with the DV Terminal (IEEE1394) This camcorder enables you to perform digital video editing. Connect the camcorder to video equipment with a DV terminal using a commercially available DV cable. A DV cable is able to transfer all dubbing signals including video and audio. Video equipment with DV terminal (e.g.
Audio Dubbing Feature You can add narration to recordings made with this camcorder, while preserving the original audio and video recordings. Microphone for Audio Dubbing You can use the built-in stereo microphone to record narration. Audio Recording In normal recording mode 12-bit audio recording The audio is recorded in stereo on Audio 1. Audio 1: Stereo (left and right) sound Audio 2: No audio 16-bit audio recording The audio is recorded in stereo with the left and right sound on two separate channels.
Advanced Features Playback Audio Dubbing To pause audio dubbing 1 Press e. Play back the recorded Mini DV cassette and locate the tape position where you wish to start audio dubbing. 2 Press y to pause playback. Press the MENU/DISPLAY button. The audio dubbing screen disappears. 3 Press the MENU/DISPLAY button until the menu screen appears. If you wish to change the dubbed audio or dub additional scenes 4 Select V, then press r on the Operation button. Select “AUDIO DUB” (1), then press r (2).
Selecting the Audio Playback Mode You can select any of the following audio playback modes. Audio 1+2 • 12-bit recording in stereo (Audio 1 and Audio 2 channels) • 16-bit recording in stereo (left and right channels) 1 Play back a Mini DV cassette with dubbed audio. 2 Press the MENU/DISPLAY button until the menu screen appears. 3 Select V, then press r on the Operation button. Select “AUDIO” (1), then press r (2). PL AY BACK SE T AUD I O DUB AUD I O 1+2 P I C.
Advanced Features Playback Configuring Software for PC Connection This camcorder can transfer still playback images in TAPE-VCR mode or still images in TAPE-CAMERA and CARD modes to a personal computer by using the supplied Video Capture Software. Connecting the camcorder to a Personal Computer 1 Turn off the PC. 2 Connect the camcorder as shown below. • Before connecting the camcorder to the PC, make sure that the PC power is off to insure that images are transferred properly.
3 Double click on the “CD-ROM” drive icon. 4 Double click on the “Acroread” folder. 5 Double click on the desired language version. Note: • For the latest product information, be sure to read the “Readme” text file located in the “Readme” folder of the Video Capture Software CD-ROM. Select the “Readme” text file you prefer. The letters between “Readme” and “.txt” define the language; for example, “en” in “Readmeen.txt” stands for English, etc.
SmartMedia Card Features SmartMedia Card Features Camera Recording Camera Recording Inserting and Removing a SmartMedia Card (Commercially available) 5 Close the card slot cover. Inserting a SmartMedia Card 1 Make sure that the Power switch is set to OFF. 2 Open the LCD monitor. Removing a SmartMedia Card Perform steps 1 and 2 above, and then pull the SmartMedia card straight out as shown below. Card slot cover 3 Open the card slot cover in the direction of the arrow.
Card Recording 6 It is possible to take a still picture in the same way as you do with a standard camera and record that image on the SmartMedia card (commercially available). Adjust the Power Zoom control to frame the subject as you desire. 7 Press the STILL button to begin recording. Media Selection switch • The S indicator flashes red while data is being recorded on the SmartMedia card, and returns to white when recording completes.
SmartMedia Card Features Camera Recording Selecting the Picture Resolution 1 In CARD-CAMERA mode, press the MENU/DISPLAY button until the menu screen appears. The picture quality of still images recorded on the SmartMedia card depends on the resolution setting. Select the appropriate setting to match the purpose of recording. 2 Select Y, then press r on the Operation button. Select “REC MODE” (1), then press r (2). CAMERA SE T RE C MODE SNAP E F F.
Recording with the Self-timer The self-timer function allows you to record images after a time-lag of 10 seconds. This is convenient when you want to record an image of you and your friends together. 1 In CARD-CAMERA mode, press the MENU/DISPLAY button until the menu screen appears. MANUAL S E T MAN. FOCUS SHU T. SP E ED E XPOSURE P I C. E F F E C T SC E NE MENU SE L F T I MER DI S 2 AUTO • The self-timer operating indicator flashes while the timer counts down.
SmartMedia Card Features Camera Recording 4 Formatting a SmartMedia Card In order to use a commercially available SmartMedia card with this camcorder, formatting is necessary before its first use. You also need to format a SmartMedia card when one of the following warning indicators appears, in order to use the card with the camcorder.
SmartMedia Card Features Playback 4 Card Playback It is possible to play back and view still images recorded on a SmartMedia card on the LCD monitor. Press e or r on the Operation button to move the selection frame to the desired image. • Each time you press e or r, the selection frame moves backward or forward. Media Selection switch Selection frame Power switch 1 2 3 4 5 6 Operation button 1 Open the LCD monitor and adjust the angle. 2 Set the Media Selection switch to CARD.
SmartMedia Card Features Playback 5 Slide Show Playback • Beginning from the image selected in step 2, the recorded images will be displayed in full-screen one after another in order of recording. It is possible to automatically play back consecutive still images recorded on a SmartMedia card at intervals of 5 seconds. This is useful when confirming the data recorded on a SmartMedia card. SL I DE SHOW CARD 1 Set the camcorder to CARD-VCR mode.
4 Delete-protection Press y to set the protection. • The R indicator appears. It is possible to prevent your important images recorded on the SmartMedia card from being accidentally erased. 1 In CARD-VCR mode, press the MENU/ DISPLAY button until the menu screen appears. 2 Select S, then press r on the Operation button. Select “PROTECT” (1), then press r (2). PL AY BACK SE T SL I DE SHOW P I C. E F F EC T PROT E C T DE L E T E DE L E T E AL L PR I .
SmartMedia Card Features Playback 4 Deleting One Stored Image Press y to set the image. • To cancel deletion, press d. You can delete unwanted images to free up memory of a SmartMedia card for new images. DEL E T E Note: • Deleted images cannot be restored. Check whether or not you want the images before performing the procedure below. 1 2 DEL E T E ? In CARD-VCR mode, press the MENU/ DISPLAY button until the menu screen appears. YE S [ NO [ 5 Select S, then press r on the Operation button.
3 Deleting All Stored Images DE L E T E AL L You can delete all images stored on a SmartMedia card in one operation. Notes: • Deleted images cannot be restored. Check whether or not you want the images before performing the procedure below. • If you want to keep some images on the SmartMedia card, first delete-protect them (see page 80), and then perform the procedure below. 1 In CARD-VCR mode, press the MENU/ DISPLAY button until the menu screen appears. PL AY BACK SE T SL I DE SHOW P I C.
SmartMedia Card Features Playback 3 Print Order The print order function allows you to add print information called DPOF to still images recorded on a SmartMedia card. PL AY BACK SE T CARD SL I DE SHOW P I C. E F F EC T PROT E C T DE L E T E DE L E T E AL L PR I . ORDE R PR I . SE L E C T PR I . AL L PR I . NONE CANC E L About DPOF DPOF is an abbreviation of “Digital Print Order Format”. This format defines print information such as the specified number of pages to be printed.
6 Press y to set the print order, then press d. • The M indicator appears. • If you want to assign another print order, repeat steps 4 to 6. Print order indicator P 1 2 3 4 5 6 PR I NT SET [ E ND [ 7 Assigning Print Order to All Images 1 Perform steps 1 and 2 in “Assigning Print Order to an Image”. 2 Press d or y (1) to select “PRI. ALL”, then press e (2).
SmartMedia Card Features Playback Transferring the Data on a SmartMedia Card to a Computer Adapters for the SmartMedia Card Via a floppy disk adapter To floppy disk drive In addition to using the supplied PC connecting cable, it is possible to directly transfer still images on the SmartMedia card by using a commercially available floppy disk adapter or PC card adapter. Image Folders and File Names Still images recorded using the camcorder are stored on a SmartMedia card as shown below.
Appendix Useful Information Hints for Better Shooting • Position the subject in the center of the scene. When you are using auto focus, whatever is in the center of the scene is kept in focus. Lighting For clear, good-quality recording, 500 to 100,000 lux is needed. Recording is possible with less light, but the picture quality may suffer. Adequate lighting is also essential for correct white balance. Brightness (Lux) Situation (Lux) Blue sky 100,000 • Avoid backlit subjects.
Appendix DV Technology Digital video, DV, is a revolutionary technology that enables recording and playback of high quality images with the use of special digital features previously unavailable with conventional analog formats. • High horizontal resolution Detailed, accurate images with the highest level of horizontal resolution for home use. • Clear color reproduction with virtually no color contamination Provides three times the color resolution of conventional VCRs (based on Sharp models).
Mini DV Cassette To protect recordings against accidental erasure Slide the protect tab on the rear of the Mini DV cassette to the “SAVE” position. Erasure protect tab Precautions when using a Mini DV cassette • Be sure to use only Mini DV cassettes with the i mark. • This camcorder can record and play back using Mini DV cassettes with cassette memory, but it cannot record or play back this memory. • To record in LP mode, use a Mini DV cassette labeled for use with LP mode.
Appendix SmartMedia™ Card Precautions on handling the SmartMedia card Contact area Write-protect area Index area Write-protect seals Index labels Contact area • The contact area shows hardware connections. • Be careful not to scratch the contact area. • Do not touch or allow dirt or foreign matter to attach to the contact area. If the contact area becomes dirty, gently wipe with a soft, dry cloth. Index area • Affix the index labels supplied with the card to the index area.
Battery Pack This camcorder uses a lithium-ion type battery pack. Charging • Charge the battery pack immediately (or a day) before use. The battery pack gradually self-discharges even if stored in a fully charged state. • Charge the battery pack between 50°F and 86°F (10°C and 30°C). • Fully charge the battery pack. Use of an insufficiently charged battery pack will shorten actual time of use. • Refresh (discharging before charging) is unnecessary.
Appendix AC Adapter/Battery Charger • The AC adapter/battery charger may interfere with reception if used near a radio. • Prevent flammables, liquids, and metal objects from entering the adapter/charger. • The adapter/charger is a sealed unit. Do not attempt to open or modify it. • Do not damage, drop, or subject the adapter/ charger to vibration. • Do not leave the adapter/charger in direct sunlight. • Avoid using the adapter/charger in humid or extremely hot places.
Dirty Video Heads Cleaning Using the camcorder when the video tape is dirty may cause the heads to clog, producing noise on the recorded image or preventing the image from being recorded at all. • Many plastic parts are used in the camcorder casing. Do not use thinner, benzene or other strong chemical cleaners. These may cause discoloration and damage to the casing. • Clean the casing with a soft, dry cloth.
Appendix Demonstration Mode 4 You can watch a brief demonstration of the special camcorder features in Demo mode. If the demonstration appears on the screen when you turn on the camcorder for the first time, cancel the Demo mode to use your camcorder. Select I, then press r on the Operation button. Select “DEMO MODE” (1), then press r (2).
Before Requesting Service Before calling for service, please check the following troubleshooting table. Symptom Connect power source properly (pp. 10, 11). Battery pack is not charged. Charge battery pack sufficiently (p. 9). Dew in camcorder. Wait until dew dries (p. 91). Safety function is in effect. Set Power switch to OFF and remove battery pack; wait for 2 seconds, then reinstall battery pack and turn on power (p. 10). REC START/STOP button does not work.
Appendix Appendix General Card mode Playback mode Symptom 95 Possible cause Suggested solution Cannot play back, rewind Position at beginning or end of or fast forward tape. tape. Rewind or fast forward tape to desired point (p. 23). Video noise in image. Dirty video heads. Call for service (p. 96), or use a commercially available video head cleaning tape (p. 92). Old or worn tape. Use a new cassette. Cannot delete image on SmartMedia card. Write-protect seal is affixed to card.
Specifications Camcorder Signal System: Recording System: Cassette: Recording/Playback Time: Tape Speed: Pickup Device: Lens: Lens Filter Diameter: Viewfinder: Monitor: Microphone: Color Temperature Compensation: Minimum Illumination: Still Image Compression System/Recording Format: Still Image Recording Medium: Power Requirement: Power Consumption: Operating Temperature: Operating Humidity: Storage Temperature: Dimensions (approx.): Weight (approx.
Guía de operación rápida en español Información importante para los consumidores de los EE.UU. ADVERTENCIA: PARA REDUCIR EL RIESGO DE CAUSAR UN INCENDIO O RECIBIR UNA DESCARGA ELÉCTRICA, NO EXPONGA ESTE APARATO A LA LLUVIA NI A LA HUMEDAD. PRECAUCION: CAUTION RISK OF ELECTRIC SHOCK DO NOT OPEN PARA REDUCIR EL RIESGO DE RECIBIR UNA DESCARGA ELÉCTRICA NO RETIRE LA TAPA. EN EL INTERIOR NO HAY PARTES QUE DEBA REPARAR EL USUARIO. SOLICITE LAS REPARACIONES AL PERSONAL DE SERVICIO CUALIFICADO.
Precauciones • Cuando no utilice la videocámara, no se olvide de extraer el videocasete, desconectar la alimentación y desenchufar la videocámara de la fuente de alimentación. • Respete siempre las prohibiciones o restricciones relacionadas con la utilización de equipos electrónicos en vuelos comerciales o en otras áreas susceptibles. • No dirija el objetivo hacia el sol.
AVISOS DE SEGURIDAD IMPORTANTES 99 1. Lectura de las instrucciones—Antes de utilizar este producto deberán leerse todas las instrucciones de seguridad y manejo. 2. Conservación de las instrucciones—Las instrucciones de seguridad y manejo deberán guardarse para poder consultarlas en futuro en caso de ser necesario. 3. Cumplimiento de las advertencias— Deberán cumplirse todas las advertencias del producto y de las instrucciones de manejo. 4.
15. Líneas de alimentación—Una antena exterior no deberá colocarse cerca de líneas de alimentación elevadas ni tampoco cerca de luces eléctricas o circuitos de alimentación, ni donde pueda caer encima de tales líneas de alimentación o circuitos. Cuando instale un sistema de antena exterior deberá tener mucho cuidado para que éste no toque tales líneas de alimentación o circuitos porque el contacto con ellos podría causar un accidente mortal. 16.
Guía de operación rápida en español Carga de la batería 1 2 Conecte el cable de alimentación suministrado al zócalo de alimentación de CA del adaptador de CA/cargador de baterías, y enchufe la clavija de CA en una toma de corriente. Alinee la marca s de la batería con la marca a del cargador (1) e introduzca la batería guiándola en la ranura. Presionando la batería (2), deslícela en el sentido de la flecha (3) hasta que quede bloqueada en posición.
Inserción de un minivideocasete DV 1 Coloque la fuente de alimentación en la videocámara, y luego deslice el control de abertura de la puerta del compartimento del videocasete y abra la puerta del compartimento del videocasete. Inserción de una tarjeta SmartMedia (Disponible en el comercio) 1 Asegúrese de que el interruptor de alimentación esté en OFF. 2 Abra el monitor LCD. Cubierta de la ranura de la tarjeta 2 3 Abra la cubierta de la ranura de la tarjeta en el sentido de la flecha.
Guía de operación rápida en español Grabación fácil con la videocámara en una cinta 1 Asegúrese de que se encuentre insertado un casete. 2 Quite la tapa del objetivo y levante el visor. 3 Ponga el conmutador selector de medio en TAPE. Reproducción de cinta 1 Pulse el botón de abertura del monitor LCD (OPEN) (1) y abra el monitor LCD de manera que forme un ángulo de 90° con el cuerpo de la videocámara (2).
Grabación con tarjeta Reproducción de tarjeta 1 Asegúrese de que se encuentre insertado una tarjeta SmartMedia (disponible en el comercio). 1 2 Quite la tapa del objetivo y levante el visor. 3 4 Ponga el conmutador selector de medio en CARD. Botón de abertura del monitor LCD(OPEN) 90 Mantenga pulsado el botón de bloqueo y ponga el interruptor de alimentación en CAMERA. 2 Ajuste el monitor LCD con un ángulo que permita ver fácilmente las imágenes de la pantalla.
On-screen Displays in Other Language Visualizaciones en pantalla en español Cuando se selecciona “ESPAÑOL” como idioma de la visualización en pantalla aparecen las siguientes visualizaciones indicadas a continuación. Modo TAPE-CAMERA AJ UST E MAN. E NFO. MANU. VEL. OB TURA EXPOS I C I Ó N E F . IMAGE N MEN Ú E SCE. DE SVANE. RE TOR. R Á P DI S AU TOM. L UZ AU TOM. 1 2 bits 3 0m SP Modo fácil (FÁCIL) ME N Ú DE SVANE. RE T OR. R Á P. FOTO I NST. EF. I NST AN. V I E NT O SON I DO V I SUAL I .
Modo CARD-CAMERA TARJ AU TOM. 1 0 90 AJ UST E MAN. E NFO. MANU. VEL. OB TURA EXPOS I C I Ó N E F . IMAGE N MEN Ú E SCE. AUTOD I SPA. DI S TARJ TARJ AU TOM. NORMAL 1 0 90 Modo fácil (FÁCIL) ME N Ú AUTOD I SPA. MODO GRABA SON I DO V I SUAL I . AJ UST E MAN. E NFO. MANU. VEL. OB TURA EXPOS I C I Ó N E F . IMAGE N MEN Ú E SCE. AUTOD I SPA. DI S AJ UST E C Á MA MODO GRABA EF. I NST AN. ZOOM DI G I . OTROS REMOTO FORMATO SON I DO MODO DEMO. I D I OMA A J .
On-screen Displays in Otherécran Languageen français Affichages sur Les affichages sur écran suivants apparaissent lorsque “FRANÇAIS” est sélectionné pour la langue de l’affichage. Mode TAPE-CAMERA RE GL . MANUE L FOCUS MAN. V I T . OB TUR E XPOS I T I ON MENU I MAGE MENU SC ENE F ONDU RE TOUR DI S AU TO LUMI . AU TO 1 2 bits 3 0min SP Mode facile (FACILE) ME NU F ONDU RE TOUR I NS T ANTANE E F F I NS T AN V ENT SON AF F I CHAGE REGL. MANUE L FOCUS MAN. V I T .
Mode CARD-CAMERA CARTE AUTO 1 0 90 REGL. MANUE L FOCUS MAN. V I T . OB TUR E XPOS I T I ON MENU I MAGE MENU SC ENE RE TARDA T. DI S CARTE CARTE AUTO NORMAL 1 0 90 Mode facile (FACILE) ME NU RE TARDA T. MODE ENREG SON AF F I CHAGE REGL. MANUE L FOCUS MAN. V I T . OB TUR E XPOS I T I ON MENU I MAGE MENU SC ENE RE TARDA T. DI S REGL. CAMERA MODE ENREG EFF I NS T AN ZOOM NUM. D I V ERS T E L ECOM. FORMAT SON MODE DEMO L ANGUE R. L CD V I SEUR RE TROE CL A I LUMI N.
VL-WD255U/hyou; 00/12/26/18:00 Valid for warranty service in the U.S.