STEREO RADIO CASSETTE RECORDER Lysol Vil fe s (S ele 3101258 STEREO-RADIOTELEGRAPHS MAGNETO PHONE A CASSETTES-RADIO STEREO RADIO REGISTRATION A CASSETTE STEREO LR ey T Y TN
bl L INTRODUCTION Thank yau for purchasing this SHARP Product. We hope it will give you many years of trouble-free enjoyment, But for the best performance, read this Manual carefully. it will goods you in operating your SHARP product.
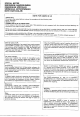
NAME OF CONTROL 1 2 34356 7 8 92 101U 1213 14 HEEHAW Headphones Socket 15. Eject Button 2. CD/Line Input Sockets 16. Cassette Compartment 3. External Microphone Socket 17. Power Indicate 4. Tape 2) Counter Display 18. Reverse Play Button and Indicator 5. Counter Reset Button 19, Fast Wind Button 6. Volume Control 20. Pause Button and Indicator 7. Graphic Equalizer 21. Record/Dubbing Button and Indicator 8. Function Switch 22. Reverse Mode Switch 9. Power Switch 23. Tape Mode Button and Indicators 1.
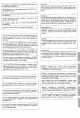
POWER SOURS %) (i~ 126) = T 6 [late e eyl ® AC power 1 et AC voyage defector 10 the voltage in your ares.
RADIO OPERATION set POWER switch to ON. 6 5et M MODE switch to STEREO for FM stereo; if sound s 2 poor, set FM MODE switch to MONO, Set FUNCTION switch te RADIO, 3 ) 7 Otter use, set POWER switch to &, Set BAND switch Use TUNING control to tuns the desired station. 5 For FM broadcasts, raise and extend telescopic rad antenna, ten adjust position and length for best reception. For SW , raise antennae vertically to full height. For LW or MW, move and rotate unit for best sound.
CASSETTE OPERATION wisp DO spoof 08 pause S [Perpetrate surcease | W General information @ The following instructions ail suppose that the cassettes are Invaded with side 1 or A facing forward. # Only use normal or chrome tape for recording. Malta tape is not recommended. (Any tune of tape can be used for playback ) ® Do n0t use C-120 tapes, tapes with internal reals, or spirituality tapes, since they can cause malfunctions.
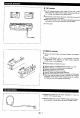
m Using the twin mechanism TAPE 1 {outer slot} and TAPE 2 (inner slot} have different functions. See table below. # With cassette in ably one deck, tape aeration is automatically # For doubling o continuous playback, it is recommended that set to deck with cassette, {Auto Mechanism Mode.} fhe seem {ape formula should be used for boll TAPE 1 and TAPE 2. Wets tapes cannot be used for recording.
1 Set DOWER switch FUNCTION switch o TAPE 3 Press down EJECT button and load gape into outer slot of cassette compartment for TAPE 1, inner soot for TAPE 2. ® Close door by firmly pushing area marked "PUSH". 4 set Tape [7] [Z] switch to NORM for norm or low-NASA tames. Set ditto for metal, CrO, or Fa-Cr tapes, ® TAPE E;! gl switch should be set according to tape in current deck Tf type of tape is different in both decks, set selector to appropriate position when playback switches from one tape to the other.
B ETE] SHe mae REV Fwp PLAY PLAY Winding the tape First press STOP button, then TAPE SILENT' button to defect desired tape. Now press FAST WIND button desired] to wing the tape. Press STOP Hutton 1o stop. m Playback pause 1 During forward or reverse playback, press PAUSE button to interrupt playback. Indicator above PAUSE button lights up, and indicator above REV PLAY or FWD PLAY bunion remains lit. 2 Press either PLAY button fo resume playback {button with lit indicator for same side].
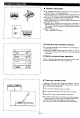
RECORDING @ When recording important selections, be sure to make a preliminary test to ensure tat the desired material is being properly recorded. ® The ALC {Automatic Record Level Control; circuit automatically controls the level of input signal strength. CHASE .35 ® The VOLUME and GRAPHIC EQUALIZER controls may be adjusted with no effect on the recording level input signal.
= Dubbing ® Try to use same tape formula and length for recording tape as master taps. ® Do not operas DUBBING/MIC switch during dubbing. 1 et FOWLER switch o ON. 2 561 FUNCTION switch to TAPE. 3 Load recorded cassette into TAPE 1 cassette compartment, and bank cassette into TAPE 2 cassette compartment. 4 Set DUBBING/MIG switch to NORM for equivalent-speed dubbing, HIGH for double-speed dubbing. 5 set Tape [7] (2] switch coordinating 1o taps i TAPE 2 settle compartment.
® When RECORD/DUBBING button is pressed, the various indicates light up differently accordingly te the erasure prevention tabs, Indicators lit Erasure prevention tabs imitator (TAPE 2] Sides record able Record/ .
USING EXTERNAL UNITS ¥ CD/Line input To listen 1o or record signals farm external units such as CD players end turntables with built-in equalizers, T Use RCA calicoes to connect desired external it to CO/LINE N caskets. (Rer! —bright channel, whits = left) 2 5t POWER switch o ON. 3 Set FUNCTION switch to CD/LINE N, 4 Activate textual unit, 5 story recording with this ult if so desired. (See page 8. Notes: # Ta prevent noise and interference when using 2 tuner, turn off the power of your CD player.
B Internal care ® Dirty heads, capstans, pinch rollers and tape guides cause poor sound and tee jams. Clean these parts with cotton swab moistened with commercial head/pinch roller cleaner or prophylaxis alcohol. ® After long ‘use, deck’s heads znd capstan will become magnetized, causing per sound. Demagnetize these parts once every 30 hours of extraordinarily time by using commercial tape deck demagnetize, Read demagnetization's instructions carefully before using.