Instructions for use Model: X2-30ES
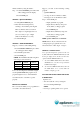
Important safety instructions, read carefully and keep for future reference. CONTENTS Precautions to Avoid Possible Exposure to Microwave Cooking Principles………………4 Excessive Microwave Energy………….…….1 Utensils Guide…….………………………….5 Specifications………………………………...1 Part Names…… .…………………………….5 Before You Call for Service………………….2 Control Panel…………………………………6 Installation……………………………………2 Operation Instructions………………………..7 Grounding Instructions.………………………2 Cleaning and Care…………………………..
BEFORE YOU CALL FOR SERVICE If the oven fails to operate: A) Check to ensure that the oven is plugged in another appliance. securely. If it is not, remove the plug from the C) Check to ensure that the control panel is outlet, wait 10 seconds and plug it in again programmed correctly and the timer is set. securely. D) Check to ensure that the door is securely B) Check for a blown circuit fuse or a tripped closed engaging the door safety lock system. main circuit breaker.
GROUNDING INSTRUCTIONS This appliance must be grounded. This oven is equipped with a cord having a grounding wire with a grounding plug. It must be plugged into a wall receptacle that is properly installed and grounded. In the event of an electrical short circuit, grounding reduces risk of electric shock by providing an escape wire for the electric current. It is recommended that a separate circuit serving only the oven be provided.
temperature should be checked before b. Remove wire twist-ties from paper or serving in order to avoid burns. plastic bags before placing bag in oven. c. If smoke is observed, switch off or 13. Cooking utensils may become hot because unplug the appliance and keep the of heat transferred from the heated food. door closed in order to stifle any Potholders may be needed to handle the flames. utensil. d. Do not use the cavity for storage 14. Utensils should be checked to ensure that purposes.
and hamburgers. Large items like roasts through cooking both from top to bottom must be turned over at least once. and from the center of the dish to the 5. Rearrange foods such as meatballs halfway outside. UTENSILS GUIDE 1. The ideal material for a microwave utensil is transparent to microwave, it allows energy to pass through the container and heat the food. 2. Microwave can not penetrate metal, so metal utensils or dishes with metallic trim should not be use. 3.
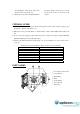
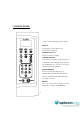
CONTROL PANEL (Also see following pages for more detail.) DISPLAY Cooking time, power, indicators and present time are displayed. NUMBER PADS (0-9) Touch to set times or weights. WEIGHT DEFROST Use to defrost frozen meat, poultry and seafood by weight. The defrosting time and power level are automatically set once the food category and the weight are programmed.
START DELAY lights will come on to indicate which stage the Use to set the oven to start-up at a later time. oven is operating in. The start delay indicator will flicker when the TIMER oven is in the start delay state. The clock must Use to set cooking time. Allows you to set up be set before the start delay function can be to 99 minutes and 99 seconds. programmed. CLOCK Use to set the time of day or recall the time of EXPRESS day.
one seconds to 99 minutes and 99 3. Touch START pad. seconds. If you are setting a time greater NOTE: than one minute, you must enter ·The respective lights will come on to numbers for both minutes and seconds. indicate which stage the oven is operating For example, to set 20 minutes, enter in. After total time has elapsed, 3 beeps 2,0,0,0. sound. After a cooking or defrosting 3.
minute at 100% by using the feature: Suppose you want set the following cooking Step : 1. Touch the EXPRESS pad 3 times then program: ① QUICK DEFROST; “1:00” will appear in the display. ② 1st stage: Cook for 5 minutes at 100%; 2. Touch START pad. ③ 2nd stage: Cook for 10 minutes at 50%. Step: 1. Touch STOP pad. SETTING “QUICK DEFROST” 1. Touch QUICK DEFROST pad. 2. Input quick defrost program. 2. Enter desired defrosting time by 3. Input timer (5 minutes) and power level (100%) cooking program.
CLEANING AND CARE 1. Turn off the oven and remove the power cleaned regularly to avoid excessive noise. plug from the wall socket before cleaning. Simply wipe the bottom surface of the oven 2. Keep the inside of the oven clean. When with mild detergent. The roller ring may be food splatters or spilled liquids adhere to washed in mild sudsy water or dishwasher. oven walls, wipe with a damp cloth.