ELECTRONIC CASH REGISTER ELEKTRONISCHE REGISTRIERKASSE CAISSE ENREGISTREUSE ELECTRONIQUE CAJA REGISTRADORA ELECTRONICA ELEKTRONISCHE KASSA INSTRUCTION MANUAL BEDIENUNGSANLEITUNG MANUEL D’INSTRUCTIONS MODEL MODELL MODELE MODELO MODEL XE-A213 MANUAL DE INSTRUCCIONES GEBRUIKSAANWIJZING XE-A213 With Quick Start Guide Mit Schnellstartanleitung Avec Guide de démarrage rapide Con Guía de inicio rápido Met Gids voor snel starten
A213/Coverback/(SEEG)(5) 06.4.28 7:58 PM Page 2 CAUTION: The cash register should be securely fitted to the supporting platforms to avoid instability when the drawer is open. CAUTION: The socket-outlet shall be installed near the equipment and shall be easily accessible. VORSICHT: Die Netzsteckdose mu§ nahe dem Gert angebracht und leicht zugnglich sein. ATTENTION: La prise de courant murale devra tre installe proximit de lÕquipement et devra tre facilement accessible.
A213_1 Quick Start Guide 06.4.28 8:20 PM Page 1 English INTRODUCTION Thank you very much for your purchase of the SHARP Electronic Cash Register, Model XE-A213. Please read this manual carefully before operating your machine in order to gain full understanding of functions and features. Please keep this manual for future reference. It will help you if you encounter any operational problems. CAUTION! English Never install the batteries into the cash register before initializing it.
A213_1 Quick Start Guide 06.4.28 8:20 PM Page 2 CONTENTS INTRODUCTION ............................................................................................................................................1 IMPORTANT ..................................................................................................................................................1 CONTENTS...................................................................................................................................
A213_1 Quick Start Guide 06.4.28 8:20 PM Page 3 Part2 FOR THE OPERATOR OTHER BASIC SALES ENTRIES ...............................................................................................................34 1 Additional Information for BASIC SALES ENTRY ...............................................................................34 2 Error Warning ......................................................................................................................................34 3 Item Entries .
A213_1 Quick Start Guide 06.4.28 8:20 PM Page 4 Part3 FOR THE MANAGER PRIOR TO PROGRAMMING ......................................................................................................................49 AUXILIARY FUNCTION PROGRAMMING .................................................................................................52 1 Miscellaneous Key Programming ........................................................................................................52 Programming for -..........
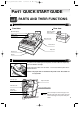
A213_1 Quick Start Guide 06.4.28 8:20 PM Page 5 Part1 QUICK START GUIDE STEP 1 PARTS AND THEIR FUNCTIONS 1 External View Front view Rear view Customer display (Pop-up type) Operator display Printer cover Receipt paper XE-A213 AC power cord Mode switch Keyboard Drawer lock Drawer 2 Printer The printer is one station type thermal printer, therefore it does not require any type of ink ribbon or cartridge. Lift the rear of the printer cover to remove.
A213_1 Quick Start Guide 06.4.28 8:20 PM Page 6 3 Mode Switch and Mode Keys The mode switch can be operated by inserting one of the two supplied mode keys - manager (MA) and operator (OP) keys. These keys can be inserted or removed only in the “REG” or “ ” position. The mode switch has these settings: : This mode locks all register operations. (AC power turns off.) No change occurs to register data. OP X/Z: To take individual clerk X or Z reports, and to take flash reports.
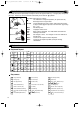
A213_1 Quick Start Guide 06.4.28 8:20 PM Page 7 Part1 GLU Guest look up key NBAL New balance key CR1 CR2 CH1 CH2 ST QUICK START GUIDE Cheque 1 and 2 keys Subtotal key TL/NS 1~ Part2 Part3 Total/No sale key 70 Direct PLU keys Credit 1 and 2 keys In this manual, key tops are shown in one line, such as p for easy reading. Department keys are shown like !, and numeric keys are indicated with simple number indication, such as 1, unless otherwise specified.
A213_1 Quick Start Guide 06.4.28 8:20 PM Page 8 5 Displays Operator display Numeric entry display area Repeat number display area Power save mark display area Function message display area • Repeat number display area The number of repeats is displayed, starting at “2” and incremental with each repeat. When you have registered ten times, the display will show “0”. (2 ➞ 3 ......9 ➞ 0 ➞ 1 ➞ 2...
A213_1 Quick Start Guide 06.4.28 8:20 PM Page 9 Part1 STEP Part2 QUICK START GUIDE Part3 2 PREPARING THE CASH REGISTER Unpack the cash register and make sure all accessories are included. For details of accessories, please refer to “SPECIFICATIONS” section on page 95. For installing the cash register, find a stable surface near an AC outlet where the cash register will not subject to water sources or direct sunlight.
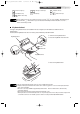
A213_1 Quick Start Guide 06.4.28 8:20 PM Page 10 2 Installing Batteries Three new alkaline batteries LR6 (“AA”size) must be installed in the cash register to prevent the data and user-programmed settings from being erased from the memory, when the AC cord is accidentally disconnected or in case of power failure. Once installed, the batteries will last approximately one year before needing replacement.
A213_1 Quick Start Guide 06.4.28 8:20 PM Page 11 Part1 QUICK START GUIDE Part2 Part3 3 Installing a Paper Roll Precaution: The paper cutter is mounted on the printer cover. Take caution when removing and installing the cover. The register can print receipts or journals. For the printer, you must install the paper roll provided with the register, even when you program the register for not printing receipts or journals.
A213_1 Quick Start Guide 06.4.28 8:20 PM Page 12 5. When not using the take-up spool (using as receipt paper): • Cut off the excess paper using the edge of the inner cover, and replace the printer cover. Press the F key to make sure the paper end comes out of the printer cover and clean paper appears. If the paper end does not come out, open the printer cover, and pass the paper end between the paper cutter and the paper guide of the printer cover, and replace the cover.
A213_1 Quick Start Guide 06.4.28 8:20 PM Page 13 Part1 STEP QUICK START GUIDE Part2 Part3 3 BASIC FUNCTION PROGRAMMING Before starting sales entries, you must first program necessary items so the cash register suits your sales needs.
A213_1 Quick Start Guide 06.4.28 8:20 PM Page 14 Guidance for text programming The register allow you to program texts for department item names (page 17), PLU/subdepartment item names (page 22), function texts (page 62), clerk names (page 24), logo messages (page 25), foreign and domestic currency symbols (page 61), and training mode texts (page 62). When you program texts, place the keyboard sheet for text programming over the keyboard sheet for ordinal use.
A213_1 Quick Start Guide 06.4.28 8:20 PM Page 15 Part1 QUICK START GUIDE Part2 Part3 3 Language Selection To set 0 s 88 *Language: 0: English 1: German By default, English is set. @ 2: French Key operation example s 88 @ 0A *Language (0-3) A 3: Spanish Operator display Print LANGUAGE CHANGE THANK YOU When you change the language, the texts such as clerk names (page 24), logo messages (page 25) and function texts (page 62), which you programmed, will be reset to the default settings.
A213_1 Quick Start Guide 06.4.28 8:20 PM Page 16 5 Tax Programming If you program the VAT/tax, the cash register can calculate the sales tax. In the VAT system, the tax is included in the price you enter in the register, and the tax amount is calculated when tendered according to the VAT rate programmed. In the tax system, the tax is calculated when tendered according to the tax rate programmed, and added to the price.
A213_1 Quick Start Guide 06.4.28 8:20 PM Page 17 Part1 Part2 QUICK START GUIDE Part3 • The lowest taxable amount is valid only when you select add on tax system. If you select VAT (Value added system), it is ignored. • If you make an incorrect entry before pressing the third @ key in programming a tax rate, cancel it with the l key. • You do not need to enter the trailing zeros of the tax rate (after the decimal point), but you do need to enter the decimal for fractions.
A213_1 Quick Start Guide 06.5.30 9:08 AM Page 18 Key operation Operator display 1. Specify the department code. (1) For dept.1 through 6, press the department key. Or enter dept. code using numeric key, and then press the d key. Immediately after displaying the current text data and the corresponding dept. key code you entered, guidance message for the next step will be displayed. 6 DEPT.06 06 ENTER[00]KEY 2. Text programming (Press s to skip. / Press A to terminate.
A213_1 Quick Start Guide 06.4.28 8:20 PM Page 19 Part1 (2) Press the s key to register the entry type. Immediately after displaying guidance message for the next step, the current setting for the next step will be displayed. Part2 QUICK START GUIDE s Part3 SELECT OF TAX1 TAX1 YES 5. VAT/tax 1 status programming (Press s to skip. / Press A to terminate.) (1) Go to (2) when the VAT/tax 1 status does not need to be changed from "TAX1 YES". Otherwise, press : key to display "TAX1 NO".
A213_1 Quick Start Guide 06.4.28 8:20 PM Page 20 8. VAT/tax4 status programming (Press s to skip. / Press A to terminate.) (1) Go to (2) when the VAT/tax 4 status does not need to be changed from "TAX4 NO". Otherwise, press : key to display "TAX4 YES". Each time : key is pressed, the display shows "TAX4 YES" and "TAX4 NO" alternatively. Default setting is "NO". (2) Press the s key to register the setting.
A213_1 Quick Start Guide 06.4.28 8:20 PM Page 21 Part1 Part2 QUICK START GUIDE Part3 11. Entry digit limit programming (Press s to skip. / Press A to terminate.) (1) Enter entry digit limit using numeric key. The entry digit limit can be set up to 8. Default setting is 8. 7 7 s (2) Press the s key to register the setting. Immediately after displaying current text setting and the corresponding department code for the next department, guidance message will be displayed. The dept.
A213_1 Quick Start Guide 06.4.28 8:20 PM Page 22 7 PLU (Price Look-Up) and Subdepartment Programming The PLU function allows speedy key entries whereby a price is automatically called up when a direct PLU key is pressed or a code is entered. The subdepartment is a kind of “open PLU”, which requires you to enter a price before the direct PLU key is pressed or after the PLU code is entered. A maximum of 1200 PLU/subdepartment settings are possible.
A213_1 Quick Start Guide 06.5.30 9:04 AM Page 23 Part1 Part2 QUICK START GUIDE Part3 2. Text programming (Press s to skip. / Press A to terminate.) (1) Press : key to enter text programming. Immediately after displaying guidance message, the current text data will be displayed. (2) Enter an item name. A maximum of 16 characters can be entered. Please refer to “Guidance for text programming” on page 14 for entering the item name.
A213_1 Quick Start Guide 06.4.28 8:20 PM Page 24 5. Function programming (Press s to skip. / Press A to terminate.) (1) Go to (2) when the function does not need to be changed from "PLU". Otherwise, press : key to display "SUBDEPT". Each time : key is pressed, the display shows "SUBDEPT" and "PLU" alternatively. Choose "PLU" for using the PLU code as PLU and "SUBDEPT" for using the PLU code as subdepartment. Default setting is "PLU". s (2) Press the s key to register the setting.
A213_1 Quick Start Guide 06.4.28 8:20 PM Page 25 Part1 Key operation example QUICK START GUIDE Operator display s5P Part2 Part3 Print CLERK NAME PROG. ENTER CLERK NO. 1@ _ DAVID_ DAVID s CLERK NAME PROG. ENTER CLERK NO. A 0.00 Logo messages (6 lines and 24 digits for each line) The register can print programmed messages on every receipt. On the standard model, a 6-line logo message is printed on the receipt. If you want to print in other logo message format, please change the format.
A213_1 Quick Start Guide 06.4.28 8:20 PM Page 26 To print the logo message “THANK YOU” using double sized characters and centering on the third line. Key operation example s4P Operator display Print LOGO TEXT PROG. ENTER LINE NO. 3@ SSS W THANK S YOU W SSS s _ _ _ W N=K= =Y=O=U_ W N=K= =Y=O=U_ = =Y=O=U _ LOGO TEXT PROG. ENTER LINE NO. A 0.00 A 6-line logo message is preprogrammed when shipped. Please start entering from the first line when you first program a logo message.
A213_1 Quick Start Guide 06.4.28 8:20 PM Page 27 Part1 STEP Part2 QUICK START GUIDE Part3 4 BASIC SALES ENTRY 1 Basic Sales Entry Example Listed below is a basic sales entry example when selling items by cash. For operation details, please refer to "Additional Information for BASIC SALES ENTRY" on page 34. Mode switch setting REG OPX/Z MGR 1. Turn the mode switch to the REG position. X1/Z1 Clerk assignment X2/Z2 2. Enter your clerk code. (For example, clerk code is 1.
A213_1 Quick Start Guide 06.4.28 8:20 PM Page 28 2 PLU Entry The cash register allows you two ways of entering PLUs; direct PLU entry and PLU code entry. For more information about PLU entries, refer to "PLU/subdepartment entries" on page 35. Direct PLU entry For the direct PLU code entry, press the direct PLU keys. For the location of the keys, refer to "Direct PLU keys" below. For the PLU level shift, refer to "PLU level shift (for direct PLU key)" on page 38.
A213_1 Quick Start Guide 06.4.28 8:20 PM Page 29 Part1 STEP QUICK START GUIDE Part2 Part3 5 CORRECTION 1 Cancellation of the Numeric Entry If you make an incorrect numeric entry, you can clear the entry by pressing the l key only before pressing a department key, PLU/subdepartment key, the d key, the % key, the - key or the f key.
A213_1 Quick Start Guide 06.5.30 9:05 AM Page 30 3 Correction of the Next-to-last or Earlier Entry (indirect void) You can void any incorrect department entry, PLU/subdepartment entry or item refund entry made during a transaction if you find it before finalizing the transaction (e.g. pressing the A key). This function is applicable to department, PLU/subdepartment and refund entries only. Press the v key just before you press a department key, d key, direct PLU key or p key.
A213_1 Quick Start Guide 06.4.28 8:20 PM Page 31 Part1 QUICK START GUIDE Part2 Part3 5 Correction of Incorrect Entries not Handled by the Direct or Indirect Void Function Any errors found after the entry of a transaction has been completed or during an amount tendered entry cannot be voided. These errors must be corrected by the manager. The following steps should be taken: 1. 2. 3. If making the amount tendered entry, finalize the transaction. Make correct entries from the beginning.
A213_1 Quick Start Guide STEP 06.4.28 8:20 PM Page 32 6 FULL SALES REPORT (Z REPORT) For reading and resetting the sales data, use the resetting function (Z). Resetting prints all sales information and clears the entire memory except for the GT1 through GT3, Training GT, BAL, reset count, and consecutive number. For more information about resetting (Z) of sales totals, refer to "READING (X) AND RESETTING (Z) OF SALES TOTALS" on page 80.
A213_1 Quick Start Guide 06.4.28 8:20 PM Page 33 Part1 Customer counter Order total Paid total Paid total average per customer Order total–Paid total Cash counter and total Cheque1 sales counter and total Credit1 sale and tendering counter and total Exchange counter and total (in preset rate entry) Domestic currency Part2 QUICK START GUIDE Part3 *1: When you take X1 report, “X1” is printed. *2: Printed in the Z1 report only. *3: BAL is not printed by default.
A213_2 FOR THE OPERATOR 06.4.28 8:01 PM Page 34 Part2 FOR THE OPERATOR OTHER BASIC SALES ENTRIES 1 Additional Information for BASIC SALES ENTRY Clerk assignment Prior to any item entries, clerks must enter their clerk codes into the register. However, the code entry may not be necessary when the same clerk handles the consecutive transactions.
A213_2 FOR THE OPERATOR 06.4.28 8:01 PM Page 35 Part1 Part2 FOR THE OPERATOR Part3 Error escape function To quit a transaction due to an error or an unforeseen event, use the error escape function as shown below: To clear the error state l Transaction E E The transaction is voided (treated as a subtotal void) and the receipt is issued by this function. If you have already entered a tendered amount, the operation is finalized as a cash sale. 3 Item Entries Single item entries 1.
A213_2 FOR THE OPERATOR 06.4.28 8:01 PM Page 36 • PLU entries Direct PLU key PLU code Direct key entry p PLU code entry • Subdepartment (open PLU) entries PLU code Direct key entry Direct PLU key Unit price * (max. 8 digits) p p Unit price * (max. 8 digits) PLU code entry * Less than the programmed upper limit amounts When zero is entered, only the sales quantity is added.
A213_2 FOR THE OPERATOR 06.4.28 8:01 PM Page 37 Part1 Part2 FOR THE OPERATOR Part3 Multiplication entries When selling a large quantity of items, it is convenient to use the multiplication entry method. Enter quantity using numeric keys and press the @ key before starting item entry as shown in the example below. When programmed to allow fractional quantity entries, you can enter up to four integers and three digit decimal, though the quantity is counted as one for sales reports.
A213_2 FOR THE OPERATOR 06.4.28 8:01 PM Page 38 PLU level shift (for direct PLU key) This shift can double or triple the number of direct PLU keys on your register without adding additional direct PLU keys. You can use direct PLU keys in three levels by utilizing shift keys Ò, Ú, and Æ. These keys have the following functions. Ò: Shifts the PLU level from level 2 or 3 to level 1 (ordinary level). Ú: Shifts the PLU level from level 1 or 3 to level 2. Æ: Shifts the PLU level from level 1 or 2 to level 3.
A213_2 FOR THE OPERATOR 06.4.28 8:01 PM Page 39 Part1 Part2 FOR THE OPERATOR Part3 When your machine has been programmed for the automatic return mode (returning to level 1 after an item entry): Key operation example The machine returns to level 1 automatically. Receipt print ¡ Ú¡ ™ ¡ A When your machine has been programmed for the lock shift mode: Key operation example The machine keeps the level 2 until other level shift key is pressed.
A213_2 FOR THE OPERATOR 06.4.28 8:01 PM Page 40 5 Finalization of Transaction Cash or cheque tendering Press the s key to get a subtotal, enter the amount tendered by your customer, then press the A key if it is a cash tender or press a cheque key (X or Y) if it is a cheque tender. When the amount tendered is greater than the amount of the sale, the register will show the change due amount with the function message “CHANGE”. Otherwise the register will show a deficit with the function message “DUE”.
A213_2 FOR THE OPERATOR 06.4.28 8:01 PM Page 41 Part1 Part2 FOR THE OPERATOR Part3 Credit sale Enter items and press a credit key (c or b). Key operation example Receipt print 2500 ( 7 d 3250 d c Mixed-tender sale You can perform mixed-tendering of cheque and cash, cash and credit, and cheque and credit. Key operation example Receipt print s 950 A b 6 Computation of VAT (Value Added Tax)/tax VAT/ tax system The cash register may be programmed for the following six VAT/tax systems.
A213_2 FOR THE OPERATOR 06.4.28 8:01 PM Page 42 Manual tax 1-4 system (Manual entry method using preset percentages) s t This system provides the tax calculation for taxable 1 through 4 subtotals. This calculation is performed using the corresponding programmed percentages when the t key is pressed just after the s key. After this calculation, you must finalize the transaction.
A213_2 FOR THE OPERATOR 06.4.28 8:01 PM Page 43 Part1 Part2 FOR THE OPERATOR Part3 OPTIONAL FEATURES 1 Auxiliary Entries Percent calculations (premium or discount) Your register provides the percent calculation for the subtotal and/or each item entry depending on the programming. Refer to "Programming for %" for the programming. • Percentage: 0.01 to 100.00% (Depending on the programming) Application of preset rate (if programmed) and manual rate entry are available.
A213_2 FOR THE OPERATOR 06.4.28 8:01 PM Page 44 Deduction for item entries Key operation example Receipt print 7 d 675 d A (When a deduction amount of 0.75 is programmed.
A213_2 FOR THE OPERATOR 06.4.28 8:01 PM Page 45 Part1 Part2 FOR THE OPERATOR Part3 2 Guest Look-Up (GLU) This feature is used to store and recall previous balances when a guest look-up (GLU) code is entered. You can accept re-order and issue bills with GLU codes. The GLU code refers to a code that is used whenever the guest check must be accessed for re-ordering or final payment. The GLU code can be 1 to 50. For new guest For a new guest, open a new guest check by assigning a GLU code.
A213_2 FOR THE OPERATOR 06.4.28 8:01 PM Page 46 Additional ordering For making additional entries for a GLU already generated and not settled yet (hereinafter referred to as open GLU), enter the corresponding open GLU code and press the G key to recall the previous balance of the open GLU, then start item entries. By default, when entering an open GLU code, the cash register does not check if the clerk code is the same as the new order was made for the guest.
A213_2 FOR THE OPERATOR 06.4.28 8:01 PM Page 47 Part1 Part2 FOR THE OPERATOR Part3 3 Auxiliary Payment Treatment Currency exchange For an additional payment in foreign currency Preset exchange rate After an entry is completed For direct finalization V *Exchange rate or After the amount Amount tendered (max. 8 digits) tendered is found smaller than the A X Y c b or or sales amount in a sales entry l Reentry Next registration or payment in domestic currency *Exchange rate: 0.000000 to 999.
A213_2 FOR THE OPERATOR 06.4.28 8:01 PM Page 48 Received-on account entries When you receive on account from a customer, use the r key. For the received-on-account (RA) entry, enter the amount, and press the r key. Cash tendering only available for RA operation. Key operation example Receipt print 12345 N 4800 r Paid-out entries When you pay an amount to a vendor, use the o key. For the paid-out (PO) entry, enter the amount and press the o key. Cash tendering only available for PO operation.
A213_3 FOR THE MANAGER(SEEG) 06.4.28 8:33 PM Page 49 Part3 FOR THE MANAGER PRIOR TO PROGRAMMING Procedure for programming 1. 2. 3. 4. Check to see whether a paper roll is present in the machine. If there is not enough REG OPX/Z MGR paper on a roll, replace it with a new one (refer to "Replacing the Paper Roll" on X1/Z1 page 89 for the replacement). X2/Z2 Put the manager key in the mode switch and turn it to the PGM position. PGM Program necessary items into the cash register.
A213_3 FOR THE MANAGER(SEEG) 06.4.28 8:33 PM Page 50 Example 2: Job code type programming (programming starting from the press of s.) Key operation example Operator display s1@ Job code entry MACHINE NO. ¥ Guidance message is displayed. To repeat Parameter entry 50 50 (depending on programming) Guidance message is changed after a new job code entry. Registration of parameter s To terminate A ENTER[TL/NS]KEY 0.
A213_3 FOR THE MANAGER(SEEG) 06.4.28 8:33 PM Page 51 Part1 Part2 Part3 FOR THE MANAGER Alphanumeric character code table Ï ««u ««o ¬ U«« ò «« O î (space) ! Ó # $ % & Õ ( ) + , - Code Character 046 047 048 049 050 051 052 053 054 055 056 057 058 059 060 061 062 063 064 065 066 067 068 069 070 071 072 073 074 075 076 077 078 079 080 081 082 083 084 085 086 087 088 089 090 .
A213_3 FOR THE MANAGER(SEEG) 06.4.28 8:33 PM Page 52 AUXILIARY FUNCTION PROGRAMMING 1 Miscellaneous Key Programming The cash register provides miscellaneous keys such as -, %, V, r, o, X, Y, c, b and A. Miscellaneous keys are programmed in one procedure with guidance messages except for the A key. • To keep current setting on each programming, press the s key when the corresponding guidance message is firstly displayed.
A213_3 FOR THE MANAGER(SEEG) 06.4.28 8:33 PM Page 53 Part1 Part2 (2) Press the s key to register the amount. Immediately after displaying guidance message for the next step, the current setting for the next step will be displayed. Part3 FOR THE MANAGER s SIGN (-) 4. Sign programming (Press s to skip. / Press A to terminate.) (1) Go to (2) when the sign does not need to be changed from "(-)". Otherwise, press : key to display "(+)".
A213_3 FOR THE MANAGER(SEEG) 06.4.28 8:33 PM Page 54 7. Entry digit limit programming (Press s to skip. / Press A to terminate.) (1) Enter entry digit limit using numeric key. The entry digit limit can be set up to 8. Default setting is 8. The entry digit limit is in effect for the REG mode operations but can be overridden in the MGR mode. The entry digit limit is represented by the number of allowable digit for the maximum entry amount for discount key. When "0" is set, open price entry is prohibited.
A213_3 FOR THE MANAGER(SEEG) 06.4.28 8:33 PM Page 55 Part1 Part2 Part3 FOR THE MANAGER (2) Enter the text. A maximum of 16 characters can be entered. Please refer to "Guidance for text programming" on page 14 for entering the text. When you start entering a character, the current text data will be overwritten by new data. Pressing the P and @ key moves the cursor to the right and left respectively. % (3) Press the s key to register the text.
A213_3 FOR THE MANAGER(SEEG) 06.4.28 8:33 PM Page 56 6. Discount calculation (for the subtotals) programming (Press s to skip. / Press A to terminate.) (1) Go to (2) when the discount calculation for the subtotals does not need to be changed from "SBTL ENABLE". Otherwise, press : key to display "SBTL DISABLE". Each time : key is pressed, the display shows "SBTL DISABLE" and "SBTL ENABLE" alternatively. Default setting is "ENABLE". s (2) Press the s key to register the setting.
A213_3 FOR THE MANAGER(SEEG) 06.4.28 8:33 PM Page 57 Part1 Part2 Part3 FOR THE MANAGER 2. Text programming (Press s to skip) (1) Press : key to enter text programming. Immediately after displaying guidance message, the current text data will be displayed. (2) Enter the text. A maximum of 16 characters can be entered. Please refer to "Guidance for text programming" on page 14 for entering the text. When you start entering a character, the current text data will be overwritten by new data.
A213_3 FOR THE MANAGER(SEEG) 06.4.28 8:33 PM Page 58 s (2) Press the s key to register the setting. Immediately after displaying guidance message for the next step, the current setting for the next step will be displayed. TAB 2 6. Position of decimal point programming (Press s to skip. / Press A to terminate.) (1) Enter the position of decimal point from right using numeric key. The position of decimal point from right can be set from 0 to 3. Default setting is 2.
A213_3 FOR THE MANAGER(SEEG) 06.4.28 8:33 PM Page 59 Part1 Part2 Part3 FOR THE MANAGER (2) Enter the text. A maximum of 16 characters can be entered. Please refer to "Guidance for text programming" on page 14 for entering the text. When you start entering a character, the current text data will be overwritten by new data. Pressing the P and @ key moves the cursor to the right and left respectively. CHEQUE (3) Press the s key to register the text.
A213_3 FOR THE MANAGER(SEEG) 06.4.28 8:33 PM Page 60 5. Entry digit limit programming (Press s to skip. / Press A to terminate.) (1) Enter entry digit limit using numeric key. The entry digit limit can be set up to 8. Default setting is 8. The entry digit limit is in effect for REG mode operation but can be overridden in the MGR mode. The entry digit limit is represented by the number of allowable digits for the maximum entry or total amount.
A213_3 FOR THE MANAGER(SEEG) 06.4.28 8:33 PM Page 61 Part1 Part2 Part3 FOR THE MANAGER Footer printing • This programming decides whether or not the machine should print a message at the foot of a receipt when the A key is used. With regard to programming method of footer logo message, refer to “Logo messages” section on page 25. Amount tendered entry • You may select amount tendered, compulsory or optional.
A213_3 FOR THE MANAGER(SEEG) 06.4.28 8:33 PM Page 62 Training mode text (12 digits) For every receipts issued in the training mode, **TRAINING** is printed by default. When you want to change the text, follow the procedure below. To keep the current setting s P 87 Character keys (max. 12 digits) Key operation example s A Print s 87 P S S TRAINING S S sA The programmed text is printed in double-size characters on the receipts issued in the training mode.
A213_3 FOR THE MANAGER(SEEG) 06.4.28 8:33 PM Page 63 Part1 Part2 Part3 FOR THE MANAGER List of function texts Function no. Key or function Default setting Function no. Key or function Default setting 1 _ Cash in drawer % (–) %1 42 2 43 Cash/cheque in drawer CA/CH ID 4 Differ DIFFER 44 Change for cheque CHK/CG 5 Taxable 1 subtotal TAX1 ST 45 Domestic currency 1 DOM.CUR1 6 Taxable 2 subtotal TAX2 ST 46 Domestic currency 2 DOM.
A213_3 FOR THE MANAGER(SEEG) 06.4.28 8:33 PM Page 64 ADVANCED FUNCTION PROGRAMMING 1 Register Number and Consecutive Number Programming The register number and consecutive numbers are printed on every receipt or journal. When your store has two or more registers, it is practical to set separate register numbers for identification. The consecutive number is increased by one each time a receipt is issued or when a journal print occurs. For consecutive number programming, enter a number (max.
A213_3 FOR THE MANAGER(SEEG) 06.4.28 8:33 PM Page 65 Part1 Part2 Part3 FOR THE MANAGER 2 Various Function Selection Programming 1 The cash register provides various detailed functions listed below. • Function selection for miscellaneous keys • Print format • Receipt print format • PLU level shift and GLU function parameters • Others For this programming, the job code entry style is applied. You can continue programming until you press the A key for the programming described in this section.
A213_3 FOR THE MANAGER(SEEG) 06.4.28 8:33 PM Page 66 Print format Job code: 6 * Item: Selection: A Printing style B Receipt print style C Time print on all receipts D Date print on all receipts E Consecutive no.
A213_3 FOR THE MANAGER(SEEG) 06.4.28 8:33 PM Page 67 Part1 Part2 Part3 FOR THE MANAGER PLU level shift and GLU function parameters Job code: 15 * Item: Selection: A PLU level shift mode B PLU level shift operation availability C PLU level shift timing for returning to level 1 in automatic return mode Checking clerk code on guest check when a reorder is made Printing of previous and new balances on G.C.
A213_3 FOR THE MANAGER(SEEG) 06.4.28 8:33 PM Page 68 Job code: 62 * Item: Selection: A B Always enter 0.
A213_3 FOR THE MANAGER(SEEG) 06.4.28 8:33 PM Page 69 Part1 Part2 Part3 FOR THE MANAGER Job code: 65 * Item: A Selection: Printing of balance GT on Z report B Resetting of balance GT at the general Z1 report C to H Always enter 0.
A213_3 FOR THE MANAGER(SEEG) 06.4.28 8:33 PM Page 70 Rounding amount printing (A) Total amount rounding when a transaction is finalized directly by X, Y, c or b key(B) • When you live in Australia, set as shown on the tale below for the parameters A and B. Rounding up of the unit digit of amount (C) Rounding down of the unit digit of amount (D) • Handle C and D as a pair. When you live in Australia, Switzerland, Norway or South Africa, set as shown on the table below for the parameters C and D.
A213_3 FOR THE MANAGER(SEEG) 06.4.28 8:33 PM Page 71 Part1 Part2 Part3 FOR THE MANAGER Temporary EJ printing during a transaction • If selecting “enable”, you can print journal data of a current transaction recorded in EJ memory by pressing the R key during the transaction. To realize this function completely, the cash register must be programmed to print the receipt and set the Receipt ON/OFF function to OFF.
A213_3 FOR THE MANAGER(SEEG) 06.4.28 8:33 PM Page 72 Job code: 70 * Item: Selection: A VAT shift operation timing B C D E F G H Always enter 0. Always enter 0. Always enter 0. Always enter 0. Always enter 0. Always enter 0. Always enter 0. Entry: Only during a transaction* Only at the start of transaction 1 0 0 0 0 0 0 0 0 3 Various Function Selection Programming 2 The cash register provides various options so you can use the register to suit your sales needs.
A213_3 FOR THE MANAGER(SEEG) 06.4.28 8:33 PM Page 73 Part1 Part2 Part3 FOR THE MANAGER Logo message print format You can select the number of lines for your logo message, and the position to print it on receipt. For details of the logo message type, please refer to “Logo messages” on page 25.
A213_3 FOR THE MANAGER(SEEG) 06.4.28 8:33 PM Page 74 Training clerk specification for training mode For the details of clerk training, please refer to “TRAINING MODE” on page 79. To cancel s @ 86 Clerk number (1 to 25) Key operation example s A Print s 86 @ 20 s A AUTO key programming — Automatic sequence key If you program frequently performed transactions or report sequences for the a key, you can recall those transactions and/or reports simply by pressing the a key in key operations.
A213_3 FOR THE MANAGER(SEEG) 06.4.28 8:33 PM Page 75 Part1 Part2 Part3 FOR THE MANAGER 4 EURO Programming For details of EURO migration operation, please refer to “EURO MIGRATION FUNCTION”. EURO system settings To set 0 for all items s @ 8 * Item: A B C D *ABCD s A Selection: Printing exchange total amount and change amount on receipt or journal Always enter 0.
A213_3 FOR THE MANAGER(SEEG) 06.4.28 8:33 PM Page 76 Date setting for EURO modification operation To set all zeros s @ 13 Key operation example s 13 01072009 s Date (Day-Month-Year) (seven or eight digits) A Print @ s A • In case you changed the date format using job code 61, follow the format you selected for setting the date. • If all zeros are set, this programming is disabled.
A213_3 FOR THE MANAGER(SEEG) 06.4.28 8:33 PM Page 77 Part1 Part2 Part3 FOR THE MANAGER Sample printouts 1 Programming report 1 Mode Function no.& its text Function parametrs Discount amt.
A213_3 FOR THE MANAGER(SEEG) 06.4.28 8:33 PM Page 78 2 Programming report 2 5 Department programming report Job code Dept. code Dept. text A to H from the left * Job code #71, 72, 76 and 77 are fixed settings, for which you cannot change the settings. Dept. function Dept.
A213_3 FOR THE MANAGER(SEEG) 06.4.28 8:33 PM Page 79 Part1 Part2 Part3 FOR THE MANAGER TRAINING MODE The training mode is used when the operator or the manager practices register operations. When a clerk in training is selected, the machine automatically enters the training mode. To specify a clerk to be trained, refer to “Training clerk specification for training mode” in “ADVANCED FUNCTION PROGRAMMING” in page 74. The training operation is valid only in REG, MGR and mode.
A213_3 FOR THE MANAGER(SEEG) 06.4.28 8:33 PM Page 80 READING (X) AND RESETTING (Z) OF SALES TOTALS • Use the reading function (X) when you need to take a reading of sales information entered since the last reset. You can take this reading any number of times. It does not affect the register’s memory. • Use the resetting function (Z) when you need to clear the register’s memory.
A213_3 FOR THE MANAGER(SEEG) 06.4.28 8:33 PM Page 81 Part1 Part2 Part3 FOR THE MANAGER • When both sales quantities and sales amounts are zero, printing is skipped. If you do not want to skip, change the programming. (Refer to “Print format” of “Various Function Selection Programming 1”.) • “X” represents read symbol and “Z” represents reset symbol in the reports. • To stop reading and resetting the PLU sales report, turn the mode switch to the MGR position.
A213_3 FOR THE MANAGER(SEEG) 06.4.28 8:33 PM Hourly report Page 82 Open GLU report • Sample report • Sample report Mode title* Report title Clerk code Previous balance Mode title* Report title Customer counter Sales total GLU code *: When you take Z1 report, “Z1” is printed. *: When you take Z1 report, “Z1” is printed. Open GLU report by clerk • Sample report • Sample report Mode title* Report title Clerk code/name *: When you take Z1 report, “Z1” is printed.
A213_3 FOR THE MANAGER(SEEG) 06.4.28 8:33 PM Page 83 Part1 Part2 Part3 FOR THE MANAGER EJ REPORT READING AND RESETTING The cash register provides an electronic journal (EJ) function. This function is intended to record the journal data in a memory instead of journal paper, and print the data as an EJ report. The register records the journal data in REG, PGM, , X1/Z1 and X2/Z2 modes. By default, a maximum of 9000 lines are stored in the memory.
A213_3 FOR THE MANAGER(SEEG) 06.4.28 8:33 PM Page 84 OVERRIDE ENTRIES Programmed limit for functions (such as for maximum amounts) can be overridden by making an entry in the MGR mode. 1. 2. Turn the mode switch to the MGR position. Make an override entry. OPX/Z REG MGR X1/Z1 X2/Z2 In this example, the register has been programmed not to allow discounts entries over 1.00. Key operation example REG mode entries PGM Print 1500 # 250 - ...Error l Turn the mode switch to the MGR position.
A213_3 FOR THE MANAGER(SEEG) 06.4.28 8:33 PM Page 85 Part1 Part2 Part3 FOR THE MANAGER EURO MIGRATION FUNCTION • EURO programming described in this section are for users in the countries which will join to the members of the European Currency Union, not for the users in the countries already have joined the Union.
A213_3 FOR THE MANAGER(SEEG) 06.4.28 8:33 PM Page 86 The details of the register system modification are as shown below: Items A=1 (EURO status 1) A=2 (EURO status 2) A=3 (EURO status 3) General Z1 report General Z2 report GT memories (GT1, GT2, GT3 and Training GT) Conversion of preset prices of Dept.
A213_3 FOR THE MANAGER(SEEG) 06.4.28 8:33 PM Page 87 Part1 Part2 Part3 FOR THE MANAGER Checking the current EURO status You can check the EURO status currently set on the cash register. Set the manager key (MA) to the X2/Z2 position, and perform the following sequence. The current EURO status will be printed on the receipt/journal.
A213_3 FOR THE MANAGER(SEEG) 06.4.28 8:33 PM Page 88 OPERATOR MAINTENANCE 1 In Case of Power Failure When power is lost, the machine retains its memory contents and all information on sales entries. • When power failure is encountered in register idle state or during an entry, the machine returns to normal operation after power recovery. • When power failure is encountered during a printing cycle, the register prints “============” and then carries out the correct printing procedure after power recovery.
A213_3 FOR THE MANAGER(SEEG) 06.4.28 8:33 PM Page 89 Part1 Part2 Part3 FOR THE MANAGER 4 Replacing the Batteries This cash register displays a low battery warning message “LOW BATTERY” when the batteries are low, and displays a no battery warning message “NO BATTERY” when batteries are extremely low or batteries are not installed. When the low battery message is displayed, replace the batteries with new ones as soon as possible. The existing batteries will be dead in about two days.
A213_3 FOR THE MANAGER(SEEG) 06.4.28 8:33 PM Page 90 Removing the paper roll When a red dye appears on the paper roll, it is time to replace it. Replace the paper roll with a new one. If you plan on not using the register for an extended period of time, remove the paper roll, and store it in an appropriate place. Caution: The paper cutter is mounted on the printer cover. Be careful not to cut yourself. When not using the take-up spool (using as receipt paper): Print roller arm 1.
A213_3 FOR THE MANAGER(SEEG) 06.4.28 8:33 PM Page 91 Part1 Part2 Part3 FOR THE MANAGER Installing the paper roll Caution: The paper cutter is mounted on the printer cover. Be careful not to cut yourself. Installing the receipt paper roll: Paper positioning guides 1. Turn the mode switch to a position other than “ ” with the power cord connected. 2. Remove the printer cover. 3. Lift up the print roller release lever to unlock and open the print roller arm. 4.
A213_3 FOR THE MANAGER(SEEG) 06.4.28 8:33 PM Page 92 7. Insert the end of the paper into the slit in the spool. (Press the key to feed more paper if required.) 8. Wind the paper two or three turns around the spool shaft. 9. Set the spool on the bearing, and press the key to take up excess slack in the paper. 10. Replace the printer cover. F F You can wind the roll paper in OP X/Z, X1/Z1, and X2/Z2 modes even if you programmed so that the printer is used for issuance of receipts.
A213_3 FOR THE MANAGER(SEEG) 06.4.28 8:33 PM Page 93 Part1 Part2 Part3 FOR THE MANAGER 8 Removing the Till and the Drawer The till in the register is detachable. After closing your business for the day, remove the till from the drawer and keep the drawer open. The 8-denomination coin case is also detachable from the till. To detach the drawer, pull it forward fully with the till removed, and remove it by lifting it up.
A213_3 FOR THE MANAGER(SEEG) 06.4.28 8:33 PM Page 94 10 Before Calling for Service The malfunctions shown in the left-hand column below, labelled “Fault,” do not necessarily indicate functional faults of the machine. It is therefore advisable to refer to “Checking” shown in the right-hand column before calling for service. Fault Checking (1) The display shows symbols that do not make sense.
A213_3 FOR THE MANAGER(SEEG) 06.4.28 8:33 PM Page 95 Part1 Part2 Part3 FOR THE MANAGER SPECIFICATIONS Model: Dimensions: Weight: Power source: Power consumption: Working temperature: Electronics: Display: Operator display: Customer display: Printer: Type: Printing speed: Printing capacity: Other functions: XE-A213 355 (W) x 430 (D) x 312 (H) mm 11 kg Official (nominal) voltage and frequency Stand-by: 11.5W (When the official voltage is 220 to 230 V) Stand-by: 11.
A213_3 FOR THE MANAGER(SEEG) 06.4.28 8:33 PM Page 96 A. Information on Disposal for Users (private households) 1. In the European Union Attention: If you want to dispose of this equipment, please do not use the ordinary dust bin! Attention: Your product is marked with this symbol. It means that used electrical and electronic products should not be mixed with general household waste. There is a separate collection system for these products.
A213/Coverback/(SEEG)(5) 06.4.28 7:58 PM Page 3 FOR CUSTOMERS IN U.K. IMPORTANT The wires in this mains lead are coloured in accordance with the following code: BLUE: BROWN: Neutral Live As the colours of the wires in the mains lead of this apparatus may not correspond with the coloured markings identifying the terminals in your plug proceed as follows. The wire which is coloured BLUE must be connected to the terminal which is marked with the letter N or coloured black.
SHARP ELECTRONICS (Europe) GmbH Sonninstraße 3, D-20097 Hamburg Printed in China / Imprimé en Chine / Gedruckt in China / Impreso en China / Gedrukt in China TINSM2551RCZZ ➁