OPERATION MANUAL MODEL XG-NV51XE LCD PROJECTOR
This equipment complies with the requirements of Directives 89/336/EEC and 73/23/EEC as amended by 93/68/EEC. Dieses Gerät entspricht den Anforderungen der EG-Richtlinien 89/336/ EWG und 73/23/EWG mit Änderung 93/68/EWG. Ce matériel répond aux exigences contenues dans les directives 89/ 336/CEE et 73/23/CEE modifiées par la directive 93/68/CEE. Dit apparaat voldoet aan de eisen van de richtlijnen 89/336/EEG en 73/ 23/EEG, gewijzigd door 93/68/EEG. Dette udstyr overholder kravene i direktiv nr.
SPECIAL NOTE FOR USERS IN THE U.K. The mains lead of this product is fitted with a non-rewireable (moulded) plug incorporating a 13A fuse. Should the fuse need to be replaced, a BSI or ASTA approved BS 1362 fuse marked or and of the same rating as above, which is also indicated on the pin face of the plug, must be used. Always refit the fuse cover after replacing the fuse. Never use the plug without the fuse cover fitted.
Before using the LCD projector, please read this operation manual carefully. Important Information OPERATION MANUAL ENGLISH IMPORTANT For your assistance in reporting the loss or theft of your Colour LCD Projector, please record the Serial Number located on the bottom of the projector and retain this information. Before recycling the packaging, please be sure that you have checked the contents of the carton thoroughly against the list of “Supplied Accessories” on page 7. Model No.: XG-NV51XE Serial No.
Contents Useful Features Setup & Connections 12 12 12 13 13 13 14 14 15 15 17 17 17 18 18 18 18 18 18 19 19 19 20 22 23 Air Filter Maintenance …………………………… Lamp/Maintenance Indicators ………………… Using the Kensington Lock …………………… Troubleshooting …………………………………… 37 38 39 39 Appendix Transporting the Projector ……………………… Connection Pin Assignments …………………… RS-232C Port Specifications …………………… Input Signals (Recommended Timing) ………… Specifications ……………………………………… Dimensions ………………………………………… Guide to Effective P
Important Safeguards Important Information ATTENTION: Please read all of these instructions before you operate your LCD Projector for the first time. Save these instructions for future reference. For your own protection and prolonged operation of your LCD Projector, be sure to read the following “Important Safeguards” carefully, before use. This projector has been engineered and manufactured to ensure your personal safety. But IMPROPER USE CAN RESULT IN POTENTIAL ELECTRICAL SHOCK OR FIRE HAZARDS.
Usage Guidelines The laser pointer on the “Power” remote control emits a laser beam from the laser pointer window. This is a Class II laser which may impair your sight if directed into the eyes. The two marks shown on the left are caution labels for the laser beam. Important Information Cautions Concerning the Laser Pointer • Do not look into the laser pointer window or shine the laser beam on yourself or others. (The laser beam used in this product is harmless when directed onto the skin.
Outstanding Features Important Information 1. WIRELESS PRESENTATIONS WITH IrCOM The IrCOM function allows for wireless transmission of digital images via infrared communication from a PC, handheld PC or digital camera to the projector. 2. ADVANCED COMPATIBILITY WITH HIGH-END WORKSTATIONS AND PCS Compatible with up to 100 Hz vertical refresh rate, Sync on Green and Composite Sync signals for use with a wide variety of high-end PCs and Workstations. 3.
How to Access the PDF Operation Manuals (for Windows and Macintosh) Important Information PDF operation manuals in several languages are included in the CD-ROM. To utilise these manuals, you need to install Adobe Acrobat Reader on your PC (Windows or Macintosh). If you have not installed Acrobat Reader yet, you can download it from the Internet (http://www.adobe.com) or install it from the CD-ROM. To Install Acrobat Reader from the CD-ROM For Windows: 1 Insert the CD-ROM in the CD-ROM drive.
Important Information Supplied Accessories “Power” remote control RRMCG1471CESA Four AA size batteries Simple presentation remote control RRMCG1480CESA Two AAA size batteries Power cord Computer cable QCNW-5108CEZZ Computer audio cable QCNW-4870CEZZ Macintosh adaptor QPLGJ1512CEZZ Mouse control serial cable QCNW-5112CEZZ Mouse control cable for IBM PS/2 QCNW-5113CEZZ Mouse control cable for Mac QCNW-5114CEZZ Remote mouse receiver RUNTK0661CEZZ Extra air filter PFILD0076CEZZ Lens cap GCOVH1307
Part Names Front View 8 1 9 2 0 3 q w 4 e 5 r 6 t 7 y u i o a s p d Side and Rear View g h f j k l : a ; s J d K L f g 1 POWER indicator [pp. 18, 19, 38] 2 POWER buttons (ON/OFF) [pp. 18, 19, 38] 3 BLACK SCREEN button [p. 30] 4 INPUT button [pp. 19, 22, 26, 29] 5 FREEZE button [p. 33] 6 KEYSTONE button [p. 14] 7 ADJUSTMENT buttons (∂ /ƒ/ ß / ©) [pp. 14, 20, 21, 23–36] 8 LAMP REPLACEMENT indicator [pp. 18, 19, 38] 9 TEMPERATURE WARNING indicator [pp.
Part Names Important Information “Power” Remote Control 1 R/C ON 9 OFF VOL ON MUTE 2 1 2 3 4 Side View Front View 0 OFF u 5 6 7 8 i BLACK SCREEN LASER 3 MENU TOOLS q 9 0 q w 4 R-CLICK 5 6 7 INPUT IrCOM FREEZE AUTO SYNC KEYSTONE ENLARGE e r t y u i e r t ADJ. MOUSE 8 w ENTER Top View o LIGHT y LCD PROJECTOR p Simple Presentation Remote Control Front View Side View a s 9 d o p a s d MUTE button [p. 19] POWER buttons (ON/OFF) [pp.
Part Names 1 Press in and downward on the arrow to remove the battery cover. 2 Insert four AA size batteries for the “Power” remote control and two AAA size batteries for the simple presentation remote control making sure their polarities match the and marks inside the battery compartment. Battery cover Battery compartment Battery cover Battery compartment 3 Insert the side tabs of the battery cover into their slots and press the cover in until it is properly seated.
Operating the Wireless Mouse from the “Power” Remote Control Important Information When operating the projector controls ADJ. MOUSE ON MOUSE When operating the wireless mouse or using the laser pointer R/C VOL ON OFF MUTE OFF ADJ. 22 BLACK SCREEN LASER MENU TOOLS 51 4 R-CLICK 52 ENTER INPUT IrCOM FREEZE AUTO SYNC KEYSTONE ENLARGE MOUSE ADJ.
Setting Up the Projector and Screen Position the projector perpendicular to the screen with all feet flat and level to achieve optimal image. Move the projector forward or backward if the edges of the image are distorted. • The projector lens should be centred in the middle of the screen. If the lens centre is not perpendicular to the screen, the image will be distorted, making viewing difficult. • Position the screen so that it is not in direct sunlight or room light.
Setting Up the Projector and Screen Ceiling-mount Setup • Use the optional Sharp ceiling-mount bracket for this installation. • Before mounting the projector, contact your nearest Sharp Authorised LCD Projector Dealer or Service Centre to obtain the recommended ceiling-mount bracket (sold separately). (AN-NV4T ceiling-mount bracket, AN-TK201/ AN-TK202 extension tube for AN-NV4T.) • When the projector is in the inverted position, use the upper edge of the screen as the base line.
Adjusting the Height of the Image Using the Adjustment Foot You can adjust the height of the image by raising the projector with the foot release. 1 Press the foot release and lift the projector to the desired angle. 2 Remove your hand from the foot release. Once the adjustment foot has locked in position, release the projector. While holding the projector, press the foot release and slowly lower the projector to its original position.
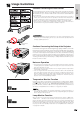
Setup & Connections Connecting the Projector Connecting the Projector to a Computer You can connect your projector to a computer for projection of full colour computer images. See the next page for details on the connections. CAUTION • Before connecting, be sure to turn both the projector and the computer off. After making all connections, turn the projector on first. The computer should always be turned on last. • Please read the computer’s operation manual carefully.
Connecting the Projector Connect your projector to a computer for projection of full-colour computer images. 1 1 Connecting an IBM-PC 1. Plug one end of the supplied computer cable into the COMPUTER INPUT port on the projector. 2. Plug the other end into the Monitor output port on the computer. 3. Secure the plugs by tightening the thumb screws. 2 Connecting a Macintosh computer 1 2 Computer cable (supplied) 3 2 Macintosh adaptor (supplied) 1 Setup & Connections 3 1.
Connecting the Projector “Plug and Play” Function This projector is compatible with VESA-standard DDC 1/DDC 2B. The projector and a VESA DDC compatible computer will communicate their setting requirements, allowing for quick and easy setup. • The DDC, Plug and Play function of this projector operates only when used in conjunction with a VESA DDC compatible computer.
Basic Operations 1 Connect the Power Cord Plug the supplied power cord into the AC socket on the back of the projector. 1 2 Turn on the Main Power Press the MAIN POWER switch on the back of the projector. The POWER indicator lights up red and the projector enters standby mode. 2 • If the bottom filter cover is not securely installed, the POWER indicator flashes. • When the main power is not on, the “Power” remote control cannot be used.
Basic Operations Projector 7a VOL ON MUTE OFF BLACK SCREEN LASER 7b MENU TOOLS 6 Selecting and Checking the Input Mode Press INPUT on the projector or the “Power” remote control to select the desired input mode. Press it again to change the mode as shown on the left. 8 6 R-CLICK ENTER INPUT IrCOM FREEZE AUTO SYNC • When no signal is being received, “No Signal” will be displayed. When a signal that the projector is not preset to receive is being received, “Not Reg.” will be displayed.
Using the GUI (Graphical User Interface) Menu Screens MOUSE ADJ. OFF MUTE R/C VOL ON ON Projector OFF BLACK SCREEN LASER MENU TOOLS 6 1, 7 2, 3, 5 R-CLICK ENTER 4 INPUT IrCOM FREEZE AUTO SYNC This projector has two sets of menu screens (Computer/ Video) that allow you to adjust the image and various projector settings. These menu screens can be operated from the projector or the “Power” remote control with the following buttons.
Using the GUI (Graphical User Interface) Menu Screens Items on the COMPUTER1 or COMPUTER2 Mode Menu Bar Main menu Picture Items on the VIDEO Mode Menu Bar Sub menu Contrast 30 30 Bright 30 Red Blue Main menu 30 30 30 Bright 30 30 30 30 Color 30 30 30 30 Tint 30 30 Sharp 30 30 Red 30 30 30 30 Treble 30 30 Bass 30 30 Reset Fine Sync [ON/OFF] Auto Sync Clock 90 90 Blue Phase 60 60 Reset H-Pos 90 90 V-Pos 60 60 1 2 Vert Fr
Using IrCOM for Wireless Presentations Projector VOL ON MUTE OFF BLACK SCREEN LASER MENU TOOLS 3 R-CLICK 4 INPUT IrCOM FREEZE AUTO SYNC PC MOUSE ADJ. LIGHT 10 cm–1 m 15˚ LCD PROJECTOR 15˚ 15˚ ADJ. • The IrCOM function can be used to wirelessly transfer still images from a computer, handheld P/C or digital camera to the projector via infrared communication. This function is used with the supplied Sharp Advanced Presentation Software.
Selecting the On-screen Display Language Projector VOL ON MUTE OFF BLACK SCREEN LASER MENU TOOLS 1, 5 R-CLICK ADJ. English is the preset language for the On-screen Display. It can be changed to English, German, Spanish, Dutch, French, Italian, Swedish, Portuguese, Chinese, Korean or Japanese. (For use with the “Power” remote control, slide the MOUSE/ADJUSTMENT switch to the ADJ. position.) 1 2 3 4 Press MENU. Press ß/© to select “Language”. Press ∂/ƒ to select the desired language .
Picture Adjustments MOUSE ADJ. You can adjust the projector’s picture to your preferences with the following picture settings.
Audio Adjustments Projector VOL ON MUTE MOUSE ADJ. This projector’s audio is factory preset to standard settings. However, you can adjust it to suit your own preferences by adjusting the following audio settings.
Computer Image Adjustments Projector VOL ON MUTE OFF BLACK SCREEN LASER MENU TOOLS 1, 5 MOUSE ADJ. When displaying computer patterns which are very detailed (tiling, vertical stripes, etc.), interference may occur between the LCD pixels, causing flickering, vertical stripes, or contrast irregularities in portions of the screen. Should this occur, adjust “Clock”, “Phase”, “H-Pos” and “V-Pos” for optimum computer image.
Computer Image Adjustments MOUSE ADJ. Auto Sync Adjustment Projector VOL ON MUTE OFF BLACK SCREEN LASER MENU TOOLS 1, 5 2, 3, 4 R-CLICK AUTO SYNC button ENTER INPUT IrCOM FREEZE AUTO SYNC KEYSTONE ENLARGE • Used to automatically adjust a computer image. • Auto Sync adjustment can be made manually by pressing AUTO SYNC on the projector or the “Power” remote control, or automatically by setting “Auto Sync” to “ON” in the projector’s GUI menu.
Computer Image Adjustments MOUSE Saving and Selecting Adjustment Settings Projector VOL ON MUTE OFF BLACK SCREEN LASER MENU TOOLS 1, 6 5 (GUI) On-screen Display This projector allows you to store up to seven adjustment settings for use with various computers. Once these settings are stored, they can be easily selected each time you connect the computer to the projector. Saving the adjustment setting (For use with the “Power” remote control, slide the MOUSE/ADJUSTMENT switch to the ADJ. position.
Digital Image Magnification and Reduction Projector OFF BLACK SCREEN LASER MENU TOOLS 2 R-CLICK 1 ENTER INPUT IrCOM FREEZE AUTO SYNC KEYSTONE ENLARGE MOUSE ADJ. MOUSE ADJ. This function allows you to magnify a specific portion of an image. This is useful when you want to display a detailed portion of the image or display it in its native resolution. (To use the “Power” remote control to operate this function, slide the MOUSE/ADJUSTMENT switch to the ADJ. position before pressing ENLARGE.
Black Screen Function button ADJ. This function can be used to superimpose a black screen over the projected image. Projector BLACK SCREEN MOUSE VOL ON MUTE Blacking out the Projected Image OFF BLACK SCREEN LASER MENU TOOLS 1, 5 Press BLACK SCREEN. “BLACK SCREEN” is displayed on the screen. To return to the original projected image, press BLACK SCREEN again.
Fit to Screen Function Projector VOL ON MUTE MOUSE ADJ. This function can be used to expand or compress images which are not native 4:3 aspect ratio (i.e. 1,280 1,024 resolution). OFF BLACK SCREEN LASER MENU TOOLS 1, 5 1 2 3 4 2, 3, 4 R-CLICK (For use with the “Power” remote control, slide the MOUSE/ADJUSTMENT switch to the ADJ. position.) ENTER INPUT IrCOM FREEZE AUTO SYNC Press MENU. Press ß/© to select “Options”. Press ∂/ƒ to select “Fit To Screen”.
Checking the Input Signal and Lamp Usage Time MOUSE ADJ. This function allows you to check the current input signal information and accumulated lamp usage time. Projector VOL ON MUTE (For use with the “Power” remote control, slide the MOUSE/ADJUSTMENT switch to the ADJ. position.) OFF BLACK SCREEN LASER MENU TOOLS 1, 4 2, 3 R-CLICK ENTER INPUT IrCOM FREEZE AUTO SYNC 1 Press MENU. 2 Press ß/© to select “Options”. The lamp usage time will be displayed.
Selecting a Startup Image Projector VOL ON MUTE OFF BLACK SCREEN LASER MENU TOOLS 1, 6 2, 3, 4 MOUSE ADJ. • This function allows you to specify the image to be displayed upon the projector’s startup. • A custom image (i.e. your company logo) can be loaded on the projector via IrCOM or an RS-232C cable. See pages 15 and 22 in this operation manual, and also the supplied Sharp Advanced Presentation Software’s operation manual for detailed instructions.
Reverse/Invert Image Function Projector VOL ON MUTE MOUSE ADJ. This projector is equipped with a reverse/invert image function which allows you to reverse or invert the projected image for various applications.
Using the Presentation Tools ON MUTE OFF 2 OFF BLACK SCREEN LASER MENU TOOLS ADJ. This projector is equipped with presentation tools, which can be accessed from the “Power” remote control. These will help you emphasise keypoints within your presentation. R/C VOL ON MOUSE 7 3, 5 4, 6 R-CLICK ENTER INPUT IrCOM FREEZE AUTO SYNC On-screen Display 1 Slide the MOUSE/ADJUSTMENT switch to the ADJ. position. 2 Press TOOLS to display the presentation tools menu window on the screen.
Checking the Adjustment Status MOUSE ADJ. This function can be used to display all the adjusted settings on the screen simultaneously. Projector VOL ON MUTE (For use with the “Power” remote control, slide the MOUSE/ADJUSTMENT switch to the ADJ. position.) OFF BLACK SCREEN LASER MENU TOOLS 1, 4 2 3 R-CLICK 1 2 3 4 Press MENU. Press ß/© to select “Status”. Press ENTER to display all the adjusted settings. To exit from the GUI, press MENU.
Air Filter Maintenance • This projector is equipped with three air filters to ensure the optimal operating condition of the projector. • The air filters should be cleaned every 100 hours of use. Clean the filters more often when the projector is used in a dusty or smoky location. • Have your nearest Sharp Authorised LCD Projector Dealer or Service Centre exchange the filter (PFILD0076CEZZ) when it is no longer possible to clean it.
Lamp/Maintenance Indicators Maintenance Indicators POWER indicator Maintenance Indicator TEMPERATURE WARNING indicator LAMP REPLACEMENT indicator POWER indicator LAMP REPLACEMENT indicator TEMPERATURE WARNING indicator Condition • The warning lights on the projector indicate problems inside the projector. • There are two warning lights: a TEMPERATURE WARNING indicator which warns that the projector is too hot, and a LAMP REPLACEMENT indicator which lets you know when to change the lamp.
Using the Kensington Lock Kensington Security Standard connector This projector has a Kensington Security Standard connector for use with a Kensington MicroSaver Security System. Refer to the information that came with the system for instructions on how to use it to secure the projector. Troubleshooting Problem No picture and no sound. Sound is heard but no picture appears. Colour is faded or poor. Picture is blurred. Picture appears but no sound is heard.
Transporting the Projector When transporting the projector, carry it by the carrying handle on the side. A soft-side carrying bag is also provided to transport the projector. Using the Carrying Handle CAUTION • Always put on the lens cap to prevent damage to the lens when transporting the projector. • Do not lift or carry the projector by the lens or the lens cap as this may damage the lens. Carrying handle Before placing the projector into the carrying bag, set up the inner pad inside the bag as shown.
Connection Pin Assignments Analog Computer 1 and 2 Signal Input Ports: 15-pin mini D-sub female connector 5 10 15 RS-232C Port: 9-pin D-sub male connector 5 1 9 6 Pin No. 1 2 3 4 5 6 7 8 9 Signal CD RD SD ER SG DR RS CS CI Computer Input Analog 1. Video input (red) 9. Not connected 2. Video input 10. GND (green/sync on green) 11. GND 1 3. Video input (blue) 12. Bi-directional data 4. Reserve input 1 13. Horizontal sync signal 6 5. Composite sync 14. Vertical sync signal 11 6. Earth (red) 15.
RS-232C Port Specifications Commands EXAMPLE • When “BRIGHT” of COMPUTER 1 IMAGE ADJUSTMENT is set to 10.
Input Signals (Recommended Timing) The computer output signal timing of different types of computer signals are shown below for reference. For IBM and compatibles For Macintosh Series VIDEO SIGNAL VIDEO SIGNAL HORIZONTAL SYNC SIGNAL a b c d e C-SYNC(H) VIDEO SIGNAL VERTICAL SYNC SIGNAL a w x VIDEO SIGNAL z y e = 2 dot d b c C-SYNC(V) w x z y V-SYNC The following is a list of compatible VESA standards.
Specifications Product type Model Video system Display method LCD panel Lens Projection lamp Contrast ratio Video input signal S-video input signal Horizontal resolution Audio output Computer RGB input signal Computer control signal Speaker system Rated voltage Input current Rated frequency Power consumption Operating temperature Storage temperature Cabinet I/R carrier frequency Laser pointer of “Power” remote control Dimensions (approx.) Weight (approx.
Dimensions Rear View Top View 19 84 11 27.5 84 7 261 346.4 310 61 142 237.5 259 61 33.5 22 43 25.4 Side View 70 243.5 77 229 128 121 10.
Guide to Effective Presentations Electronic presentations are one of the most effective tools presenters can use to persuade an audience. There are several ways to enhance your presentation and maximise your effectiveness. The following are guidelines to help you create and deliver a dynamic presentation. a. Types of Presentations Computer Presentations • To present basic information such as graphs, spreadsheets, documents and images, use word processing and spreadsheet applications.
Guide to Effective Presentations • Background colours can subconsciously affect the audience: Red Blue Red—increases viewers’ pulse and breathing and encourages risk taking but can also be associated with financial loss. Blue—has a calming and conservative affect on the audience but can also create boredom among corporate audiences that are often inundated with this background colour. Green—stimulates interaction. Green Black Black—conveys finality and certainty.
Guide to Effective Presentations Good Bad Presentation from SHARP 30 25 20 15 10 5 0 Good c. Set-Up When giving a presentation, you need to set the stage both figuratively and literally for success. The way you set up a presentation room will have a great impact on the audience’s perception of you and your message. By manipulating the placement and use of the following tools, you will improve the impact of your presentation.
Guide to Effective Presentations d.Rehearsing & Delivery • The best time to rehearse is the day or evening before, not a couple of hours before, and the best place to rehearse is in the actual room. Rehearsing a speech in a small office is not the same as standing up in front of 100 people in a hotel ballroom or classroom. • Due to varying processor speeds of computers, practice your slide transitions for proper timing.
Glossary Aspect ratio Width and height ratio of an image. The normal aspect ratio of a computer and video image is 4 : 3. There are also wide images with an aspect ratio of 16 : 9 and 21 : 9. ANSI lumen Brightness unit established by the American National Standards Institute. Auto sync Optimises projected computer images by automatically adjusting certain characteristics. Background Initial setting image projected when no signal is being input.
Index A AA size batteries .............................................................. AC socket ......................................................................... ADJUSTMENT buttons ..................................................... Air filter ............................................................................. Aspect ratio saving .......................................................... Audio adjustment .............................................................
SHARP CORPORATION Osaka, Japan SHARP ELECTRONICS (EUROPE) GmbH Sonninstraße 3, 20097 Hamburg, Germany SHARP ELECTRONICS (U.K.) LTD. Manchester, U.K.