
XG-PH50X/NL Operation-Manual GB


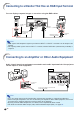
Table Of Contents
- Introduction
- Quick Start
- Setup
- Connections
- Connections
- Samples of Cables for Connection
- Connecting to a Computer
- Connecting to Video Equipment
- Connecting to Video Equipment That Has an HDMI Output Terminal with a DVI to HDMI Cable
- Connecting to Video Equipment That Has a DVI Output Terminal with a DVI Digital Cable
- Connecting to RGB Video Equipment with a 5 RCA RGB Cable
- Connecting to Video Equipment That Has Component Output Terminals
- Connecting with an S-video Cable or a Composite Video Cable
- Controlling the Projector by a Computer
- Connecting to a Monitor That Has an RGB Input Terminal
- Connecting to an Amplifier or Other Audio Equipment
- Basic Operation
- Turning the Projector On/Off
- Image Projection
- Shifting the Lens
- Using the Adjustment Feet
- Adjusting the Focus
- Adjusting the Projected Image Size
- Correcting Trapezoidal Distortion
- Switching the Input Mode
- Adjusting the Volume
- Turning off the Sound Temporarily
- Displaying an Enlarged Portion of an Image
- Freezing a Moving Image
- Selecting the Picture Mode
- Resize Mode
- Displaying the Black Screen
- Displaying and Setting the Break Timer
- Useful Features
- Menu Items
- Using the Menu Screen
- Picture Adjustment (“Picture” menu)
- Color Management System (“C. M. S.”menu)
- Computer Image Adjustment (“Fine Sync”menu)
- Audio Adjustment (“Audio”menu)
- Using the “Options (1)” Menu
- Displaying Dual Pictures (Pict in Pict)
- Setting the Resize Mode
- Shifting the Projected Image Vertically (Digital Shift)
- Setting On-screen Display
- Setting the Video System
- Capturing Projected Images
- Selecting the Background Image
- Selecting the Startup Image
- Eco Mode
- Detecting the Input Signals Automatically
- Auto Power Off Function
- System Lock Function
- Helpful Functions Set during Installation (“Options (2)” menu)
- Setting a Password
- Checking the Lamp Life Status
- Setting the Lamp Mode
- Reversing/Inverting Projected Images
- Controlling Multiple Projectors with the One Remote Control
- Shortcut to Make Projector Stack Settings
- Locking the Operation Buttons on the Projector
- Bypassing Unused Input Selections
- Selecting the Transmission Speed (RS-232C)
- Monitor Output Settings
- LAN/RS232C Setting
- Service Mode
- Returning to the Default Settings
- Using the Other Menus (“Language”and “Status”menus)
- Appendix

-34
Connecting with an S-video Cable or a Composite Video Cable
Connect the video equipment to the INPUT 4 or 5 terminal using the S-video cable or com-
posite video cable (commercially available).
Note
• The S-video signal input to the S-VIDEO terminal is separated into color and luminance signals for real-
izing a higher-quality image.
• An RCA audio cable (commercially available) is required for audio input.
• When you connect video equipment with a 21-pin RGB output (Euro-scart) to the projector, use a com-
mercially available cable that fits in the projector terminal you want to connect.
RCA audio cable (commercially available)
To video output
terminal
Composite video cable (commercially available)
To INPUT 5
terminal
To AUDIO input
(4, 5) terminals
To audio output
terminals
To S-video
output terminal
S-video cable (commercially available)
To INPUT 4
terminal
Video Equipment
Side view
Connecting to Video Equipment