
XG-PH50X/NL Operation-Manual GB

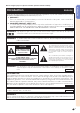
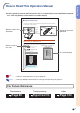
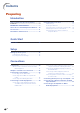
Table Of Contents
- Introduction
- Quick Start
- Setup
- Connections
- Connections
- Samples of Cables for Connection
- Connecting to a Computer
- Connecting to Video Equipment
- Connecting to Video Equipment That Has an HDMI Output Terminal with a DVI to HDMI Cable
- Connecting to Video Equipment That Has a DVI Output Terminal with a DVI Digital Cable
- Connecting to RGB Video Equipment with a 5 RCA RGB Cable
- Connecting to Video Equipment That Has Component Output Terminals
- Connecting with an S-video Cable or a Composite Video Cable
- Controlling the Projector by a Computer
- Connecting to a Monitor That Has an RGB Input Terminal
- Connecting to an Amplifier or Other Audio Equipment
- Basic Operation
- Turning the Projector On/Off
- Image Projection
- Shifting the Lens
- Using the Adjustment Feet
- Adjusting the Focus
- Adjusting the Projected Image Size
- Correcting Trapezoidal Distortion
- Switching the Input Mode
- Adjusting the Volume
- Turning off the Sound Temporarily
- Displaying an Enlarged Portion of an Image
- Freezing a Moving Image
- Selecting the Picture Mode
- Resize Mode
- Displaying the Black Screen
- Displaying and Setting the Break Timer
- Useful Features
- Menu Items
- Using the Menu Screen
- Picture Adjustment (“Picture” menu)
- Color Management System (“C. M. S.”menu)
- Computer Image Adjustment (“Fine Sync”menu)
- Audio Adjustment (“Audio”menu)
- Using the “Options (1)” Menu
- Displaying Dual Pictures (Pict in Pict)
- Setting the Resize Mode
- Shifting the Projected Image Vertically (Digital Shift)
- Setting On-screen Display
- Setting the Video System
- Capturing Projected Images
- Selecting the Background Image
- Selecting the Startup Image
- Eco Mode
- Detecting the Input Signals Automatically
- Auto Power Off Function
- System Lock Function
- Helpful Functions Set during Installation (“Options (2)” menu)
- Setting a Password
- Checking the Lamp Life Status
- Setting the Lamp Mode
- Reversing/Inverting Projected Images
- Controlling Multiple Projectors with the One Remote Control
- Shortcut to Make Projector Stack Settings
- Locking the Operation Buttons on the Projector
- Bypassing Unused Input Selections
- Selecting the Transmission Speed (RS-232C)
- Monitor Output Settings
- LAN/RS232C Setting
- Service Mode
- Returning to the Default Settings
- Using the Other Menus (“Language”and “Status”menus)
- Appendix

Introduction
-3
-56
Menu items
The menu can be operated to achieve two functions, adjustments and settings. (For setting
the menu items, see pages 58 and 59. )
Using the Menu Screen
Menu Selections (Adjustments)
Example: Adjusting “Bright”
• This operation can also be performed by using the buttons on the projector.
ENTER
button
MENU button
UNDO button
Mouse/
adjustment
button ('/"/\/|)
Adjustment
buttons ('/"/\/|)
MENU button
UNDO button
ENTER button
Example: “Picture” screen menu for
INPUT 1 (RGB) mode
1
Press .
• The “Picture” menu screen for the se-
lected input mode is displayed.
2
Press
\\
\\
\ or
||
||
| to display the other
menu items.
• There are eight menu items as shown
below.
Note
• The “Fine Sync” menu is not available
for selecting INPUT 4 or INPUT 5.
Menu item
How to Read This Operation Manual
••
••
• In this operation manual, the illustrations and on-screen displays are simplified for explana-
tion. This may differ from the actual on-screen display.
Info
...........Indicates safeguards when using the projector.
For Future Reference
Maintenance Troubleshooting Index
Page 104
Pages 99 and 100
Page 90
On-screen display
Button used in
this step
Note
........Indicates additional information for setting up and operating the projector.
Buttons used in this
operation
Buttons used in this
operation