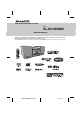
DVD MICRO COMPONENT SYSTEM MODEL XL-DV75HMKII OPERATION MANUAL Thank you for purchasing this SHARP product. To obtain the best performance from this product, please read this manual carefully. It will guide you in operating your SHARP product. XL-DV75HMKII DVD Micro Component System consisting of XL-DV75HMKII (main unit) and CP-DV75H (speaker system).
Special Notes WARNINGS ● When the ON/STAND-BY button is set at STAND-BY position, mains voltage is still present inside the unit. When the ON/STAND-BY button is set at STAND-BY position, the unit may be brought into operation by the timer mode or remote control. ● This unit contains no user serviceable parts. Never remove covers unless qualified to do so. This unit contains dangerous voltages, always remove mains plug from the socket before any service operation and when not in use for a long period.
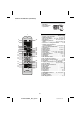
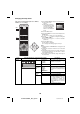
CONTENTS Page Page General Information Video CD and Super Video CD Operation Precautions . . . . . . . . . . . . . . . . . . . . . . . . . . . . . . . . . . 4 Controls and indicators . . . . . . . . . . . . . . . . . . . . . . 4 - 5 Types of playable discs . . . . . . . . . . . . . . . . . . . . . . . . . 6 Description of discs . . . . . . . . . . . . . . . . . . . . . . . . . . . . 7 System connections . . . . . . . . . . . . . . . . . . . . . . . . . 8 - 9 Remote control . . . . . . . . . . . . . . .
Precautions ■ ● Do not remove the outer cover, as this may result in General electric shock. Refer internal service to your local SHARP service facility. The ventilation should not be impeded by covering the ventilation openings with items, such as newspapers, tablecloths, curtains, etc. No naked flame sources, such as lighted candles, should be placed on the apparatus. Attention should be drawn to the environmental aspects of battery disposal.
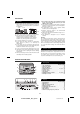
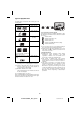
Controls and indicators (continued) ■ Speaker system 1. Full Range 2. Bass Reflex Duct 3. Speaker Wire 1 2 3 ■ 1 ON / STAND-BY 19 3 4 5 6 7 8 9 10 11 12 13 14 1 2 3 4 5 6 7 8 9 0 10 DIRECT TUNING TUNING PRESET PRESET SETUP OSD FUNCTION EQUALIZER VOLUME X-BASS MEMORY MUTE 20 21 22 23 24 25 26 27 TOP MENU MENU/PBC ENTER SUB TITLE / DIGEST RETURN 15 AUDIO 16 17 18 Reference page 1. Remote Control Transmitter . . . . . . . . . . . . . . . . .9 2. On/Stand-by Button . .
Types of playable discs The DVD player can play back discs bearing any of the following marks: Disc type Disc contents DVD Video Disc Audio and video (movies) Super Video CD Audio and video (movies) Video CD Audio and video (movies) Audio CD Audio CD-R/CD-RW (*1) 2 or 3 or 4 Icons used in this operation manual Some functions may not be available depending on discs. The following icons indicate the discs that can be used in the section. ... Indicates DVDs. ... Indicates Super video CDs. ...
Description of discs ■ ● DVDs without the region ● ● ● ● ■ Discs that cannot be played number on the disc. DVDs with SECAM system DVD-ROM DVD-RAM DVD-Audio ● ● ● ● ● ● CDG CDV Photo CD CD-ROM SACD Discs recorded in special formats, etc. Display heard although images appear on the screen or vice versa. ● Incorrect operation may damage the speakers and can have a negative effect on your hearing when played at high volume settings. ● You cannot play illegally produced discs.
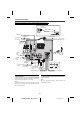
System connections Make sure to unplug the AC power lead before making any connections.
System connections (continued) ■ ■ Speaker connection Connect the black wire to the minus (–) terminal, and the red wire to the plus (+) terminal. AC power connection After checking all the connections have been made correctly, plug the AC power lead of this unit into the wall socket. If you plug in the unit first, the unit will enter the stand-by mode. Caution: ● Use speakers with an impedance of 6 ohms or more, as lower impedance speakers can damage the unit.
Changing the setup menu Turn on the TV, and switch the input to the “VIDEO 1”, “VIDEO 2”, etc. accordingly. 1 Press the ON/STAND-BY button to turn the power on. ● The startup screen appears. ● The startup screen does ON / STAND-BY not appear when the input is not set to the disc mode. Press the FUNCTION button to select DVD/CD mode. OPEN / CLOSE ON / STAND-BY 1 2 3 4 5 6 7 8 9 0 10 2 Press the SETUP button.
Changing the setup menu (continued) Setup menu Audio Selectable parameters (* indicates default setting) GENERAL AUDIO DOLBY VIDEO PREFERENCE - - AUDIO SETUP PAGE - ANALOG AUDIO DIGITAL AUDIO ANALOG AUDIO DIGITAL AUDIO DOWNMIX DIGITAL OUTPUT LT/RT STEREO* SPDIF OFF SPDIF/RAW* SPDIF/PCM GO TO AUDIO SETUP PAGE LPCM OUTPUT Dolby DUAL MONO GENERAL AUDIO DOLBY VIDEO PREFERENCE MONO - - DUAL DOLBY DIGITAL SETUP - DYNAMIC DYNAMIC (*1) Video AUDIO DOLBY - - VIDEO SETUP PAGE - VIDEO OUTPUT Res
Changing the setup menu (continued) Setup menu Preference GENERAL AUDIO Selectable parameters (* indicates default setting) Description GAMMA HIGH MEDIUM* LOW NONE HUE -9 –> 0* –> +9 SATURA-9 –> 0* –> +9 TION LUMA 0T* DELAY 1T DivX VOD OK SHARP provide you the DivX registration code that allows you to rent and purchase videos using the DivX service. Please go to www.divx.com/vod for more information. HDMI HDMI ON* SETUP OFF AUDIO AUTO* SOURCE PCM TV TYPE PAL* Please refer page 13.
Changing the setup menu (continued) ■ ■ TV display setting Indicator 4:3 PANSCAN Setting TV type setting Indicator When playing a wide image (16:9) disc, the left and right sides of the image are cut (pan scan) to display a naturallooking 4:3 size image. A wide image disc without pan scan is played back in 4:3 letterbox. A 4:3 disc is played in 4:3. AUTO Setting Select this mode for the multi-system TV. NTSC Select this mode for the NTSC TV. PAL Select this mode for the PAL TV.
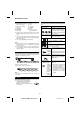
Changing the setup menu (continued) ■ ■ Language setting Indicator 1 Select “PREFERENCES” on the setup menu screen Setting (see steps 1 - 3 on page 10). OSD A language for screen display can be set LANGUAGE for the setup menu, messages, etc. English AUDIO buttons and press the ENTER button. * If this is the first time, enter “000000”. A language for audio can be set. You can specify a language conversation and narration. for ou nk y Thank you ■ Merci A language for disc menus can be set.
General control ■ Volume auto set-in ● If you turn off and on the main unit with volume set to 16 or higher, the volume will start at 16. ● If you turn the unit off then on again with the volume level set to less than 15, it will turn on again at the level set.
DVD playback Audio CD/MP3 Press the ( ) button. When the unit is left unoperated for more than 5 minutes after pressing the ( ) button, a screen saver appears (see page 10 when the screen saver setting is “ON”). Press any button on the main unit or remote control. The startup screen returns. / Caution: ● Close the disc tray when not in use. Otherwise, dust may accumulate inside and cause malfunction. ON / STAND-BY ● The unit gets slightly warm when used for a long time.
Basic operation ● Whilst searching on a SVCD or a VCD, the sound is not heard. ON / STAND-BY DIRECT TUNING ● When search is performed during the DVD playback, OPEN / CLOSE 1 2 4 5 6 7 8 9 0 PRESET MEMORY TUNING 10 TUNING TUNING PRESET PRESET SETUP OSD FUNCTION EQUALIZER VOLUME X-BASS PRESET ■ MUTE MEMORY ENTER ENTER SUB TITLE / DIGEST You can playback the desired tracks with titles or chapters in a specific order. Maximum of 20 tracks can be programmed.
Useful operation Basic operation (continued) In the playback mode ON / STAND-BY 1 Whilst in the playback mode, press the DIRECT button. TV screen OPEN / CLOSE 1 2 4 5 7 8 3 9 0 10 6 DIRECT TUNING TUNING PRESET 2 Select the title or chapter by pressing the or button PRESET SETUP OSD FUNCTION EQUALIZER VOLUME X-BASS MENU/PBC MUTE MEMORY and press the ENTER button. MENU/PBC TOP MENU 3 Enter the title or chapter number using the Direct Search buttons.
Useful operation (continued) ■ On SVCD/VCD/DivX, only forward play is possible and the speed changes as follows: 1/2 1/4 1/8 1/16 You can play a chapter (track) or a title repeatedly by specifying it during playback. When playing SVCD or VCD, cancel the P.B.C. (playback control) (see page 22). PLAY (Normal play) PLAY (Normal play) 2 Press the / button to return to the normal playback. 1 Whilst a disc is playing, press the RANDOM/ Note: On some discs, the slow-motion play functions are disabled.
Useful operation (continued) ■ ■ To play the contents between the specified points repeatedly (A-B repeat) To select a title from the top menu of the disc You can play the desired portion repeatedly by specifying it during playback. On a DVD with multiple titles, you can select a title from the top menu. 1 Whilst a disc is playing, press the A - B button. 1 Whilst in the stop or TV screen playback mode, press the TOP MENU button to display the title menu.
Various settings (continued) ■ DVD: To change the audio channel TITLE ELAPSED T:01/03 0:15:01 You can select an audio channel. Whilst a disc is playing, press the AUDIO button repeatedly to select the desired audio channel. E.g.: The audio channel changes as follows on DVD: C:01/29 Elapsed playback time for current title TITLE REMAIN Audio 1/3: AC3 5 CH English T:01/03 1:26:54 Audio 2/3: AC3 2 CH English CHAPTER ELAPSED T:01/03 0:15:01 Audio 3/3: DTS 5.
Video CD and Super Video CD playback The following playback functions are the same as DVD or CD operations. Page To locate the beginning of a chapter (track) (skip). . . . . . . . . . . . . . . . . . . . . . . . . . . . . . . . . 17 Fast forward/Fast backward (search) . . . . . . . . . . . . 17 Still picture. . . . . . . . . . . . . . . . . . . . . . . . . . . . . . . . . . 18 Slow-motion play . . . . . . . . . . . . . . . . . . . . . . . . 18 - 19 To zoom images (zoom) . . . . . . . . . . . . . . . . . . .
Video CD and Super Video CD playback (continued) ■ You can playback a desired track by selecting one from the 6 displayed tracks on the screen. Random play 1 Press the SUB TITLE/DIGEST button. 2 Select digest type by using cursor or The tracks on the disc(s) can be played in random order automatically. button and then press ENTER button: ● Track digest (disc will be divided by tracks) ● Disc Interval (disc will be divided into 10 minutes interval) ● Up to 6 tracks will be displayed on the screen.
CD operation This system can play back a standard CD, CD-R/RW in the CD format and CD-R/RW with MP3 or WMA files, but cannot record on them. Some audio CD-R and CD-RW discs may not be playable due to the state of the disc or the device that was used for recording. To change the programmed contents: Repeat the above procedures from step 1. Programmed contents will be cleared when you perform the following operations: ● Switch the input or remove the discs. ● Set to the stand-by mode.
MP3 and JPEG disc operation MP3: MP3 is a form of compression. It is an acronym which stands for MPEG Audio Layer 3. MP3 is a type of audio code which is processed by significant compression from the original audio source with very little loss in sound quality. ● This system supports MPEG 1 Layer 3 and VBR files. ● During VBR file playback, time counter in the display may differ from its actual playback time. ● Bitrate which is supported by MP3 is 32 ~ 320 kbps.
MP3 and JPEG disc operation (continued) Repeat play on the JPEG menu screen: Condition A You can play all images in the disc. Playback will stop after complete playback all the images in the disc. button To perform repeat play, press the RANDOM/ whilst in the stop mode and then press the ENTER button. Each time the button is pressed, the play mode changes in the following order: Repeat play on the MP3/WMA menu screen: Condition A You can play all songs in the disc.
MP3 and JPEG disc operation (continued) ■ ■ Rotating a picture Random play (REMOTE CONTROL ONLY) You can rotate images. The tracks/images on the disc(s) can be played in random order automatically. During playback, press the or button. The image rotates as shown below. button : 90° rotation in a clockwise direction. To random play all tracks/images: During stop mode, press the RANDOM/ button to select “RANDOM” then press / button to play.
MP3/WMA folder mode (only for MP3/WMA files) To play back MP3/WMA (Windows Media Audio) file There are many music sites on the internet that you can download MP3/WMA (Windows Media Audio) music files. Follow the instructions from the website on how to download the music files. You can then play back these downloaded music files by burning them to a CD-R/RW disc. ● Your downloaded song/files are for personal use only. Any other usage of the song without owner’s permission, is against the law.
Listening to the radio ■ ON / STAND-BY Memorising a station OPEN / CLOSE ON / STAND-BY 1 2 Up to 40 stations for FM band can be stored and recalled at the push of a button. (PRESET ( or )) 3 4 5 6 7 8 9 DIRECT 0 TUNING TUNING 10 TUNING TUNING PRESET PRESET SETUP OSD FUNCTION EQUALIZER VOLUME X-BASS 1 Perform steps 1 - 3 in “Tuning”. 2 Press the MEMORY/DISP button to enter the preset PRESET PRESET tuning saving mode.
Using the Radio Data System (RDS) RDS is a broadcasting service which a growing number of FM stations provide. These FM stations send additional signals along with their regular programme signals. They send their station names, and information about the type of programme such as sport, music, etc. When tuned to an RDS station, “RDS” and the station name will be displayed.
Using the Radio Data System (RDS) (continued) ■ Descriptions of the PTY (Programme Type) codes signal. You can search for and receive the following PTY. To recall stations in memory To specify programmed types and select stations (PTY search): You can search a station by specifying the programme type (news, sports, traffic programme, etc. ... see pages 31 - 32) from the stations in memory. NEWS Short accounts of facts, events and publicly expressed views, reportage and actuality.
Enhancing your system Using the Radio Data System (RDS) (continued) ■ SOCIAL Programmes about people and things that influence them individually or in groups. Includes: sociology, history, geography, psychology and society. RELIGION Any aspect of beliefs and faiths, involving a God or Gods, the nature of existence and ethics. PHONE IN Involving members of the public expressing their views either by phone or at a public forum.
Troubleshooting chart (continued) ■ ■ MP3/WMA/JPEG files Symptom ● Playback does not start. Possible cause ● Is the disc loaded upside down? ● Are the files supported by If such a problem occurs, do the following: the unit? ● Some files cannot playback. ● Are the files supported by 1 Set the unit to the stand-by mode and turn the power on ● Is it a false MP3 file? 2 If the unit is not restored in the previous operation, again.
Maintenance Specifications (continued) ■ ■ Cleaning the cabinet Periodically wipe the cabinet with a soft cloth and a diluted soap solution, then with a dry cloth. Caution: ● Do not use chemicals for cleaning (petrol, paint thinner, etc.). It may damage the cabinet. ● Do not apply oil to the inside of the unit. It may cause malfunctions.
FOR LOCATION ENQUIRIES WITHIN AUSTRALIA REGARDING YOUR LOCAL SHARP APPROVED SERVICE CENTRE VISIT OUR WEBSITE AT www.sharp.net.au OR CALL SHARP CUSTOMER CARE 1300 135 022 (LOCAL CALL COSTS APPLY WITHIN AUSTRALIA) SHARP CORPORATION OF AUSTRALIA PTY LTD FOR LOCATION ENQUIRIES WITHIN NEW ZEALAND REGARDING YOUR LOCAL SHARP APPROVED SERVICE CENTRE VISIT OUR WEBSITE AT www.sharp.net.
SHARP CORPORATION 92L410DM812061 XL-DV75HMKII_Back.