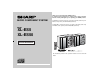
Thank you for purchasing this SHARP product. To obtain the best performance from this product, please read this manual carefully. It will guide you in operating your SHARP product. MICRO COMPONENT SYSTEM XL-ES5 Micro Component System consisting of XL-ES5 (main unit), CPES5F (front speakers) and CP-ES5SW (subwoofer). XL-ES50 Micro Component System consisting of XL-ES50 (main unit), CP-ES50F (front speakers) and CP-ES50SW (subwoofer).
XL-ES5 XL-ES50 SPECIAL NOTES Note: Important Instruction CAUTION: TO REDUCE THE RISK OF ELECTRIC SHOCK, DO NOT REMOVE COVER (OR BACK). NO USER-SERVICEABLE PARTS INSIDE. REFER SERVICING TO QUALIFIED SERVICE PERSONNEL.
IMPORTANT SAFETY INSTRUCTIONS be read before the product is operated. 2 Retain Instructions - The safety and operating instructions should be retained for future reference. 3 Heed Warnings - All warnings on the product and in the operating instructions should be adhered to. 4 Follow Instructions - All operating and use instructions should be followed.
Important Instruction XL-ES5 XL-ES50 IMPORTANT SAFETY INSTRUCTIONS (continued) 15 Outdoor Antenna Grounding - If an outside antenna or cable system 19 Object and Liquid Entry - Never push objects of any kind into this is connected to the product, be sure the antenna or cable system is grounded so as to provide some protection against voltage surges and built-up static charges.
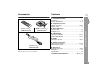
Accessories Contents Please confirm that the following accessories are included. General Information XL-ES5 XL-ES50 Page Precautions . . . . . . . . . . . . . . . . . . . . . . . . . . . . . . . . . . . . . . . . . 6 Controls and indicators . . . . . . . . . . . . . . . . . . . . . . . . . . . . . .7 - 9 Preparation for Use System connections . . . . . . . . . . . . . . . . . . . . . . . . . . . . . .10 - 12 Remote control . . . . . . . . . . . . . . . . . . . . . . . . . . . . . . . . . . . . .
XL-ES5 XL-ES50 Precautions General z Please ensure that the equipment is positioned in a well-ventilated area and ensure that there is at least 4" (10 cm) of free space along the sides, top and back of the equipment. 4" (10 cm) 4" (10 cm) z Hold the AC power plug by the head when removing it from the AC outlet, as pulling the cord can damage internal wires. z Do not remove the outer cover, as this may result in electric shock. Refer internal service to your local SHARP service facility.
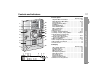
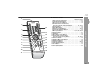
Controls and indicators XL-ES5 XL-ES50 10 1 2 11 12 3 13 4 14 5 15 6 16 17 7 8 18 9 1 2 34 5 6 7 8 9 10 Reference page 1. Equalizer Mode Select Button . . . . . . . . . . . . . . . . . . . . . . 14 2. Extra Bass/Demo Mode Button . . . . . . . . . . . . . . . . . . 12, 14 3. Timer Indicator . . . . . . . . . . . . . . . . . . . . . . . . . . . . . . . . . . . 25 4. Power On/Stand-by Button . . . . . . . . . . . . . . . . . . . . . . . . . 14 5. CD Button . . . . . . . . . . . . . . . . .
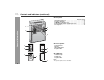
XL-ES5 XL-ES50 Controls and indicators (continued) Rear panel Reference page 1. AC Power Input Jack . . . . . . . . . . . . . . . . . . . . . . . . . . . . . . 12 2. Speaker Terminals . . . . . . . . . . . . . . . . . . . . . . . . . . . . . . . . 11 3. FM/AM Loop Antenna Jack . . . . . . . . . . . . . . . . . . . . . . . . . 11 4. Video/Auxiliary (Audio Signal) Input Jacks . . . . . . . . . . . . 27 5. Cooling Fan . . . . . . . . . . . . . . . . . . . . . . . . . . . . . . . . . . . . . .
XL-ES5 XL-ES50 2 12 3 13 4 14 5 15 6 16 7 17 8 18 9 19 10 20 Reference page 1. Remote Control Transmitter . . . . . . . . . . . . . . . . . . . . . . . . 13 2. Power On/Stand-by Button . . . . . . . . . . . . . . . . . . . . . . . . . 14 3. Direct Track Search Buttons . . . . . . . . . . . . . . . . . . . . . . . . 19 4. CD Track Down or Fast Reverse, Tuner Preset Down, Time Down Button . . . . . . . . . 15, 18, 23 5. CD Stop Button . . . . . . . . . . . . . . . . . . . . . . . . . . . . . .
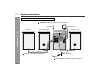
XL-ES5 XL-ES50 System connections Make sure to unplug the AC power cord before any connections.
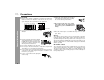
XL-ES5 XL-ES50 FM/AM loop antenna connection Speaker connection Connect the FM/AM loop antenna to the ANTENNA jack. Connect the black wire to the minus (-) terminal, and the red wire to the plus (+) terminal. Position the FM antenna wire and rotate the AM loop antenna for optimum reception. Place the AM loop antenna on a shelf, or attach it to a stand or a wall. Subwoofer Notes: z Placing the antenna on the stereo system or near the AC power cord may cause noise pickup.
XL-ES5 XL-ES50 System connections (continued) Notes: z The speakers are magnetically shielded. Therefore, they do not affect the display even if you use them near the TV. However, some color variation may occur, depending on the type of TV used. Cooling fan: This product is equipped with a cooling fan inside for better heat radiation. If color variation occurs... Turn off the TV (from the power switch). After 15 - 30 minutes, turn the TV on again.
Remote control Battery installation Use 2 "AA" size batteries (UM/SUM-3, R6, HP-7 or similar). Batteries are not included. 1 2 3 Remove the battery cover. Insert the batteries according to the direction indicated in the battery compartment. When inserting or removing the batteries, push them toward the battery terminals. Replace the cover. XL-ES5 XL-ES50 Notes concerning use: z Replace the batteries if the operating distance is reduced or if the operation becomes erratic.
XL-ES5 XL-ES50 General control Volume control Main unit operation: When the VOLUME control is turned clockwise, the volume will increase. When it is turned counterclockwise, the volume will decrease. Remote control operation: Press the VOLUME (+ or -) button to increase or decrease the volume. 0 ..... 30 MAXIMUM Basic Operation Bass control (X-BASS) When the power is first turned on, the unit will enter the extra bass mode which emphasizes the bass frequencies, and "X-BASS" will appear.
Setting the clock XL-ES5 XL-ES50 3 Within 30 seconds, press the PRESET ( or ) button to adjust the hour and then press the MEMORY/SET button. Press the PRESET ( or ) button once to advance the time by 1 hour. Hold it down to advance continuously. In this example, the clock is set for the 12-hour (AM 12:00) display. 1 2 Press the CLOCK button and within 8 seconds, press the MEMORY/SET button.
XL-ES5 XL-ES50 Listening to a CD (CDs) This system can also play audio CD, CD-R and CD-RW discs, but cannot record. Some audio CD-R and CD-RW discs may not be playable due to the state of the disc or the equipment used for recording. CD playback 1 2 3 Press the ON/STAND-BY button to turn the power on. 4 Place the CD on the disc tray 1, label side up. Press the CD button. Press the OPEN/CLOSE button to open the disc compartment. All trays open in tiers.
XL-ES5 XL-ES50 Press the OPEN/CLOSE button to close the disc compartment. Total number of tracks on the CD whose number is flashing 7 Press the / Total playing time of the CD whose number is flashing button to start playback. CD play indicator z Playback will begin from track 1 on disc 1. After that disc finishes playing, the next disc will automatically play. z After the last track on the fifth disc is played, the CD player stops automatically.
XL-ES5 XL-ES50 Listening to a CD (CDs) (continued) Various CD functions CD Playback Function 18 Main unit Remote control Operation Play Press in the stop mode. Stop Press in the playback mode. Pause Press in the playback mode. Press the / button to resume playback from the paused point. Track up/ Track down Press in the playback or stop mode. If you press the button in the stop mode, press the / button to start the desired track.
Advanced CD playback XL-ES5 XL-ES50 To play from a specified disc Direct track search You can start playback from the desired disc by selecting the number. By using the direct search buttons, the desired tracks on the current disc can be played. 1 Press one of the 1- 5 buttons to select the desired disc. Use the direct search buttons on the remote control to select the desired track while playing the selected disc. Selected track number Selected disc number Press the / button. A.
XL-ES5 XL-ES50 Advanced CD playback (continued) Repeat play Random play You can play up to 5 discs, or a programmed tracks continuously. The tracks on the disc(s) can be played in random order automatically. To repeat all tracks on up to 5 discs: Press the / To random play all tracks on up to 5 discs: button twice. Press the RANDOM button on the remote control.
XL-ES5 XL-ES50 You can choose up to 32 selections for playback in the order you like. 1 While in the stop mode, press one of the 1 select the desired disc. 5 buttons to Selected disc number 2 Press the direct search buttons on the remote control to select the desired track. You can also select a track by pressing the or button. Selected track number 3 Press the MEMORY/SET button to save the track number. 4 Repeat steps 1 - 3 for other tracks. Up to 32 tracks can be programmed.
XL-ES5 XL-ES50 Listening to the radio Tuning 1 2 Press the ON/STAND-BY button to turn the power on. 3 Press the TUNING ( station. Press the TUNER (BAND) button repeatedly to select the desired frequency band (FM or AM). or ) button to tune in to the desired Radio Manual tuning: Press the TUNING button as many times as required to tune in to the desired station. Auto tuning: When the TUNING button is pressed for more than 0.
XL-ES5 XL-ES50 Memorizing a station To recall a memorized station You can store 40 AM and FM stations in memory and recall them at the push of a button. (Preset tuning) Press the PRESET ( or lect the desired station. Perform steps 1 - 3 in "Tuning" on page 22. 3 Within 30 seconds, press the PRESET ( or ) button to select the preset channel number. Store the stations in memory, in order, starting with preset channel 1.
XL-ES5 XL-ES50 Timer and sleep operation Timer playback: The unit turns on and plays the desired source (CD, tuner) at the preset time. Advanced Features Sleep operation: The radio and compact disc can all be turned off automatically. 24 Timer playback Before setting timer: 1 Press the CLOCK button to check that the clock is set to the correct time. (Refer to page 15.) 2 Load the discs to be played. 1 2 Press the ON/STAND-BY button to turn the power on.
XL-ES5 XL-ES50 Within 30 seconds, press the PRESET ( or ) button to specify the minute to start, then press the MEMORY/SET button. z Settings are displayed in order and the unit will enter the timer stand-by mode. z Timer set indicator will light up. To cancel the timer playback: Press the ON/STAND-BY button to turn the power on. 7 When the preset time is reached, playback will start. To reset or change the timer setting: Perform "Timer playback" from the beginning.
XL-ES5 XL-ES50 Timer and sleep operation (continued) Sleep operation Advanced Features 1 2 To use timer and sleep operation together Play back the desired sound source. Press the TIMER/SLEEP button repeatedly until "SLEEP" is displayed and then within 8 seconds, press the MEMORY/ SET button. or (cancel) 3 4 0:05 1:30 0:10 Timer playback setting Sleep operation will automatically stop. 0:30 Within 30 seconds, press the MEMORY/SET button.
Enhancing your system XL-ES5 XL-ES50 VCR, DVD, etc. White To the line output jacks White Red Red RCA cord (not supplied) Listening to the playback sounds from VCR, DVD, etc. 1 Use a connection cord to connect the VCR, DVD, etc. to the VIDEO/AUX IN jacks. When using video equipment, connect the audio output to this unit and the video output to a television. 2 Press the ON/STAND-BY button to turn the power on. 3 Press the VIDEO/AUX button. 4 Play the connected equipment.
XL-ES5 XL-ES50 Troubleshooting chart Many potential problems can be resolved by the owner without calling a service technician. If something is wrong with this product, check the following before calling your authorized SHARP dealer or service center. References General Symptom Possible cause z The clock is not set to the z Did a power failure occur? Reset correct time. the clock. (Refer to page 15.) z When a button is pressed, z Set the unit to the power standthe unit does not respond.
If trouble occurs Care of compact discs When this product is subjected to strong external interference (mechanical shock, excessive static electricity, abnormal supply voltage due to lightning, etc.) or if it is operated incorrectly, it may malfunction. If such a problem occurs, do the following: 1 Set the unit to the stand-by mode and turn the power on again. 2 If the unit is not restored in the previous operation, unplug and plug in the unit, and then turn the power on.
XL-ES5 XL-ES50 Specifications As part of our policy of continuous improvement, SHARP reserves the right to make design and specification changes for product improvement without prior notice. The performance specification figures indicated are nominal values of production units. There may be some deviations from these values in individual units. AC 120 V, 60 Hz References Power consumption 98 W Dimensions Width: 6-5/16" (160 mm) Height: 9-7/16" (240mm) Depth: 11-13/16" (300 mm) Weight 10.8 lbs. (4.
CONSUMER LIMITED WARRANTY SHARP ELECTRONICS CORPORATION warrants to the first consumer purchaser that this Sharp brand product (the “Product”), when shipped in its original container, will be free from defective workmanship and materials, and agrees that it will, at its option, either repair the defect or replace the defective Product or part thereof with a new or remanufactured equivalent at no charge to the purchaser for parts or labor for the period(s) set forth below.