PROJEKTOR MULTIMEDIALNY MODEL XR-20X/XR-20S XR-10X/XR-10S INSTRUKCJA OBSŁUGI
Opisywane urządzenie jest zgodne z dyrektywami 89/336/EWG i 73/23/EWG z uwzględnieniem poprawki 93/68/EWG. A. Informacje dla użytkowników (prywatne gospodarstwa domowe) dotyczące usuwania odpadów Uwaga: Jeśli chcą Państwo usunąć to urządzenie, prosimy nie używać zwykłych pojemników na śmieci! Na opisywanym urządzeniu znajduje się powyższy symbol. Oznacza on, że zużytego urządzenia nie można łączyć ze zwykłymi odpadami z gospodarstw domowych.
Przed przyst pieniem do pracy z projektorem nale y się uwa nie zapoznać z niniejsz instrukcj . Wprowadzenie WA NE Prosimy o zapisanie numeru modelu oraz numeru seryjnego (Serial No.) posiadanego przez Państwa projektora. B dzie to przydatne na wypadek jego ewentualnej kradzie y lub zagubienia. Numer ten znajduje si na spodzie projektora.
Ostrze enie dotycz ce wymiany lampy Patrz „Wymiana lampy” na stronie 50. Opisywany projektor wykorzystuje moduł DMD. Jest to wysokiej klasy element zawieraj cy 786.432 (XR-20X/XR10X) / 480.000 (XR-20S/XR-10S) mikrolusterek. Podobnie jak w przypadku innych zaawansowanych technologicznie urz dzeń elektronicznych (telewizorów wielkoekranowych, systemów wideo i kamer) istniej pewne dopuszczalne odchylenia od standardów, które urz dzenie musi spełniać.
Jak korzystać z niniejszej instrukcji Opisywane w niniejszej instrukcji projektory nieznacznie ró ni si pewnymi parametrami, jednak ich sposób podł czania i obsługi jest taki sam. • Rysunki przedstawiaj ce w niniejszej instrukcji projektor i menu ekranowe maj uproszczon postać i mog nieznacznie odbiegać od rzeczywisto ci. Przyciski u ywane w tej procedurze Przycisk u yty w tym kroku Menu ekranowe Informacja ....... oznacza informacje zwi zane z bezpiecze stwem podczas korzystania z projektora. Wskazówka.
Spis treści Przygotowanie Wprowadzenie ......................................................................................1 Jak korzystać z niniejszej instrukcji ...................................................3 Spis treści .............................................................................................4 WA NE INFORMACJE DOTYCZ CE BEZPIECZE STWA ................6 Przyst puj c do instalacji projektora nale y zapoznać si z poni szymi wskazówkami: ............................................
Elementy menu ekranowego ............................................................ 35 Korzystanie z menu ekranowego ..................................................... 37 Podstawy obsługi menu (regulacje) .........................................................37 Regulacja obrazu (menu „Picture”).................................................. 39 Regulacja obrazu (menu „Picture”) (ci g dalszy) ........................... 40 Ustawienie sposobu projekcji (menu „SCR - ADJ”) .......................
WA NE INFORMACJE DOTYCZ CE BEZPIECZE STWA OSTRZE ENIE: Przed przyst pieniem do pracy nale y zapoznać się uwa nie z poni szymi informacjami. Energia elektryczna znalazła bardzo wiele zastosowań. Opisywany projektor został zaprojektowany i skonstruowany w taki sposób, eby zapewnić bezpieczeństwo osobom, które go obsługuj i przebywaj w jego pobli u. Nale y jednak pami tać, e NIEPRAWIDŁOWA OBSŁUGA ZWI KSZA RYZYKO PORA ENIA PR DEM I WYST PIENIA PO ARU.
18. Kiedy wezwać serwis W nast puj cych przypadkach prosimy o odł czenie projektora z sieci i skontaktowanie si z serwisem: a.Je li kabel sieciowy lub wtyczka zostały uszkodzone. b.Je li jakikolwiek płyn przedostał si do wn trza projektora. c. Je li projektor został poddany działaniu wody lub deszczu. d.Je eli projektor nie działa prawidłowo podczas normalnej obsługi. Prosimy o regulacj tylko tych funkcji, które opisane zostały w niniejszej instrukcji.
Przystępując do instalacji projektora należy zapoznać się z poniższymi wskazówkami: Ostrze enia dotycz ce wymiany zespołu lampy Je li lampa p knie, we wn trzu projektora mog si znajdować odłamki szkła. W takim przypadku nale y porozumieć si z serwisem. Opis wymiany lampy znajduje si na stronie 50. Uwagi dotycz ce ustawienia projektora eby maksymalnie wydłu yć okres bezawaryjnej pracy projektora, nie nale y z niego korzystać w pomieszczeniach wilgotnych, zakurzonych lub zadymionych.
Po wył czeniu projektora wentylator pracuje jeszcze przez chwil , eby obni yć temperatur we wn trzu obudowy. Kabel zasilaj cy nale y odł czyć dopiero po zatrzymaniu si wentylatora. Czas pracy wentylatora zale y od warunków otoczenia i temperatury we wn trzu projektora. Korzystanie z projektora w innych krajach Napi cie zasilaj ce i typ gniazdka elektrycznego zale od kraju, w którym projektor jest eksploatowany. Zabieraj c projektor za granic nale y si zaopatrzyć w odpowiedni kabel zasilaj cy.
Wyposa enie Dostarczone wyposa enie Pilot zdalnego sterowania RRMCGA256WJSA Dwie baterie R-6 Kabel RGB (3,0 m) (Rozmiar „AA”, UM/SUMQCNWGA045WJPZ 3, HP-7 lub podobne) • Instrukcja obsługi (niniejsza instrukcja) i płyta CD-ROM (UDSKAA062WJZZ) Osłona obiektywu (zało ona) CCAPHA024WJSA Kabel zasilaj cy* (1,8 m) Wersja dla Stanów Zjednoczonych, Kanady itp.
Nazwy i funkcje części W polach podane s numery stron, na których mo na znale ć więcej informacji na dany temat. Projektor Widok z góry Wska nik zasilania Wska nik LAMP Wska nik TEMP. Przycisk ON/STANDBY Słu y do wł czenia projektora i przeł czania go do trybu czuwania. Przycisk ENTER Słu y do ustawiania wybranych elementów w menu. Przycisk KEYSTONE Słu y do wł czania trybu korekcji efektu trapezowego. Przyciski VOL. (+W/X-) Słu do regulacji poziomu gło noci.
Nazwy i funkcje części (ci g dalszy) W polach podane s numery stron, na których mo na znale ć więcej informacji na dany temat. Widok z boku Gniazda Patrz równie opis „Urz dzenia podł czane do gniazd INPUT” na stronie 21. Gniazdo AUDIO (INPUT 1, 2) (Wspólne dla wej ć INPUT 1 i 2) Gniazdo OUTPUT (INPUT 1, 2) (Wspólne wyj cie sygnałów RGB i component doprowadzanych do wej ć INPUT1 i 2.) Umo liwia podł czenie monitora. Gniazda INPUT 1 i INPUT 2 Do podł czenia komputerowego sygnału RGB i sygnału component.
W polach podane s numery stron, na których mo na znale ć więcej informacji na dany temat. Pilot zdalnego sterowania Przycisk STANDBY Słu y do przeł czania projektora do trybu czuwania. Przycisk KEYSTONE Słu y do wł czania trybu korekcji efektu trapezowego. Przycisk ON Słu y do wł czenia projektora. Przycisk MENU/HELP Słu y do wy wietlania menu oraz pomocy ekranowej. Przycisk RETURN Słu y do powrotu do poprzedniego okna podczas dokonywania ustawień w menu.
Nazwy i funkcje części (ci g dalszy) Wkładanie baterii 1 Naciśnij zatrzask na osłonie pojemnika baterii i zsu j w kierunku wskazywanym przez strzałkę. 2 Włó dostarczone w zestawie baterie. • Wkładaj c baterie nale y pami tać, by były one uło one zgodnie z oznaczeniami i wewn trz pojemnika. Załó osłonę i nasu j w kierunku wskazywanym przez strzałkę. 3 Nieprawidłowe korzystanie z baterii mo e spowodować ich wyciek lub wybuch. Prosimy o przestrzeganie poni szych zalece .
Zasięg pilota Odbiornik Pilot mo e być u ywany do sterowania projektorem w zasięgu pokazanym na rysunku obok. •••••••••••••••••••••••••••••••••• Wskazówka • Sygnał pilota mo e być odbijany od ekranu. Jednak efektywny zasi g w takiej sytuacji b dzie zale ał od rodzaju materiału, z jakiego wykonany został ekran. •••••••••••••••••••••••••••••••••• Podczas korzystania z pilota: • Pilota nie wolno nara ać na wstrz sy, wilgoć lub wysok temperatur .
Skrócony opis obsługi W tej części instrukcji znajduje się skrócony opis obsługi projektora. Szczegółowe informacje znajduj się na wskazanych stronach. Ustawienie projektora i wyświetlenie obrazu Poni ej jako przykład opisana została procedura podł czenia projektora do komputera. Przycisk STANDBY Przycisk STANDBY/ON Przycisk INPUT Przycisk ON Przycisk ENTER Przycisk KEYSTONE Przycisk KEYSTONE Przycisk ENTER Pierście regulacji ostrości obrazu (FOCUS) Przycisk INPUT 1 D wignia HEIGHT ADJUST 1.
4. Wyreguluj obraz korzystaj c z procedury ułatwiaj cej ustawienia. 1 Po wł czeniu projektora uruchomiona zostanie procedura ułatwiaj ca ustawienia „Setup 2 3 Guide” (Je li funkcja ta b dzie wł czona – patrz strona 42.). Post puj zgodnie ze wskazówkami widocznymi w oknie „Setup Guide”, eby wyregulować ostro ć, wielko ć obrazu i poło enie obrazu w pionie (k t pochylenia projektora).
Ustawienie projektora Ustawienie projektora W celu uzyskania optymalnego obrazu nale y ustawić projektor na poziomej powierzchni, prostopadle do płaszczyzny ekranu. Pozwoli to unikn ć konieczno ci u ycia funkcji korekcji efektu trapezowego i zapewni obraz o najlepszej jako ci (patrz strona 31). Ustawienie standardowe (projekcja od przodu) Projektor nale y ustawić w odpowiedniej odległo ci od ekranu, zale nie od danej wielko ci obrazu (patrz strona 20).
Tryby projekcji Opisywany projektor mo e wy wietlać obraz w jednym z czterech opisanych poni ej trybów. Wybierz odpowiedni tryb wy wietlania w zale no ci od sposobu ustawienia projektora. (Tryb projekcji mo na ustawić w menu „SCR-ADJ”. Patrz strona 42.
Ustawienie projektora (ci g dalszy) Rozmiar ekranu a odległość projektora od ekranu Tryb NORMAL (4:3) Rozmiar ekranu (obrazu) Przek tna (χ) 300” (762 cm) 270” (686 cm) 250” (635 cm) 200” (508 cm) 150” (381 cm) 100” (254 cm) 84” (213 cm) 72” (183 cm) 60” (152 cm) 40” (102 cm) χ: L: L1: L2: H: Szeroko ć 610 cm (240”) 549 cm (216”) 508 cm (200”) 406 cm (160”) 305 cm (120”) 203 cm (80”) 171 cm (67”) 146 cm (58”) 122 cm (48”) 81 cm (32”) Wysoko ć 457 cm (180”) 411 cm (162”) 381 cm (150”) 305 cm (120”) 229 cm (
Podł czenia Urządzenia podłączane do gniazd INPUT Gniazdo COMPUTER-RGB /COMPONENT OUTPUT Gniazda INPUT 1, INPUT 2 Podł czenie komputera. (Patrz strona 23.) Podł czenie sprz tu wideo z wyj ciem sygnału component (odtwarzacza DVD, dekodera DTV itp.) (Patrz strona 24.) Podł czenie monitora umo liwiaj cego podgl d obrazu wy wietlanego przez projektor. (Patrz strona 25.) Gniazdo AUDIO (INPUT 1, 2) Gniazdo AUDIO (INPUT 3, 4) Podł czenie kabla audio. (Jest to wspólne wej cie audio dla wej ć INPUT 1, 2.
Przykładowe kable umo liwiaj ce podł czenie • Wi cej informacji na temat odpowiednich kabli podł czeniowych mo na znale ć w instrukcji obsługi podł czanych urz dzeń. • Do podł czenia mog być potrzebne równie inne kable niewymienione poni ej.
Podł czenie projektora do komputera Przed przyst pieniem do pracy nale y wył czyć zarówno zasilanie projektora jak i wszystkich podł czanych urz dze . Po dokonaniu podł cze nale y najpierw wł czyć projektor, a następnie wszystkie pozostałe urz dzenia. W przypadku podł czenia komputera, nale y pamiętać, eby był on ostatnim wł czanym urz dzeniem. Przed dokonaniem podł czeń nale y si zapoznać z instrukcjami obsługi wszystkich podł czanych urz dzeń.
Podł czenie projektora do urz dze wideo Opisywany projektor jest wyposa ony w gniazda wej ciowe zgodne z sygnałami component, s-wideo i wideo. Sposób podł czania urz dzeń audio-wideo jest pokazany na rysunku poni ej. Obraz o najlepszej jako ci zapewniaj kolejno sygnały: component, S-wideo i wideo. Je li podł czane urz dzenie wyposa one jest w wyj cie sygnału component, nale y u yć wej cia COMPUTER/COMPONENT (INPUT1 lub INPUT2) w projektorze.
Podł czenie poprzez kabel wideo - gniazdo INPUT4 Do wyj ć sygnału audio Do wyj ć sygnału wideo DVD itp. Do gniazd AUDIO (INPUT3, 4) Do gniazda INPUT4 Kabel audio z wtyczkami RCA (dost pny powszechnie w sprzeda y) Kabel wideo (dost pny powszechnie w sprzeda y) Podł czenie monitora z wejściem RGB Obraz z komputera wy wietlany przez projektor mo na równocze nie obserwować na ekranie monitora podł czonego poprzez dodatkowy kabel RGB.
Sterowanie projektorem przy pomocy komputera Je li gniazdo RS-232C w projektorze zostanie poł czone przy pomocy adaptera DIN D-sub/RS-232C (opcjonalnego: AN-A1RS) oraz kabla RS-232C (typu krzy owego, dost pnego powszechnie w sprzeda y) z analogicznym gniazdem w komputerze, mo na b dzie u ywać komputera do sterowania i kontroli stanu projektora. Szczegóły na ten temat mo na znale ć na stronie 54.
Wł czanie i wył czanie projektora Włączenie projektora Przed wykonaniem opisanych poni ej czynno ci nale y podł czyć do projektora niezb dne urz dzenia zewn trzne. (Patrz strony 23 do 26.) Naciśnij przycisk rze lub przycisk STANDBY/ON na projektoON na pilocie. Informacja • Zgodnie z ustawieniem fabrycznym, menu ekranowe wy wietlane jest w j zyku angielskim. Opis wyboru j zyka menu znajduje si na stronie 42.
Wyświetlenie obrazu Okno „Setup Guide” Procedura ułatwiająca ustawienia („Setup Guide”) Po wł czeniu projektora wy wietlone zostanie okno „Setup Guide”, które ułatwi przygotowanie projektora do pracy. Procedura ta składa si z nast puj cych elementów: 1 FOCUS (regulacja ostro ci) 2 HEIGHT ADJUST (regulacja poło enia obrazu w pionie) 3 ZOOM (regulacja wielko ci obrazu) Naciśnij przycisk okno „Setup Guide”.
3 Położenie obrazu w pionie K t odchylenia projektora od poziomu i poło enie obrazu w pionie mo na regulować przy pomocy wysuwanych nó ek w przedniej i tylnej cz ci projektora. Je li ekran jest zawieszony powy ej poziomu, na którym ustawiony jest projektor, mo na unie ć obraz, odchylaj c projektor. 1 2 Unosz c d wignię HEIGHT ADJUST, odchyl projektor, eby wyregulować jego ustawienie. Gdy projektor znajdzie się we właściwym poło eniu, zwolnij d wignię HEIGHT ADJUST.
Wyświetlenie obrazu (ci g dalszy) Wybór sygnału wejściowego Wybierz odpowiedni sygnał wej ciowy, zale nie od podł czonych ródeł sygnału. INPUT 1, INPUT 2, Naciśnij przycisk INPUT 3 lub INPUT 4 na pilocie, eby wybrać odpowiedni sygnał wejściowy.
Korekcja efektu trapezowego Przycisk KEYSTONE Jeśli projektor jest ustawiony poni ej lub powy ej ekranu i obraz jest wyświetlany pod k tem, obraz jest zdeformowany i ma kształt trapezu. Do korekcji tego efektu słu y funkcja Keystone. ••••••••••••••••••••••••••••••••• Przyciski regulacyjne (S/T/W/X) Wskazówka • Funkcja Keystone Correction umo liwia korekcj deformacji obrazu w zakresie ±13°. O taki k t mo na równie odchylić ekran od osi obiektywu.
Wyświetlenie obrazu (ci g dalszy) Zmiana proporcji obrazu Ta funkcja umo liwia zmian trybu wy wietlania i dostosowanie go do indywidualnych potrzeb, poprawiaj c jako ć wy wietlanego obrazu. W zale no ci od rodzaju sygnału wej ciowego mo na wybrać „NORMAL”, „BORDER” lub „STRETCH”. Naciśnij przycisk RESIZE. • Opis ustawień w menu ekranowym znajduje si na stronie 41.
Sygnał wideo • Je li wprowadzany jest sygnał 540P, 720P lub 1080I, wybierany jest tryb „STRETCH”. Obraz wyjściowy na ekranie Sygnał wejściowy Standard DVD/wideo Typ obrazu NORMAL BORDER STRETCH Obraz o proporcjach 4:3 480I, 480P, NTSC, PAL, SECAM Obraz letter box ci ni ty obraz 16:9 ci ni ty obraz 4:3 540P, 720P, 1080I (16:9) ci ni ty obraz 16:9 ci ni ty obraz 16:9 (proporcje 4:3 na ekranie 16:9) * Tryb umo liwiaj cy wy wietlenie obrazu w oryginalnych proporcjach bez odcinania jego fragmentów.
Funkcje i ustawienia dostępne z pilota Przyciski regulacyjne (S/T/W/X) Automatyczne dostrojenie do sygnału z komputera (Auto Sync) Przycisk BREAK TIMER Przycisk FREEZE Przycisk PICTURE MODE Funkcja Auto Sync wł cza się po wykryciu sygnału wejściowego przy wł czeniu projektora. eby wywołać funkcję Auto Sync mo na równie nacisn ć przycisk AUTO SYNC.
Elementy menu ekranowego Poni ej pokazane s elementy, które mo na ustawiać w menu ekranowym projektora. Menu „Picture” Menu główne Menu poboczne Menu główne Menu poboczne INPUT 1 (RGB)/INPUT2 (RGB) INPUT 1 (Component)/INPUT 2 (Component)/INPUT 3/INPUT 4 Menu „SCR - ADJ” • Elementy oznaczone ikonami , mo na równie ustai wić przy pomocy odpowiednich przycisków na pilocie zdalnego sterowania. *1 Elementy dost pne, je li wybrane jest wej cie INPUT 1 lub INPUT 2 i odbierany jest sygnał RGB.
Elementy menu ekranowego (ci g dalszy) Menu „PRJ - ADJ” Menu „Help” Menu główne Menu poboczne Elementy dostępne w menu „Help” Menu „Help” – patrz strona 46.
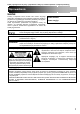
Korzystanie z menu ekranowego Przycisk ENTER Przyciski regulacyjne (S/T/W/X) Przycisk MENU/HELP Przyciski regulacyjne (S/T/W/X) Przycisk MENU/HELP Przycisk ENTER Przycisk RETURN • Je li menu jest wł czone, mo na nacisn ć przycisk RETURN, eby powrócić do poprzedniego okna menu. Podstawy obsługi menu (regulacje) Przykład: regulacja jasno ci (element „Bright”) • Opisane czynno ci mo na równie wykonać przy pomocy przycisków na projektorze. 1 Naciśnij przycisk go sygnału wej ciowego.
3 Przy pomocy przycisku d lub c wybierz element, który chcesz wyregulować (w tym przypadku „Bright”). • Wybrany element menu zostanie zaznaczony. Pojedynczy element regulacyjny Regulacja obrazu przy jednoczesnej obserwacji jego zawartości Naciśnij przycisk ENTER. • Wy wietlony zostanie pasek regulacji zwi zany • Naci ni cie przycisku d lub c b dzie powodowa- wył cznie z wybranym elementem (np. „Bright”). ło wy wietlenie pasków regulacji s siednich elementów (np. „Red” po „Bright”).
Regulacja obrazu (menu „Picture”) X Przykład: menu „Picture” dla trybu INPUT 1 (RGB) Obsługa menu patrz strona 37. X Przykład: menu „Picture” dla trybu INPUT 3 Ustawienie trybu wyświetlania obrazu Tryb Opis Ustawienia domyślne wybierane po wł czeniu odpowiedniego trybu funkcji Picture Mode CLR Temp Bright Boost Tryb pracy lampy Standard Obraz standardowy 7500K 1 Bright Presentation Rozja nia ciemne fragmenty obrazu, dzi ki czemu wy wietlane prezentacje s wyra niejsze.
Regulacja obrazu (menu „Picture”) (ci g dalszy) Obsługa menu patrz strona 37.
< Ustawienie sposobu projekcji (menu „SCR - ADJ”) Obsługa menu patrz strona 37. * Funkcja „Auto Keystone” dost pna jest tylko w modelu XR-20X. Ustawienie proporcji obrazu ••••••••••••••••••••••••••••••••• Wskazówka • Szczegółowe informacje na temat ustawień proporcji • Proporcje obrazu mo na równie obrazu znajduj si na stronach 32 i 33. zmienić naciskaj c przycisk RESIZE – patrz strona 32. ••••••••••••••••••••••••••••••••• Regulacja poło enia obrazu Istnieje mo liwo ć przesuwania obrazu w pionie.
Ustawienie sposobu projekcji (menu „SCR - ADJ”) (ci g dalszy) Wł czanie i wył czanie komunikatów ekranowych Odwrócenie i obrót obrazu Dostępne ustawienia Dostępne ustawienia Opis On Wy wietlane s wszystkie informacje ekranowe. Off Komunikaty INPUT, VOLUME, AV MUTE, FREEZE, AUTO SYNC, RESIZE, PICTURE MODE i „An invalid button has been pressed.” nie s wy wietlane.
Ustawienie funkcji projektora (menu „PRJ - ADJ”) Obsługa menu patrz strona 37. Funkcja automatycznego wyszukiwania ródeł sygnału Ta funkcja automatycznie wyszukuje i przeł cza odbierane ródła sygnału bezpo rednio po wł czeniu projektora lub naci ni ciu przycisku INPUT.
Ustawienie funkcji projektora (menu „PRJ - ADJ”) (ci g dalszy) Ustawienie szybkości transmisji (RS-232C) Nale y si upewnić, e taka sama szybko ć transmisji jest ustawiona w projektorze i w komputerze. Dostępne ustawienia Opis R Mniejsza szybko ć 9600 bps 115200 bps Wi ksza szybko ć Ustawienie szybkości wentylatora Ta funkcja pozwala zmienić szybko ć obrotów wentylatora. Zabezpieczenie przed kradzie Zabezpieczenie przed kradzie uniemo liwia osobom niepowołanym korzystanie z projektora.
2 Naciśnij cztery przyciski na pilocie lub projektorze, eby wprowadzić nowy kod w polu „New Code”. •••••••••••••••••••••••••••••• Wskazówka • Do wprowadzenia kodu zabezpieczaj cego mo na u yć nast puj cych przycisków: • ON • STANDBY • ENTER • RETURN • MENU/HELP • Przyciski na pilocie i projektorze s rozró niane przez system niezale nie od tego, e zwi zane s z tymi samymi funkcjami.
Rozwi zywanie problemów z wykorzystaniem menu „Help” Ta funkcja ułatwia rozwi zywanie ró nych problemów, które mog si pojawić w trakcie eksploatacji projektora. Przyciski regulacyjne (S/T/W/X) Wyświetlenie okna „Help” Przycisk MENU/HELP Przycisk ENTER Przykład: Obraz mruga. Poni ej przedstawiony jest sposób post powania, w przypadku gdy obraz wprowadzany w postaci komputerowego sygnału RGB mruga. 1 Naciśnij przycisk MENU/HELP.
Konserwacja projektora Czyszczenie projektora Przed przyst pieniem do czyszczenia projektora nale y odł czyć kabel zasilaj cy od gniazdka elektrycznego w cianie. Zarówno obudowa jak i pulpit sterowniczy s wykonane z plastiku. Do ich czyszczenia nie wolno u ywać benzyny ani rozpuszczalnika, poniewa mogłoby to spowodować ich uszkodzenie. Obudow nale y chronić przed działaniem wszelkich lotnych substancji, takich jak np. rodki owadobójcze.
Wska niki informacyjne Wska niki umieszczone na obudowie projektora (wska nik zasilania oraz wska niki LAMP i TEMP.) informuj o problemach w jego wn trzu. Je li wyst pi jaki problem, jeden ze wska ników LAMP lub TEMP. zacznie wiecić na czerwono i projektor przeł czy si do trybu czuwania. Po przeł czeniu si projektora do trybu czuwania nale y post pować według poni szych wskazówek. Widok z góry Wska nik TEMP. Wska nik LAMP Wska nik zasilania Wska nik TEMP.
Wska nik Sytuacja Normalna Wska nik TEMP. wieci na czerwono, projektor Nie wieci. przeł cza si do trybu gotowo ci. Wska nik LAMP wieci na czerwono. wieci na zielono lub pulsuje, gdy wieci na lampa si czerwono, rozgrzewa. projektor przeł cza si do trybu gotowo ci Wska nik zasilania • • • • wieci na czerwono lub zielono. Objaw Anormalna Pulsuje na czerwono. Temperatura wewn trz projektora jest zbyt wysoka. Lampa nie wieci. Lampa musi zostać wymieniona. Lampa nie wieci.
Informacje dotycz ce lampy Lampa Wymiana lampy (sprzedawanej oddzielnie) jest zalecana, gdy wska nik stopnia przydatno ci lampy pokazuje 5% lub mniej, albo w sytuacji, gdy zauwa alne b dzie znaczne obni enie jako ci obrazu i kolorów. Czas pracy lampy mo e być kontrolowany w menu ekranowym. Patrz strona 44. W sprawie wymiany lampy (typ AN-XR20LP/AN-XR10LP) nale y si porozumieć z autoryzowanym przedstawicielem firmy SHARP.
Montaż i demontaż zespołu lampy Wyposa enie opcjonalne Zespół lampy AN-XR20LP (dla XR-20X/XR-20S) AN-XR10LP (dla XR-10X/XR-10S) Ostrze enie! • Nie wymontowuj zespołu lampy bezpośrednio po wył czeniu projektora. Lampa mo e być bardzo gor ca, co mogłoby spowodować powa ne poparzenia. Informacja • Zespół lampy nale y trzymać wył cznie za uchwyt. Nie wolno dotykać szklanej powierzchni lampy lub wn trza projektora.
Informacje dotycz ce lampy (ci g dalszy) 4 Wyjmij zespół lampy. • Wykr ć wkr ty zabezpieczaj ce zespół. Trzymaj Uchwyt zespół za uchwyt i wysuń go z projektora w kierunku wskazywanym przez strzałk . Zespół lampy nale y trzymać poziomo i nie przechylać go. 5 6 Zainstaluj nowy zespół lampy. • Doci nij zespół i zabezpiecz go wkr tami. Wkręty mocuj ce Zamocuj pokrywę zespołu lampy.
Opis gniazd Gniazda COMPUTER-RGB/COMPONENT INPUT1, 2 i COMPUTER-RGB/COMPONENT OUTPUT: gniazdo 15-stykowe mini D-sub eńskie Wejście RGB 1. Wej cie wideo (czerwony) 2. Wej cie wideo (zielony/synchronizacja) 3. Wej cie wideo (niebieski) 4. Niepodł czone 5. Niepodł czone 6. Masa (czerwony) 7. Masa (zielony/synchronizacja) 8. Masa (niebieski) 9. Niepodł czone 10. Masa 11. Niepodł czone 12. Dane dwukierunkowe 13. Synchronizacja pozioma (poziom TTL) 14. Synchronizacja pionowa (poziom TTL) 15.
Port RS-232C – parametry i lista rozkazów Sterowanie z komputera PC Do sterowania projektorem mo e być u ywany komputer PC poł czony z nim poprzez kabel RS-232C (typ null modem cross, dostępny powszechnie w sprzeda y). Opis podł czenia kabla znajduje się na stronie 26. Warunki transmisji Port RS-232C w komputerze nale y skonfigurować według poni szych parametrów: Format danych: zgodny ze standardem RS-232C Kontrola parzystości: brak Prędkość*: 9.600 / 38.400 / 115.
Rozkazy Przykład: eby wł czyć projektor, nale y wysłać następuj cy rozkaz: Projektor: Komputer: P O W R _ _ _ ↵ 1 Power Off Power On Power Status Projector Condition P P P T O O O A W W W B R R R N _ _ ? _ _ _ ? _ _ _ ? _ 0 1 ? 1 Lamp Status Lamp Power Status Lamp Quantity Lamp Usage Time (Hour) Lamp Life (Percentage) Model Name Check Model Name Check Projector Name Setting 1 (First four characters) * 1 Projector Name Setting 2 (Middle four characters) * 1 Projector Name Setting 3 (Last fo
Port RS-232C – parametry i lista rozkazów (ci g dalszy) INPUT 1 Picture Mode : Presentation INPUT 1 Picture Mode : Movie INPUT 1 Picture Mode : Game INPUT 1 Picture Mode : sRGB INPUT 1 Contrast (-30 - + 30) INPUT 1 Bright (-30 - + 30) INPUT 1 Color (-30 - + 30) INPUT 1 Tint (-30 - + 30) INPUT 1 Red (-30 - + 30) INPUT 1 Blue (-30 - + 30) INPUT 1 Sharp (-30 - + 30) INPUT 1 CLR Temp * 2 INPUT 1 Bright Boost (0 - 2) INPUT 1 Progressive : 2D INPUT 1 Progressive : 3D INPUT 1 Progressive : Fim Mode INPUT 1 Signal
INPUT 4 Sharp (-30 - + 30) INPUT 4 CLR Temp * 2 INPUT 4 Bright Boost (0 - 2) INPUT 4 Progressive : 2D INPUT 4 Progressive : 3D INPUT 4 Progressive : Film Mode Clock (-150 - + 150) Phase (-30 - + 30) H-Position (-150 - + 150) V-Position (-60 - + 60) Fine Sync Adjustment Reset Auto Sync : Off Auto Sync : On Internal Speaker : Off Internal Speaker : On Image Shift (-96 - + 96 (XGA)/-75 - + 75 (SVGA)) OSD Display : Off OSD Display : On Video System Selection : AUTO Video System Selection : PAL Video System Sele
Lista obsługiwanych sygnałów komputerowych Sygnał z komputera • Obsługiwane sygnały: Cz stotliwo ć pozioma: 15 – 70 kHz; Cz stotliwo ć pionowa: 45 – 85 Hz; Zegar punktowy: 12 – 108 MHz Sygnał synchronizacji: poziom TTL • Projektor jest kompatybilny ze standardami, których sygnał synchronizacji jest przekazywany z sygnałem zieleni.
Rozwi zywanie problemów Problem Przyczyna lub mo liwe rozwi zanie • Kabel zasilaj cy nie jest podł czony do gniazdka w cianie. • Zasilanie podł czonych urz dzeń zewn trznych jest wył czone. 26 • Kable zostały nieprawidłowo podł czone do gniazd projektora. 30 • Wybrane jest nieodpowiednie ródło sygnału. Brak d wi ku i obrazu. • Baterie pilota wyczerpały si . • W podł czonym notebooku wył czone jest zewn trzne wyj cie obrazu. • Pokrywa zespołu lampy jest zainstalowana nieprawidłowo.
Problem Przyczyna lub mo liwe rozwi zanie Obraz w trybach INPUT • Zmień ustawienia sygnału wej ciowego. • Je li nie mo esz wybrać typu sygnału wej ciowego, po wybraniu innego 1 (COMPONENT) / ustawienia ni „sRGB” w menu „Picture Mode” wybierz opcj „Color is faINPUT 2 (COMPONENT) ded or poor” w menu „Help”, a nast pnie wybierz typ sygnału wej ciowego. jest zielony. Obraz w trybie INPUT 1 (RGB) / INPUT 2 (RGB) jest ró owy (brak zieleni). Obraz jest zbyt jasny i wyblakły. Wentylator gło no pracuje.
Autoryzowane serwisy SHARP W przypadku wyst pienia problemów podczas korzystania z opisywanego projektora nale y spróbować rozwi zać je na podstawie informacji w tabelach na stronach 59 i 60. Jeśli problemu nie udało się rozwi zać, prosimy o kontakt z autoryzowanym serwisem firmy SHARP. SHARP ELECTRONICS GESSELSCHAFT M.B.H. Sp. z o.o. ODDZIAŁ W POLSCE 02-844 Warszawa, ul. Puławska 469 tel.
Dane techniczne Rodzaj urządzenia Model Systemy Wideo Sposób wyświetlania Panel DMD Obiektyw Lampa Wejściowy sygnał component (INPUT 1/2) Rozdzielczość pozioma Wejściowy sygnał RGB (INPUT 1/2) Wejściowy sygnał S-wideo (INPUT 3) Wejściowy sygnał wideo (INPUT 4) Częstotliwość pionowa Częstotliwość pozioma Zegar punktowy Gniazdo RS-232C Wejście audio Wyjście audio (Gniazdo AUDIO OUTPUT 1-5) Głośnik Napięcie zasilające Prąd wejściowy Częstotliwość zasilania Maksymalny pobór mocy Pobór mocy w trybie gotowości
Wymiary 23 /64 (9) 11 1/32 (280) 13 64 / (5) Wszystkie wymiary w calach (milimetrach) 7 16 / (11) 4 19/64 (109) 2 7/8 (73) 1 55/64 (47) ø9 7/64 (69.2) 3 5/32 (80) 3 1/16 (77.5) /16 (11) 1 7/8 (47.5) 4 7/64 (104) 12 13/32 (315) 2 61/64 (75) 7 1 11/32 (33.8) 1 53/64 (46.2) 2 19/32 (65.
Skorowidz A P Adapter DIN-D-sub RS-232C ............................................ 26 Automatyczna korekcja efektu trapezowego ..................... 41 Automatyczne dostrojenie do sygnału z komputera......................................................34, 36, 43, 46 Automatyczne wył czenie zasilania .................................. 43 Automatyczne wyszukiwanie ródeł sygnału..................... 43 Parametr H-Pos ......................................................... 36, 46 Parametr V-Pos ........
XR-20X/XR-20S/XR-10X/XR-10S SHARP ELECTRONICS (EUROPE) GMBH Sp. z o.o. Oddział w Polsce 02-844 Warszawa, ul. Puławska 469 tel.