Wichtige Informationen WARNUNG: Das Geriet ist mit einer starken Lichtquelle ausgestattet! Niemals direkt in den Lichtstrahl sehen, Besonders darauf achten, daf Kinder nicht direkt in den Lichtstrahl sehen. WARNUNG: ZUR VERRINGERUNG DER GEFAHR VON FEUER ODER ELEKTRISCHEM SCHLAG DIESES GERATE NICHT MIT FLÜSSIGKEITEN IN BERÜHRUNG BRINGEN, VORSICHT: ZUR VERRINGERUNG DER GEFAHR VON ELEKTRISCHEM SCHLAG NICHT DAS GEHAUST ENTFERNEN. IM INNERN DES GERADES BEFINDEN SICH KEINE VOM BENUTZER ZU WARTENDEN BAUTEILE.
WICHTIGE SICHERHEITSHINWEISE Elektrische Energie kann viele nützliche Funktionen ausfahren. Dieses Gerät wurde so konstruiert, daB es die Sicherheit von Personen gewährleistet. FALSCHE VERWENDUNG KANN ZU ELEKTRISCHEM SCHLAG ODER ZU FEUER FUHREN. Damit die in diesem LCD-Projektor eingebauten Sicherheitsfunktionen nicht umgangen werden, sollten die folgenden Hinweise fir Installation, Gebrauch und Wartung befolgt werden.
13 Als zusätzlichen Schutz des LCD-Projektors bei Gewitter oder wenn er der langer Zeit unbeaufsichtigt und ungenutzt stehen gelassen wird, den Netzstecker ziehen, sowie alle angeschlossenen Systeme abtrennen. Dies verhindert Beschädigungen des Empfängers durch Blitzschlag oder Stromstube in den Stromleitungen. 14 Netzsteckdosen und Verlagerungskabel nicht {ber der zulässigen Leistungsangabe verwenden, da dies zu Feuer oder elektrischem Schlag fuhren kann.
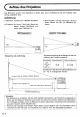
Aufbau des Projektors Das Bild kann verzerrt und undeutlich zu sehen sein, wenn die Bildwand und der Projektor nicht richtig aufgestellt sind. Aufstellung 1) Bildwand: Vertikal zum Fußboden aufstellen. 3) Den Projektor und den Tisch bzw. Stand in einem Winkel von 90° zur Bildwand auf) Projektor: Auf einen Tisch oder Stand aufbauen. bauen, dessen Oberfische horizontal zum Fußboden ist.
Einstellungen zum Ausgleichen und Anheben « Wenn die Bildwand aufgrund der gegebenen Tastverhältnisse hoch angebracht werden mu8, kann der Projektionswinkel mit den EinstellfiiBen auf der Unterseite des Projektors eingestellt werden, * Einstellungen im Bereich von ca. 4° sind möglich. e Absanken ( 2 \' Anheben Bis 2u 6a. 4° (Hohe: cz. 20 mim) FUSSE ZUM AUSGLEICHEN BZW. ANHEBEN Transport des Projektors * Den Tragegriff zum Transportieren des Projektors verwenden.
Verwendung des Projektors Eine Videoquelle (Videorecorder 0.a.} an die entsprechenden Anschisse auf der Rockseite des Projektors anschließen. 1. Einschalten des Projektors. 1) Das Netzkabel mit einer Netzsteckdose verbinden. Die Stromversorgung mit dem Hauptnetzschalter {MAIN POWER) @ auf der Trickserei des Projektors einschalten. (Die Betriebsanzeige (POWER) @ leuchtet rot auf) 2) Die Lampe/Betriebstaste (FLOWERPOWER) @ auf der Oberseite des Projektors drinstecken.
Farbregler M Die normale Einstellung des vom Projektor wiedergegebenen Farbbildes wird durch Drinstecken der Zurückstellte (RESET) (3 vorgenommen. Die Farbe kann jedoch den persönlichen Wünschen entsprechend mit den Regler tasten (CONTROLLER) in der Klappe des Projektors eingestellt werden. KONTRASTREGLER HELLIGKEITSREGLER FARBREGLER Durch Drinstecken der Taste “ A7 des Kontrastreglers {KONTRAST) (8 wird der Kontrast erholt und beim Drinstecken von N verringert.
Rockprojektion Die Riickprojekiion-Taste RESERVE (RESERVE) drinstecken Wenn ein Spiegelbild z.B. bei Rockprojektionen notwendig ist, kann die Bildumkehr-Taste {RESERVE} zur Umschaltung verwendet werden. Dis Rilckprojektion-Taste drucken. Das Bild aut der Bildschirm wird als ein Spiegelbild des Videoeingangssignals wiedergegeben. Zum Umschalten des Bildes filz die normale Wiedergabe die Taste noch einmal drinstecken. Luftfilter Das Reinigen des Filters ist sehr wichtig.
Wartungsanzeige Wenn die Lampenwartungs-Anzeige (CAMP SERVICE) (& oder die Temperaturanzeige (TEMPERATUR) (2> aufleuchten und die Stromversorgung abgeschaltet wird, kennen die folgenden Störungen vorhanden sein. 1.
Technische Daten System Duales Stern PAL/SECAM ProjektionsbildgréBe 51 bis 102¢m All bei einem Abstand von ca. 1,9m (diagonal) 127 bis 254cm Zoll bei einem Abstand von ¢a. 4,6m LCD-Projektionspiatten 3" Witwen-TFT Aktivmatrixplatten x 3 Anzahl der Punkte 302.940 (100.980 x 3} Objektiv F4.