® MODELE XV-C20E XV-C100E PROJEKTOR WIZYJNY LCD INSTRUKCJA OBSŁUGI
Wstęp Witamy wśród użytkowników produktów firmy SHARP. Miło nam, że wybrali Państwo nasz kolorowy projektor wizyjny LCD, który wyróżnia się wysoką jakością wykonania i niezawodnością pracy. Każdy projektor firmy SHARP jest poddawany w trakcie produkcji wielu rygorystycznym testom, które gwarantują uzyskanie wysokiej jakości obrazu. Niniejsza instrukcja ma na celu pomoc Państwu w dostosowaniu koloru i ostrości obrazu do Ich własnych potrzeb.
Spis treści ! Ważne informacje . . . . . . . . . . . . . . . . . . . . . . . . . . . . . . . . . . . . . . . . . . . . . . . . . . . . . . . . . . . . . . . . . . . . . . . . . . . . . . . ! Główne funkcje projektora . . . . . . . . . . . . . . . . . . . . . . . . . . . . . . . . . . . . . . . . . . . . . . . . . . . . . . . . . . . . . . . . . . . . . . 1 ! Informacje dotyczące bezpieczeństwa . . . . . . . . . . . . . . . . . . . . . . . . . . . . . . . . . . . . . . . . . . . . . . . . . . . . . . . . .
Informacje dotyczące bezpieczeństwa UWAGA: Prosimy o przeczytanie wszystkich poniższych informacji przed przystąpieniem do pracy z projektorem oraz o zachowanie niniejszej instrukcji na wypadek późniejszych niejasności. W celu zapewnienia własnego bezpieczeństwa i jak najdłuższej sprawności projektora należy zapoznać się z poniższymi uwagami. Opisywany projektor został skonstruowany w taki sposób, żeby zapewnić bezpieczeństwo osobom, które go obsługują i przebywają w jego pobliżu.
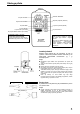
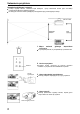
Położenie regulatorów i przycisków WIDOK Z PRZODU Wskaźniki Pokrętło regulacji kąta obiektywu Kratka wentylatora (tędy wychodzi powietrze) Głośnik Kratka wentylatora i filtr (tędy wchodzi powietrze) Czujnik pilota Pierścień regulacji ostrości Nóżki PULPIT STEROWNICZY Przycisk (ON/OFF) Przyciski VOLUME Pulpit sterowniczy Uwagi: Kratka wentylatora, osłona żarówki i elementy znajdujące się w ich pobliżu mogą być bardzo gorące w czasie pracy projektora.
Obsługa pilota Nadajnik Wskaźnik TRANSMIT Przyciski VOLUME Włącznik projektora (ON/OFF) Przyciski ADJUSTMENT Przycisk wyciszania (MUTE) Przycisk MENU Przycisk ENTER Przycisk STATUS Przycisk LIGHT (XV-C20E) lub przycisk INPUT SELECT (XV-C100E) Korzystanie z pilota w ciemnym pomieszczeniu (tylko XV-C20E) Przyciśnij przycisk LIGHT, żeby włączyć podświetlenie przycisków na ok. 5 sekund. Uwagi dotyczące obsługi pilota Pilota nie należy narażać na wstrząsy oraz unikać jego kontaktu z wilgocią i płynami.
Ustawienie projektora Ustawianie obiektywu i ostrości Funkcje regulacji ostrości, ustawienia kąta obiektywu i opcja odwracania obrazu (tylko XV-C20E) rozszerzają możliwości instalacji projektora. Na kolejnych stronach instrukcji znajdą się szczegółowe opisy poszczególnych funkcji. tylko XV-C20E 1. Włącz zasilanie sieciowym. głównym włącznikiem Przyciśnij włącznik tak, by znajdował się w położeniu ON. 2. Uruchom projektor.
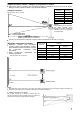
Związek wielkości obrazu z odległością projektora od ekranu Ostry obraz może być uzyskany przy ustawieniu projektora w odległości od 0,9 m do 6,6 m od ekranu. Dlatego też należy ustawić projektor w tym przedziale odległości.
Korzystanie z funkcji INVERT i REVERSE (tylko XV-C20E) Opisywany projektor wyposażony jest w funkcję obracania obrazu w pionie i w poziomie (INVERT/REVERSE). Obraz można obracać korzystając z przycisków MENU, ENTER i ADJUSTMENT "/#. >STATUS1 VIDEO ADJ. SYSTEM LANGUAGE BLUE SCREEN (ON) OFF TIMER (OFF) REVERSE (OFF) INVERT (ON) ["/#]SEL. [ENTER] NEXT [MENU] END 1. Przyciśnij przycisk MENU. Przy wyświetlonym menu należy za pomocą przycisków ADJUSTMENT "/# wybrać "INVERT", a następnie przycisnąć klawisz ENTER.
Ustawienie projektora i ekranu Uwagi dotyczące ustawienia projektora: Z projektora nie należy korzystać w pomieszczeniach wilgotnych, zakurzonych lub zadymionych. Jeśli obiektyw, lustro lub inny element optyczny zostanie zabrudzony uzyskiwany obraz będzie niewyraźny. Projektor nie powinien pracować w zbyt wysokiej lub zbyt niskiej temperaturze. Optymalna temperatura w czasie pracy projektora: to 50 C do 400 C. Temperatura przechowywania projektora: od - 200 C do 600 C.
Ustawienie wysokości obrazu Jeśli ustawienie położenia obrazu nie może być wykonane wyłącznie przy pomocy regulatora kąta ustawienia obiektywu, lub gdy podstawa obiektywu nie jest pozioma, należy wyregulować jego ustawienie przy pomocy nóżek. 1. Określ położenie obrazu za pomocą regulatora kąta ustawienia obiektywu. Zob. s. 7. 2. Ustaw położenie obrazu za pomocą wykręcanych nóżek. Żeby uzyskać odpowiednie położenie obrazu, wkręcaj lub wykręcaj nóżki.
Podłączenie projektora Żeby można było wyświetlać obrazy odtwarzane przez urządzenie video, należy dokonać poniższych podłączeń. Uwaga: Przed rozpoczęciem dokonywana podłączeń zawsze wyłączaj zasilanie, żeby zapobiec uszkodzeniom. Po zakończeniu podłączania najpierw włączaj projektor. Urządzenia podłączone do projektora muszą być zawsze włączane na końcu. Gniazda S-video należy używać, gdy wykorzystywane urządzenie emituje sygnał w tym standardzie.
Podstawy obsługi projektora 1. Włącz zasilanie głównym włącznikiem sieciowym. Gdy zasilanie jest włączone wskaźnik LAMP pulsuje, by poinformować użytkownika o aktualnym stanie żarówki. Kolor zielony: Żarówka jest gotowa. Pulsujący zielony: Żarówka się rozgrzewa Kolor czerwony: Wymień żarówkę. Wskaźnik wyłączony Główny wyłącznik sieciowy jest wyłączony. Wskaźnik świeci na czerwono Stan gotowości. Wskaźnik świeci na zielono Żarówka projektora jest włączona. Przyciśnij główny włącznik sieciowy.
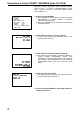
4. Zmiana systemu. Fabrycznie tryb wyboru systemu jest ustawiony na AUTO. Można jednak wybrać także inne tryby pracy. 1) Przyciśnij przycisk MENU. Na ekranie pojawi się menu. 2) Przyciskami ADJUSTMENT "/# wybierz opcję "SYSTEM" i przyciśnij przycisk MENU, by przejść do następnego menu. 3) Przyciskami ADJUSTMENT "/# wybierz pożądany system i przyciśnij przycisk MENU. SYSTEM >AUTO PAL SECAM N4.43 N3.58 ["/#]SEL. [ENTER] BACK [MENU] END PAL SECAM PAL NTSC 3.
Regulacja obrazu Wszystkie parametry obrazu posiadają pewne ustawienia fabryczne. Możesz jednak je zmienić przy pomocy przycisków ADJUSTMENT, dostosowując do własnych potrzeb. Możesz zmienić cztery następujące parametry obrazu: kontrast (PICTURE), jasność (BRIGHT), nasycenie koloru (COLOR), odcień (TINT) i ostrość (SHARPNESS). Uwaga: Opcja TINT może być ustawiona tylko w systemie NTSC. >STATUS1 VIDEO ADJ. SYSTEM LANGUAGE BLUE SCREEN (ON) OFF TIMER (OFF) REVERSE (OFF) INVERT (ON) ["/#]SEL.
Inne funkcje Niebieski ekran IMAGE ADJ. >BLUE SCREEN (OFF) OFF TIMER (OFF) LANGUAGE ["/#]SEL. [ENTER] NEXT [MENU] END # BLUE SCREEN (ON) ["/#]SEL. [ENTER] NEXT [MENU] END REMAIN 5M REMAIN 4M Opisywany projektor wyposażony jest w opcję niebieskiego ekranu, która aktywowana jest, gdy nie jest odbierany żaden sygnał wizyjny. Przyciśnij przycisk MENU. Z menu wybierz przyciskami ADJUSTMENT "/# opcję "IMAGE ADJ.
Wyłącznik czasowy STATUS1 VIDEO ADJ. SYSTEM LANGUAGE BLUE SCREEN (ON) >OFF TIMER (OFF) REVERSE (OFF) INVERT (ON) ["/#]SEL. [ENTER] NEXT [MENU] END Opisywany projektor wyposażony jest w wyłącznik czasowy, który automatycznie wyłącza projektor po upływie określonego czasu. Przyciśnij przycisk MENU. Z menu wybierz przyciskami ADJUSTMENT "/# opcję "OFF TIMER" i przyciśnij ENTER. Przyciskami ADJUSTMENT "/# wybierz pożądany czas i przyciśnij klawisz MENU.
Obsługa filtra powietrza Filtr powietrza powinien być czyszczony po każdych 100 godzinach pracy projektora. Czyść filtr częściej, jeżeli projektor jest używany w pomieszczeniach o dużej ilości kurzu lub dymu papierosowego. Jeśli filtr musi zostać wymieniony, należy zakupić nowy wkład (PFILD0070CEZZ dla XV-C20E lub PFILD0002PEZZ dla XV-C100E) u autoryzowanego dealera firmy SHARP. Widok od spodu Zespół filtrujący Zespół filtrujący Filtr Osłona 1 Wyłącz zasilanie. Odłącz przewód sieciowy.
Wskaźniki Żarówka projektora Czas życia żarówki projektora jest równy ok. 2.000 godzin pracy i może on ulegać niewielkim zmianom w zależności od warunków, w jakich korzystasz z projektora. Jeśli czas życia żarówki dobiega końca, jakość kolorów i obrazu może zostać wyraźnie obniżona. Jeśli projektor jest włączony, a jego żarówka była wykorzystywana już ponad 1.900 godzin, wskaźnik LAMP będzie świecił na czerwono a żółty napis "LAMP" będzie pulsował na ekranie.
Dane techniczne Model XV-C20E XV-C100E Rodzaj urządzenia Projektor wizyjny LCD System video PAL/SECAM/NTSC 3.58/NTSC 4.43 Sposób tworzenia obrazu Moduł LCD, system optycznej przesłony RGB Rozmiar 20,1 x 26,9 mm Sposób wyświetlania Moduł LCD Sposób sterowania Liczba punktów 20 x 26,8 mm Diapozytywowy moduł LCD Aktywna matryca TFT 576.000 (480 x 1.200) Obiektyw 181.
XV-C20E / XV-C100E ® SHARP ELECTRONICS GESSELSCHAFT M.B.H. Sp. z o.o.