
XV-Z21000 Operation-Manual GB
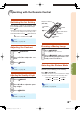
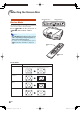

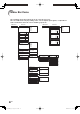
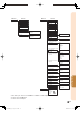
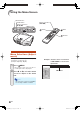
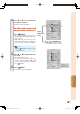
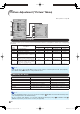
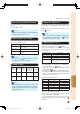
Table Of Contents
- Contents
- Accessories
- IMPORTANT SAFEGUARDS
- Part Names and Functions
- Using the Remote Control
- Quick Start
- Setting Up the Projector
- Samples of Cables for Connection
- Connecting to Video Equipment
- Connecting to a Computer
- Controlling the Projector by a Computer
- Turning the Projector On/Off
- Image Projection
- Operating with the Remote Control
- Selecting the Screen Size
- Menu Bar Items
- Using the Menu Screen
- Picture Adjustment (“Picture” Menu)
- Selecting the Picture Mode
- Adjusting the Image
- Selecting the Gamma Position
- Switching the Iris Setting
- Lamp Setting
- Using the Advanced
- Adjusting the Colors
- Adjusting the BrilliantColor TM
- Selecting the Progressive Mode
- Selecting the Film Mode
- Reducing Image Noise (DNR)
- Mosquito Noise Reduction (MNR)
- Adjusting the Unveil Control
- Adjusting the Automatic Contrast
- Resetting All Adjustment Items
- Gamma Adjustment (“Gamma” Menu)
- Computer Image Adjustment (“Fine Sync” Menu)
- Using the “Options” Menu
- Adjusting the Image Position
- Adjusting the Vertical Size of the Display (Subtitle Setting)
- Adjusting the Overscan
- Adjusting the White Level/Black Level
- Turning LED Off
- Checking the Lamp Life Status
- Setting On-screen Display
- Setting the Video System
- Signal Type Setting
- Adjusting the Color Space
- Adjusting the Dynamic Range
- Selecting the Background Image
- Adjusting the Economy Mode
- Selecting the Transmission Speed (RS-232C)
- Fan Mode Setting
- Reversing/Inverting Projected Images
- Returning to the Default Settings
- Other Function
- Maintenance Indicators/Maintenance
- Regarding the Lamp
- Connecting Pin Assignments
- RS-232C Specifi cations and Command Settings
- Wired Remote Control Terminal Specifications
- Computer Compatibility Chart
- Troubleshooting
- Specifications
- Dimensions
- Index

-36
Picture Adjustment (“Picture” Menu)
Menu operation ⇒ Page 34
Selectable
items
Description
The main default settings of each item when selecting Picture Mode
CLR Temp BrilliantColor™ IRIS Lamp Setting
Standard For standard image 7500 Off High Brightness Bright
Natural A balanced color image is obtained. 7500 Off High Brightness Bright
Dynamic A vivid image is obtained. 7500 On High Brightness Bright
Movie1 For viewing images with the brightness
slightly toned down in a darkened
room
6500 Off Medium Mode Eco + Quiet
Movie2 For viewing images with the brightness
slightly boosted in a darkened room
6500 Off High Contrast Eco + Quiet
Memory Allows you to store your picture
adjustment settings. The settings
stored effect each input mode.
7500 Off High Brightness Bright
• You can set or adjust each item in the “Picture” menu to your preference. Any changes you make are retained in memory.
Note
• You can also press PICTURE MODE on the remote control to select the picture mode. (See page 29.)
• The default settings are subject to change without notice.
Adjustment items
\ button | button
Contrast For less contrast. For more contrast.
Bright For less brightness. For more brightness.
Color For less color intensity. For more color intensity.
Tint For making skin tones purplish. For making skin tones greenish.
Sharp For less sharpness. For more sharpness.
CLR Temp For making images slightly more reddish
(slightly warmer colors).
For making images slightly more bluish
(slightly cooler colors).
Note
• To reset all adjustment items, select “Yes” in “Reset” and press ENTER. The Picture Mode settings of the
selected input return to the default settings.
• As for “Contrast” and “Bright”, you can make adjustments directly by using
CONTRAST and
BRIGHT, respectively, on the remote control. (See page 29.)
1 Selecting the Picture Mode
2 Adjusting the Image
This function allows you to select the picture mode that best suits the room brightness and the type of image being
projected.
XVZ21000EOusyuP36-45.indd36XVZ21000EOusyuP36-45.indd36 2006/07/3119:55:262006/07/3119:55:26