ELECTRONIC ORGANIZER OPERATION MANUAL MODEL ZQ- P20A CONTENTS Part Names .......................................................................................... 1 Using the Organizer for the First Time ............................................... 2 Entering Characters ............................................................................ 2 Clock Mode .......................................................................................... 3 Telephone Mode ....................................
NOTICE • SHARP strongly recommends that separate permanent written records be kept of all important data. Data may be lost or altered in virtually any electronic memory product under certain circumstances. Therefore, SHARP assumes no responsibility for data lost or otherwise rendered unusable whether as a result of improper use, repairs, defects, battery replacement, use after the specified battery life has expired, or any other cause.
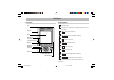
Part Names Part Names Key Assignments : 2nd Function key Stylus Activates the second function specifically assigned to the next key tapped.
Using the Organizer for the First Time Entering Characters R Be sure to perform the following operations before using the Organizer for the first time. 1. Remove the isolating film that is affixed to the battery holder on the back of the unit. 2. Press the RESET switch with a stylus. “RESET?” is displayed. 3. Tap f and press x to initialize the Organizer. “RESET!” is displayed. You have now cleared the memory contents. The Select Language screen then appears.
• To enter a letter with an accent mark, tap the relevant key shown below repeatedly after tapping s. (Key) (CAPS ON) (CAPS OFF) (Key) (CAPS ON) (CAPS OFF) Clock Mode Home clock Daylight saving time set ( with “#”) Home city (with “ ”) Day of the week 2nd Date Time • Activate “CAPS” on to enter capitalized letters. Making corrections Move the cursor to the character to be corrected. Enter the correct character to replace the previous one.
2. Setting the clock 1. Tap CLOCK once or twice to display the Home clock (with “ 2. Tap f e to start setting. The cursor starts to flash on the city name. ”). 3. Press > or < to select the desired city. (Refer to the list of cities described below.) • Enter the city name, if needed (6 characters or under). Only one changed name for Home clock can be stored. 4. Tap to move the cursor to the day. 5. Enter the day, the month, and the year (4 digits ).
1. Tap CLOCK once or twice to display the World clock (without “ ”). 2. Press > or < and select the desired city to be set as the new home city. 3. Tap f e to change the cities between Home and World clocks. • The previous home city is now set as the world city (without “ ”). 4. Tap CLOCK to check the home city. • The selected city in step 2 is set as the home city (with “ ALARM2, and ALARM3). 2. Hourly alarm ...... beeps every hour when minutes reach “00”, when “ ” is turned on. 3. Schedule alarm ..
Turning the each daily alarm on and off 1. Display Home clock and tap . 2. Press > or < to display the daily alarm screen. 3. Each time you tap or , the daily alarm you selected turns on or off (e.g. daily alarm1). ALARM on ALARM off Note • The daily alarm which is turned off does not beep even though the “ ” is displayed. Telephone Mode Telephone mode has two directories for storing data. Tap TEL to toggle between “1” and “2” on the display. Use these files for convenience, e.g.
• “STORED!” appears briefly, then the Telephone mode screen is displayed. The telephone entry is now stored. Field Number of characters The 1st line: Name, E-mail address, web address (URL) 36 characters or under address The 2nd and the 3rd lines: Phone number Allowable characters Alphabetic letters, numbers, symbols, “+ – × ÷ .”, space Schedule mode is used for storing schedule details (36 characters or under), date and time (year, month, day, hour, and minute).
To Do Mode Memo Mode In the To Do mode, you can store your important To Do items with a priority index. Storing To Do entries 1. Tap TO DO to enter the To Do mode. 2. Enter the description and tap . Storing memo entries 3. Select the Priority number from 1(High) to 9(Low) enter the number, then tap . 4. Enter the date and time. • The types of date and time are the same as the types set for the clock. • To enter a single-digit date or time, enter “0” and the digit (e.g. “O2”). 5.
Notes for storing and recalling entries • When the memory is full, “MEMORY FULL!” appears briefly, and the entry cannot be stored. • When the symbol “ ” or “ ” appears, more information exists. Tap or to switch the display. Checking details of entries in Telephone mode • To display each field on the 1st line, follow the symbol “ ” or “ ” and tap or . (The symbol above the 1st line shows each field.) • Tap and hold to start the auto scroll on the 1st line. Tap again to stop or restart the scroll.
Editing or deleting entries Editing 1. Recall the entry to be edited. 2. Tap . The cursor starts to flash. EDIT 3. Tap , edited. , , or to move the cursor to the position to be 4. Enter, insert, or delete characters (refer to “Entering Characters”). • To cancel editing, tap C•CE . 5. Press ENTER several times (until “STORED!” appears briefly) to finish editing and to store the entry. Deleting 1. Recall the entry to be deleted. 2. Tap DEL . • “DELETE?” is displayed.
Calculation examples Example Operation (–24+2)÷4=–5.5 24 C•CE 34+57=91 34 45+57=102 45 68×25=1700 68 Currency/Unit Conversion Mode Display 2 –5.5 4 91. 57 102. (The addend becomes a constant.) 68×40=2720 25 1700. 40 2720. (The multiplicand becomes a constant.) 20. 10 % 1. Setting a currency rate 1. Tap CALC/CONV several times to display the currency conversion mode screen (refer to “Calculator mode”). Example: 1 CAD (Canada dollars) = 0.
2nd CAPS 3. Tap to convert CAD into USD. CAD – – USD • To convert in reverse order (e.g. 200 USD into CAD), enter 200 and tap . 3 3 0. • You can use the unit conversion in the same manner. You cannot change the units or the rates for units. • The conversion result may have a slight error as a result of rounding off the number (e.g. up to 2 decimal places for currency conversions). Use the conversion result for reference.
3. Press ENTER to start a game. CAPS 4. Tap the same key as the first character at EYK W the left end of the 1st line. (In this case, tap keys in the order: E → Y → K → W.) 01 • Pressing the correct key in the correct order deletes the character. • When 12 characters are displayed in each level, the game continues in the faster level (up to 20). • When no more characters can be displayed, the game is over. The Game mode screen with the level when the game is over is displayed.
Diet Function Mode The Diet Function can organize your daily calories burned by walking, as well as managing your daily caloric intake. Tap DIET several times to display the Diet Function mode screen and the Game mode screen (Diet Function → BLACKJACK → ALPHA ATTACK → Diet Function ...). PEDOME T ER The Diet Function calculates the estimated calories burned by using the built-in pedometer, and compares the value with the entered target value.
5. Enter the target calorie value for your daily intake (I.T.CAL), and tap m. 6. Enter the target carbohydrate value for your daily intake (I.T.CARBS.), and tap m. 7. Enter the target calorie value of your daily consumption (C.T.CAL), then press ENTER to store the setting. Note: • It is recommended that you refer to the appropriate documentation, or consult your physician before setting all target values such as your Daily caloric intake. • Units such as LENGTH and WEIGHT can be changed in the MENU mode.
Viewing the step count and calorie values 1. Tap the DIET once, twice, or three times to enter the Diet Function Mode. 2. Select “PEDOMETER” using k or m, CA LOR I E K c a l and press ENTER twice to display the 8 0.2 1 3 interim report of calories burned and 21–3–2006 total step count. Use k or m to switch the two displays. Tap C•CE to return to the previous screen. • Step count of the day will be registered automatically when the time is at “23:59:59”.
1. Tap DIET once, twice, or three times to enter the Diet Function Mode. 2. Select “INTAKE” using k or m, and press ENTER . 3. Tap EDIT , then use < and > to select a desired food in the selection field. You can enter the first few letters of the desired food name, then browse the items using < or >. When no match is found, then a message "NOT FOUND!" is displayed. 4. Use k and m to select the entry field AMOUNT for each AMOUNT and the DATE of the 1. intake to enter values.
Backlight function The Backlight allows you to view the display and use the Organizer even in low-light conditions. Pressing z once illuminates the display for as long as you continue to use the Organizer, or until no key is pressed for 10 seconds. • To turn the Backlight off, press z again. • The Backlight may remain on for less than the preset interval or it may not function if the battery level is low. • The Backlight does not function in the PC Link mode.
Managing the Organizer’s Memory Use the memory management function to utilize the Organizer's memory more efficiently. Note: • Before performing memory management, back up your data. • While the memory management is in progress, do not press the RESET switch. Doing so may result in losing all the data stored in the Organizer. 1. Tap TEL , , or TO DO to display “NAME?”, “SCHEDULE?”, “TO DO?” or “MEMO?”. 2. Tap f MENU , select “MANAGE MEM.” using k or m. 3. When x is pressed, a message “PERFORM...
4. Enter the same password once more for verification and press ENTER . • The display returns to the Home clock. The secret function turns on automatically. • If you enter the wrong password, “ERROR !” appears briefly and display returns to the Home clock. Follow the above steps again to register a password. 2. Turning Secret function off When the Secret function is on, it is necessary to turn off to perform the Telephone, Schedule, To Do, and Memo modes. 1. Tap TEL , , TO DO or .
Using the Included PC Software The CD-ROM contains software to enable exchange of data with a PC. The software consists of: Synchronization Software: Can be used to synchronize Microsoft® Outlook® data, such as Contacts, Calendar, Tasks, and Notes, with the Organizer. Desktop Utilities: Can be used to backup/restore data in the Organizer and export/ import data to different file formats.
Serial Port Setup Installing Precautions: • Prior to installing the Synchronization Software, make sure that Microsoft® Outlook® is installed and set up. If not, install and set up the Outlook® first, then install the Synchronization Software. 1. Insert the PC software CD-ROM into your CD-ROM drive. Installation process should automatically start. If the PC software screen does not appear, double-click “My Computer” to locate the CD-ROM drive directory, then double-click to launch “installer.
Synchronization Software The Conflict Resolution Tab After the Serial Port Setup is complete, the Settings window will appear. To bring up the Settings window manually, right-click on the Synchronization icon on the Windows® system tray, then select "Settings..." in the menu. General tab This tab allows you to select the application that you want to synchronize with the PC. • Click on the checkbox for each application to enable synchronization.
The Connection tab Export/Import This tab allows you to change settings for the serial port and the password. • Serial port : Specify the serial port to connect the unit to the PC. • Auto Detect : Click to allow the PC to detect the appropriate serial port. The Export/Import menu of the Desktop Utilities allows you to import data created by each PC application to the unit, or export data out of the unit.
When the “LOW BATTERY” Symbol Appears Battery Replacement Batteries used Type Lithium battery Model Quantity CR2032 2 Use Unit operation and backlighting • Be sure to write down any important information stored in the memory before replacing the batteries. Precautions Since improper use of the batteries may cause leakage or explosion, strictly observe the following instructions: • If fluid from a leaking battery accidentally gets into your eyes, it may result in serious injury.
Replacing the batteries Specifications • Make sure the power is turned off before replacing the batteries. • Do not press o until the battery replacement procedure is completed. • Do not remove all of the batteries at once. Remove and replace batteries one by one. R 1. Press o to turn the power off. 2. Loosen the screw (turn counterclockwise) and remove the battery holder cover on the back of the unit. 3. Remove one used battery using a ball-point pen or similar object.
Diet Function Mode: Step count precision: within ±10 % (by vibration testing machine) Food Database: 200 foods Value entry: 2 fields (Calorie, Carbohydrate) Power consumption: 0.13 W Operating temperature: 0°C to 40°C Power supply: – (DC) (Lithium battery CR2032 x 2) 3.0V ... Auto Power Off Function: Approx. 5 minutes Battery life: (at 25°C) • Approx. 6 months While PEDOMETER is set to ON, with 5 minutes of data search, 55 minutes of data display, and 10000 step counts per day. • Approx.
A. Information on Disposal for Users (private households) Attention: Your product is marked with this symbol. It means that used electrical and electronic products should not be mixed with general household waste. There is a separate collection system for these products. 1.
For Australia / New Zealand only: For warranty information please see www.sharp.net.au ZQ-P20A(En)(Cover) 3 08.1.
SHARP CORPORATION PRINTED IN CHINA/IMPRIMÉ EN CHINE/IMPRESO EN CHINA 08BT (TINSE0836EH50) ZQ-P20A(En)(Cover) 4 08.1.