
Instruction Manual

8+
Printed in China
1-800-374-2744
FOR TECHNICAL SUPPORT, PLEASE CALL
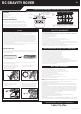
1. Turn the power knob on the remote clockwise and flip the power switch on the vehicle to ON. The
remote pair light and orange vehicle lights will pulse. They will turn solid when paired.
Note: Do not touch rover while its blades are spinning.
2. Control the vehicle using the remote control pads. The left pad controls the left wheels and the
right pad controls the right wheels. Push both pads up to go forward and down to go backward.
3. When ready to climb the wall, engage the Gravity Drive by pressing and holding the button on the
remote down for 2 seconds. The blades will begin rotating. You can now climb on the walls or ceiling.
4. To turn o the Gravity Drive, press and hold the button on the remote down for 2 seconds. Make
sure the vehicle is on the ground before to avoid the vehicle falling and becoming damaged.
5. In the event of an emergency, the Gravity Drive can be disengaged immediately by double tapping
the Gravity Drive ON/OFF button.
6. When the battery is low, the Gravity Rover lights will flash. Drive the vehicle to ground level to avoid
unnecessary damage caused by a fall from the ceiling or walls.
1. If your vehicle is having trouble climbing or maneuvering on the walls or ceiling after a full charge,
your tires could be cleaned to improve traction. Wipe your tires with a slightly damp soft cloth to
remove surface dust and dirt.
2. If your Gravity Rover is malfunctioning due to a crash or fall, please follow these tips to restore
your vehicle to working condition:
a. The small gear between the wheels may
come out of alignment. Carefully press the
gear back into place so the gear teeth
mesh with the wheel gear teeth.
b. If the tires come loose or o, you can
reinstall them on to the wheels.
To charge the Gravity Rover, insert the USB-C cable (included) into the port on the
vehicle. Insert the other end into an AC wall adapter (not included). The battery takes
approximately 100 minutes to charge fully. The red indicator light on the bottom of
the rover will become dim when fully charged.
• Do not mix old and new batteries.
• Do not mix alkaline, standard (carbon-zinc), or rechargeable batteries.
• Alkaline batteries are recommended. Use only the specified voltage.
• Insert batteries using the correct polarity. Always use, replace, and recharge (if
applicable) batteries under adult supervision.
• Do not short-circuit the battery supply terminals.
• Do not dispose of batteries in fire, batteries may explode or leak.
• Remove batteries before storing.
• Recycle or dispose of batteries according to federal, state, and local laws.
• Keep these instructions for future reference.
BATTERY WARNING
RECHARGEABLE BATTERY WARNING
This device complies with part 15 of the FCC rules. Operation is subject to the following two conditions:
1)This device may not cause harmful interference, and
2)This device must accept any interference received, including interference that may cause undesired operation.
NOTE: This equipment has been tested and found to comply with the limits for a Class B digital device, pursuant to Part
15 of the FCC Rules.
These limits are designed to provide reasonable protection against harmful interference in a residential installation.
This equipment generates, uses and can radiate radio frequency energy and, if not installed and used in accordance
with the instructions, may cause harmful interference to radio communications. However, there is no guarantee that
interference will not occur in a particular installation. If this equipment does cause harmful interference to radio or
television reception, which can be determined by turning the equipment o and on, the user is encouraged to try to
correct the interference by one or more of the following measures:
• Reorient or relocate the receiving antenna.
• Increase the separation between the equipment and receiver.
• Connect the equipment into an outlet on a circuit dierent from that to which the receiver is connected.
• Consult the dealer or an experienced radio/TV technician for help.
© 2021 MerchSource, LLC. Irvine, CA 92618. All rights reserved.
KEEP THIS INSTRUCTION MANUAL AS IT CONTAINS IMPORTANT INFORMATION FOR FUTURE REFERENCE
Due to continuous product improvements, the picture on the manual may dier slightlyfrom the actual product.
RC GRAVITY ROVER
TROUBLESHOOTING
Dust and Dirt Tires
USB-C
Charging
Port
• There is a risk of fire and personal injury if battery is punctured, damaged, or misused
• Do not dismantle, crush, incinerate or short-circuit battery.
• Never expose battery to extreme temperatures or moisture.
• Keep away from flammable materials and direct sunlight.
• Only charge using the provided charger, cable, and/or adapters.
• Rechargeable battery is only to be charged by an adult.
• Adult Supervision of the battery while it is charging is required.
• Allow battery to cool to room temperature before charging.
• Charge on a non-flammable surface and keep away from flammable products.
• Discontinue charging if battery becomes hot, swells, smokes, or gives o a strong odor.
• Battery chargers used with the product are to be regularly examined for damage to the cord, plug, enclose, and
other parts, and in the event of such damage, they must not be used until the damage has been repaired.
• Recycle or dispose of battery according to federal, state, and local laws.
• Keep these instructions for future reference.
• Adult supervision is required.
• The Gravity Drive blades rotate at a very high rate of speed. When they blades are on, do NOT place your
hand, face, or any extremity near the vehicle. Once the Gravity Drive is disengaged and the blades have
stopped rotating, you can handle the vehicle.
• Not for children under 8 years of age.
• Do not use people or animals as obstacles.
• For indoor use only.
• Never operate your vehicle in inclimate weather, rain, or standing water.
• Keep fingers, hair and loose clothing away from wheels while vehicle is in motion.
• Do not expose to extreme temperatures and moisture.
• Do not leave vehicle or transmitter near sources of heat or under direct sunlight for long periods of time.
• Thoroughly inspect products before every use. If the product appears worn, frayed/splintered, cracked, or
broken in any manner, discontinue use and discard immediately.
• IMPORTANT! The RC Gravity Rover is an indoor vehicle ONLY, intended for flat surfaces such as floor,
walls, windows, and ceilings. Do NOT play with the Gravity Rover outdoors.
SAFETY WARNINGSPLAY
Clean Tires
CONTENTS AND BATTERY INSTALLATION
Contents
Gravity Rover Vehicle
USB-C charging cable
Remote Control
Safety Cage (installed on Gravity Rover)
Battery Installation
The vehicle requires 1 3.7V 550mAh rechargeable lithium battery
(included) and the remote requires 4 AA 1.5V batteries (not included).
Use a Phillips head or Cross screwdriver to loosen the screw securing
the battery cover on bottom of the remote. Insert the batteries, ensuring
the correct polarity. Replace the battery cover and tighten the screw.
OFF
ON
Power Knob
Left Wheels Right Wheels
Gravity Drive
ON/OFF
Status Light
c. The gear connecting rod can become
deformed. It is flexible and can be gently
shaped back into place.
d. The blades can become stuck in the Gravity
Rover shell openings. As the blades and
shell are flexible, the shell can be gently
flexed outward to free the blade to rotate.
Warning: Changes or modifications to this unit not expressly approved by the party responsible for compliance could
void the user's authority to operate the equipment.
Model No.: 1014117