
Instruction Manual

CONTENTS AND OPERATION
Sharper Image® name and logo are registered trademarks. Distributed by
and © 2020 MerchSource, LLC. Irvine, CA 92618. All rights reserved.
BATTERY WARNING:
• Do not mix old and new batteries.
• Do not mix alkaline, standard (carbon-zinc), or
rechargeable batteries.
• Alkaline batteries are recommended. Use only the
specified voltage.
• Insert batteries using the correct polarity. Always use,
replace, and recharge (if applicable) batteries under adult
supervision.
• Do not charge with non-rechargeable batteries.
• Do not short-circuit the battery supply terminals.
• Do not dispose of batteries in a fire, batteries may explode
or leak.
• Remove batteries before storing.
• Recycle or dispose of batteries according to federal, state,
and local laws.
• Keep these instructions for future reference.
• Do not use people or animals as obstacles.
• Never operate your vehicle in inclimate weather, rain, or
standing water.
• Keep fingers, hair and loose clothing away from wheels while
vehicle is in motion.
• Do not expose to extreme temperatures.
• Do not leave vehicle or transmitter near sources of heat or
under direct sunlight for long periods of time.
• Adult supervision is recommended when operating the vehicle.
• Thoroughly inspect products before every use. If the product
appears worn, frayed/splintered, cracked, or broken in any
manner, discontinue use and discard immediately.
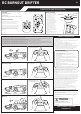
Forward/Reverse
Drifting Turn
Burnout
This device complies with Part 15 of the FCC Rules. Operation is subject to
the following two conditions: (1) this device may not cause harmful
interference, and (2) this device must accept any interference received,
including interference that may cause undesired operation.
KEEP THIS INSTRUCTION MANUAL AS IT CONTAINS IMPORTANT
INFORMATION FOR FUTURE REFERENCE.
Due to continuous product improvements, the pictures on this manual may
dier slightly from the actual product.
NOTE: This equipment has been tested and found to comply with the limits
for a Class B digital device, pursuant to Part 15 of the FCC Rules. These limits
are designed to provide reasonable protection against harmful interference
in a residential installation. This equipment generates, uses and can radiate
radio frequency energy and, if not installed and used in accordance with the
instructions, may cause harmful interference to radio communications.
However, there is no guarantee that interference will not occur in a
particular installation. If this equipment does cause harmful interference to
radio or television reception, which can be determined by turning the
equipment o and on, the user is encouraged to try to correct the
interference by one or more of the following measures:
Reorient or relocate the receiving antenna.
Increase the separation between the equipment and receiver.
Connect the equipment into an outlet on a circuit dierent from that to
which the receiver is connected.
Consult the dealer or an experienced radio/TV technician for help.
SAFETY PRECAUTIONS
1-800-374-2744
FOR TECHNICAL SUPPORT,
PLEASE CALL
6+
Push the throttle up and down
to control forward and reverse.
Normal Turning
Push the throttle up and push
the steering button.
Warning: Changes or modifications not expressly approved by the party
responsible for compliance could void the user’s authority to operate the
equipment.
Printed in China
Model Number: 1014148
Push drift mode button first,
then push the throttle up and
steering buttons right or left.
Press the burnout button.
RC BURNOUT DRIFTER
Play
1. Carefully remove items from the package. Disconnect “Try Me” cable from the car.
2. Turn the power knob on the remote clockwise and push the power button on the bottom of the vehicle to switch on. The remote pair light will pulse. It will turn solid when paired. To
turn the vehicle o, press and hold the power button on the bottom of the vehicle for 3 seconds.
3. Control the vehicle using the remote-control sticks. The throttle controls forward and reverse. The steering controls left and right turning.
4. For normal turning, push the throttle up to go forward and the turning stick to the left or right depending on what direction you want to turn.
5. For a drifting turn, press the drift mode button on the top right of the remote. The remote light will flash showing the vehicle is in Drift Mode. Push the throttle up and turn right or
left to drift with smoke eect. Press the drift mode button again to exit drift mode.
6. To perform a burnout, make sure the vehicle is stationary, then press the burnout mode button on the top left of the remote. The vehicle will automatically accelerate forward with
smoke eect. Please leave enough room (approximately 20 feet) in front of the vehicle.
7. When the Burnout Drifter water tank is empty, the rear wheel red LED will flash during burnout to let you know you need to add more water.
The vehicle requires 6 AA 1.5V batteries (included
for “Try Me”, replace before use) and the remote
requires 4 AA 1.5V batteries (not included).
Use a Phillips head or Cross screwdriver to loosen
the screw securing the battery cover on bottom of
the vehicle and remote. Insert the batteries,
ensuring the correct polarity per the molded
diagram. Replace the battery covers and tighten
the screws.
Contents
Battery Installation
1. Fill the water container with
water. The water container
cap and spout can be
unscrewed by turning
counterclockwise. Fill with
clean, cold tap water.
2. Open the Burnout Drifter
reservoir by sliding the door
(with the water drop symbol)
toward the rear of the vehicle.
3. Open the PVC gasket by
gently pulling on the tab.
4. Slowly fill the tank using the
water container until full.
Gently squeeze the tank to
dispense the water. Wipe
any excess water with a dry
clean towel.
5. Reclose the gasket and slide
the reservoir door closed.
Reservoir Filling
Burnout Demo
Burnout Drifter Vehicle
Remote Control
Water Container (for filling vehicle water reservoir)
Drift Mode
Status Light
WARNING:
CHOKING HAZARD - Small
Parts. Not For Children Under
3 Years.