DECT 6.
CONTENTS Contents.................................................1 Main Feature...........................................2 Caution...................................................3 Package contents..................................3 Feature layout........................................4 Installation instruction.............................5 Menu overview.......................................6 What's on display...................................7 Function key description........................
MAIN FEATURES Enhanced digital technology ensuring clear&secure voice quality GAP compatible Handsfree function Backlit LCD (optional) LCD contrast adjustable(8 levels) for handset Call Waiting Handset powering down function 5 basic ringer tone ,5 polyphonic ringer tone and ring off 40 groups Missed Call memory(number and name) 10 groups Outgoing Call memory 50 groups Phonebook memory DTMF/ FSK dual Caller ID system 5 steps digital volume control for ringer tone/
CAUTION: When using telephone equipment, there are basic safety instructions that should always be followed. Refer to the IMPORTANT SAFETY INSTRUCTIONS provided with this product and save them for future reference. Important Safety Instructions NOTE: Some of the precautions below may not apply to your product, e.g.: Battery and power cord precautions.
technician to restore the product to normal operation. E. If the product has been dropped and damaged. F. If the product exhibits a distinct change in performance. 16. Avoid using a telephone (other than cordless) during an electrical storm. There is a remote risk of electric shock from lightning. 17. Do not use the telephone to report a gas leak in the vicinity of the leak. 18. Do not dispose of batteries in a fire. They may explode. Check with local codes for possible special disposal instructions.
~5~
~6~
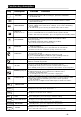
MENU OVERVIEW MENU BS MELODY RING SETUP BS VOLUME SNOOZE OFF SNOOZE ON AREACODE SET AREACODE?
What's on display icons 1).clock time and talk time 2).number field for call or phonebook 3).character field for CID or phonebook 4).character field for MENU display Icon Description MENU Caller ID Function The menu icon will be shown when the user is accessing menu operating mode, 1).The CID icon will be displayed when viewing the CID list. 2).The icon will flash when the CID list is full. 3).when user has new CID, it will blink with icon together.
Function key description Key Description OFF HOOK Function Definition , . 1). press it to enter off-hook mode for making or answering a call. 2). while an intercom call is coming in, press it to establish an internal call. , HANDSFREE , , 1). In standby mode, press it to enter handsfree mode, 2). Under handsfree mode, press it to switch handsfree mode and handset mode. . MENU/OK/MUTE 1). In standby mode, press the key to enter menu program, . 2).
Read first before use Radio signals between handset and base unit To use your cordless handset and base unit together, you must be able to establish a radio link between them. The signal range between the handset and the base station is in accordance with the approved standard. • • Maximum range: 300metres outdoors Maximum range: 50 metres indoor The signal range could become lower during normal use.
To set Date and Time Note : If you subscribe to Caller Display , your CH-D707 time and date settings will automatically updated by the network when you receive an incoming call. The Caller Display service only sends the month and date, not the year, so you may still need to set the year. If the time and date are set on the cordless handset, it will automatically be updated on the base unit, and vice-versa, if set time on base unit, handset display time will automatically be updated.
In standby mode, press and hold ALARM 2 ALARM 2 key on base unit to set the time of base alarm clock 2, till the right clock icon start blinking, and "hour" digit also start flashing , press "UP" or "DOWN" button to adjust "hour" to your desired value, then briefly press ALARM 2 key again, "minute" digit start flashing, press "UP" or "DOWN" button to adjust "minute" to your desired value, then briefly press ALARM 2 key ,LCD display will return to previous time(which is running) and base will sound a "du
To make and answer calls To make a call To make a call 1) press button and the TALK icon will appear,OR press button will appear, you will hear dial tone , a callthe SPEAKERPHONE icon and 2). input telephone number by numeral keys to make a call.
To register and deregister To register a handset Note : the registration has already been done on this device when ex-factory, antenna icon will appear at the top of right corner while handset power on. While antenna icon is steady on display, it means handset has linked up with base unit. If antenna icon blinks long time on display, it means lost linking with base units, you are required to re-register the handset. process as below: 1).
3). press button to enter base menu setting,handset show " DEL HS" 4). press button to enter next step setting, handset will show "PIN CODE" 5). press button to confirm, after you input correct pin code(default 0000) then handset will show "HS 1 6). press or " button to select the desired handset(HS 2, 3, 4) which you want to delete(Please note you only can delete HS which number followed with mark: 7).
Phonebook submenu structure: "LIST"---- shows all of phonebook memories one by one "NEW ENTRY"--- add a new phonebook entry "EDIT RECORD"--- modify an existing phonebook memory "DEL RECORD"--- delete a phonebook memory "DELETE ALL "--- delete all phonebook memories "MEM STATUS"--- shows the number of entries programmed in the total phonebook capacitor. To review phonebook memory(name and number): you can enter phonebook menu to review phonebook list one by one. 1). In standby mode, press 2).
6). press or button to scroll phonebook memories(name) to find the desired one, 7). press button to start name character modification , blinking cursor guide user to modify character, 8). press button to confirm name and display will show phonebook number, blinking cursor guide user to modify number. 9). press button to confirm,display will show "MELODY 1" and play ring melody to user, 10). press or button to select desired melody(total 10 kinds ring melody).
To store redial number in phonebook button to enter redial number list(10 groups at most) 1. in the idle mode, press 2). press or button to find the desired number , 3). press button , handset will show "ADD TO PB" 4). press button , handset will show "NAME", input name character by numeral keys 5).
**if caller ID information included name, it will only show name in the list, pressing "0" button can switch caller ID number, number or call time.
DELETE a call from the dialed call list While you review the dialed call list(see above "ADD TO PB" from dialed call list ) button , handset will show "ADD TO PB" 1). press 2). press 3). press button once to select "DELETE" button to confirm, display show "CONFIRM?" 4). press button to double confirm, handset will give a beep tone and display show next received call. 5). press button to exit present setting and return to previous menu. 6). press button to return to standby mode.
To adjust Handset ringing melodies Note: There are 10 different melodies to choose from. Melodies 1 to 5 are monotone rings, and melodies 6 to 10 are polyphonic melodies. To adjust the ringing melody for intercom call 1). In standby mode, press 2). press 3). press 4). press 5). press or button to enter handset setting mode, button to find " HS SETTINGS" button to enter next step handset setting, or button to find "RING SETUP" button to confirm selection, display will show "INT RING", 6).
To adjust ringing volume for external calls 1). In standby mode, press 2). press 3). press or 4). press or 5). press button to enter handset setting mode, button to find " HS SETTINGS" button to enter next step handset setting, button to find "RING SETUP", button to confirm selection, display will show "EXT RING", 6). press button to confirm, display will show "MELODY" , 7). press button , display will show "VOLUME " , 8). press 9).
(3). To turn out of range alarm tone on/off 1). In standby mode, press 2). press or 3). press 4). press button to enter handset setting mode, button to find " HS SETTINGS" button to enter next step handset setting or button to find "TONE SETUP" 5). press button to confirm, display show "KEY TONE" 6). press or button to find "RANGE ALARM" The balance setting is same as " To turn key tone on/off " step 6 ~10.
1). Handset 1 in talk mode, press button on handset1, you hear a constant tone in the earpiece of hanset 1. Handset 1 display will show "HS? 2, 3, 4"(if registered 4 HS) 2). Key in one number of other handset (for instance 2) using the handset digit keys handset 1 will show "CALLING HS 2". The called handset 2 will ring and the display will show "HS1 CALLING". 3).
To select handset display language You can select between 16 kinds of languages for the handset display. 1). In standby mode, press button to enter handset setting mode, 2). press or button to find " HS SETTINGS", 3). press 4). press 5). press 6). press button to enter next step handset setting, or button to find "LANGUAG" button to enter language selection, or button to scroll 16 kinds language 7). press button to choose your desired language, 8). press button to return to standby mode.
To set handset default settings 1). In standby mode, press button to enter handset setting mode, 2). press or button to find " HS SETTINGS", 3). press button to enter next step handset setting, 4). press or 5). press button to confirm , display will show "PIN?" button to find "HS DEFAULT" directly input pin code 0000(default pin code). 6).
BASE BASIC SETTING FROM THE HANDSET You can set some of the basic base functions from the cordless handset. The base must be powered up and in idle mode, otherwise you will hear an error tone when you try to access the "BS SETTING" menu. To set base ring melody and volume button to enter setting mode, 1). In standby mode, press 2). press or button to find " BS SETTINGS", 3). press button to enter next step base setting, 4). press or 5).
To modify pin code A PIN code is required to access some functions on the handset and base. The default PIN is 0000, but you can change it to your personal 4-digit PIN. 1). In standby mode, press button to enter setting mode, 2). press or button to find " BS SETTINGS", 3). press 4). press button to enter next step base setting, or button to find "MODIFY PIN" button to confirm , display will show "PIN ?" 5). press input pin code by numeral keys (0000, if you did not change before) 6).
Troubleshooting ~28~
Cleaning and care § Do not clean any part of your CH-D707 with benzene, thinners or other solvent chemicals – this may cause permanent damage which is not covered by the Guarantee. When necessary, clean it with a damp cloth. § Keep your CH-D707 away from hot, humid conditions or strong sunlight , and do not let it get wet Every effort has been made to ensure high standards of reliability for your CH-D707.
Limited Warranty In the unlikely event that this product is defective, or does not perform properly, you may within ninety (90) days from your original date of purchase return it to the authorized service center for repair or exchange. TO OBTAIN WARRANTY SERVICE: - Provide proof of the date of purchase within the package (dated bill of sale). - Prepay all shipping costs to the authorized service center, and remember to insure your return. - Include a return shipping address (no P.O.