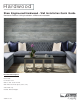
Hardwood Shaw Engineered Hardwood - Wall Installation Quick Guide Horizontal Floor to Ceiling Installation & Wainscot Installation Recommended Spaces Interior walls Low moisture rooms Walls less than 10’ tall x 40’ wide Walls without anchored objects (such as a TV) Vertical walls only Flat walls without wallpaper shawfloors.
Welcome! This guide will help you install your new w o o d wall planks via Two methods- horizontal floor to ceiling installation and wainscoting installation. Here are a few quick tips before getting started: HELPFUL TIPS: • Do not install on walls that are greater than 10 feet tall and 40 feet long, and do not install on ceilings or other overhead surfaces. • Installation on walls located in wet areas, i.e., back splash, bathrooms etc., is not recommended.
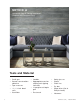
METHOD A Horizontal Floor to Ceiling Installation (Engineered Hardwood Only) Tools and Material • Caulk gun • Ladder • Safety glasses • General construction adhesive • Appropriate saw for cutting and ripping laminate • Gloves • Chalk line • Pry bar • Screw driver (flat & Phillip’s head) • Hammer • Tape measure 3 • 1 ½ -1 ¾ inch brad nails • 18 gauge brad/staple gun • Stud finder • Dust mask shawfloors.
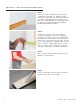
METHOD A - Floor to Ceiling Installation STEP 1 Remove existing baseboards on the wall that will be receiving the engineered hardwood. STEP 2 Make sure to turn off the power supply while working around exposed power outlets or light switches. Remove any electric outlet and light switch covers. Take care not to touch any exposed wiring. STEP 3 Mark all studs using a stud finder and then using a chalk line from top to bottom mark the wall studs.
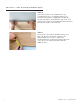
METHOD A - Floor to Ceiling Installation (cont.) STEP 5 Measure the wall to determine if the first row of planks will need to be cut down to avoid a Small piece on the finish row. Remember to leave the engineered hardwood ½ inch away from the finish floor/ subfloor. When working from the floor up, the tongue of the engineered hardwood should face toward the ceiling. STEP 6 Using a tape measure, pencil and chalk line, establish a starting line.
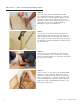
METHOD A - Floor to Ceiling Installation (cont.) STEP 10 Push the plank onto the wall lining it up with The starting line that was established. Using the Brad nailer shoot a nail through the tongue of the plank into the wall studs. Proper air pressure is important - Make sure that the nail head is seated properly. Take care not to shoot completely through the engineered hardwood.
METHOD A - Floor to Ceiling Installation (cont.) STEP 14 Connect the planks in the following rows by repeating the process of applying adhesive to the back of the planks, engaging the length side tongue and groove, along with the short ends, and fastening the engineered hardwood with a brad nailer through the tongue in the wall stud. STEP 15 The last row of the engineered hardwood may need to be cut.
METHOD B Wainscot Installation (Engineered Hardwood Only) Tools and Material • Caulk gun • Ladder • Safety glasses • General construction adhesive • Appropriate saw for cutting and ripping laminate • Gloves • Chalk line • Pry bar • Screw driver (flat & Phillip’s head) • Hammer • Tape measure 8 • 1 ½ -1 ¾ inch brad nails • 18 gauge brad/staple gun • Stud finder • Dust mask shawfloors.
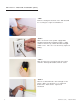
METHOD B - Wainscot Installation (cont.) STEP 1 Remove existing baseboards on the wall that will be receiving the engineered hardwood. STEP 2 Make sure to turn off the power supply while working around exposed power outlets or light switches. Remove any electrical outlet and light switch covers. Take care not to touch any exposed wiring. STEP 3 Mark all studs using a stud finder and then using a chalk line from top to bottom, mark the studs. STEP 4 Measure to determine the desired length of the planks.
METHOD B - Wainscot Installation (cont.) STEP 5 Using a construction adhesive put an s-bead of adhesive on the back of the planks. STEP 7 Push the plank against the wall. Using the brad nailer shoot a nail through the tongue of the plank into the wall. Make sure that the nail head is seated properly and not sticking up. Take care not to shoot completely through the engineered hardwood. You may also face nail the planks at the bottom of the plank into the wall plate.
METHOD B - Wainscot Installation (cont.) STEP 9 The last row of the laminate may need to be cut. Measure the distance between the finishing walls To the last row of engineered hardwood that was installed and using a table saw or jig saw cut the laminate to the width desired. 11 shawfloors.