
Instructions / Assembly


10
shawfloors.com
|
1-800-4
11-
7
429
METHOD B -
Wainscot Installation
(
c
ont.)
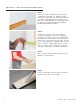
STEP
5
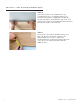
Using a
construction adhesive
put an
s-bead
of
adhesive
on the back of the
planks.
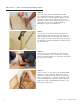
STEP
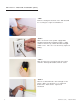
7
Push the plank against the wall. Using the
br
ad
nailer shoot
a nail
through
the
tongue
of
the
plank
into the wall. Make sure
that
the nail
head
is
sea
t
ed
properly
and not sticking
up. Take
car
e
not to
shoot completely through
the engineered
hardwood
.
Y
ou
may also
face
nail the planks at
the
bottom
of
the
plank into the wall
pla
t
e
.
Make sure
to
use a
nail
that
is long enough
to
go
through
the
engineered hardwood
,
sheetrock
and into the wall
pla
t
e
.
STEP
8
For the
second
plank and all
other
planks you
will
need
to
insert the groove into the
exposed
tongue
edge of the
first
plank. Using the brad nailer,
shoot a
nail
through
the
tongue
of the plank into the
w
all.
Make sure
to apply
an
s-bead
of
adhesive
to the
back
of all planks. Then using the brad nailer shoot
a
nail
through
the
tongue
edge of every plank into
the
w
all.