
Instructions / Assembly


6
shawfloors.com
|
1-800-4
11-
7
429
METHOD A - Floor
to
Ceiling Installation
(
c
ont.)
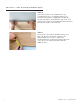
STEP
10
Push the plank
onto
the wall
lining it
up
with
The
starting
line
that
was
established.
Using
the
Brad nailer shoot
a nail
through
the
tongue
of
the
plank into the wall studs.
Proper
air
pressure is
important
- Make sure
that
the nail head is
sea
t
ed
pr
operly
.
Take care not to
shoot
c
omplet
ely
through
the
engineered hardwood
.
STEP
11
You may also
face
nail the
first
row of planks for
added support,
and place the nails low enough
so
that
the
baseboard
or
desired trim
will
cover the
nails. Make sure
to
use a nail
that
is long enough
t
o
go
through
the engineered hardwood
,
sheetrock
and
into the
wall
s
tud.
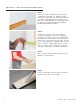
STEP
12
Once the
first
row is
complete
you will need
t
o
Cut the
first
plank of the
second
row to
cr
ea
t
e
the
proper
end
joint
s
tagger
.
The end
joints should
not
be closer than 8
inches.
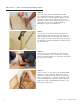
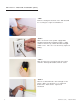
STEP
13
Once you have cut the plank to
the
desired length
apply
an
s-bead
of
adhesive
to
the back of
the
plank. Then, engage the length side groove and tongue.
Slide or a taping block or scrap piece of flooring can be
used to tap/engage the short ends together. Using the
brad nailer
,
shoot
a nail
through
the
tongue
of the
plank into
the wall
s
tuds.