
Installation Guide

d. For interior installations only.
COVERAGE:
a. 1/16“ Grout joint approximately 500 sqft/gallon.
b. 1/8“ Grout joint approximately 300 sqft/gallon.
c. 1/4“ Grout joint approximately 140 sqft/gallon.
LIMITATIONS:
a. Shaw Array-Grout should not be installed, when ambient temperature is below 60° F and above 90° F. Shaw Array-Grout should be kept
at room temperature for 24 hours before installation.
b. Some types of glazed ceramic tile, marble and stone can be scratched, stained or damaged when grouted with pigmented or sanded
grouts. Generally white grout is best suited for grouting white or light colored marble or granite. Follow tile manufacturer’s
recommendations. Test a small area prior to use. Certain tile with high absorption, surface porosity or rough textured surfaces and
certain types of porcelain may require sealing prior to grouting to prevent staining.
SURFACE PREPARATION:
a. Tile must be firmly attached to a sound substrate and setting material must be cured for a minimum of 24-48 hours before grouting.
b. Remove all spacers. Grout joints should be uniform in depth and width and free of all loose debris, contaminants and excess mortar or
adhesive.
APPLICATION:
New installation:
a. Before grouting, soak the grout sponge in a pail of clean cool water and thoroughly wring out.
b. Use the dampened sponge and lightly wipe the tile surface in an area no larger than 5-10 sq. ft. A slightly wet tile surface allows the
grout to glide easily over the tile and into the grout joint while providing for easier cleanup.
c. While tile is still damp, dispense a liberal amount of grout onto the tile surface.
d. Using the grout float, press the grout into the grout joints over the dampened area apply grout on no more than 5-10 sq. ft. at a time to
allow for prompt cleaning; delayed cleaning may cause some cracking.
e. Place the grout float on edge at a 45° angle and rake the float diagonally across the tile surface while exerting a downward pressure. This
will force the grout evenly into the grout joints.
f. Immediately remove all excess grout from the tile surface by holding the grout flat at a 90° angle to the tile and drawing it diagonally
across the tile.
g. Clean by soaking grout sponge in clean cool water. Wring out excess water completely.
h. Use dampened sponge in a circular motion to smooth grout joints and clean off any remaining excess grout.
i. Continue rinsing of sponge in clean, cool water will aid in cleanup.
j. Avoid excess water in grout joints. For final cleaning/haze removal, allow grout to cure for 24 hours. Use a dampened sponge, then soft
cloth to polish off residue.
Repair existing grout:
a. Remove existing old grout with a grout saw 1/8” below the surface of existing tile, Sweep or vacuum dust and debris from surface of tile
and grout joints.
b. Shaw Array-Grout can be applied directly over old grout. Apply enough to totally cover the old grout. Follow directions for new
installation as shown above.
CLEANUP:
Clean tools and hands with cold water before material dries.
CARE & MAINTENANCE:
Mold and Mildew can grow on dirt, food, and soap scum that can accumulate on the grout surface. Routine cleaning will limit mold and mildew
growth.
SAFETY:
Avoid eye contact or prolonged contact with skin. Wash thoroughly after handling. If eye contact occurs, flush with water for 15 minutes and
consult a physician.
INSTALLATION FOR VINYL PLANKS:
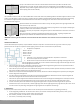
Layout of the Room:
a. Find the center point of the room. Strike a line.
b. Obtain a true 90’ angle by using a carpenter’s square.
c. Strike a second line which will divide the room in to four equal parts.
d. Measure the distance from the center to the wall, parallel to the direction of the plank.
e. Divide the measurement by the width of the plank. If less than half remains as the border plank,
adjust the point to compensate. This will give a larger border along the wall and reduce the chance of having to
For reference purposes only if printed or downloaded.