
Installation Guide


4. SHAW ADHESIVES & PRIMER
Refer to adhesive label for proper trowel requirements, spread rates and application.
Prior to application of adhesive determine if the substrate is a porous or non-porous substrate. Follow instructions on the adhesive label for porous
or non-porous subfloor.
IMPORTANT: Recommended to perform a bond test in order to determine adhesive working time per job site conditions. The strength of the
bond test will indicate whether Shaw 9050 floor primer is necessary.
5. INSTALLING RESILIENT TILE & PLANK PRODUCTS & FLOORTE™ PRO PRODUCTS
General:
a. Ensure that moisture tests have been conducted and that the results do not exceed the acceptable moisture limit for the adhesive used.
b. PH of concrete sub-floor needs to be between 7 & 10.
c. The permanent HVAC system is turned on and set to a minimum of 65°F (20°C) ) or a maximum of 85°F, for a minimum of 72 hours prior
to, during and after installation. After the installations, the maximum temperature should not exceed 85°F.
d. Do not stack more than 5 cartons high.
e. Flooring material and adhesive must be acclimated to the installation area for a minimum of 48 hours prior to installation.
f. Use appropriate trowel size regarding substrate porosity
g. Material should always be visually inspected prior to installation. Any material installed with visual defects will not be considered a
legitimate claim as it pertains to labor cost.
h. Install tiles running in same direction.
i. Ensure that all recommendations for sub-floor and jobsite conditions are met prior to beginning the installation. Directional designs are
optional, however, once the installation is started, you have accepted those conditions.
j. Floorte™ Pro Product with attached EVA pad – These products require the use of Shaw T-180 adhesive only. Use of non-approved
adhesives may result in adhesive failure.
LAYOUT AND INSTALLATION GENERAL RULES:
a. Shaw tile and plank - Install using conventional tile and plank installation techniques. Plank products should have a minimum of 6 – 8"
seam stagger.
b. Carefully determine where to begin tile or plank installation.
c. It is customary to center rooms and hallways so borders are not less than half a tile or plank.
d. Working out of multiple boxes at a time is recommended.
e. In hallways and small spaces, it may be simpler to work lengthwise from one end using a center reference line as a guide.
f. Make sure cut edges are always against the wall.
g. To properly cut LVT/LVP products score the top side of the material with a utility knife. Bend the product and finish the cut through the
backside. This will ensure the cleanest cut. It may be necessary to use a heat gun to cut around vertical obstructions. Allow the heated
LVT/LVP to return to room temperature before installation.
h. Cutting the product into a fine point may lead to delamination. Use an ethyl cyanoacrylate based super glue to help fuse the LVT/LVP
point together. Be sure to clean all glue from the top surface immediately. Alcohol based super glues may cause vinyl to swell.
i. For random width plank begin installation with the widest plank first.
NOTE: Recommended to use floor protection after installation. DO NOT use a plastic adhesive based protection system.
INSTALLATION FOR TILE:
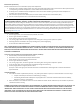
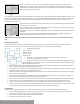
Layout of the Room for Squarely Laid Fields
To square the area to be covered, first find the center of one end of the main rectangle. Locate the same point at the
other end wall. Snap a chalk line between these points to mark the center line on the floor. Then measure along this
center line to find the middle of the room. At the center point, mark off a line across the room at exactly right angles
to the first line. This may be accomplished by the 3-4-5- triangle method as shown in Figure 1. Then measure 4 feet
toward each side wall from the center point. Then measure 3 feet from the center point along the longer line,
measure exactly 5 feet from the 3 foot mark on the center line to the 4 foot mark on the cross line. If the 5 foot
measurements do not come out exactly 5 feet, the center crossing lines are not at a true right angle. For large rooms,
multiples of the above dimensions may be used to obtain greater accuracy. (6-8-10 or 9-12-15, etc.)
Figure 1
For reference purposes only if printed or downloaded.