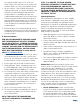
INSTALLATION INSTRUCTIONS This is an interactive PDF, click on the rectangular buttons or blue text to jump to the sections. Easy-to-follow instructions for the handy DIYer. SIMPLE Start to finish, everything you need to know to install your Matrix floor like a professional.
INSTALLATION 101 THE PREP 1. Store and install Matrix flooring in a climate controlled location with a temperature range between 65°–85°F (18°–29°C). If product is stored in temperatures outside this range, acclimate the product for 48 hours prior to installation 2. Inspect Subfloor (See Step 1) 3. Inspect planks for damage before installing. 4. To minimize shade variation, mix and install planks from several cartons.
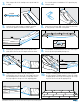
4. Use several spacers to maintain a 1/4" expansion gap along the walls. 3. 5. Lock the short ends together to complete your first row. Cut the planks as needed to fit the space. 6. Start your second row. With a cut-off that is more than 6" long (15cm) or start with a new plank. 7. Inserting the long side tongue into the groove of the plank in the first row at a low angle and rotate down. 8. Second plank, second row: Insert the short end tongue into the previously installed plank groove. 9.
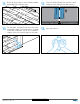
11. Protect all exposed edges of the flooring by installing wall molding and/or transition strips. 12. Protect the finished flooring from exposure to direct sunlight to reduce fading and thermal expansion. 13. For door jambs, a flat pull bar may be used to assist in locking the planks. For irregular spaces, cut planks cleanly with a utility knife. You can use a cardboard template of the area to transfer pattern to the plank. 14. Enjoy your new floor! EXCLUSIVELY AT LOWE’S® LEARN MORE AT LOWES.
TECHNICAL INSTALLATION INSTRUCTIONS 1. GENERAL INFORMATION strength of 3,000 psi are acceptable. • F or cracks or saw cuts deeper than 1", follow the preparation and application instructions for Shaw QuikFill. QuikFill is a 2-part urethane treatment that prevents future damage from moisture penetrating to the surface of the slab that may damage or breakdown adhesives or unapproved patching compounds.
vent spacing should be equal to 1.5% of the total square footage of the crawl space area to provide cross ventilation. Where necessary, local regulations prevail. 3. All other subfloors - Plywood, OSB, particleboard, chipboard, wafer board, etc. must be structurally sound and must be installed following their manufacturer’s recommendations.
moisture level and pH requirements. Use of gypsumbased patching and/or leveling compounds which contain Portland or high alumina cement and meet or exceed the compressive strength of 3,000 psi are acceptable. • Hydronic Radiant Floors: pump heated water from a boiler through tubing laid in a pattern under the flooring. Typically installed in channels under a wooden subfloor (or) imbedded in concrete slabs. Requires the installer follow a specific nailing pattern to avoid penetration of the heat system. C.
utility knife using the “score and snap” technique. The leftover of this plank may be used to start the third row if it’s a minimum 8" (20.32 cm) long. 9. Continue installing planks and make sure to achieve a random appearance with end pieces of minimum 8" (20.32 cm). Check that all planks are fully engaged; if a slight gapping is found, the gap can be tapped together by using a tapping block and a scrap of flooring to cover the tapping block in order to avoid damages on the planks. 10.
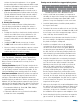
FREQUENTLY ASKED QUESTIONS 1. Is underlayment required? Underlayment is recommended, but not required. We suggest using SMARTCORE Soft & Sound (Item #1191177 Model #LX50100001), which is also available at Lowe's. 2. Is a moisture barrier required? No, a moisture barrier is not required but is recommended when installing over a concrete subfloor. It is optional over a wood subfloor. 3.
PROJECT PLANNER Follow the steps below to calculate out the total number of cartons of Matrix flooring you will need for your project. 1. 2. First, measure the length and width of your space (A,B). A B length (ft) width (ft) Next, multiply the length (A) by the width (B) of your space to determine the estimated square footage (C). A x length (ft) 3. = width (ft) C estimated square footage Next, multiply your estimated square footage (C) by 1.